

'%20x='0'%20y='0'%20height='100%25'%20width='100%25'%20%0A%20%20%20%20%20%20%20%20%20%20xlink%3Ahref='data:image/jpg;base64,/9j/2wBDAAYEBQYFBAYGBQYHBwYIChAKCgkJChQODwwQFxQYGBcUFhYaHSUfGhsjHBYWICwgIyYnKSopGR8tMC0oMCUoKSj/2wBDAQcHBwoIChMKChMoGhYaKCgoKCgoKCgoKCgoKCgoKCgoKCgoKCgoKCgoKCgoKCgoKCgoKCgoKCgoKCgoKCgoKCj/wgARCAAIAAoDASIAAhEBAxEB/8QAFQABAQAAAAAAAAAAAAAAAAAABQf/2gAIAQEAAAAAiBn/xAAUAQEAAAAAAAAAAAAAAAAAAAAB/9oACAECEAAAAD//xAAUAQEAAAAAAAAAAAAAAAAAAAAC/9oACAEDEAAAAF//xAAcEAACAgIDAAAAAAAAAAAAAAABAgMEEiEABRH/2gAIAQEAAT8AWOzEitKhUFHw9rghhi4OjztYqy9pcWKxPJGJnCu8CqWGR2R7rn//xAAUEQEAAAAAAAAAAAAAAAAAAAAA/9oACAECAQE/AH//xAAUEQEAAAAAAAAAAAAAAAAAAAAA/9oACAEDAQE/AH//2Q=='%3E%3C/image%3E%3C/svg%3E)
Different versions of Minecraft require somewhat different methods when changing skins or creating skin packs. One of these methods is the skin compiler, which is often used to import custom skins into Education Edition.
Skin compilers for Minecraft are often found online, using simple prompts to "compile" a group of skins into a file where the game can utilize them as a skin pack.

The file can then be opened by Bedrock versions of Minecraft in most cases, such as Pocket or Education Edition. Java Edition does not operate in cohesion with skin packs and Minecraft Marketplace, so skins are usually changed on the game's main website.
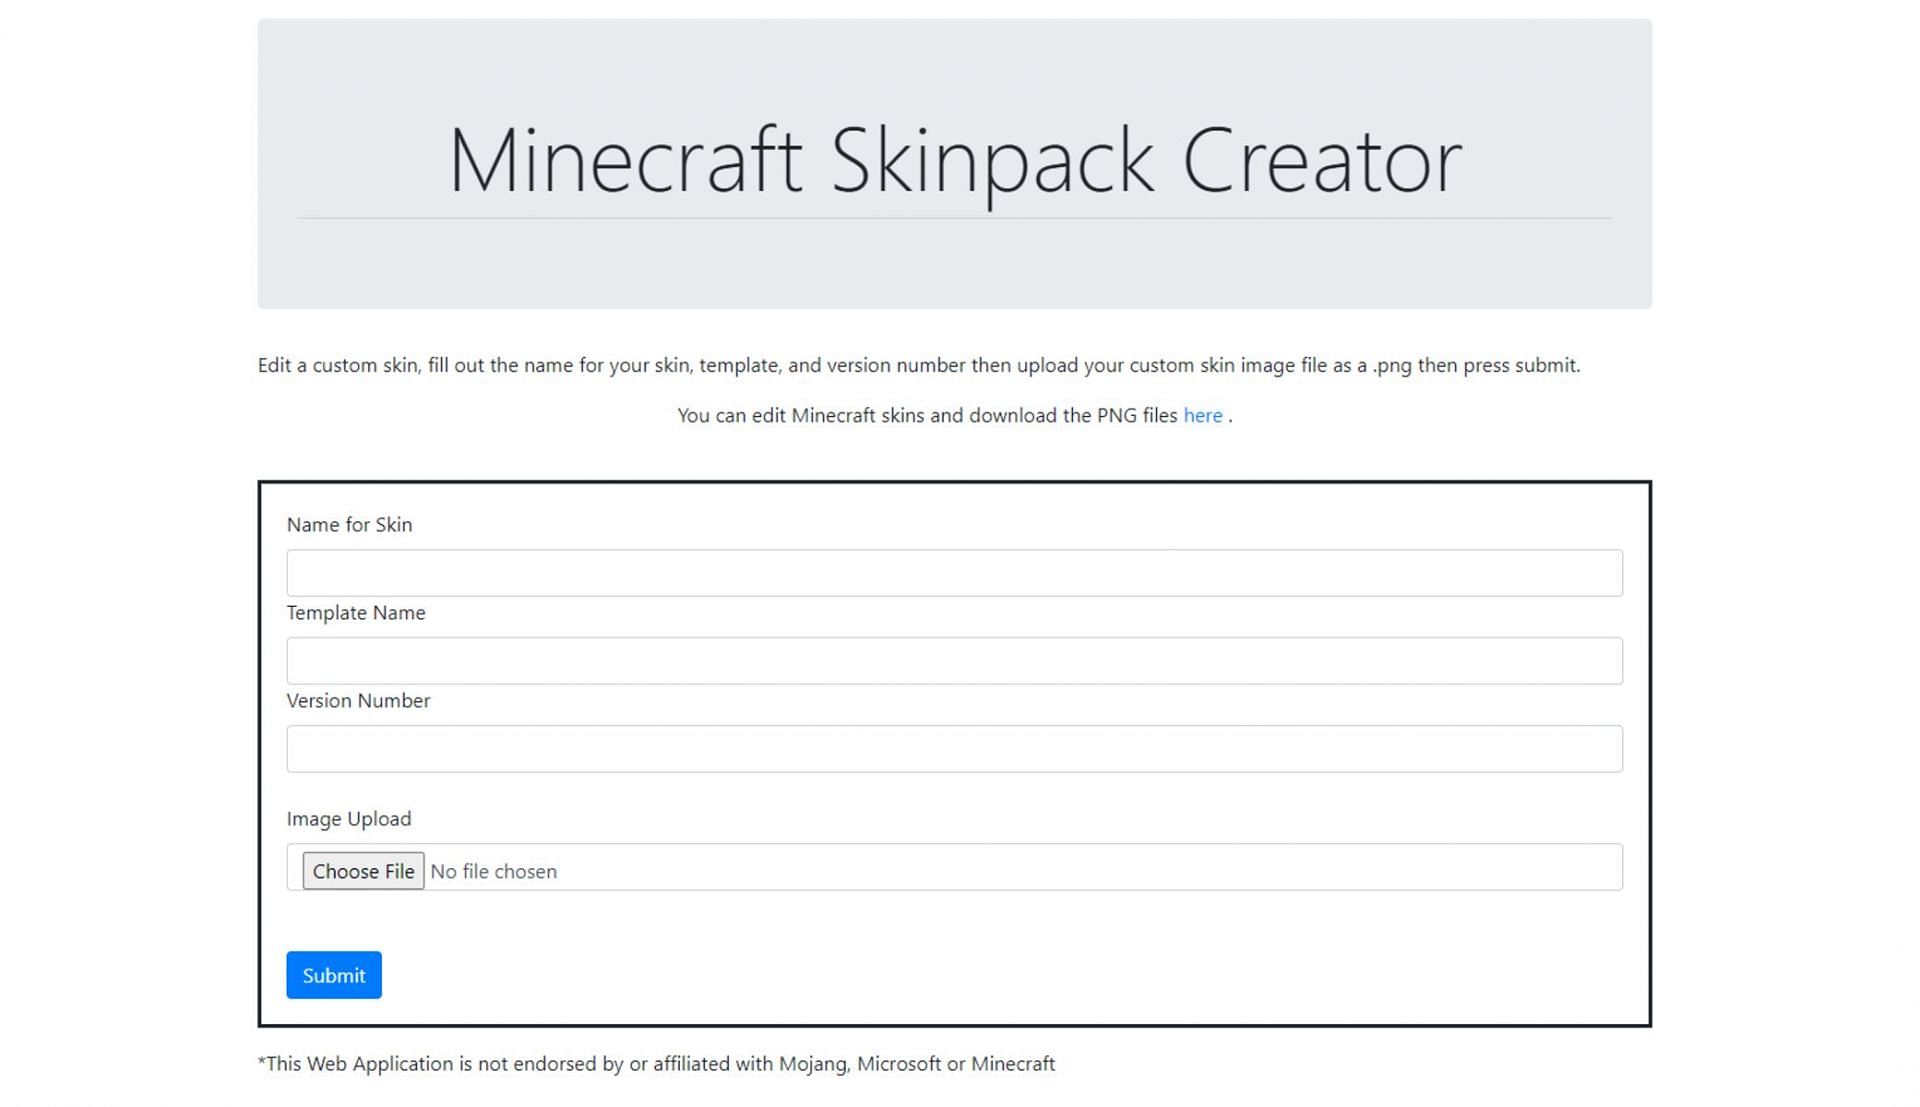
Minecraft: Using CDsmythe's skin compiler to create a skin pack
Fortunately for players, there are a large number of simple-to-use skin compilers that can be found online. Among these are those found on Github, but one of the most notable is the one hosted via CDsmythe.
This particular site has multiple applications for importing skins, including skin pack creators for both classic and slim-sized skins. Depending on what the player is looking for, they can use different compilers for the job, all from the same site, making CDsmythe quite convenient.
Below, players can find a short list of steps that detail how to create and import a skin pack using the CDsmythe compiler:
- To begin, players should download the .png files of skins they'd like to include in their skin pack. These can be found via most skin sites such as The Skindex. It's important, however, for all of the skins to have the same proportions (normal or slim) unless players want to make separate skin packs.
- Head to https://cdsmythe.com/2020/minecraft-skin-mcpack-creator/ which will bring players to the CDsmythe skin compiler hub page.
- From here, players have the option to either select to create a normal or a slim skin pack.
- At the new skin pack creation page, players will want to add their skins by selecting "image upload" and selecting the .png file of the desired skin.
- Once the skin is uploaded, players can enter the name of the uploaded skin as well as the name for the skin pack itself and the version (in case players want to make revisions at a later date).
- Once the skin is uploaded and the information fields have been fielded, players can select "download pack" to download their skin pack into a .MCPACK file. However, players may also select "add another skin" next to the "download pack" button to add additional skins to the pack.
- For additional skins, the same method outlined in steps 4-5 can be repeated. If the skin pack's name and version have already been set, players can simply continue to enter names for their new skins. Once players have entered all of the skins they'd like into the pack, they can download the pack with the button referenced in step 6.
- Once the .MCPACK file for the skin pack has been downloaded, players can double-click it. This will typically open the file by default in Minecraft, importing the skin pack into the player's skin editor and making it available for use right away.
Obsessed with Crosswords, Wordle, and other word games? Take our quick survey and let us get to know you better!
