

'%20x='0'%20y='0'%20height='100%25'%20width='100%25'%20%0A%20%20%20%20%20%20%20%20%20%20xlink%3Ahref='data:image/jpg;base64,/9j/4AAQSkZJRgABAQAAAQABAAD/2wCEAAMDAwMDAwQEBAQFBQUFBQcHBgYHBwsICQgJCAsRCwwLCwwLEQ8SDw4PEg8bFRMTFRsfGhkaHyYiIiYwLTA+PlQBAwMDAwMDBAQEBAUFBQUFBwcGBgcHCwgJCAkICxELDAsLDAsRDxIPDg8SDxsVExMVGx8aGRofJiIiJjAtMD4+VP/AABEIAAYACgMBIgACEQEDEQH/xABgAAEBAQAAAAAAAAAAAAAAAAAAAQgQAAIABgMBAAAAAAAAAAAAAAIEAAEDBREhBhMxUwEBAQAAAAAAAAAAAAAAAAAABQYRAQACAgMBAAAAAAAAAAAAAAECAwAhBAURMf/aAAwDAQACEQMRAD8A1q7Y72zz9V8r3WlbAX2kI4Pu9zI/nPr2MVxOsTjBSIN1TnvOfYQg+2MTYfXeVPT8i6dkhTyNYGgz/9k='%3E%3C/image%3E%3C/svg%3E)
Valorant is an online multiplayer game developed and published by Riot Games. The title receives various updates like bug fixes, character balance changes, and huge seasonal updates (Acts and Episodes). These pile up and can take up a significant amount of space on the local drives of the PC.
Players usually prefer to install games and software on faster drives like SSDs to experience faster launch speeds. However, players might want to migrate their game files to another drive for various reasons. This guide will provide a step-by-step method for moving the installed title to a different drive without damaging files or folders.

How to move Valorant to a different drive?
At the time of writing this guide, Valorant can take up around 30 GB of space in the local system. It is important to note that players can opt to directly uninstall the title from their drives and reinstall it in another location. The second option involves some risks but can be easily completed if all the steps are followed correctly.
Moving Valorant
Reinstalling the title can be time-consuming and troublesome to repeat every time the files need to be relocated. Players can follow the steps listed below to quickly change the location of Riot's First-Person Shooter (FPS) from one drive to another.
It is a healthy practice to check the size of the folder before moving it to ensure its integrity. It may differ for every player due to additional game files.
Here are the steps to move the game files to another drive.
- Cut the "Riot Client" folder and move it to the desired location.
- Open the Local Disk C (or where Windows is installed).
- Open the ProgramData folder.
- Navigate to the Riot Games folder and open it.
- Open the “RiotClientInstalls.json” file using notepad, replace the path with the new game client path, and save the file.
- Open the Metadata folder inside the same “Riot Games” folder.
- Navigate to the “valorant.live” folder and open it.
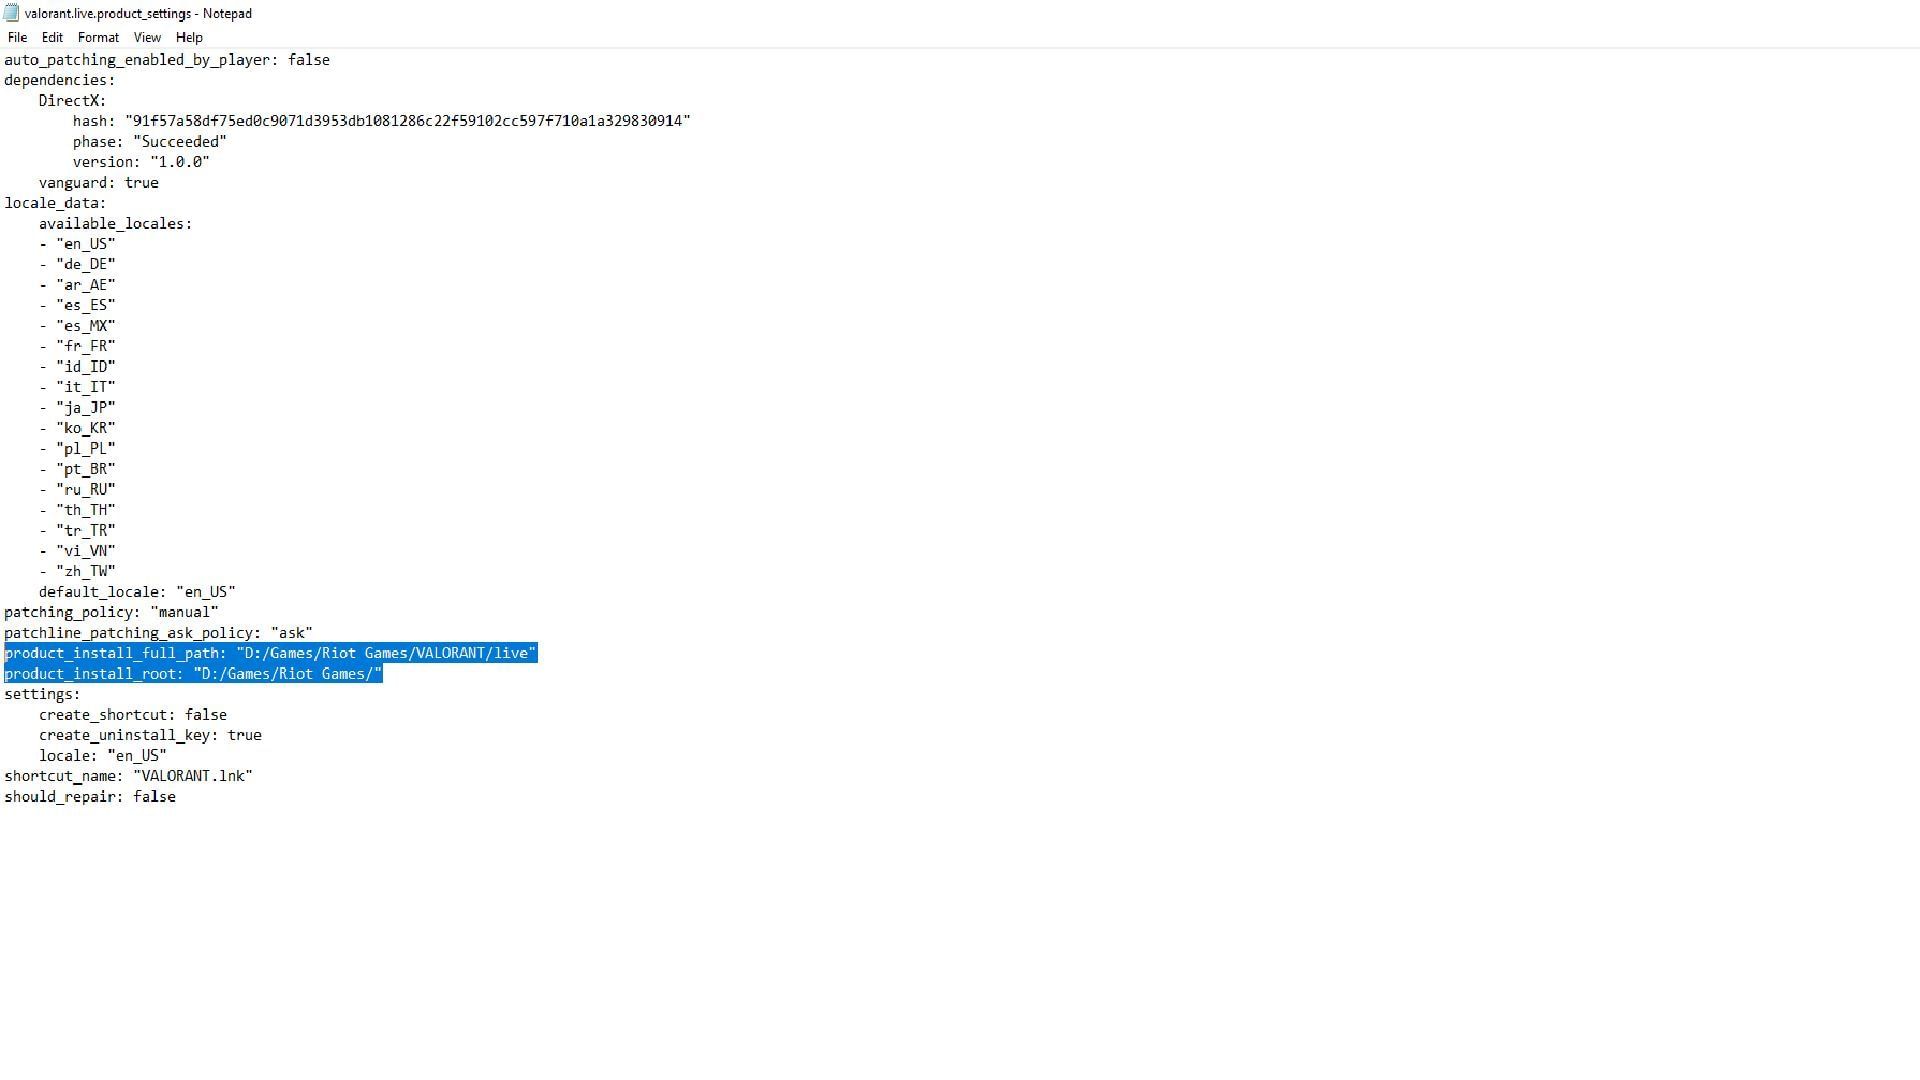
- Open the “valorant.live.product_settings.yaml” file using notepad.
- Change the lines “product_install_full_path” and “product_install_root” with the new game client path and save it.
Players might not be able to find the “ProgramData” file inside the Windows installation drive. To solve this issue, players need to click on the View option of the folder and click on the Show Hidden Items option. These steps will ensure Valorant is completely migrated to another drive without damaging files.
In case of any errors or mishaps, players can revisit the files, recheck the new paths, and verify them. Mistakes in the path line can cause the Riot Client not to detect the game files. The worst-case scenario in this method might result in the title completely crashing and failing to start.
This is a rapid process to change the game’s directory location to save as much time as possible. If the user is not in a rush to clear out space from the drive, they can opt for the safer but slower option and reinstall it on a different drive. The entire process usually takes an hour to complete with an average network connection.
Follow Sportskeeda for the latest updates and more guides, tips, and tricks.
