
'%20x='0'%20y='0'%20height='100%25'%20width='100%25'%20%0A%20%20%20%20%20%20%20%20%20%20xlink%3Ahref='data:image/jpg;base64,/9j/2wBDAAYEBQYFBAYGBQYHBwYIChAKCgkJChQODwwQFxQYGBcUFhYaHSUfGhsjHBYWICwgIyYnKSopGR8tMC0oMCUoKSj/2wBDAQcHBwoIChMKChMoGhYaKCgoKCgoKCgoKCgoKCgoKCgoKCgoKCgoKCgoKCgoKCgoKCgoKCgoKCgoKCgoKCgoKCj/wgARCAAGAAoDASIAAhEBAxEB/8QAFgABAQEAAAAAAAAAAAAAAAAAAAQG/8QAFAEBAAAAAAAAAAAAAAAAAAAABf/aAAwDAQACEAMQAAAAzNQsN//EAB4QAAEDBAMAAAAAAAAAAAAAAAIDERIAAQQTBXGx/9oACAEBAAE/AAWXQ5LEFMoAIHtGUtjeUJptZxJ+7V//xAAXEQADAQAAAAAAAAAAAAAAAAAAAhET/9oACAECAQE/AM1p/8QAGREAAQUAAAAAAAAAAAAAAAAAAgABAxEh/9oACAEDAQE/ACmOm1f/2Q=='%3E%3C/image%3E%3C/svg%3E)
Valorant marked the beginning of Episode 7 Act 2 with the introduction of its 10th map, Sunset, on August 29, 2023. This new map, set in L.A., has a dual-site layout, a central area with closely spaced spawn barriers, and a network of intricate and interconnected alleys. While it's early to make predictions regarding which Agents will excel on this map, Initiators like KAY/O hold significant promise.
If you are aiming to be the best Initiator in your next ranked Sunset match, we've got you covered with this lineup guide for KAY/O's Zero/Point knife.
Note: Some aspects of this article are subjective and solely reflect the opinions of the writer

All essential Zero/Point lineups for attack on Sunset in Valorant
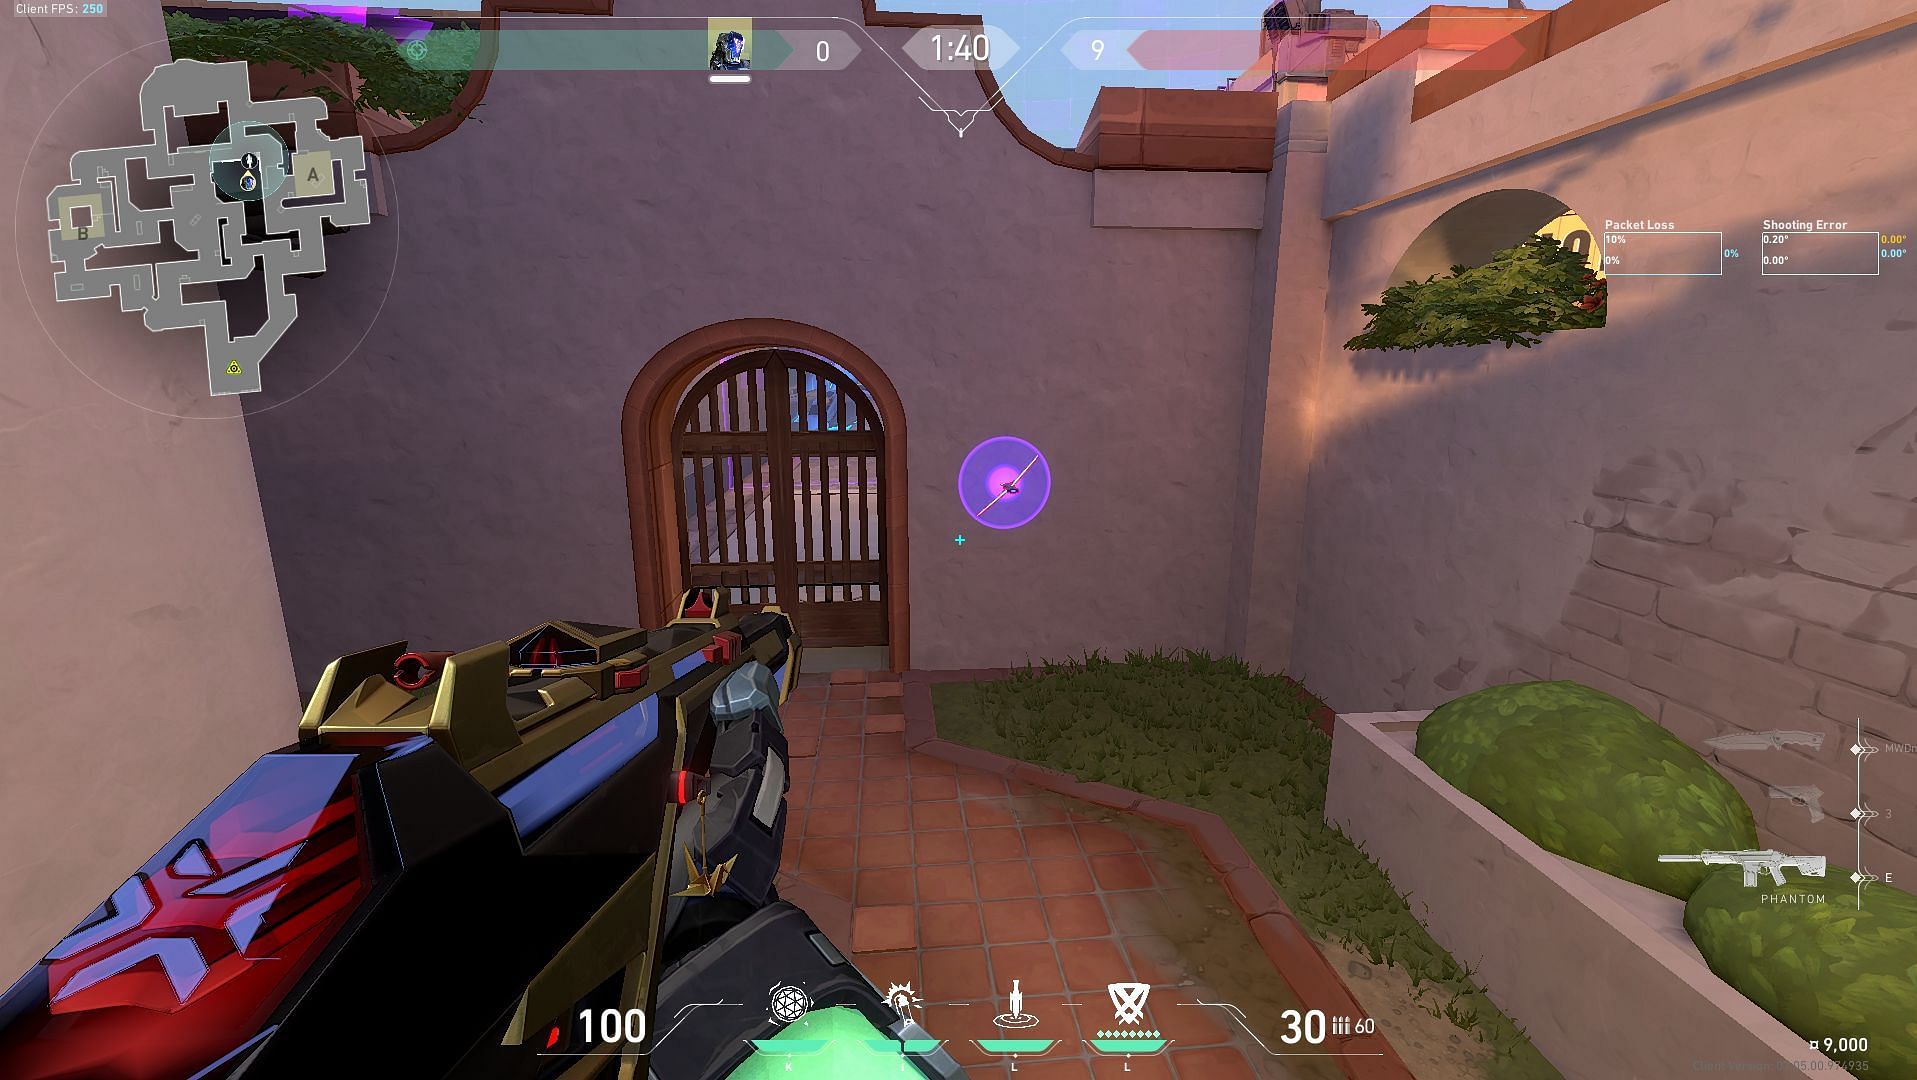
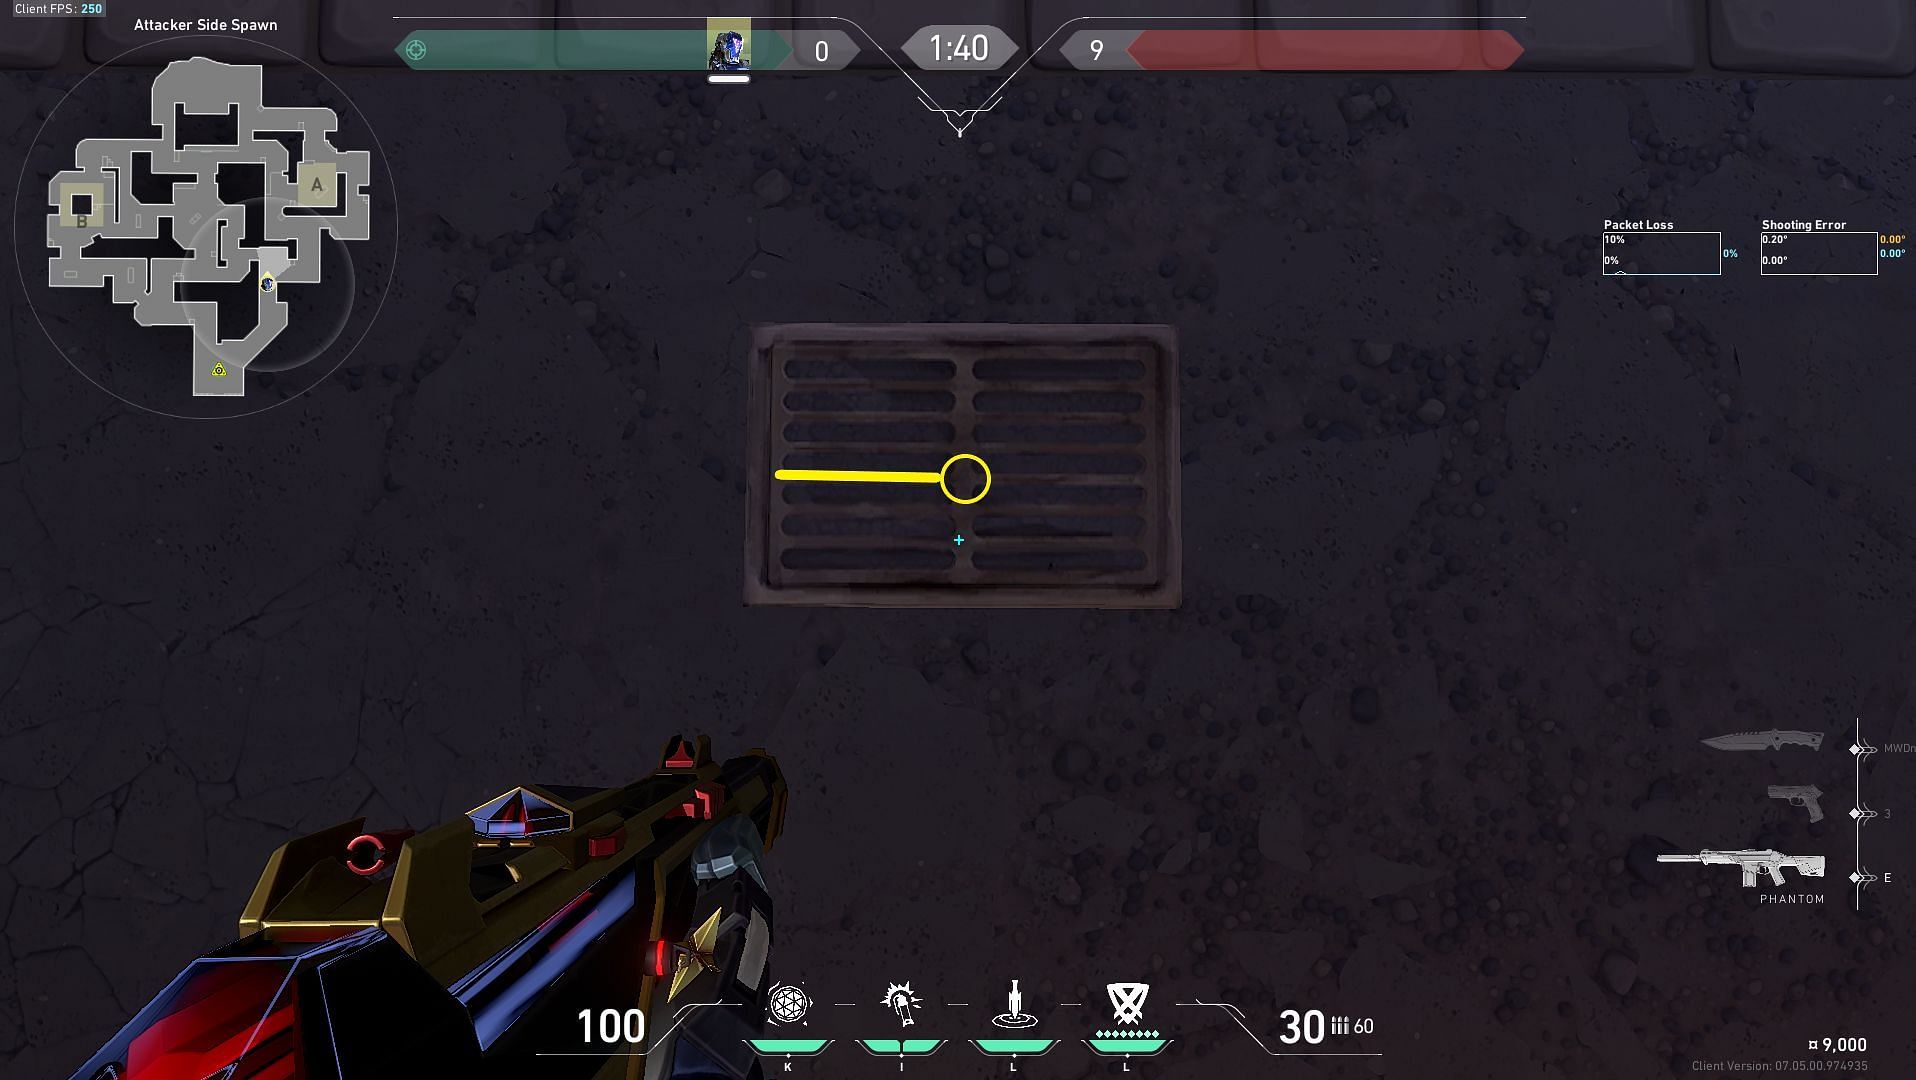
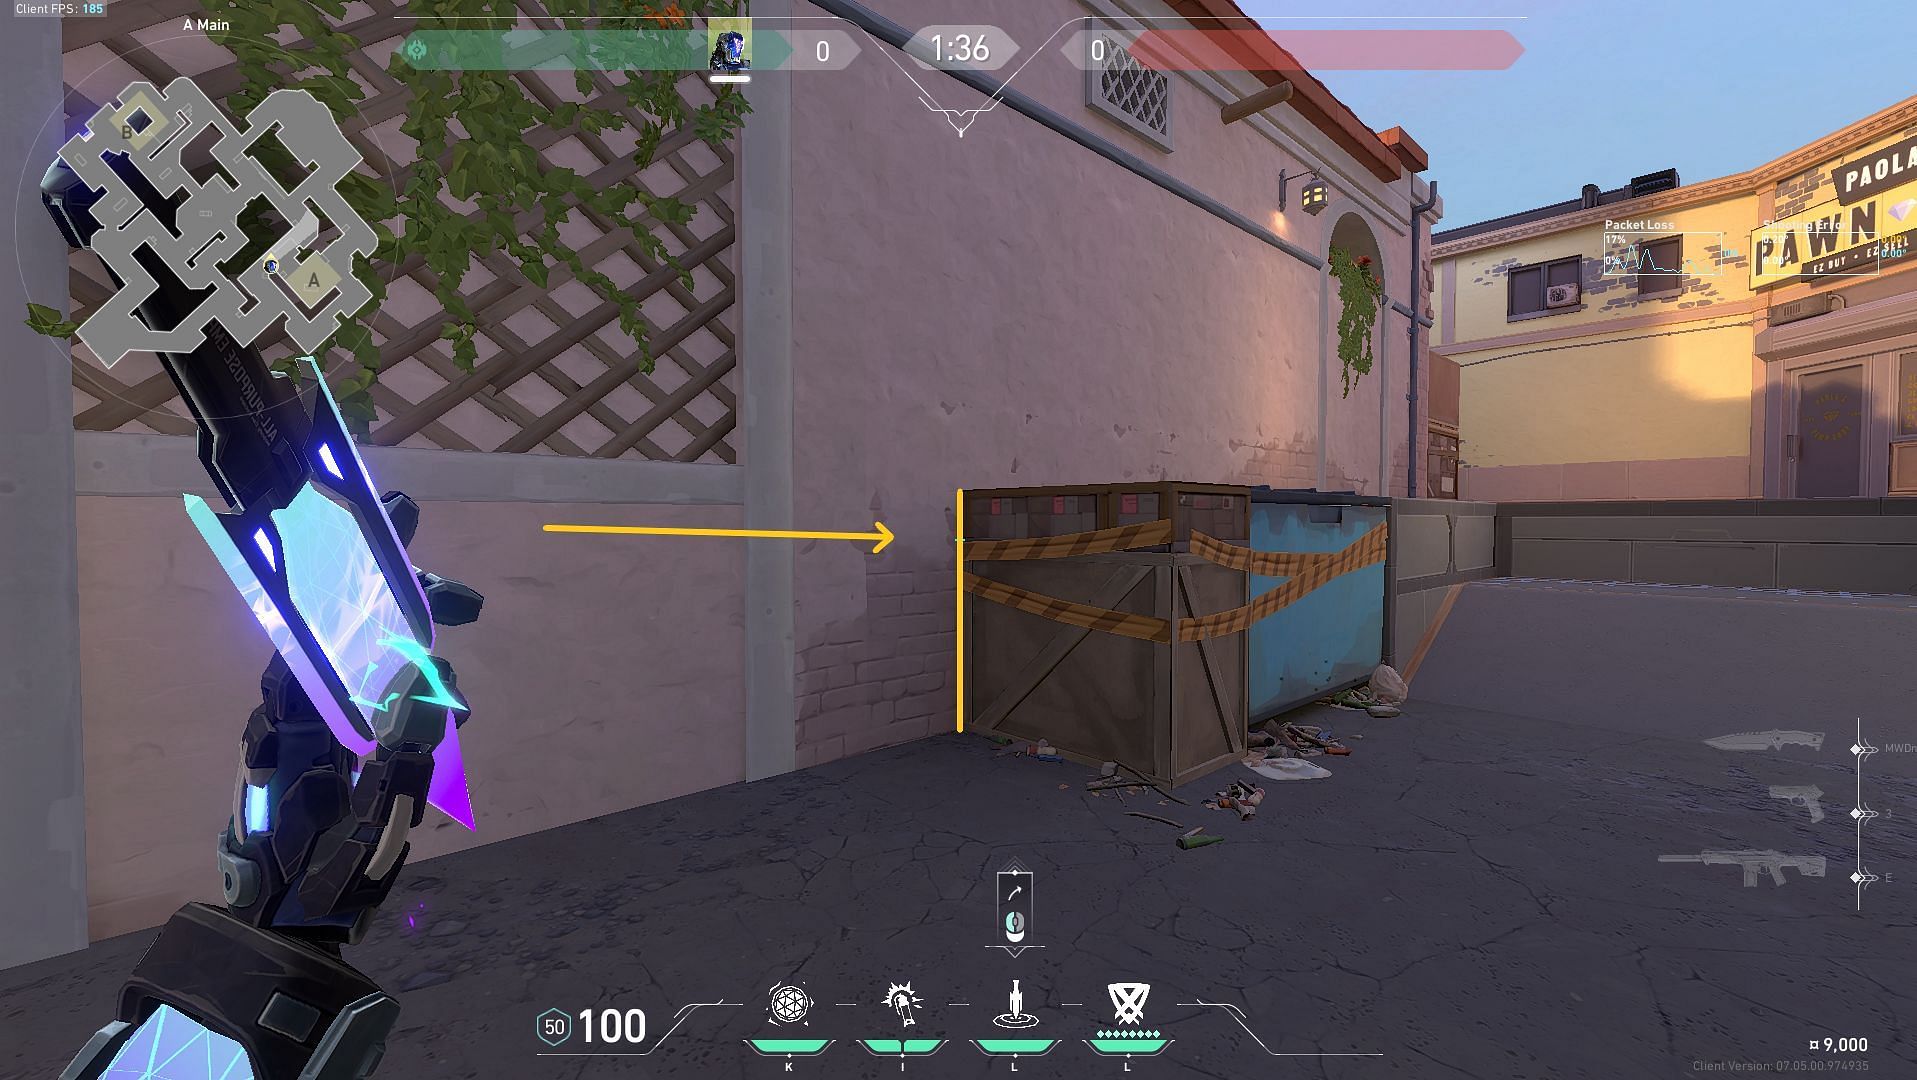
1) A Main
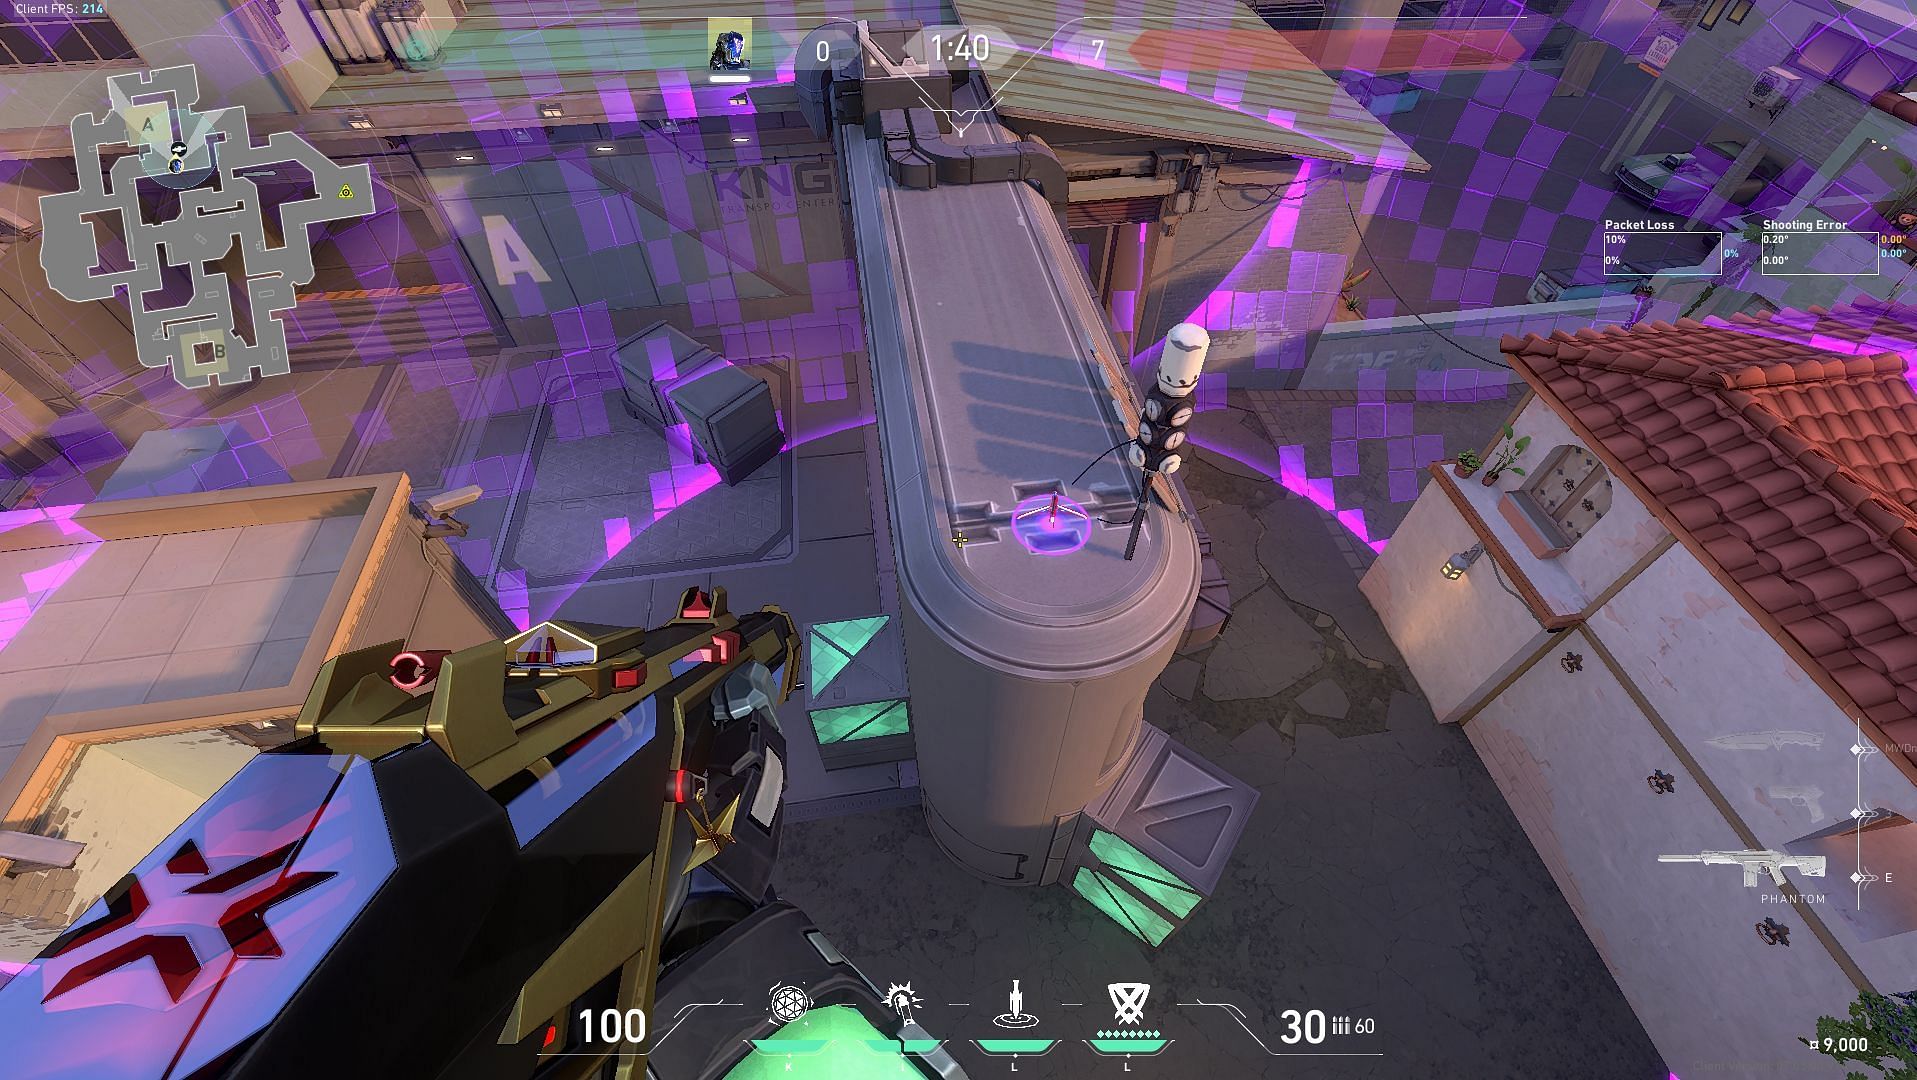
This unbreakable Zero/Point knife will land on the top wall in A-Main, revealing and suppressing defenders caught in its detection radius around A Main, A Link drop, and the front site.
In the buy phase of your Valorant round, place yourself in the highlighted corner of the A Lobby barrier, shown in the image above.
Now, facing A site, you have to drag your crosshair straight up till you can match the right side part of the Frag/Ment HUD line lines up with the rope attaching to the roof in A Lobby. Throw the knife using the left click as soon as the barriers go down.
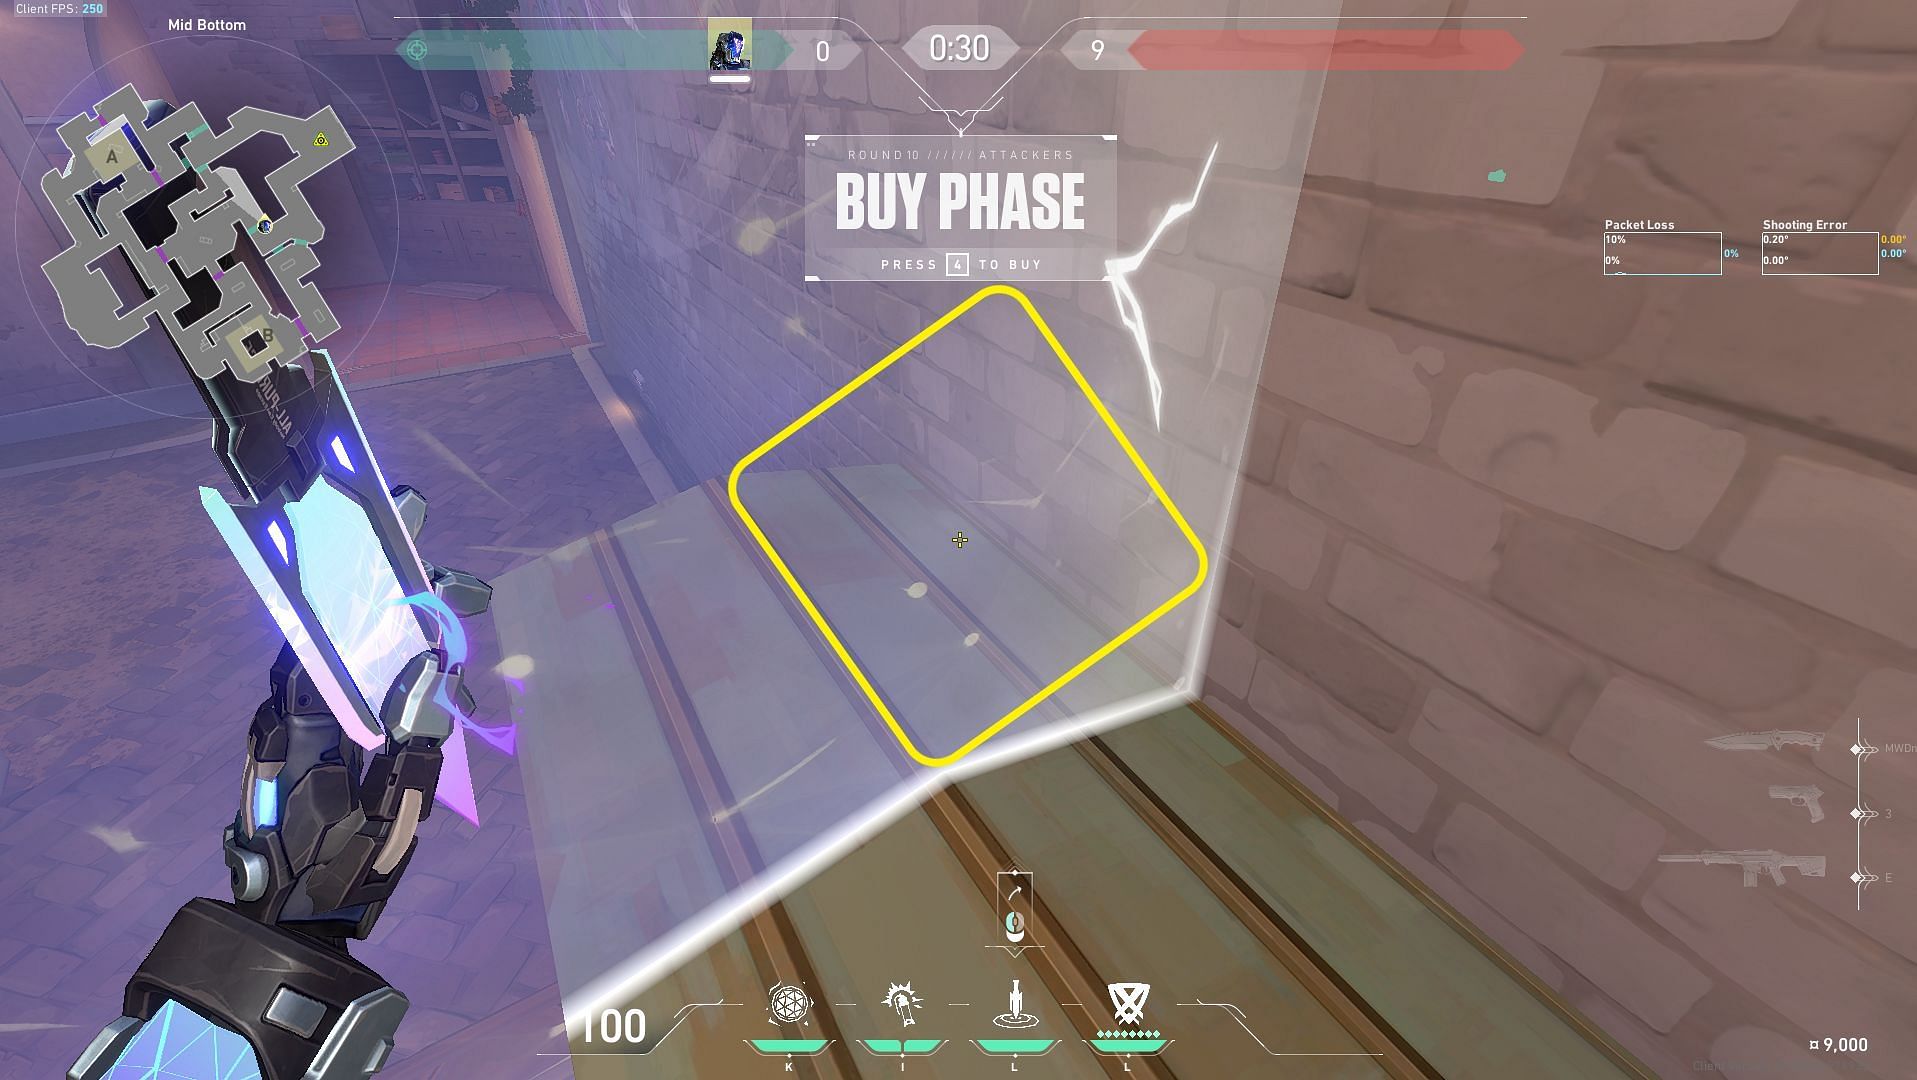
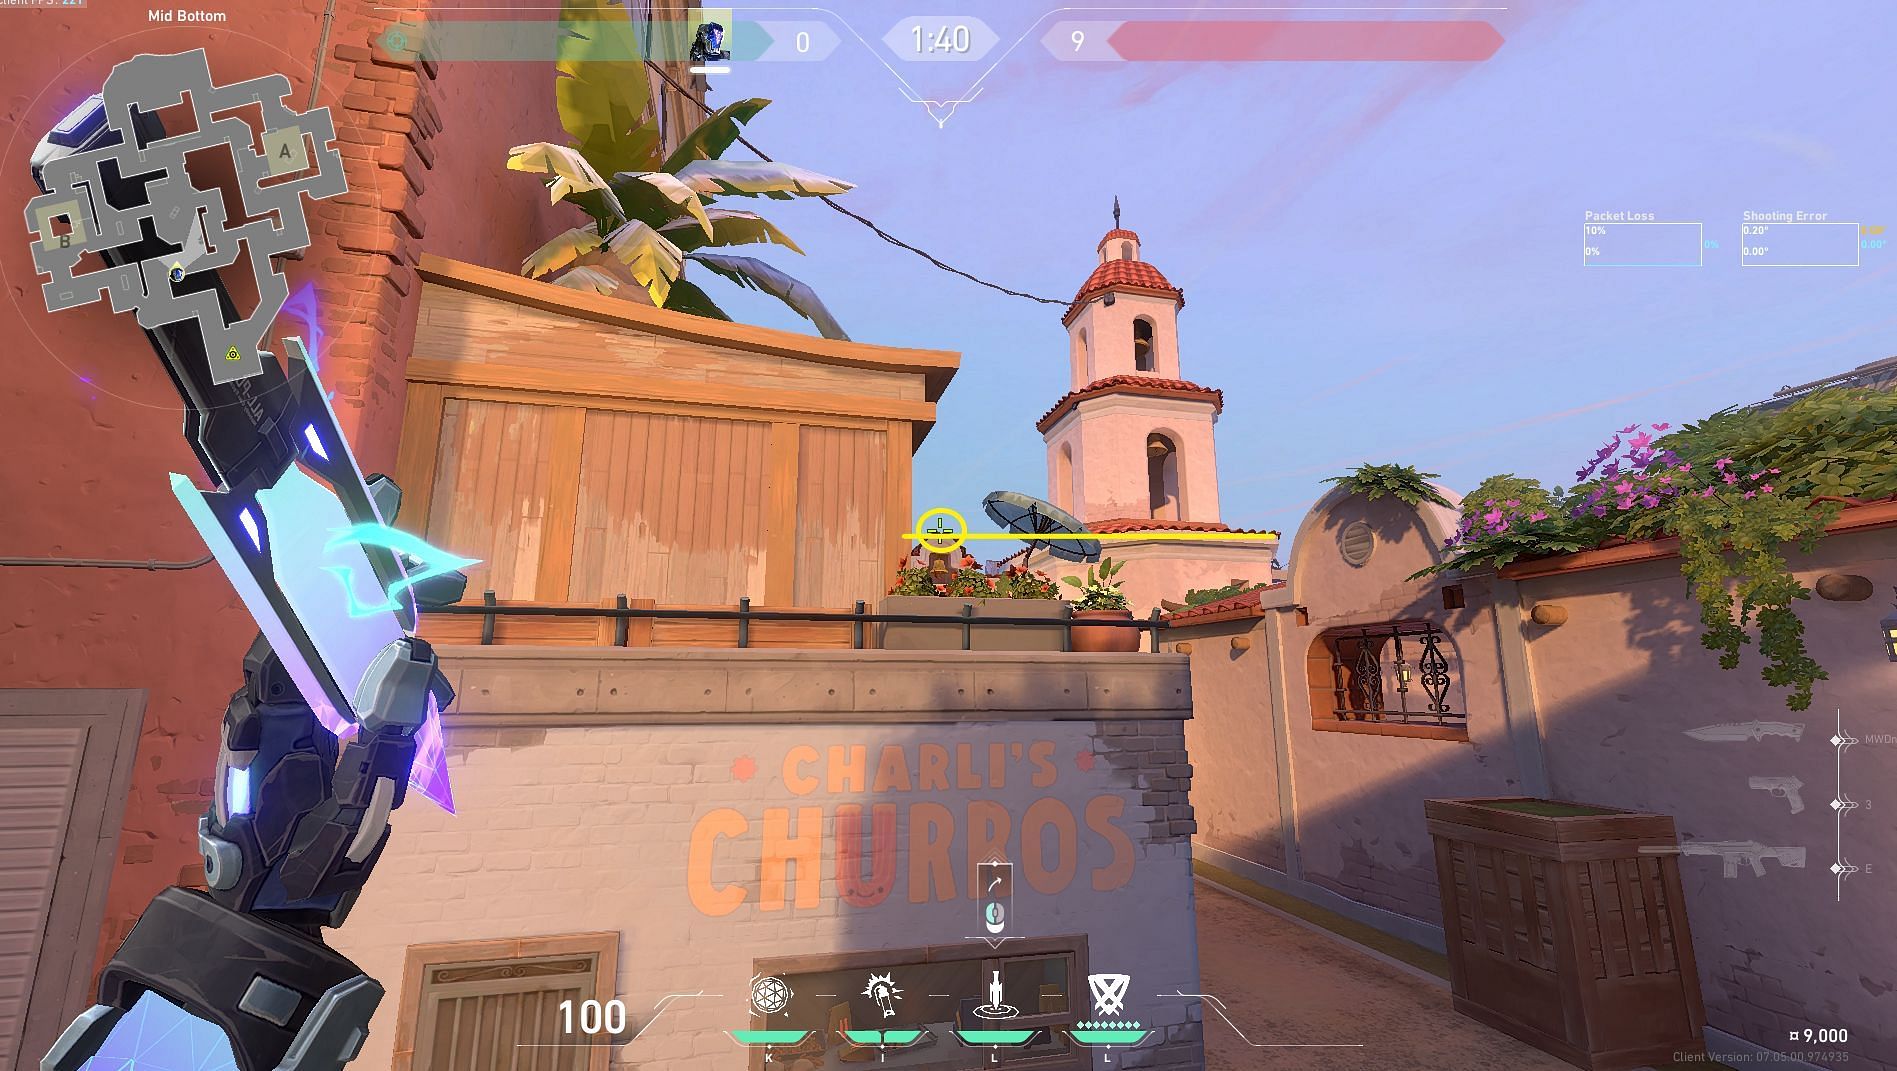
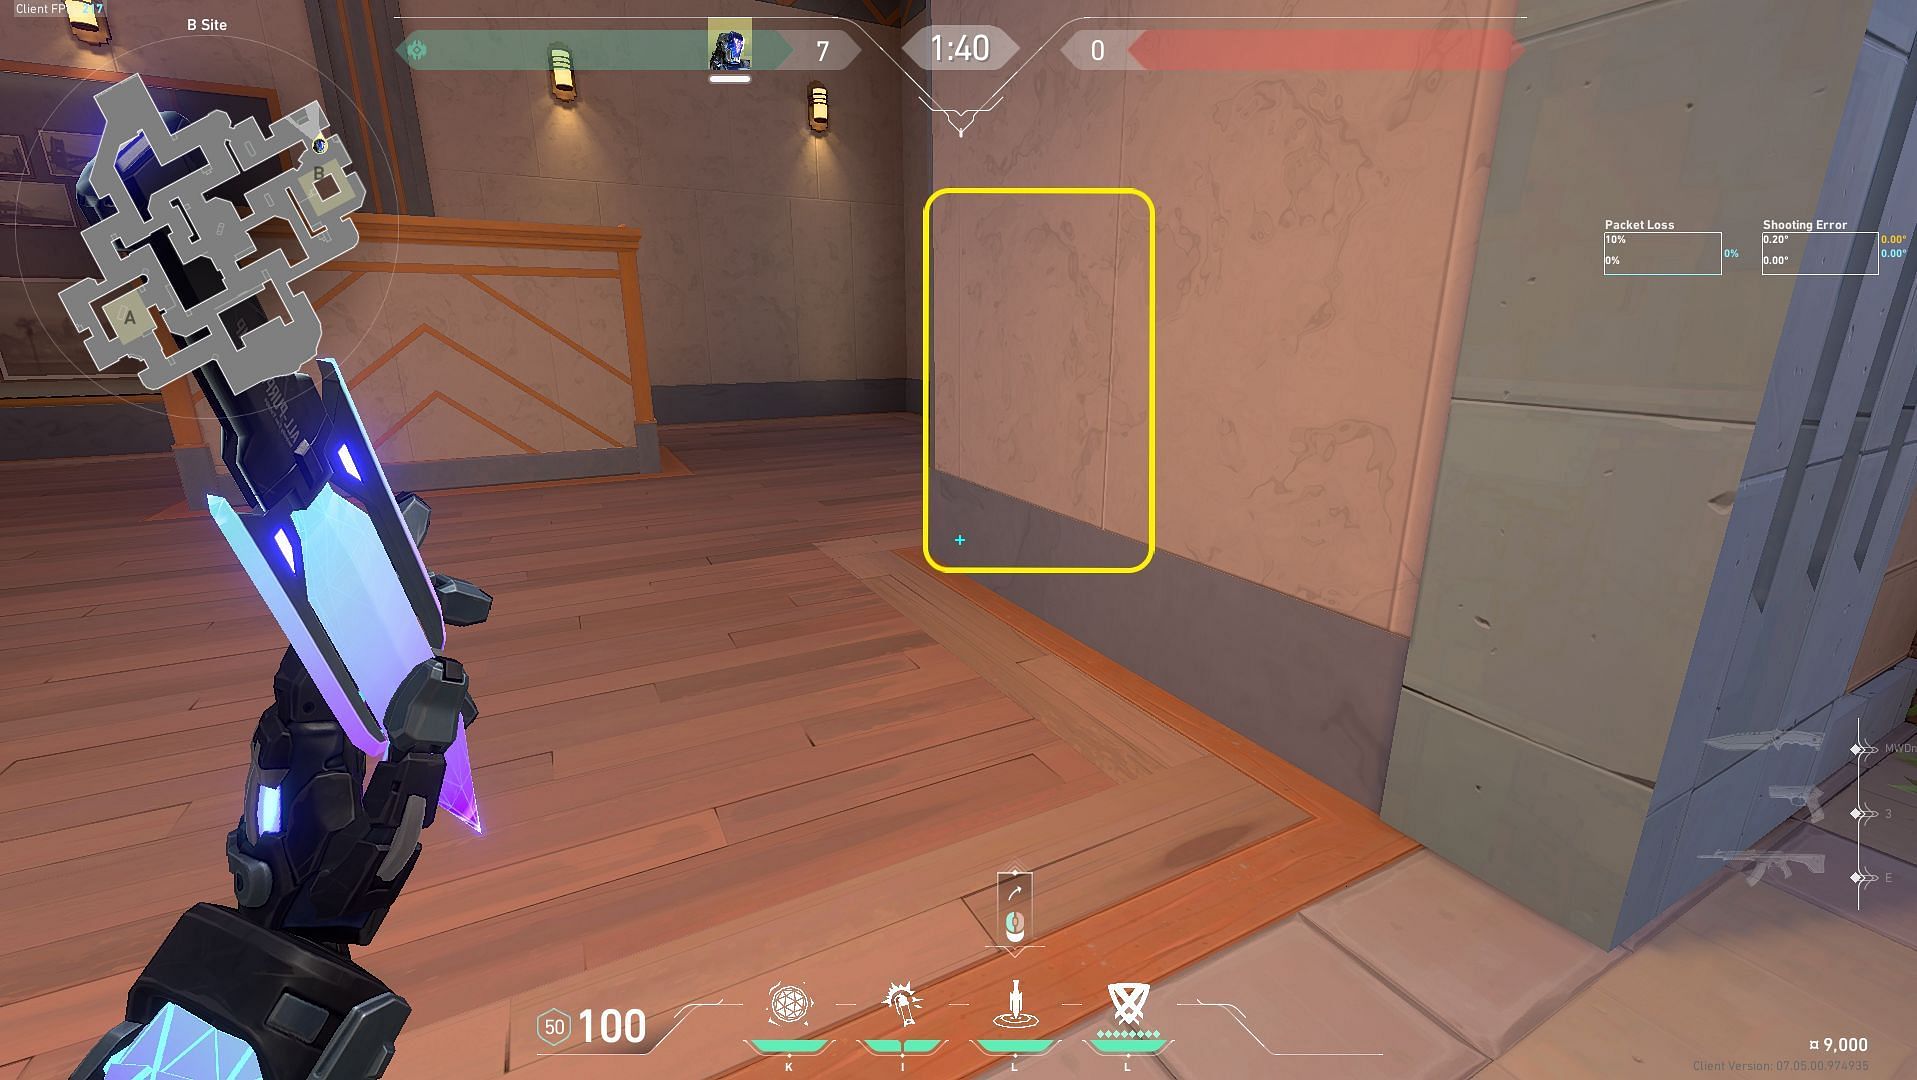
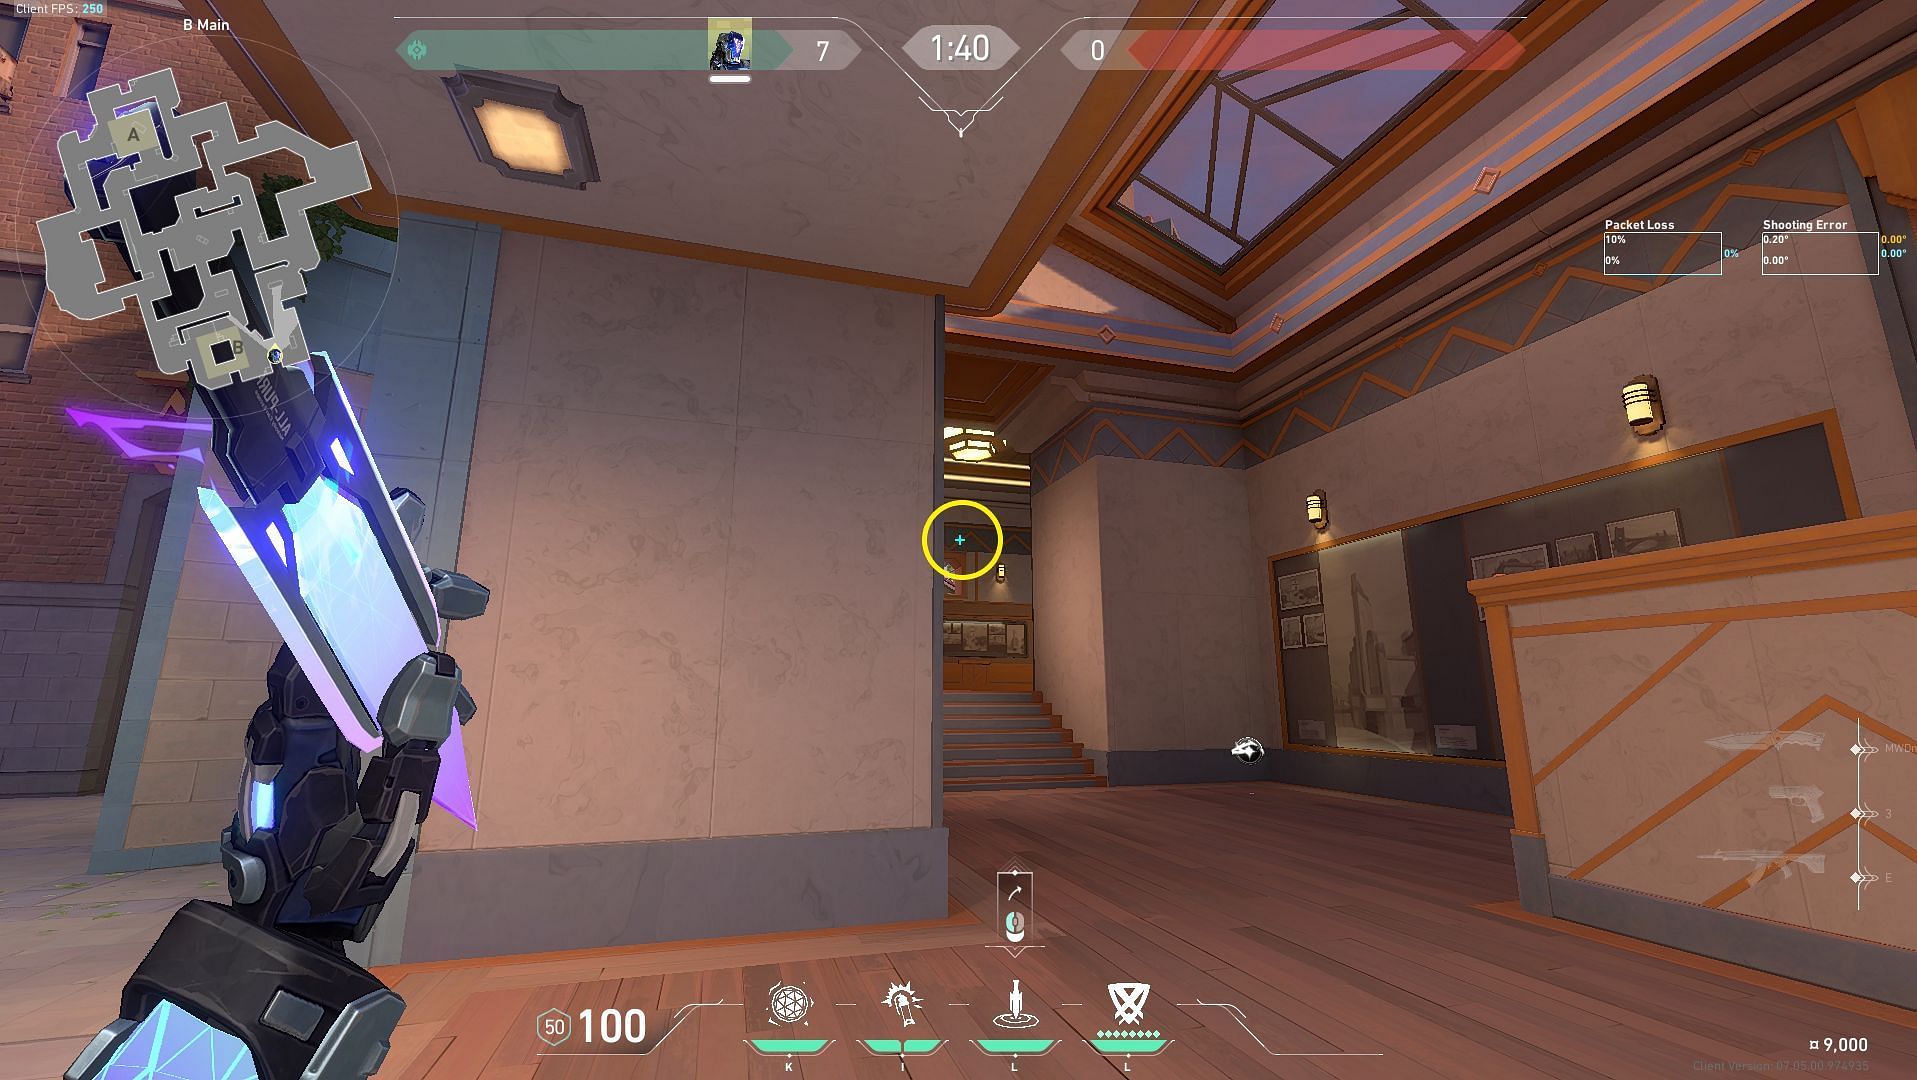
2) B Main
This Zero/Point knife will land instantly on top of the wall outside the B Site chokepoint, suppressing defenders around B Main and in front of B site.
In the pre-round phase, place yourself in the highlighted corner of the Bottom Mid barrier, as shown in the image above, by climbing on top of the boxes.
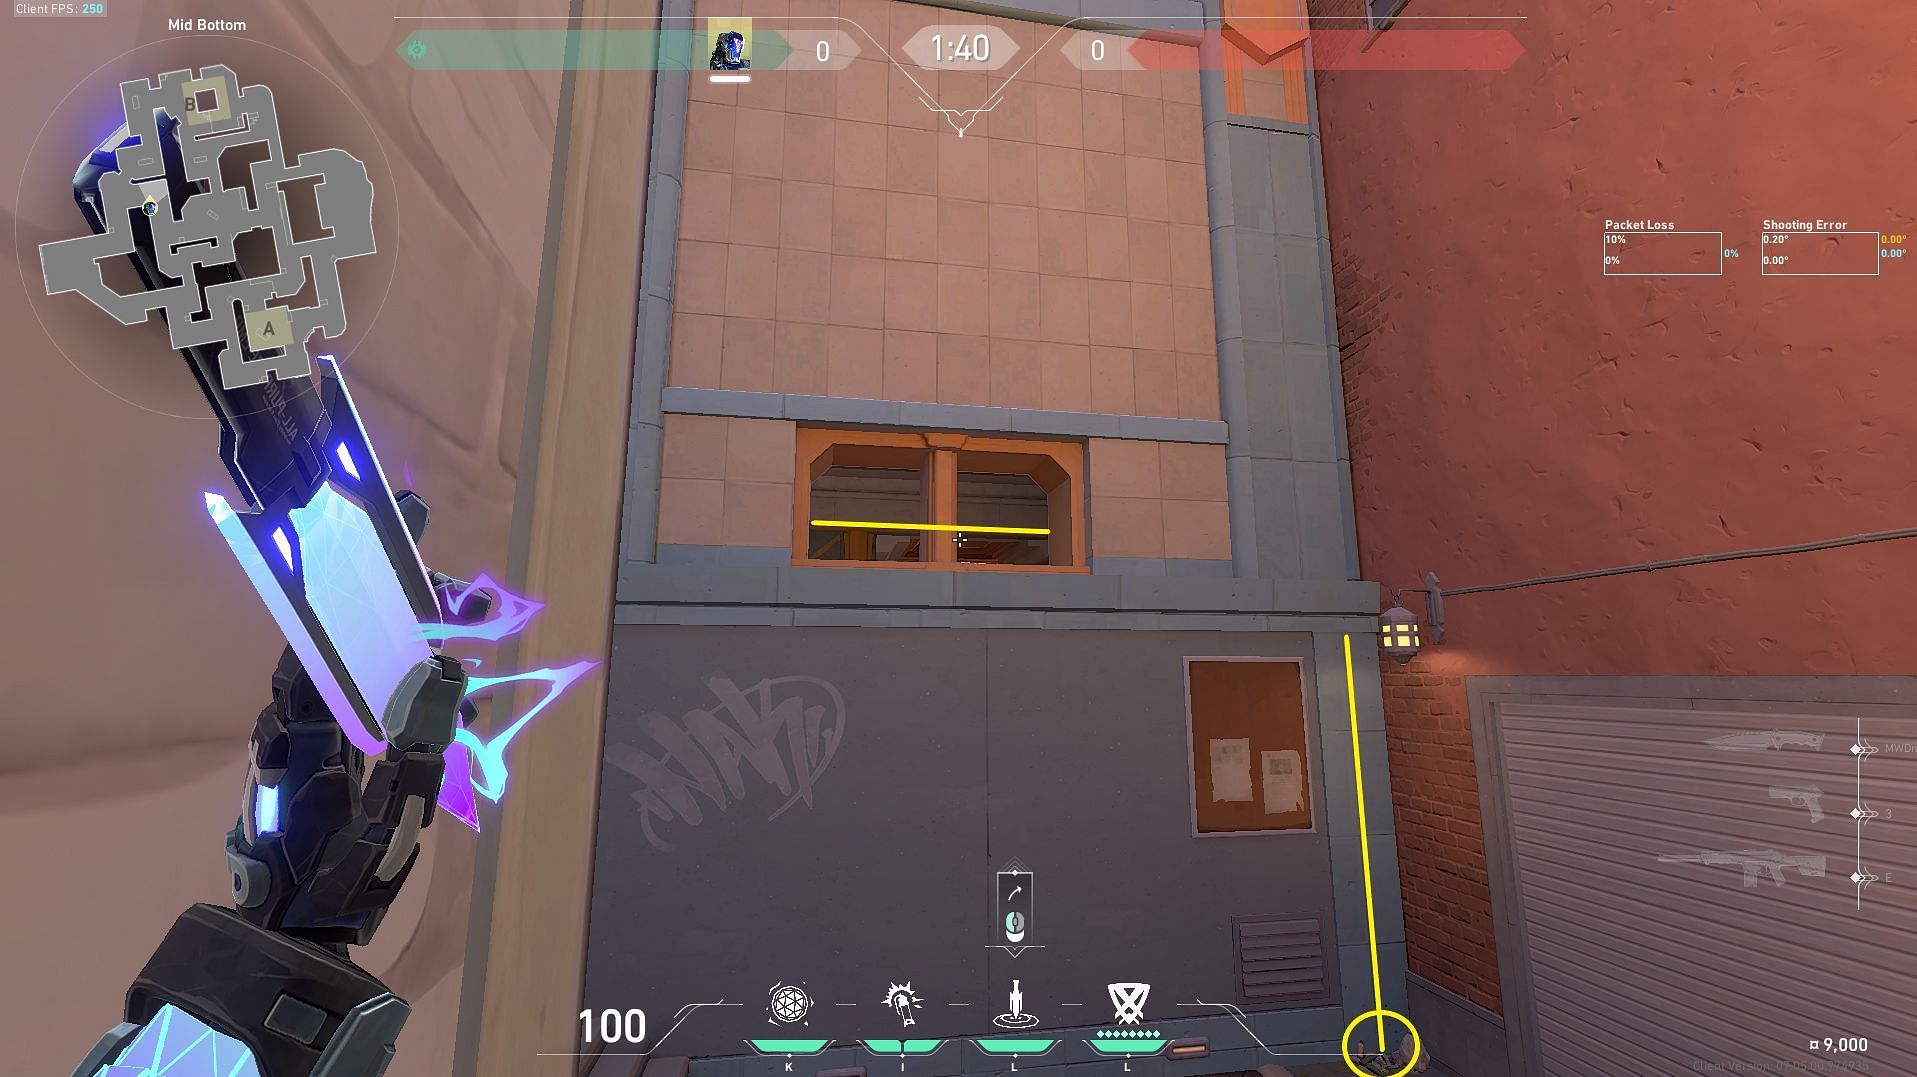
Now, aim above the highlighted line while facing B Main window and line up the right side end of the ability bracket HUD with trash bags in the right corner, as highlighted in the image above. As soon as the barriers in Valorant lower at the start of the round, use the left mouse button to toss your knife.
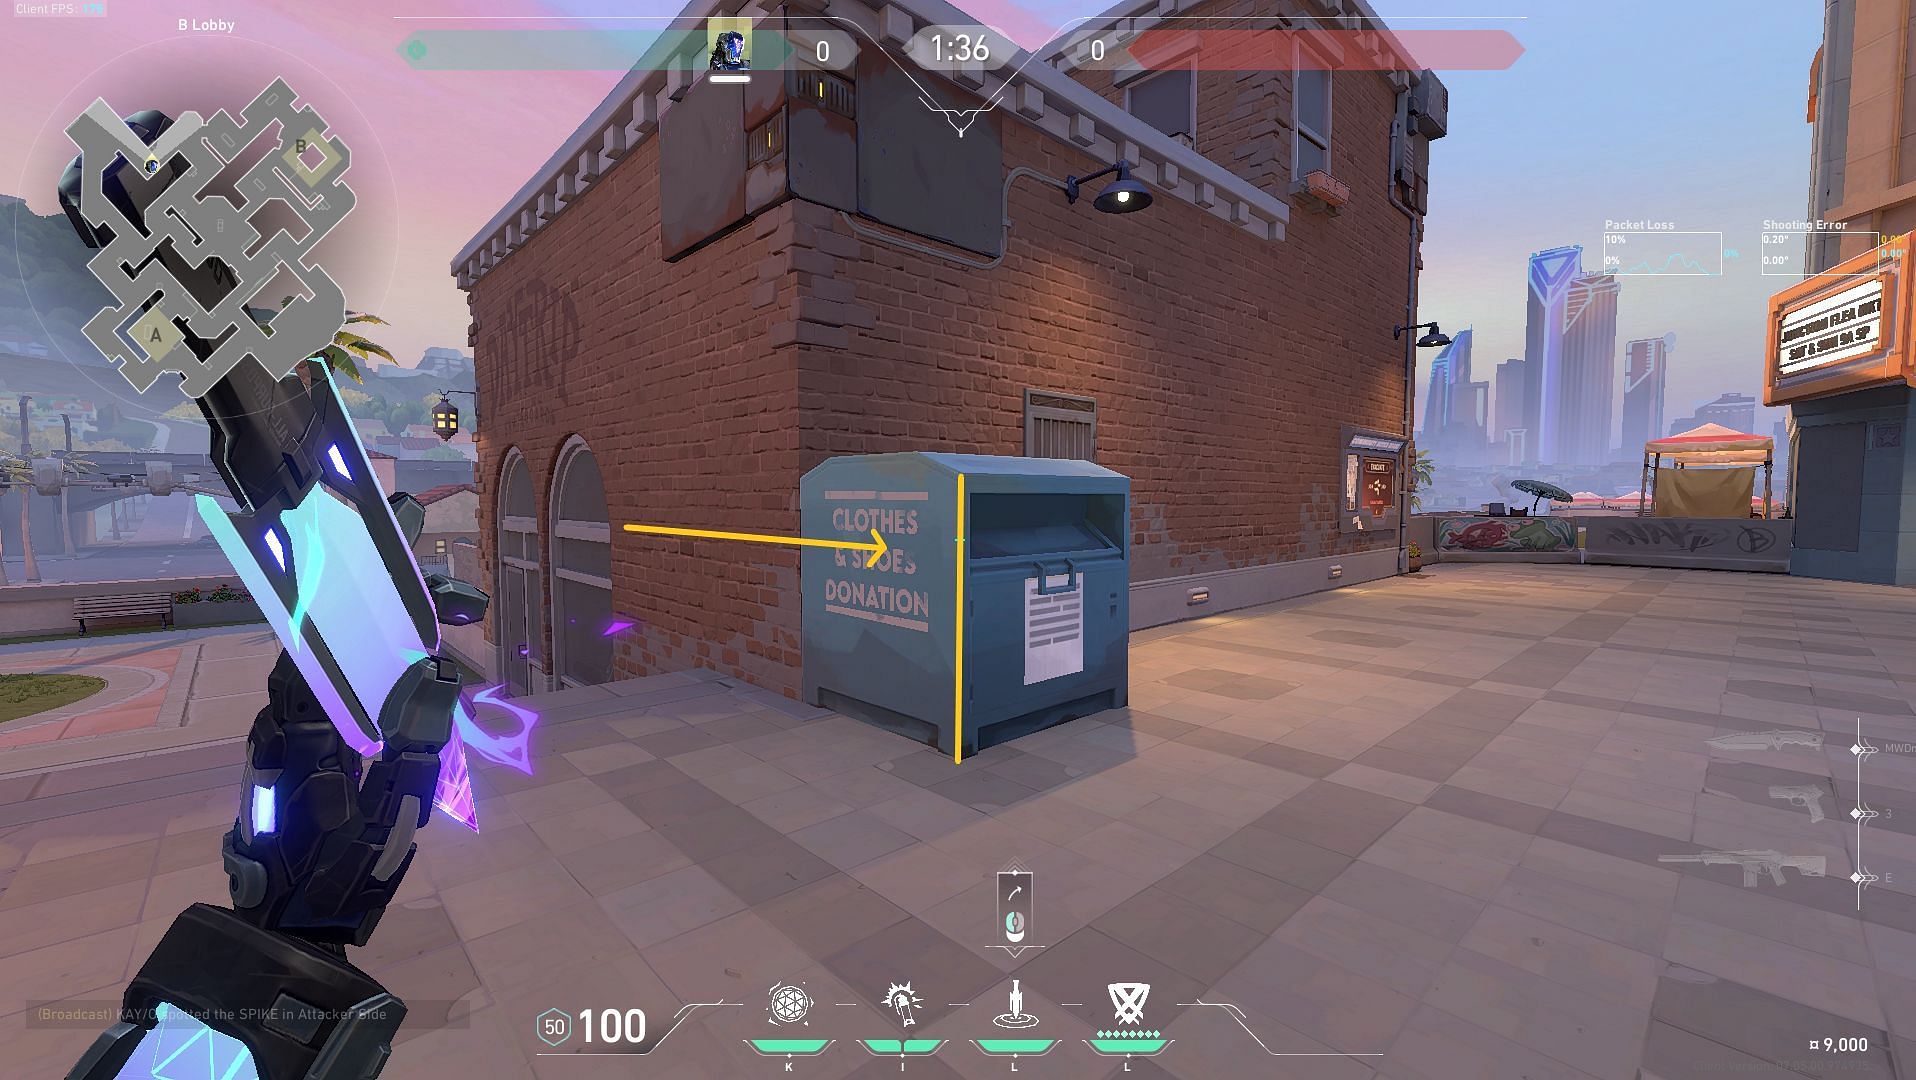
3) B Pillar
This unbreakable Zero/Point knife will land on top of the pillar in the B site, suppressing defenders anchoring B site from the front left step and back site.
In the pre-round phase, place yourself in the highlighted corner beside the green dumpster in the B lobby, as shown in the image above.
Now, facing the B site, you have to drag your crosshair straight up till you can match the left side part of the Frag/Ment HUD line lines up with the 'E' neon light as shown in the picture. As soon as the barriers in Valorant lower at the start of the round, use the left mouse button to toss your knife.
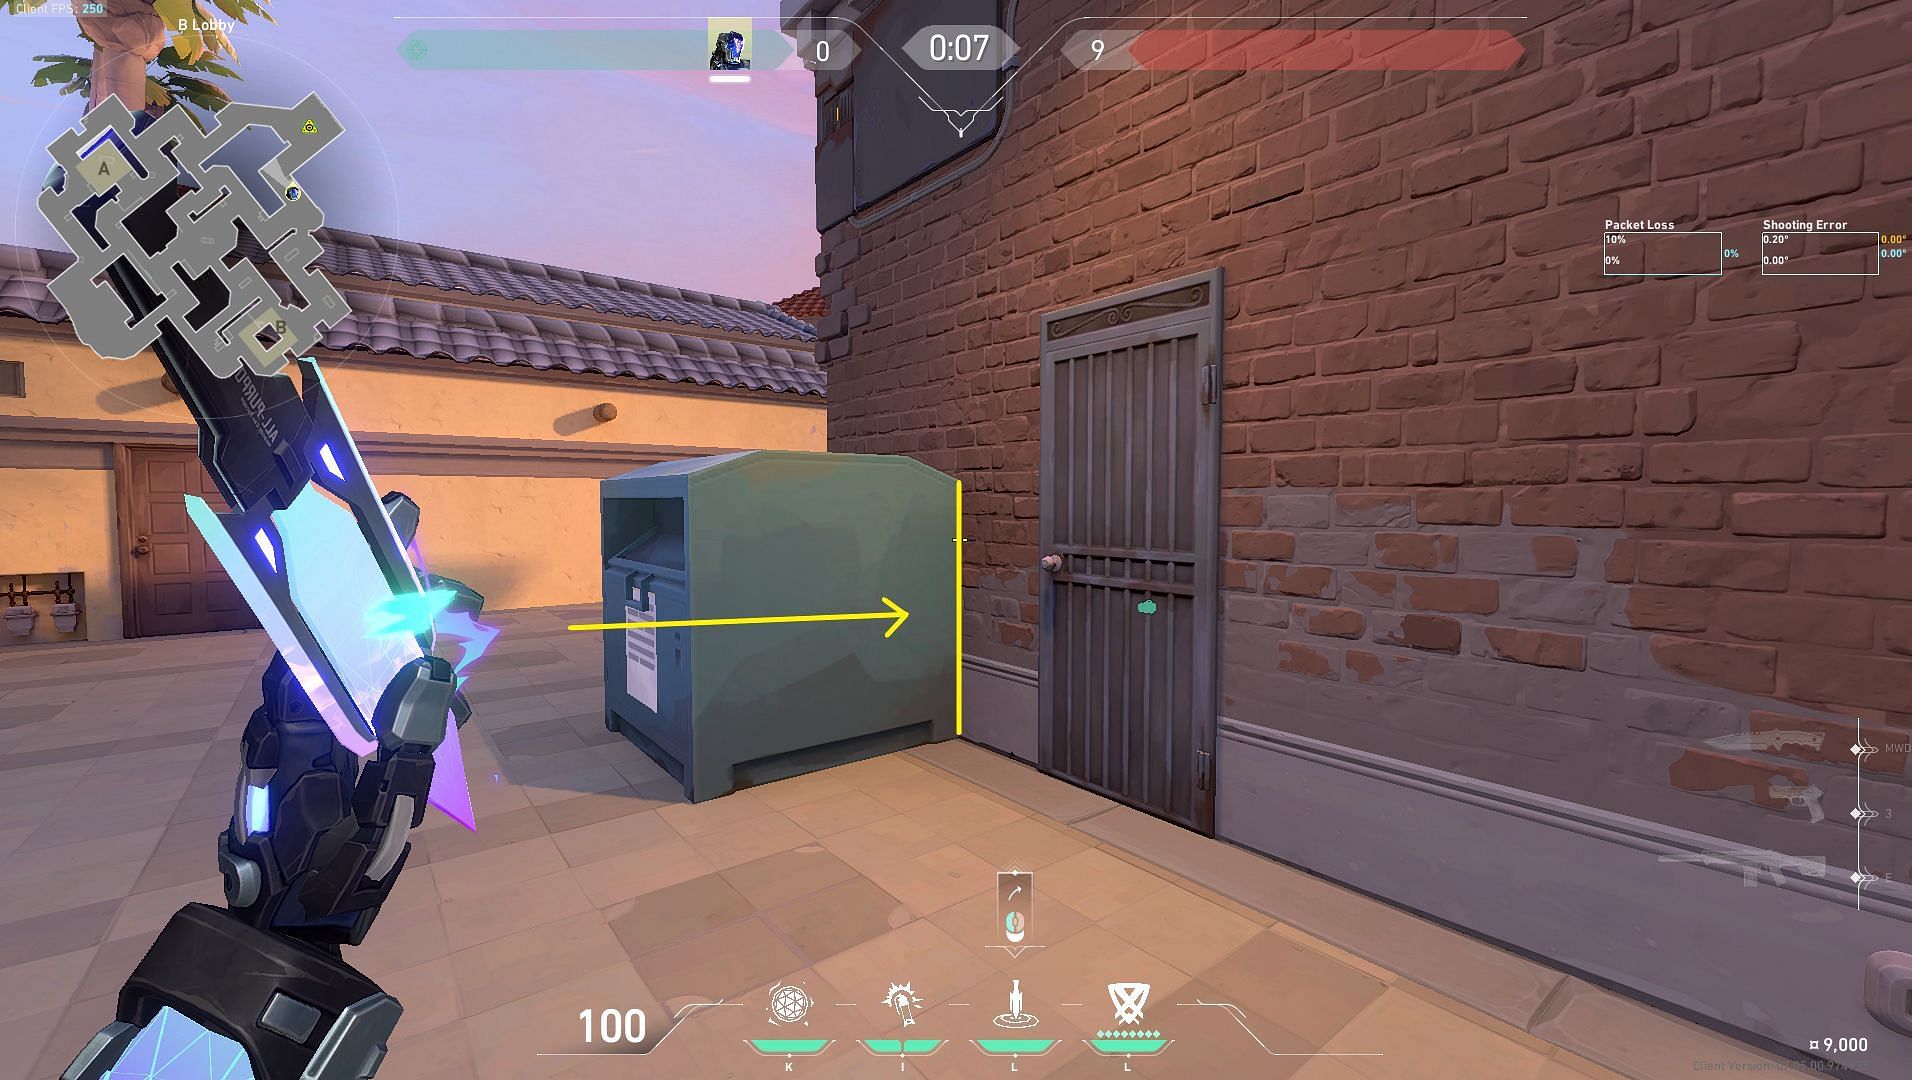
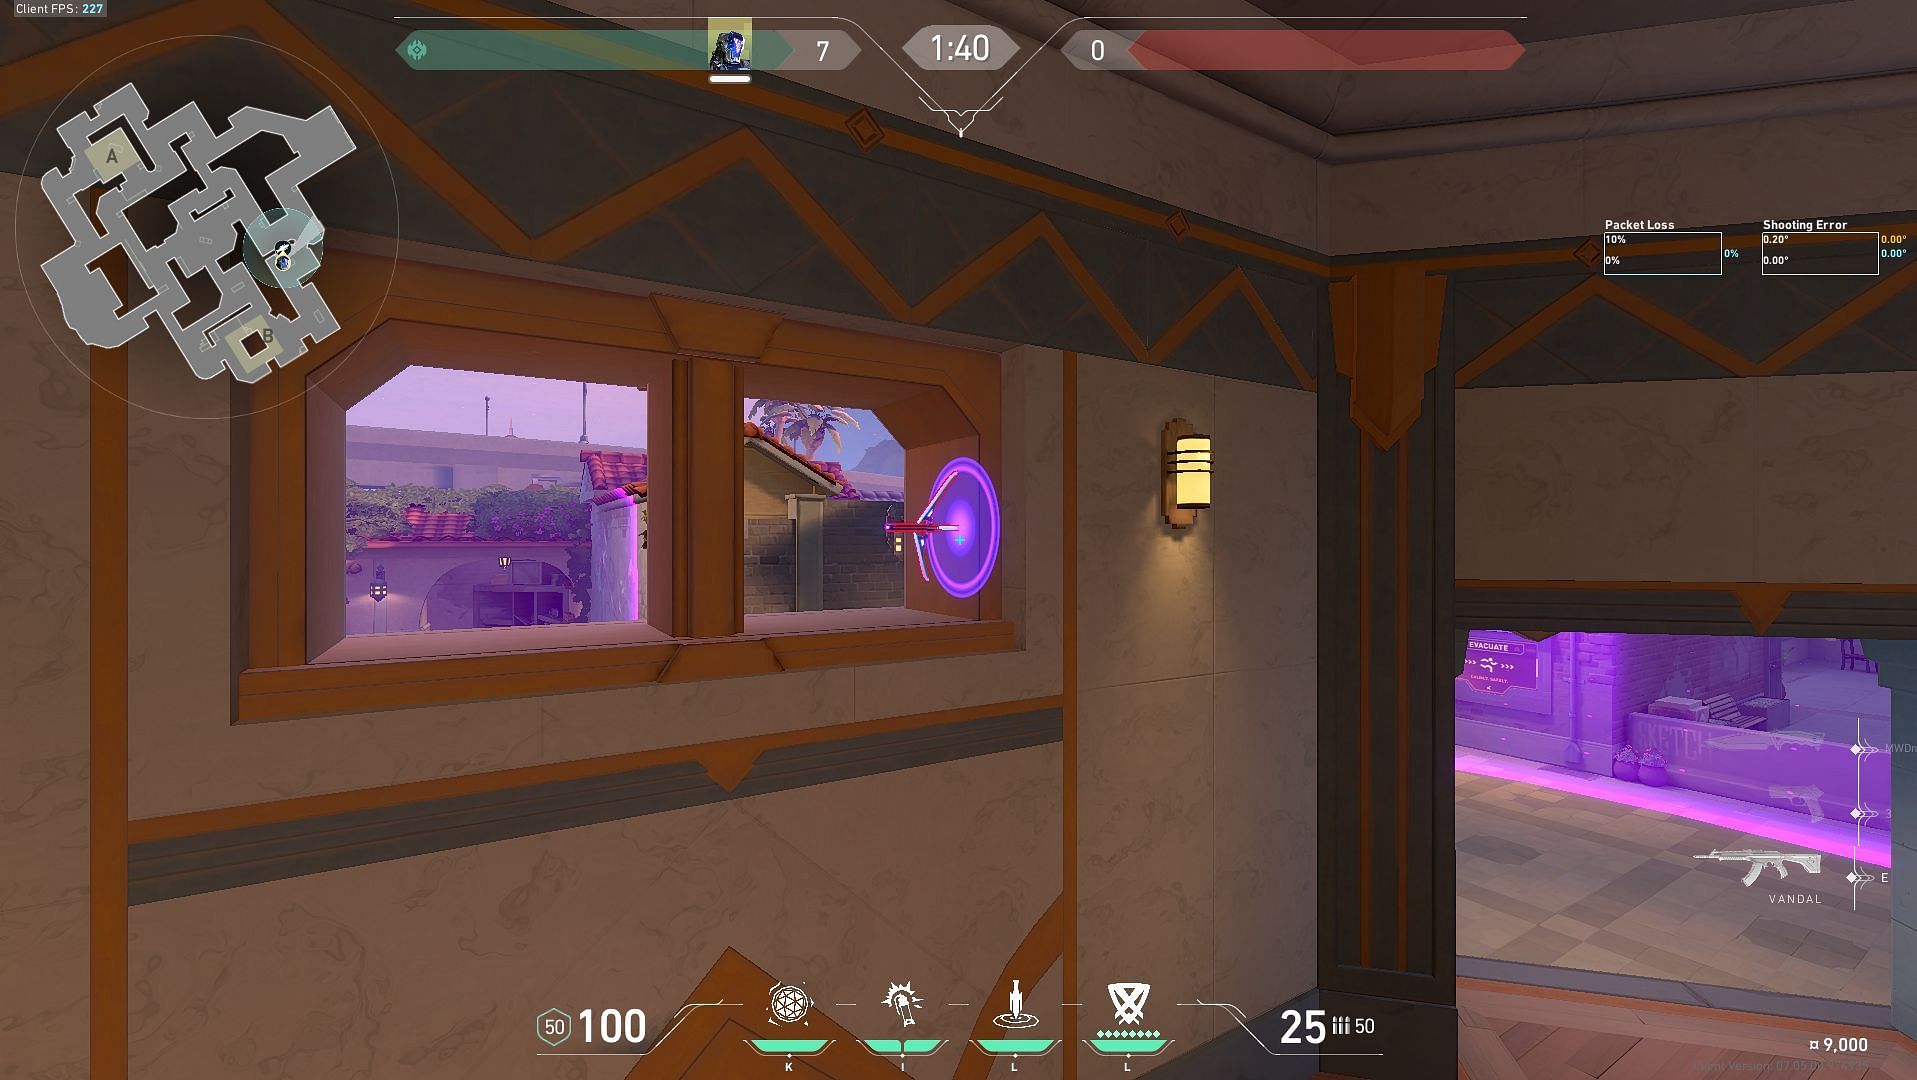
4) B Market
This Zero/Point knife will land on the railings above B Market, making it hard to destroy while revealing and suppressing defenders in B Market contesting Middle Courtyard or holding B site.
In the pre-round phase, place yourself directly in front of this corner of the green dumpster in B Lobby, as shown in the image above.
Now, facing towards the general area of the B side of the map, you have to drag your crosshair straight up till you can match the highlighted part of your HUD with the dark corner of the floating concrete piece. As soon as the barriers in Valorant lower at the start of the round, use the left mouse button to toss your knife.
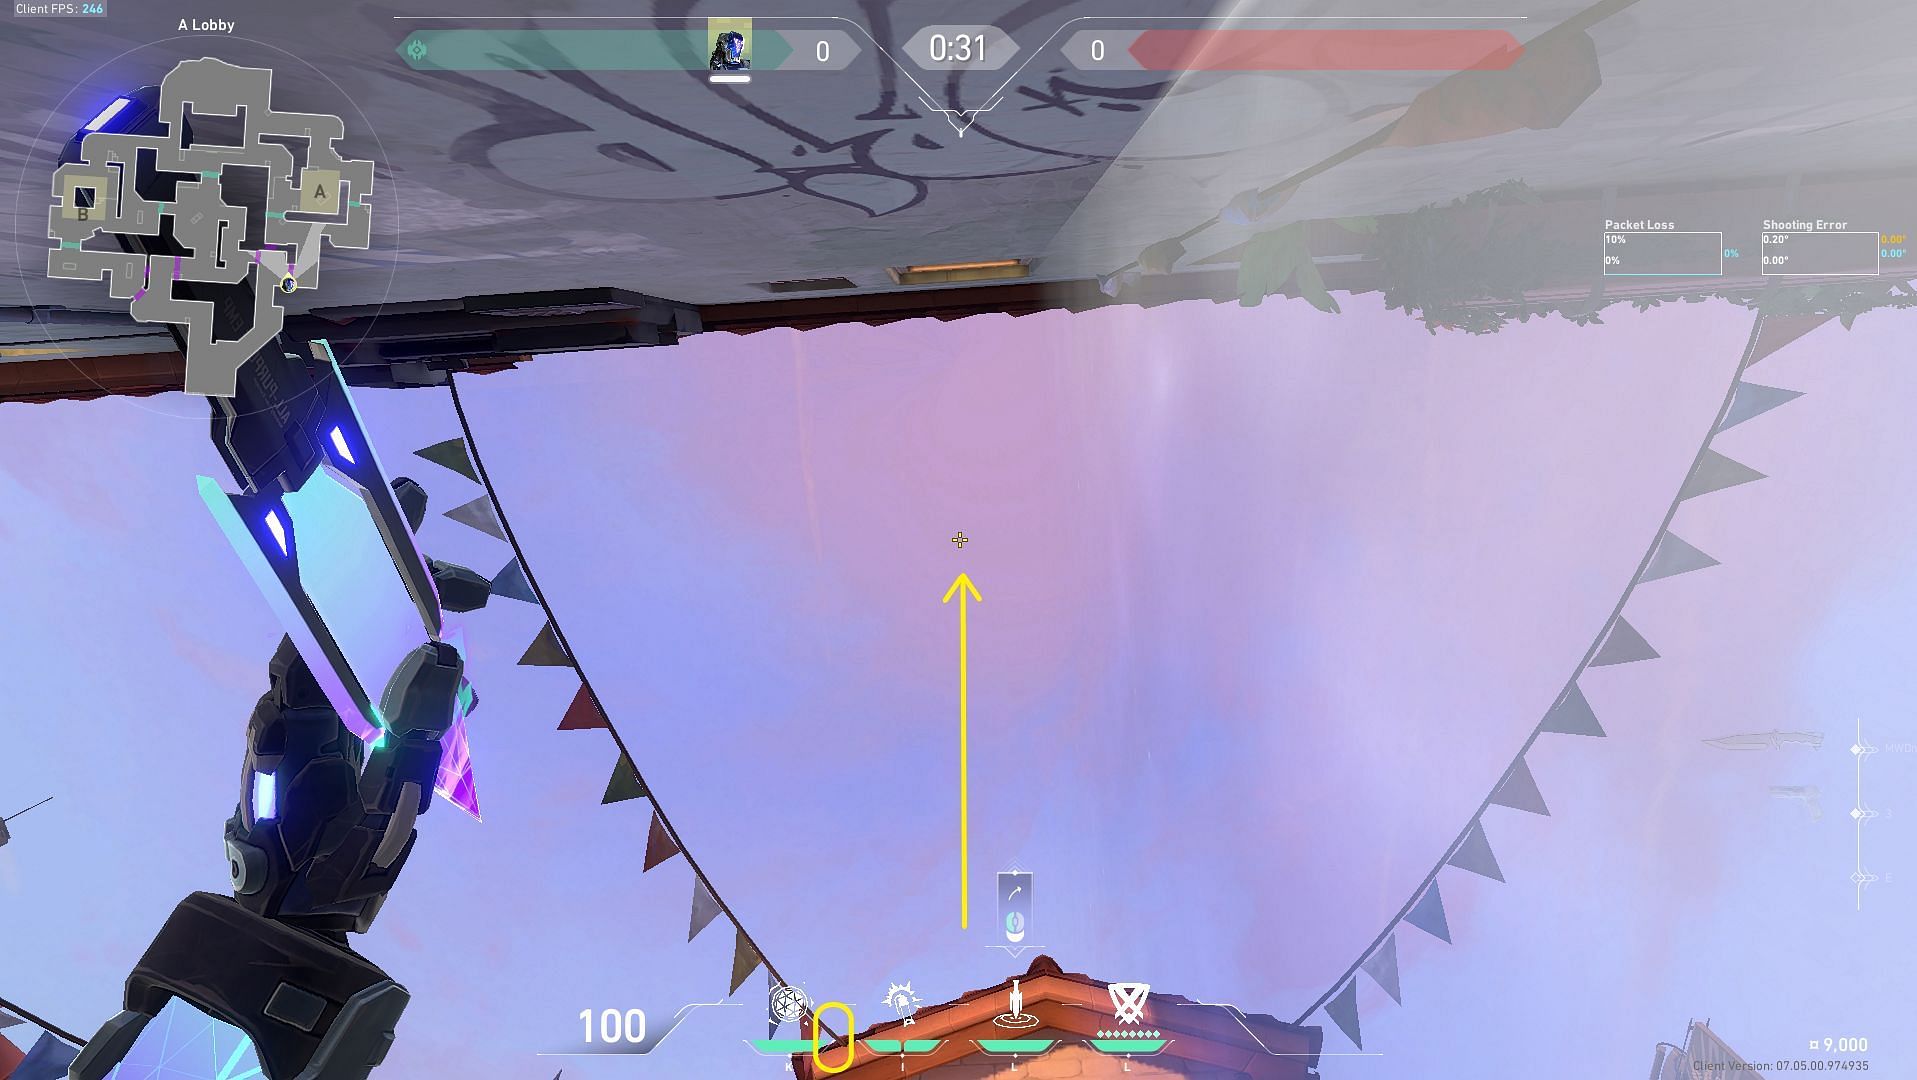
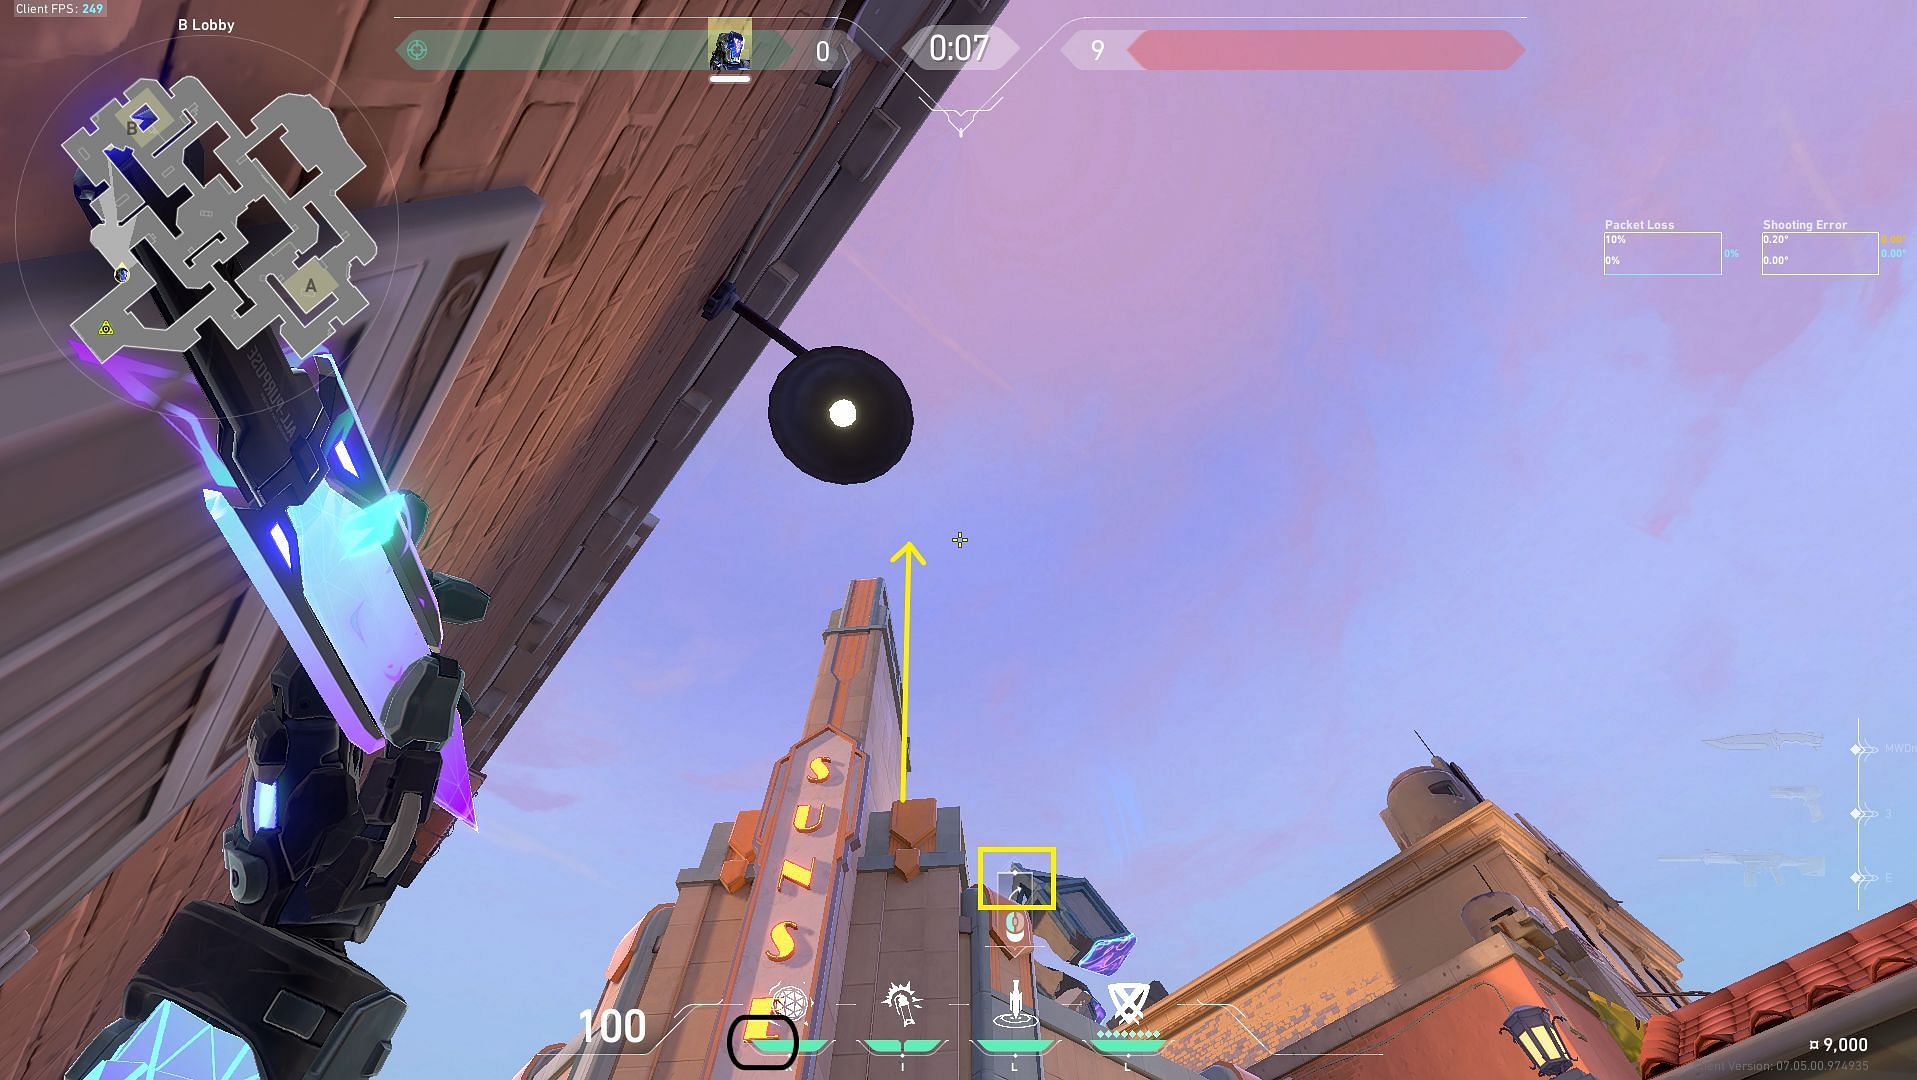
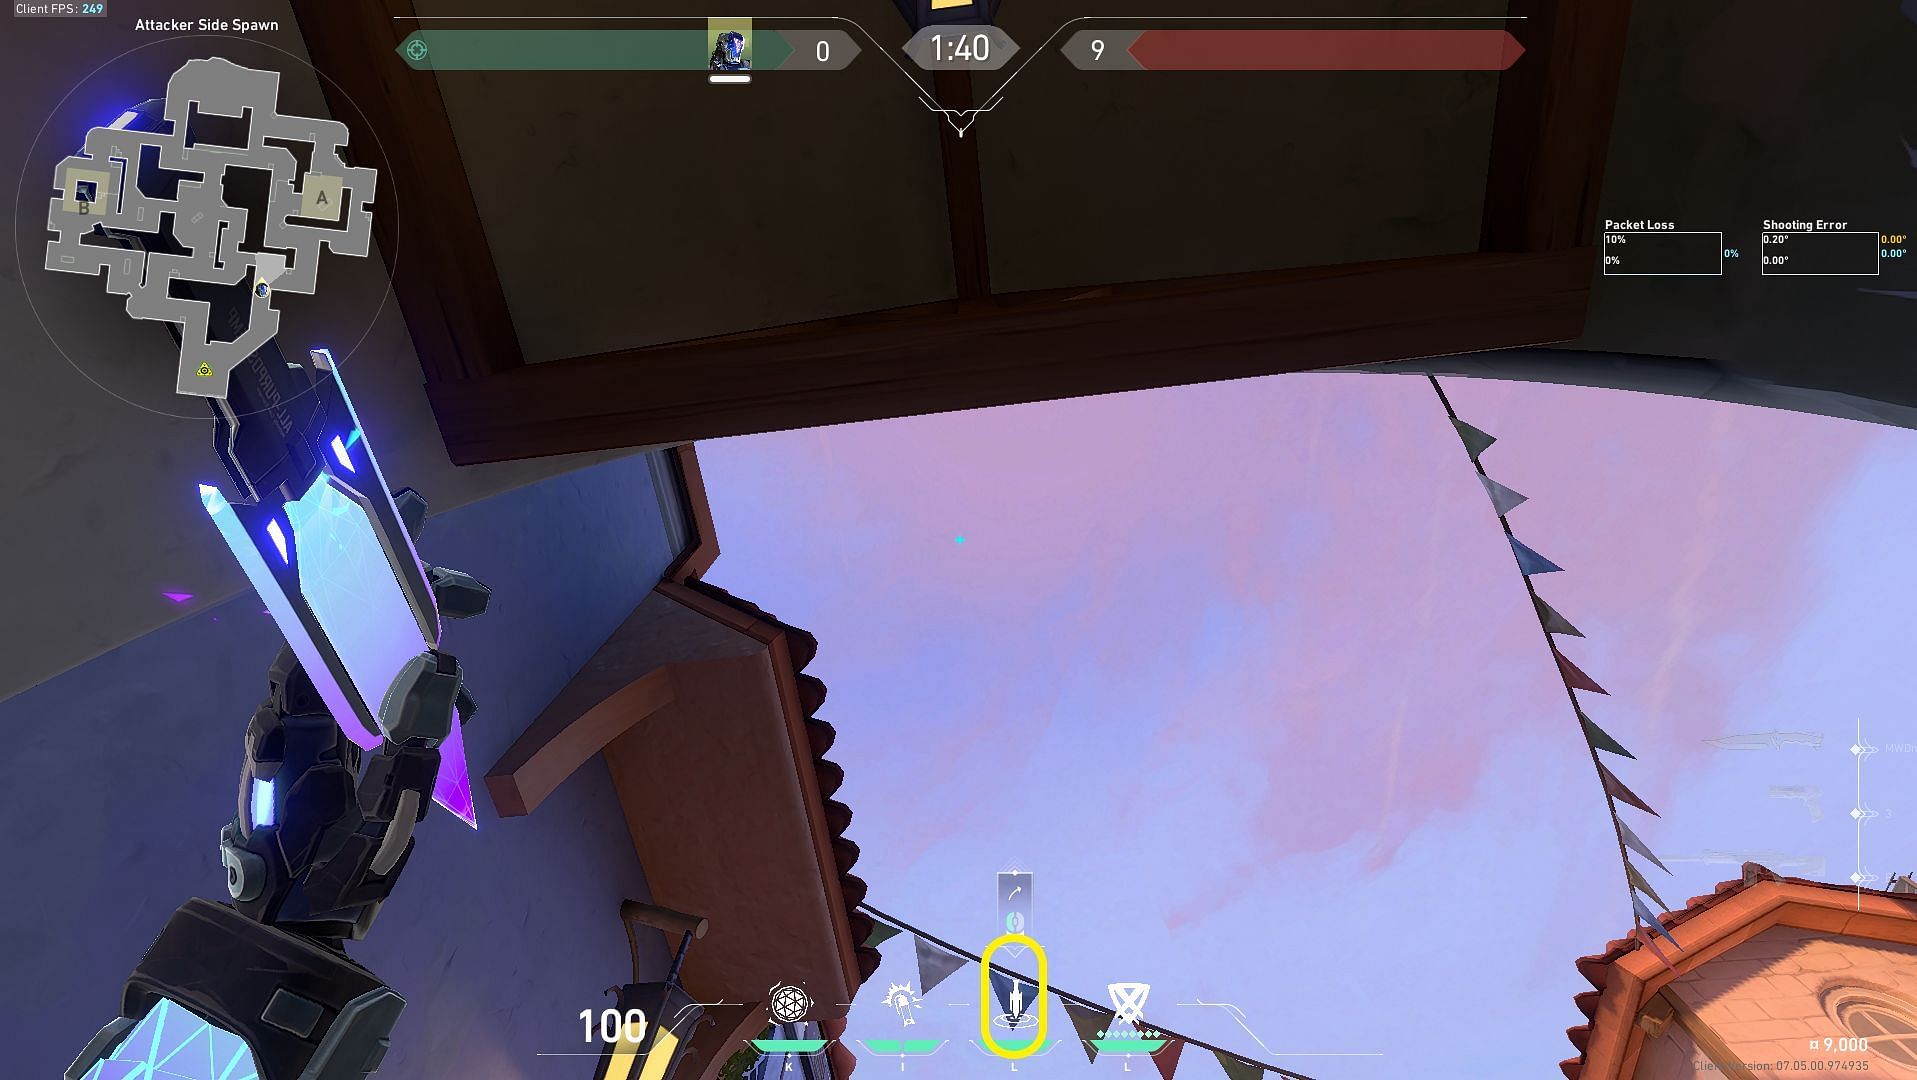
5) Mid Top
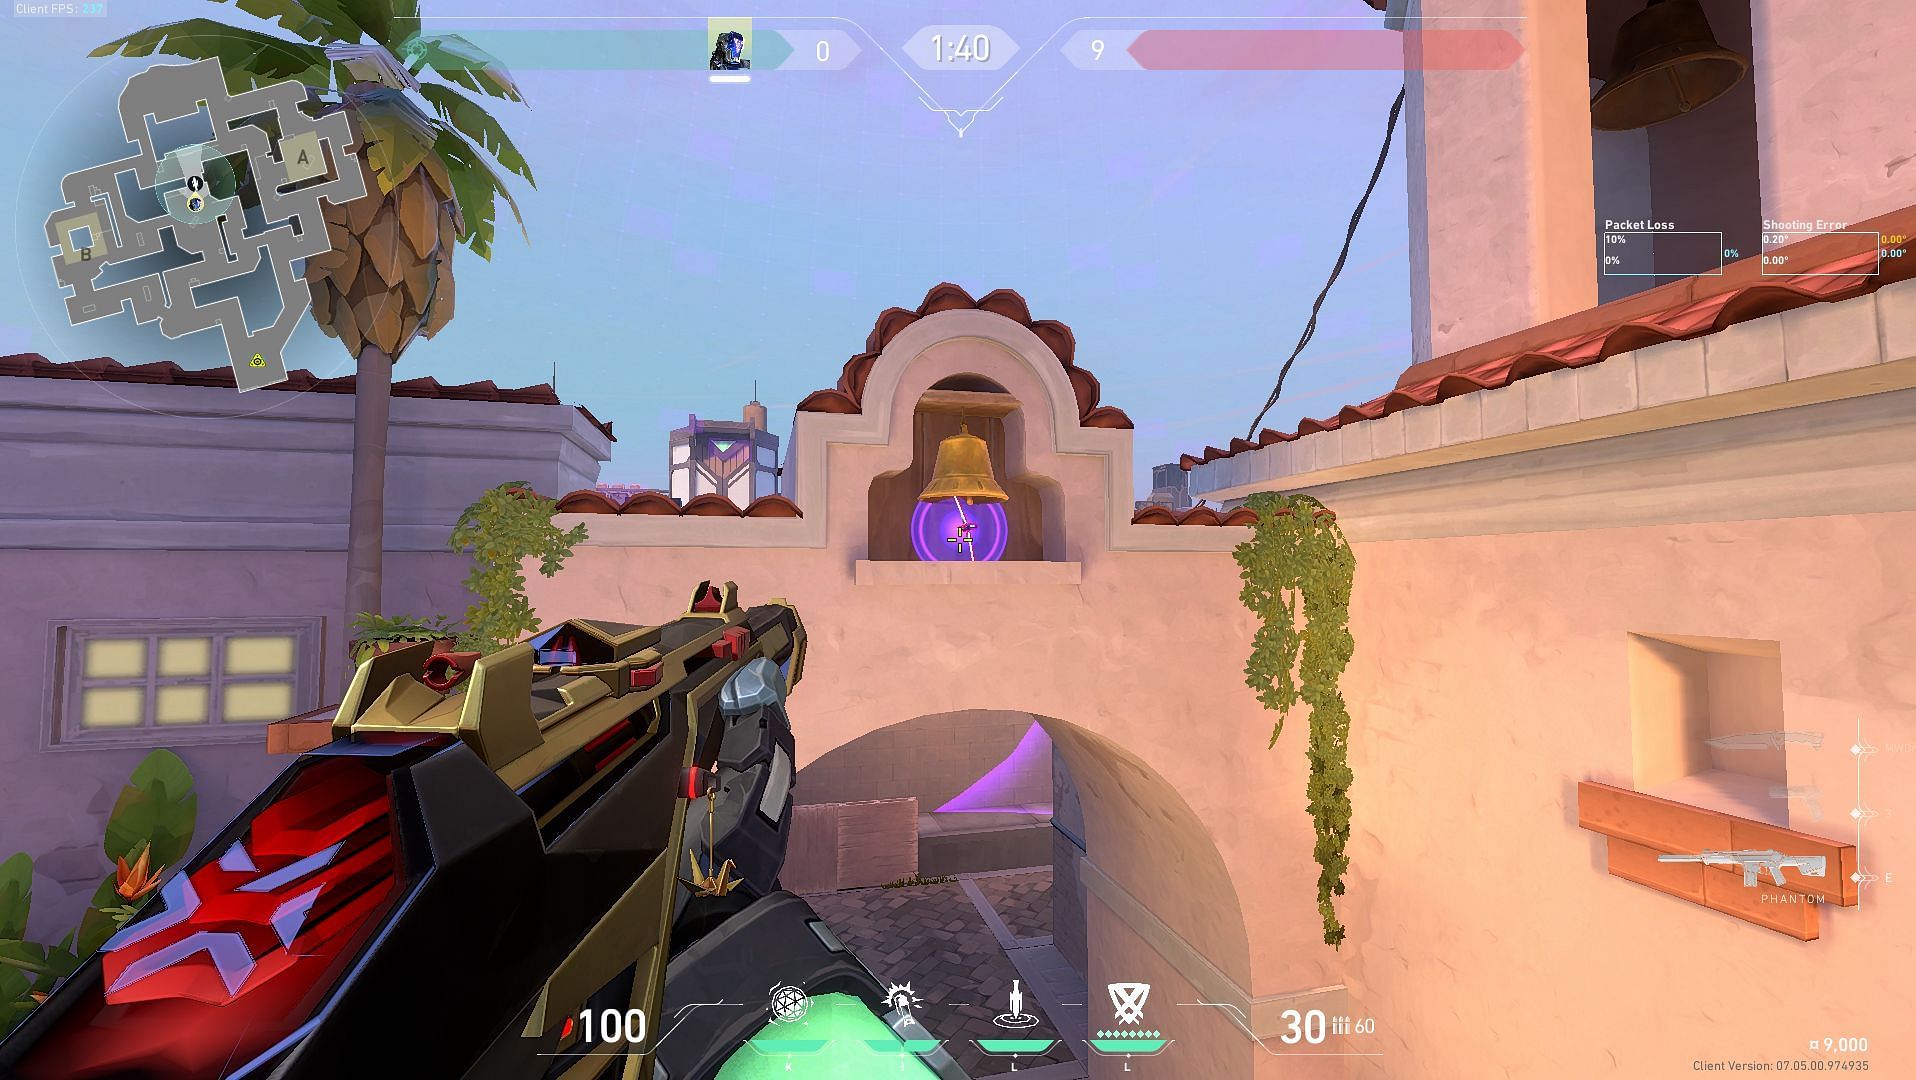
This unbreakable Zero/Point knife will land inside the cavity where a bell is hung on the outside of the Mid Top arch, suppressing defenders peeking Mid Tiles or Bottom Mid.
As the barrier in Bottom Mid drops down, get into the position highlighted in the image above.
Aim your crosshair above the line highlighted in the image so that you are aiming just above the Mid Top arch. As soon as the Middle courtyard barrier in Valorant lowers at the start of the round, use the left mouse button to toss your knife.
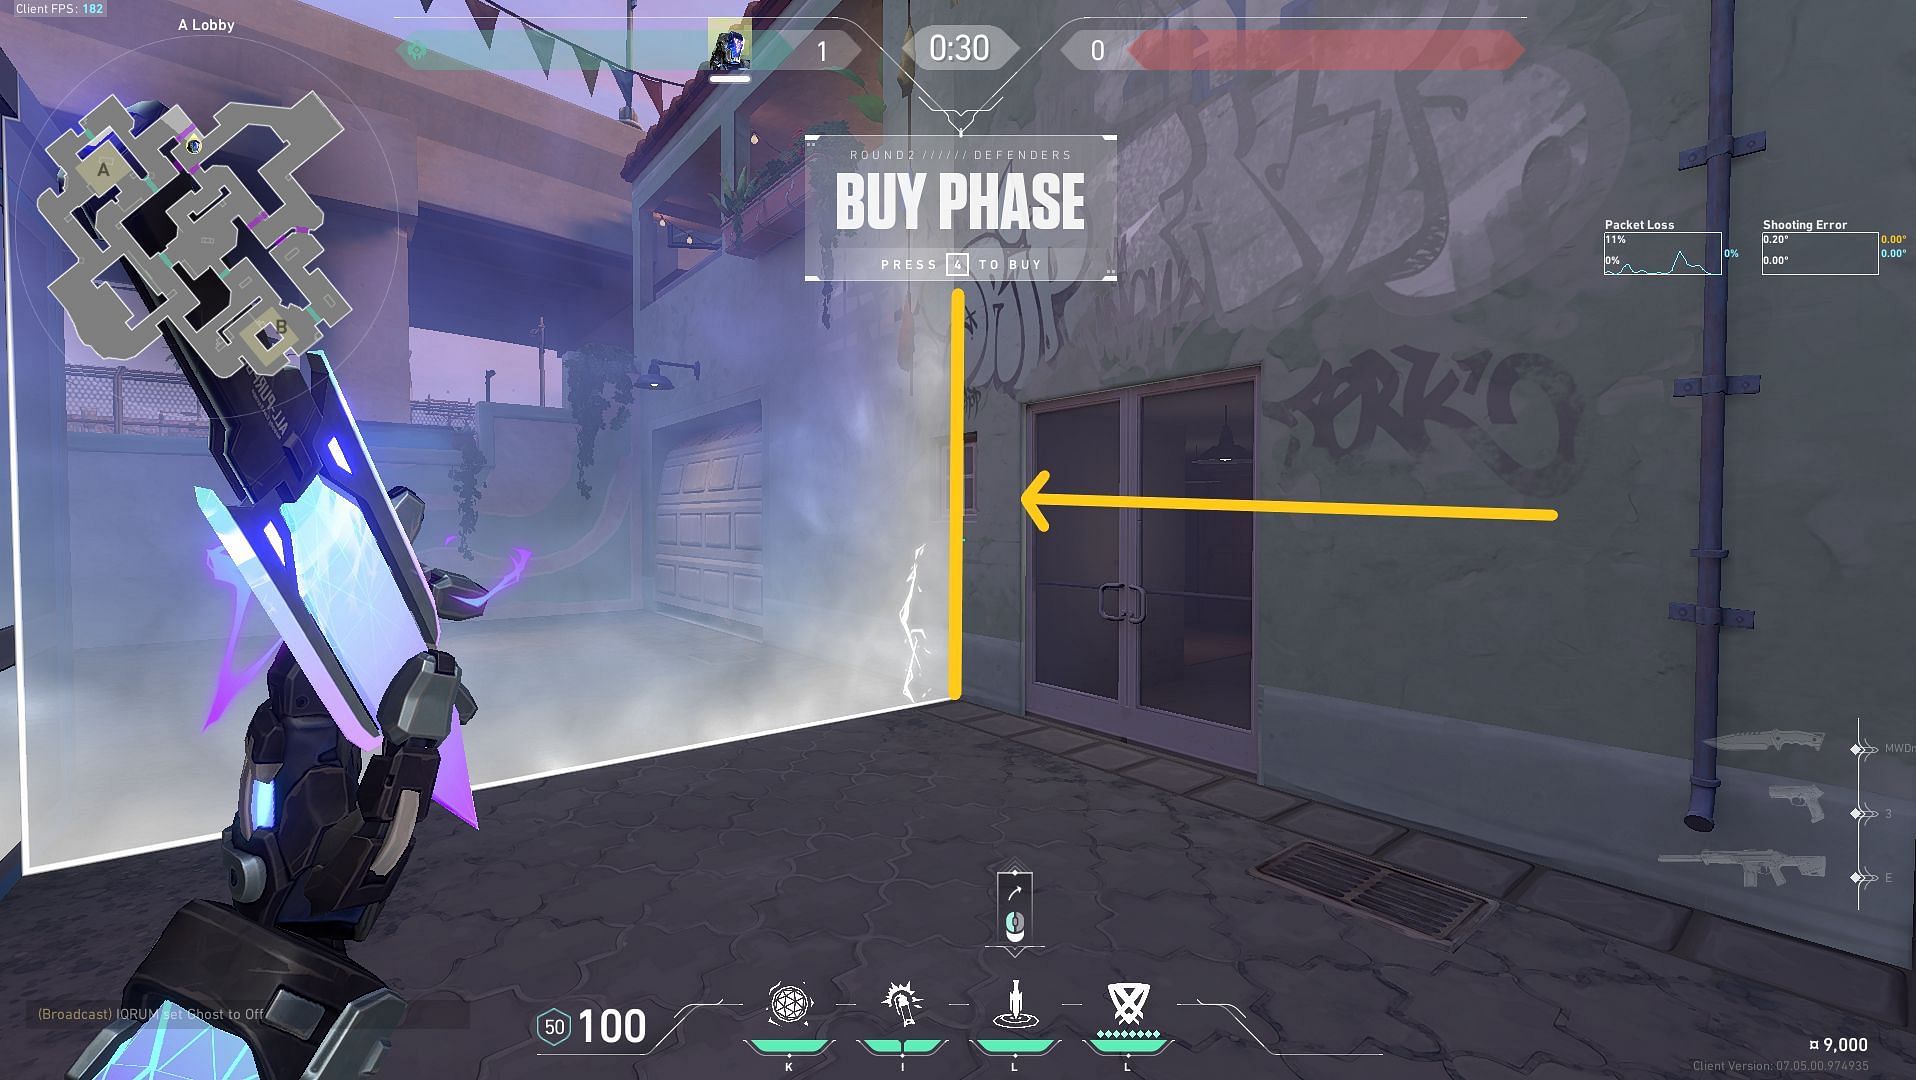
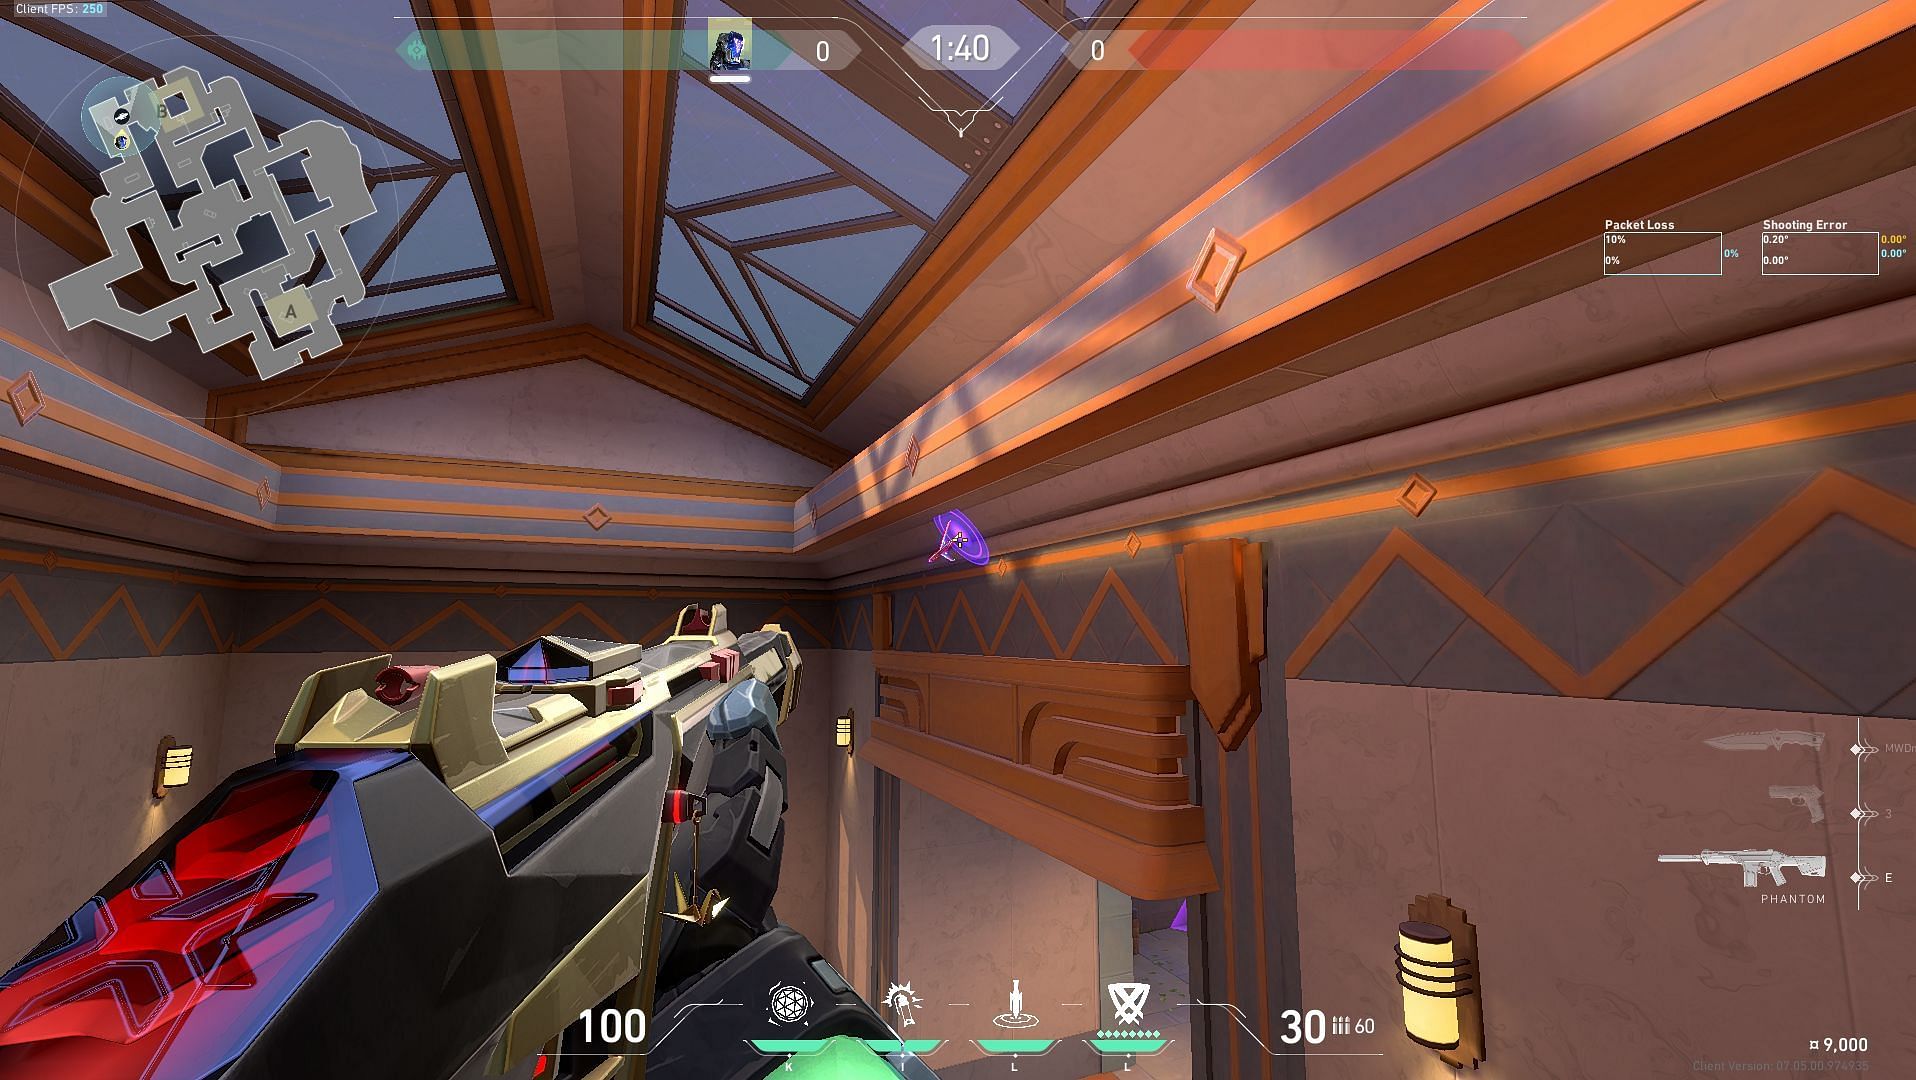
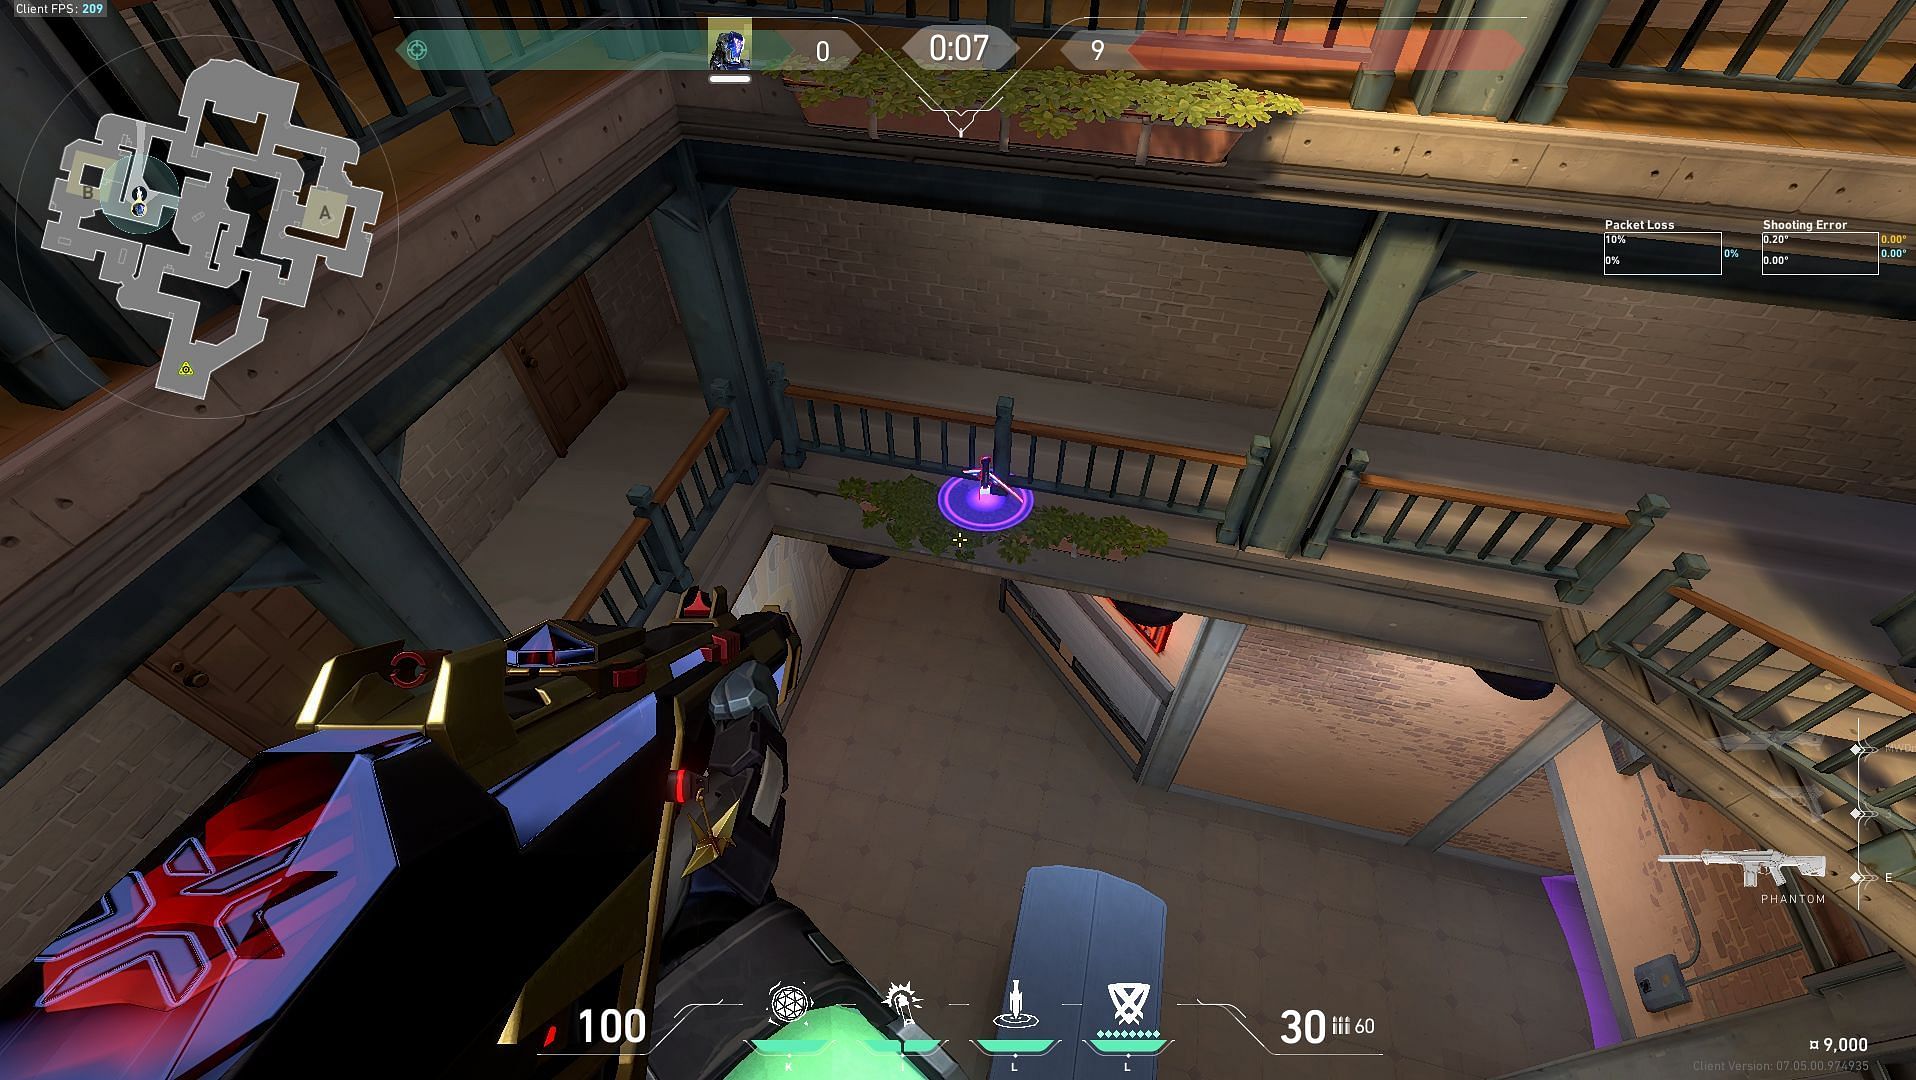
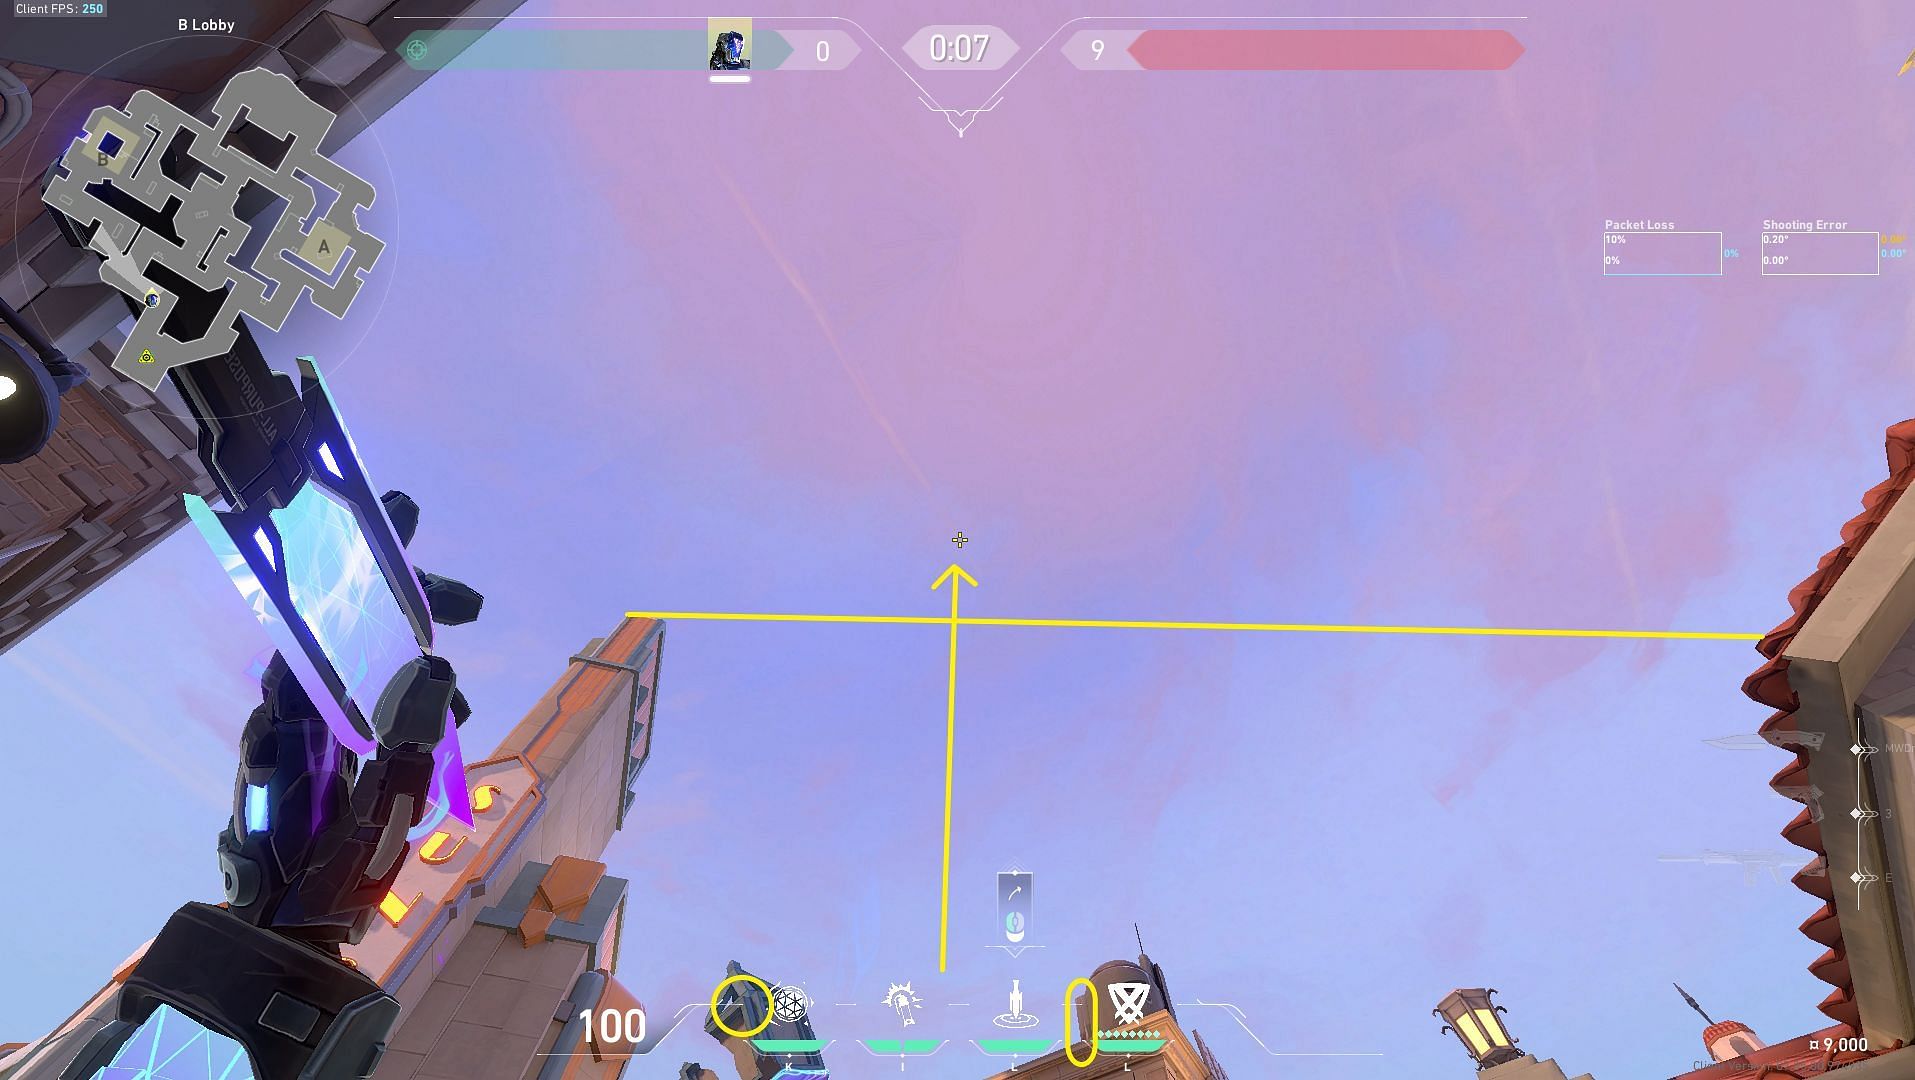
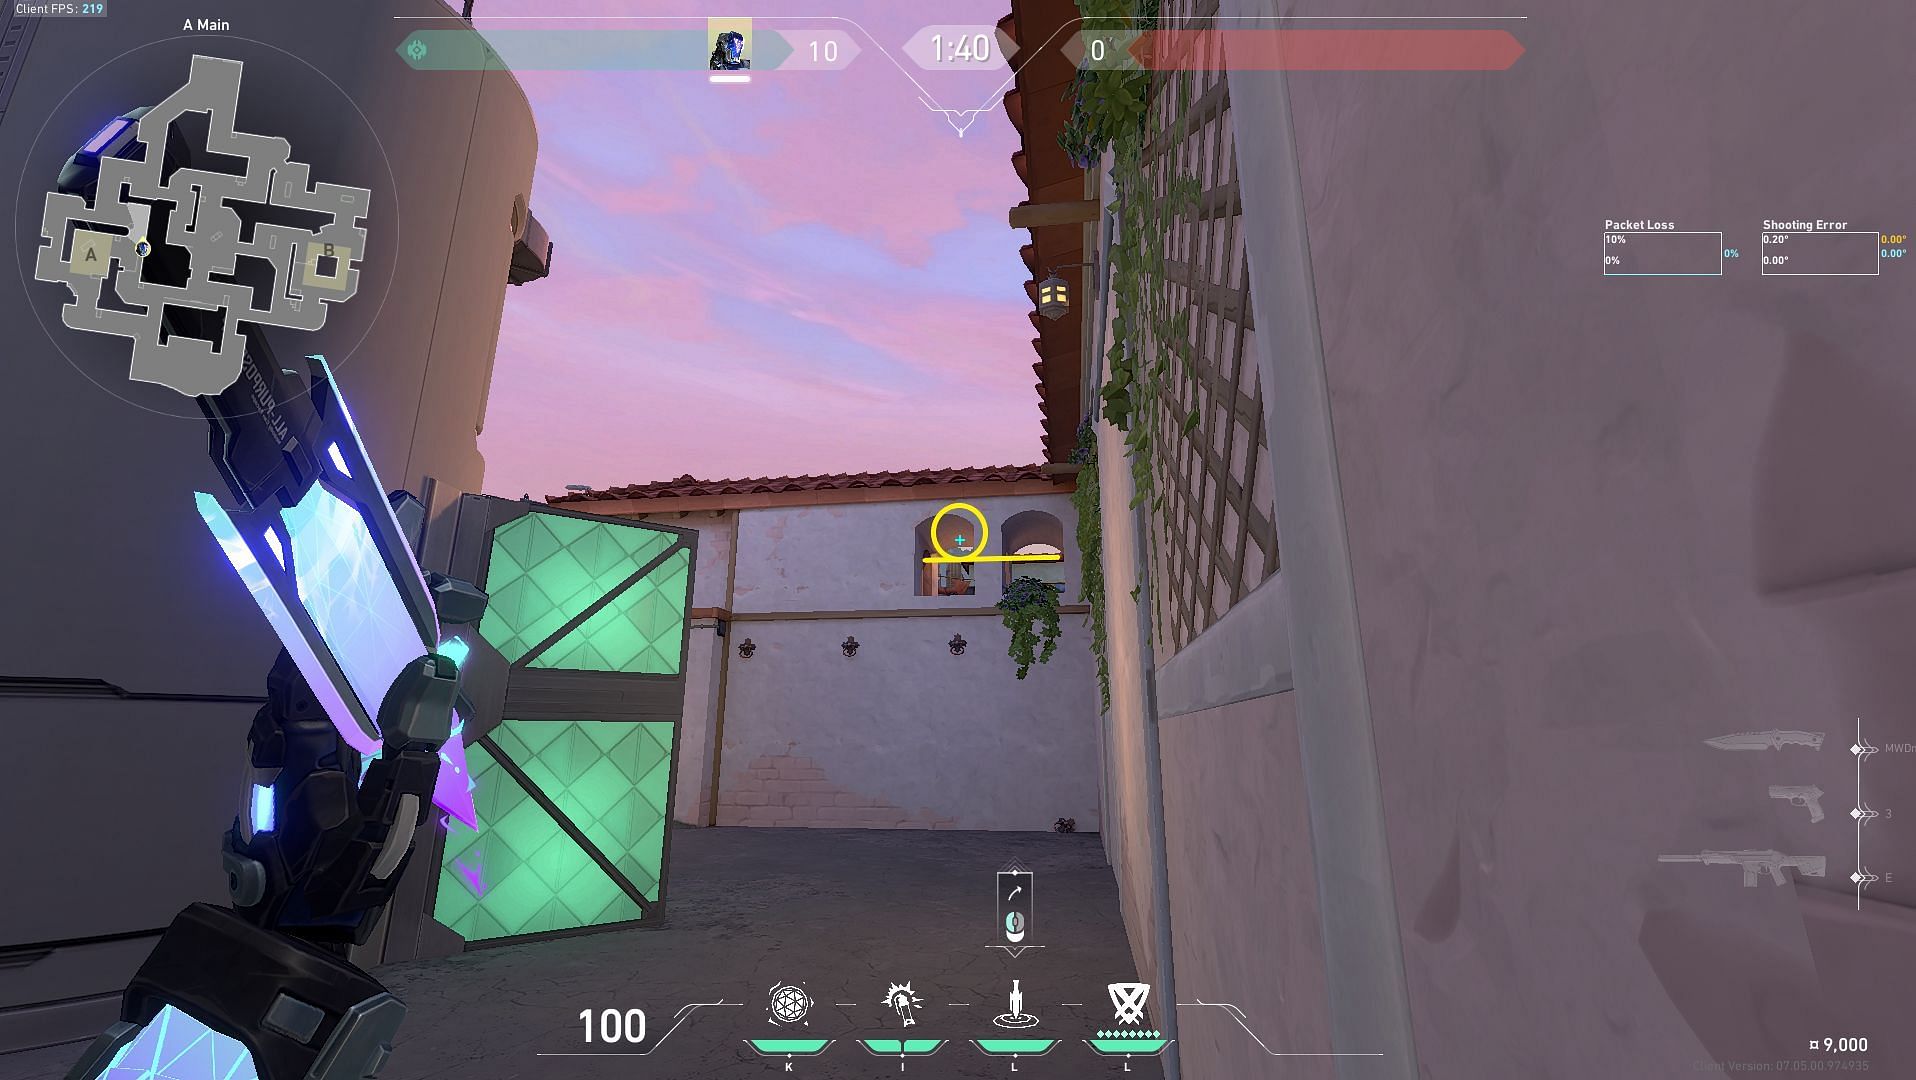
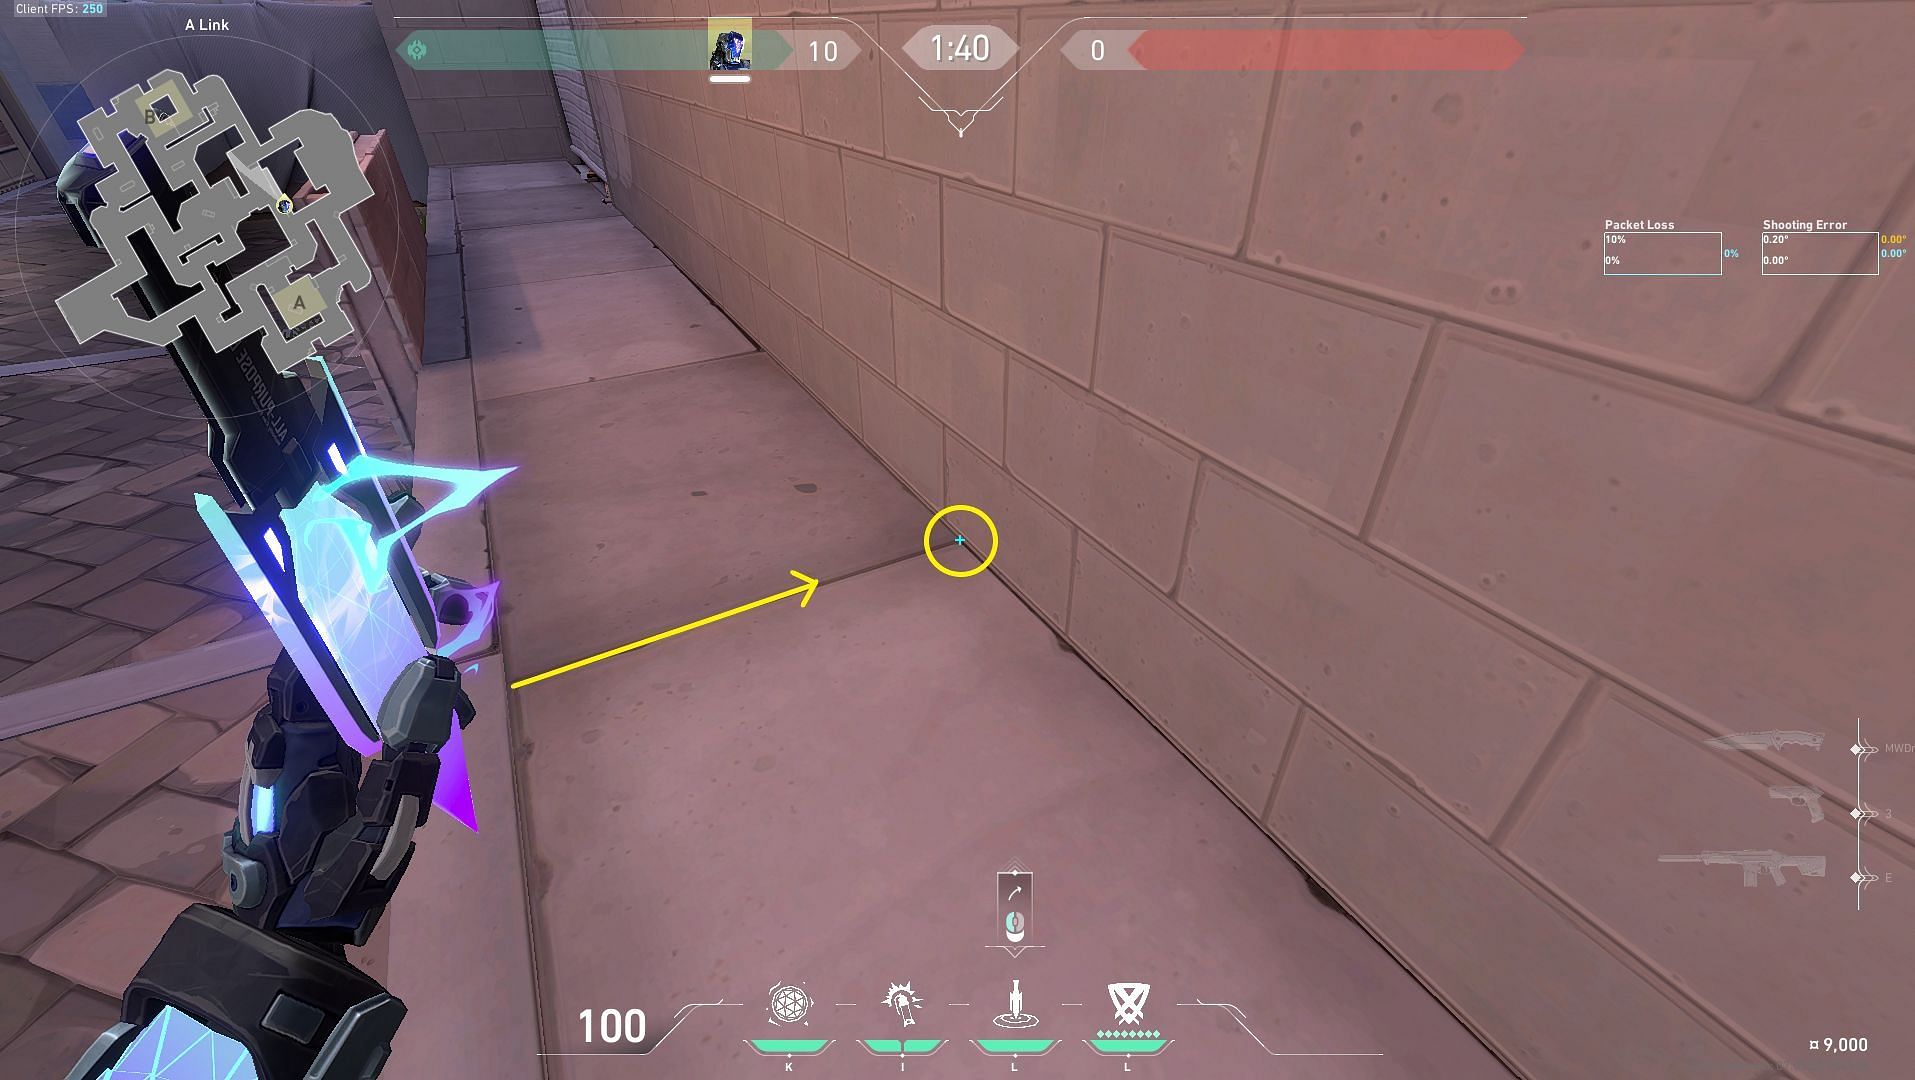
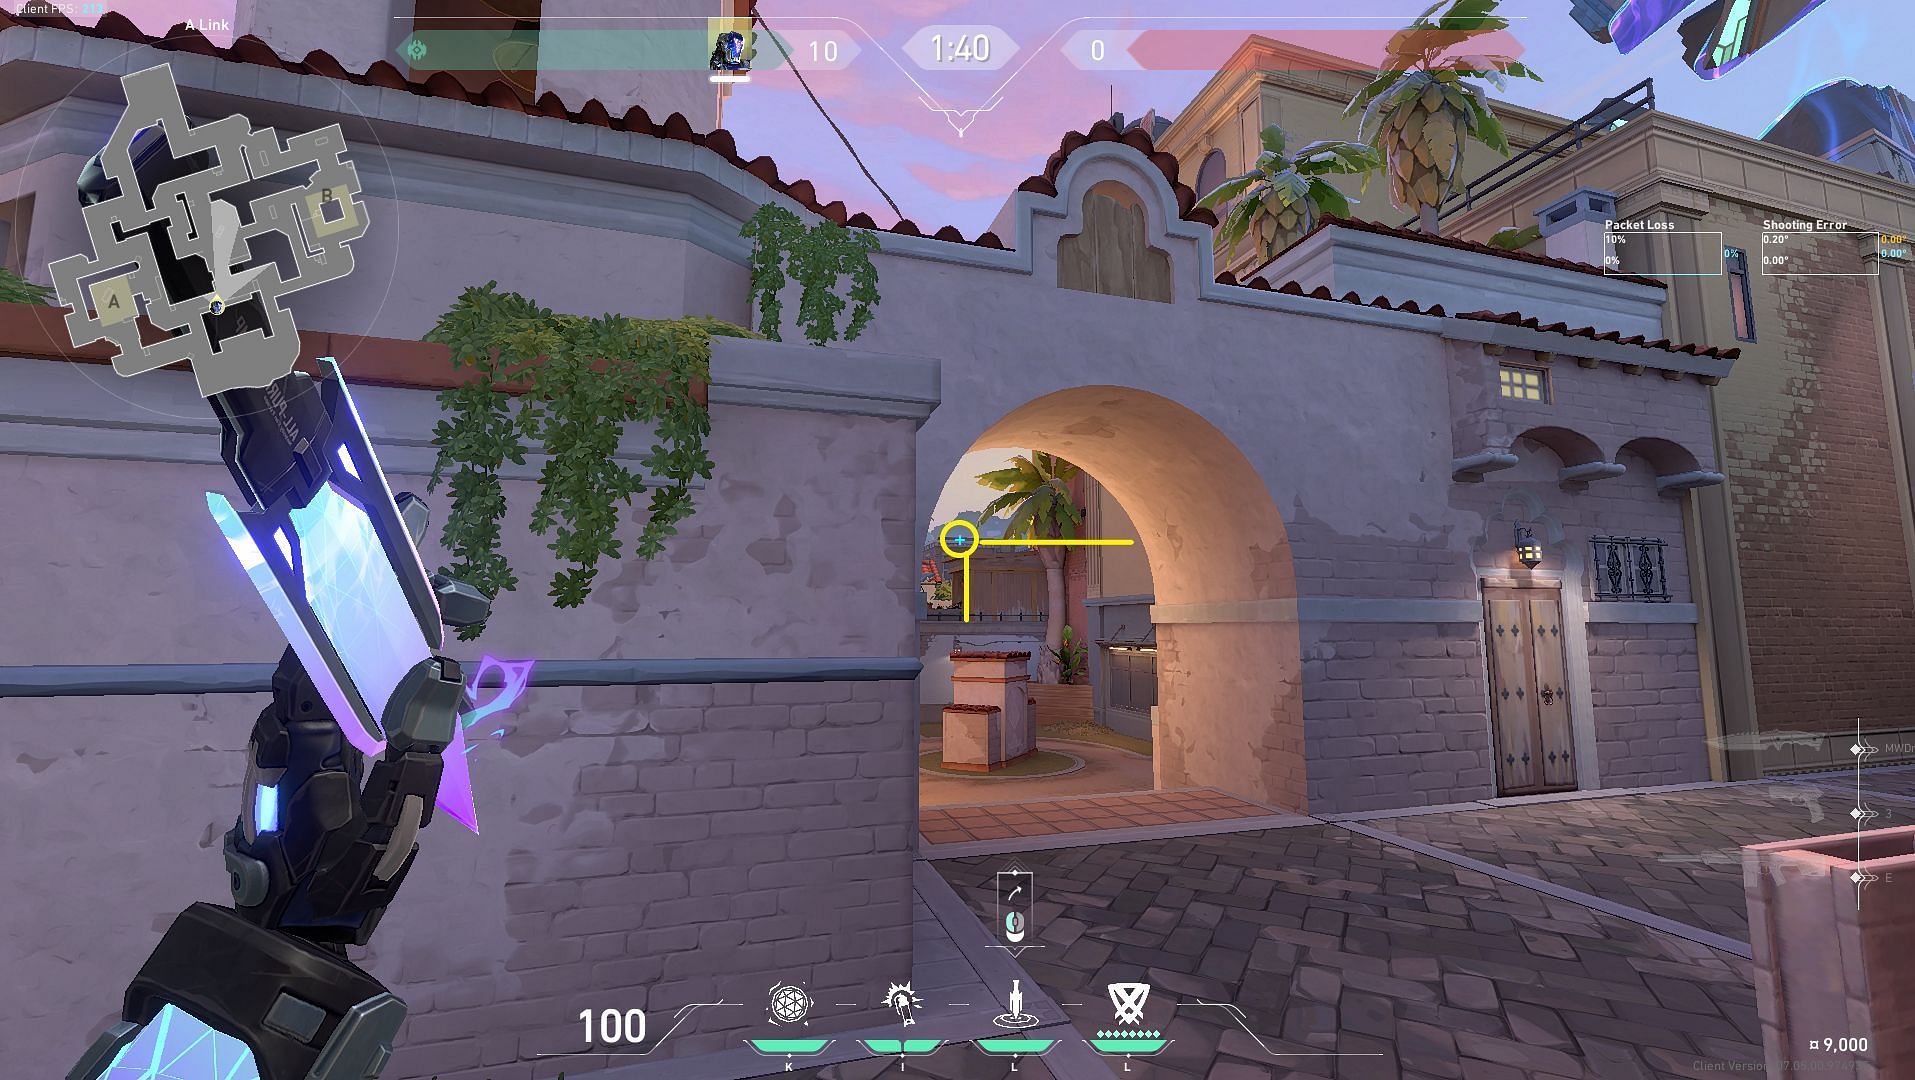
6) A Link
This unbreakable Zero/Point knife will land inside an inaccessible part of the map beside A Link, suppressing defenders in the detection radius covering A Link, A Link drop, and the left side of Top Mid.
Stand directly on top of the highlighted section of the grill in A Lobby.
Line up the Zero/Point ability HUD with the blue flag, and as soon as the barriers in Valorant lower at the start of the round, use the left mouse button to toss your knife.
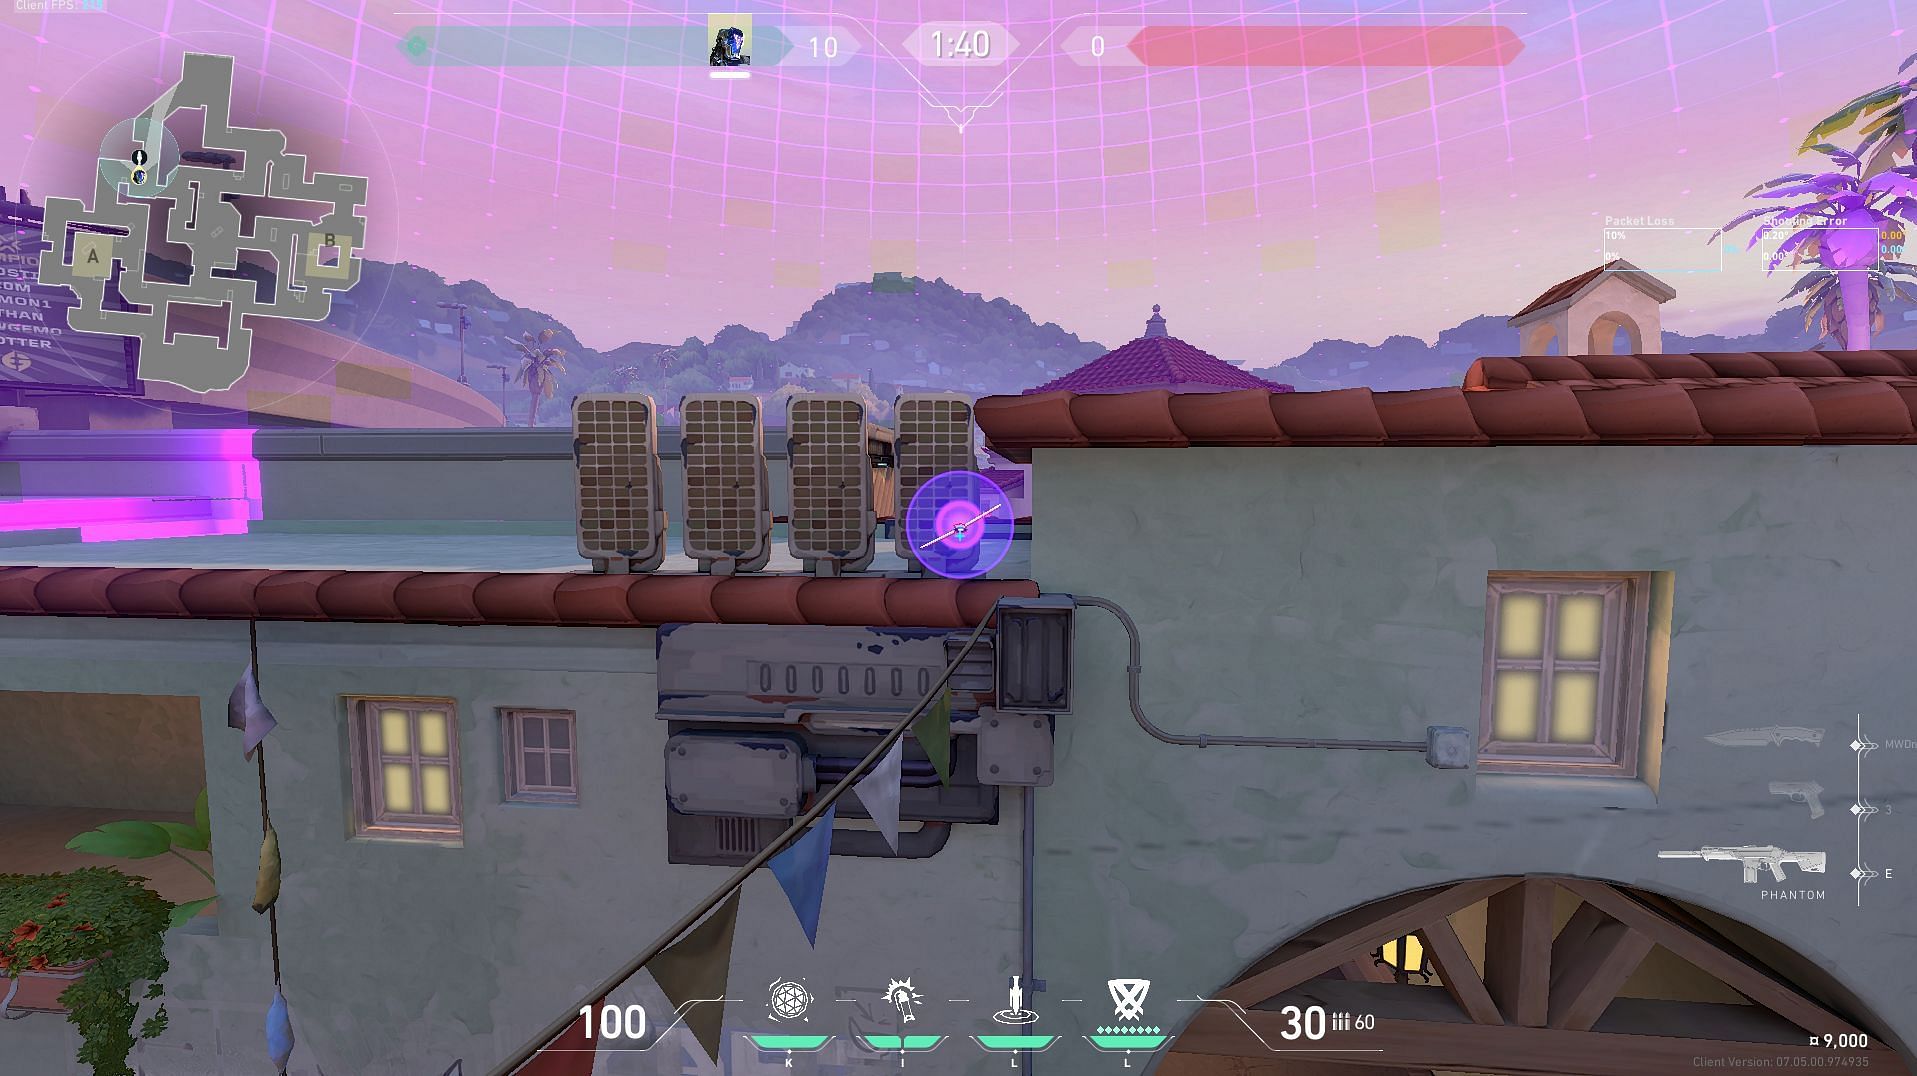
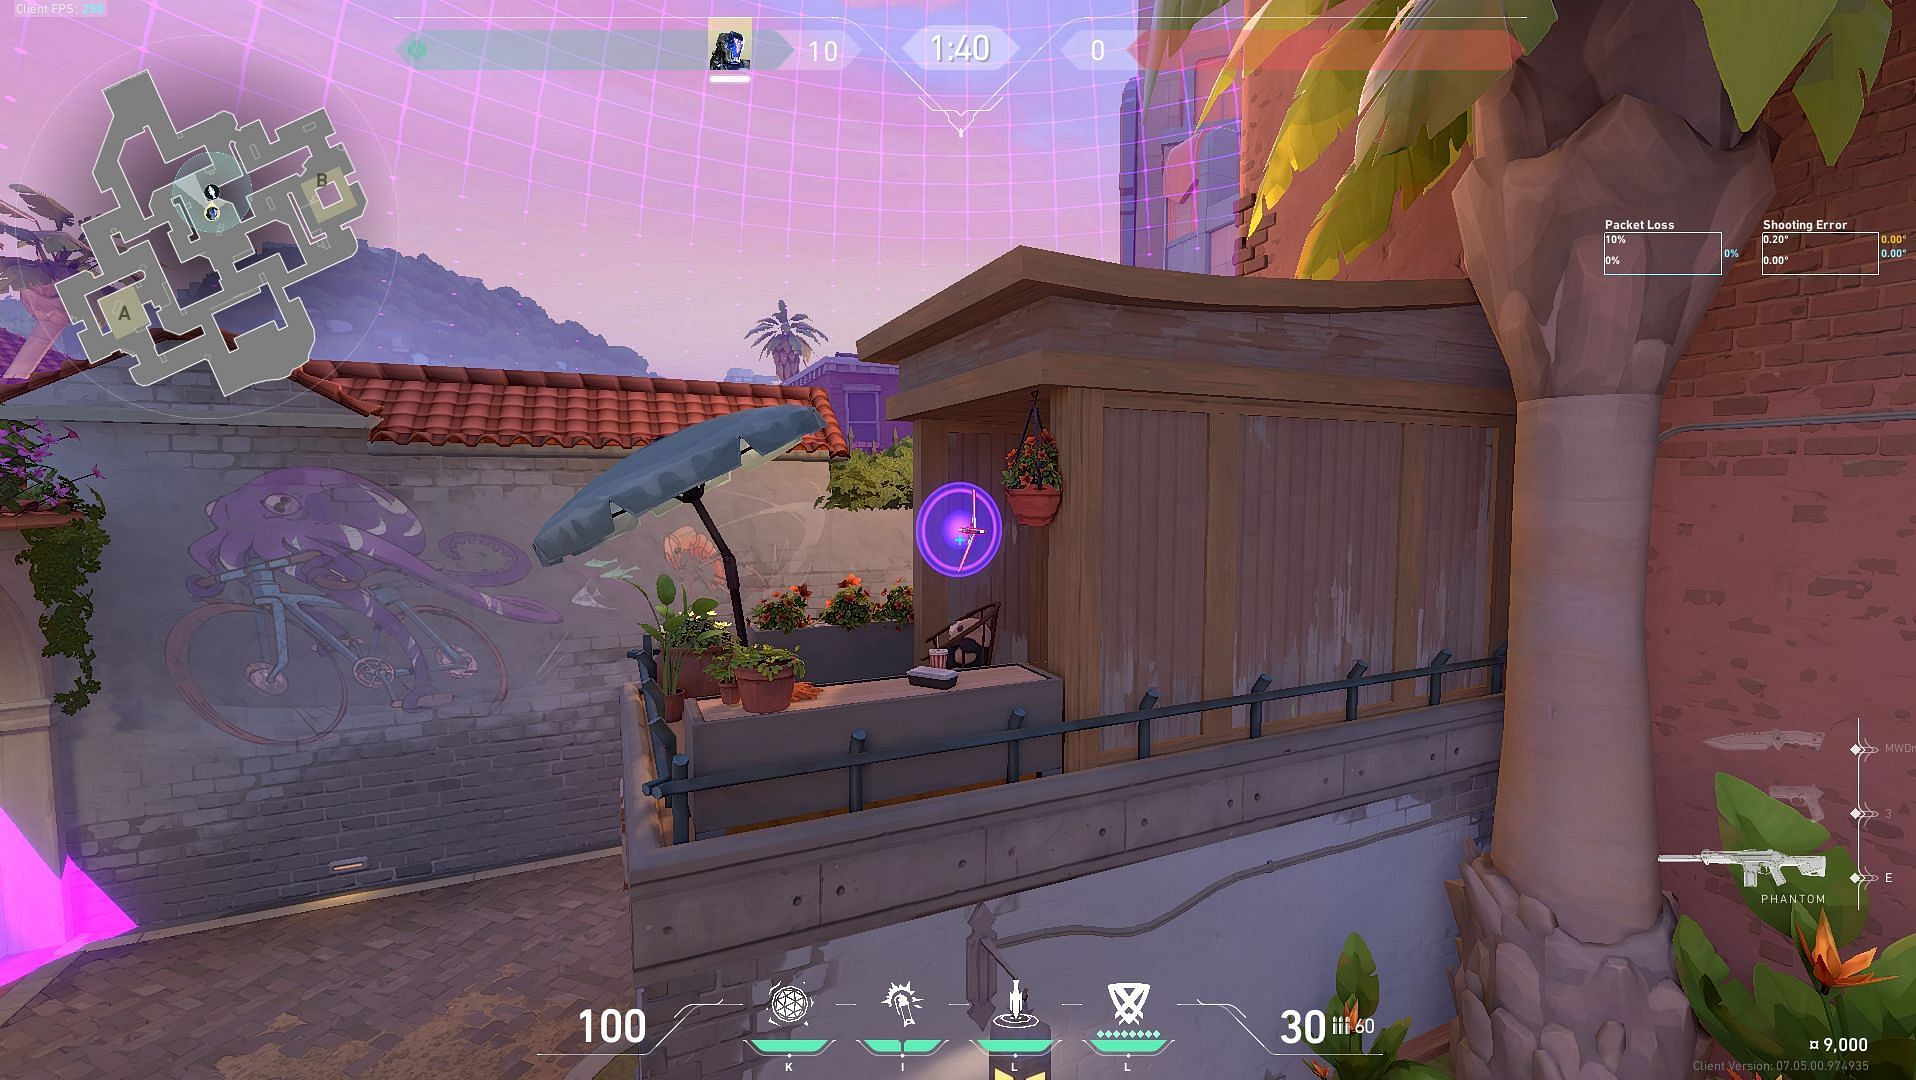
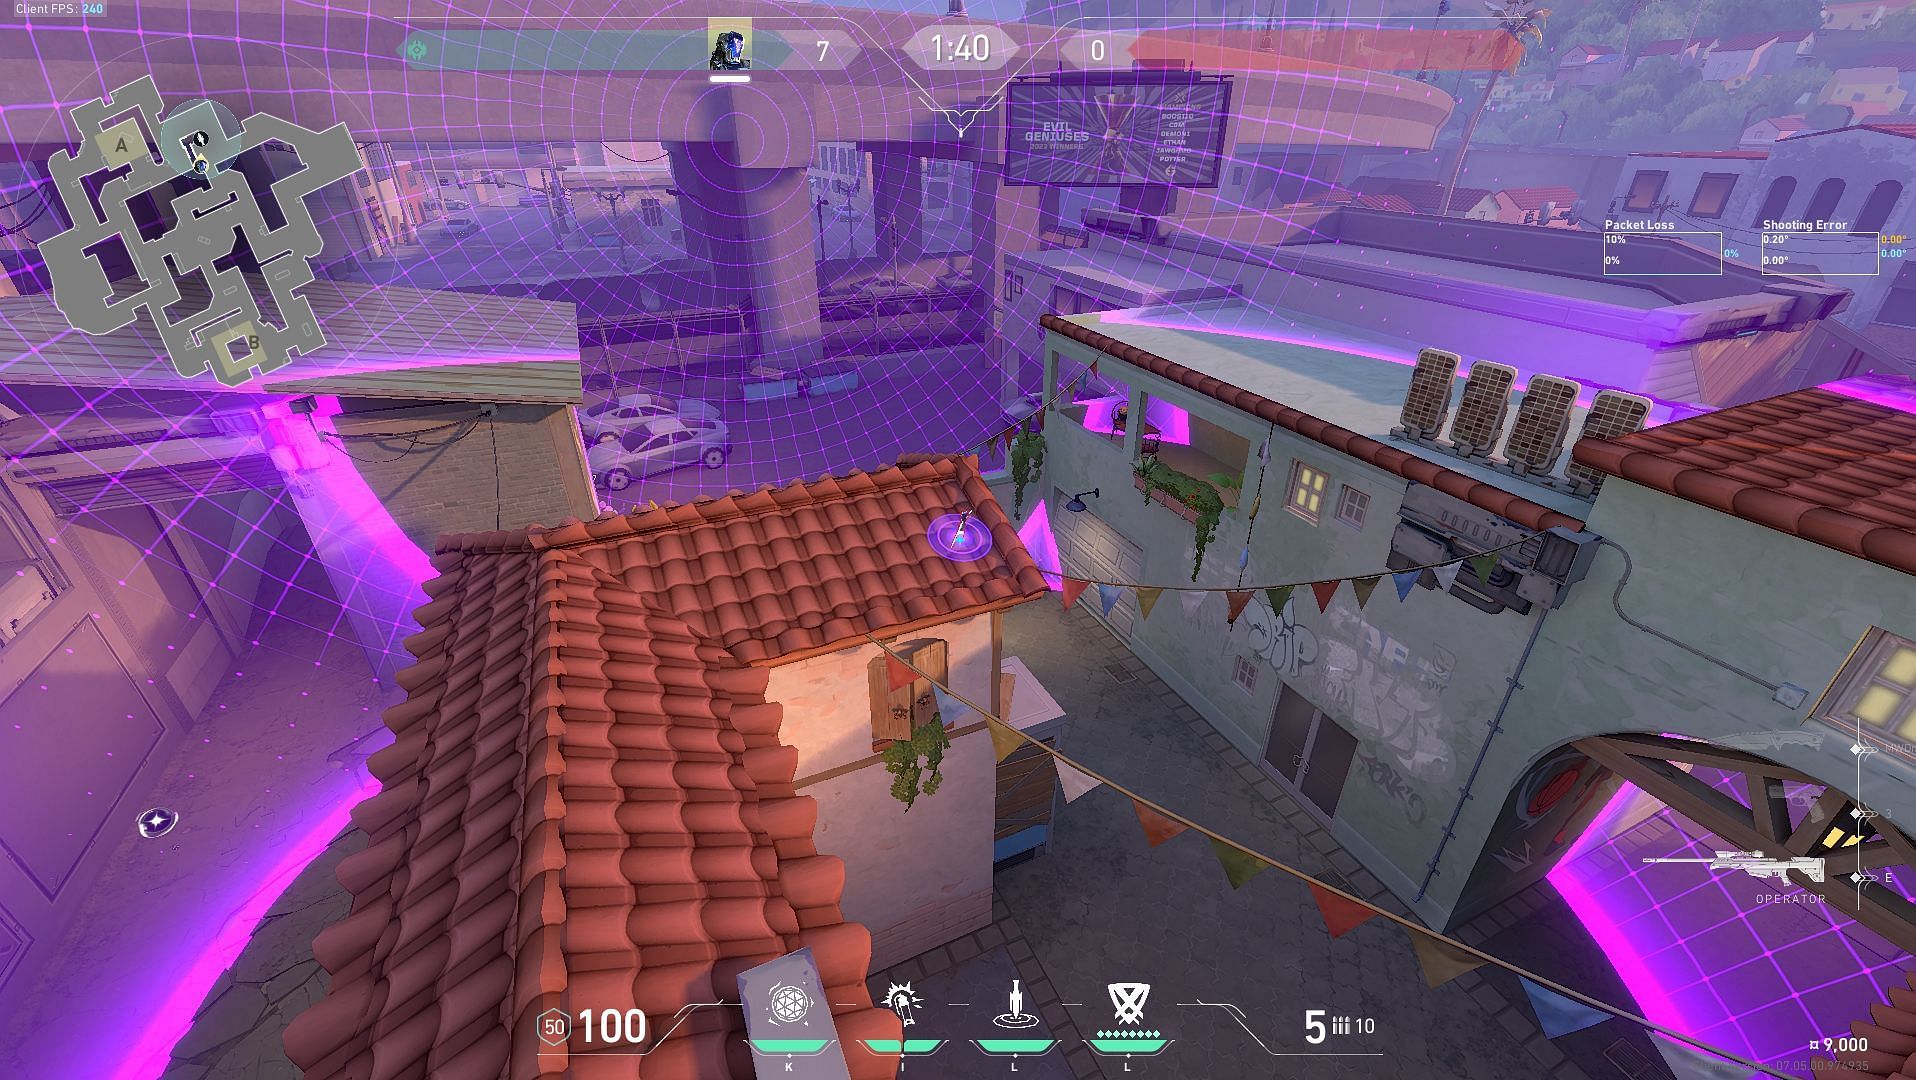
7) A Elbow
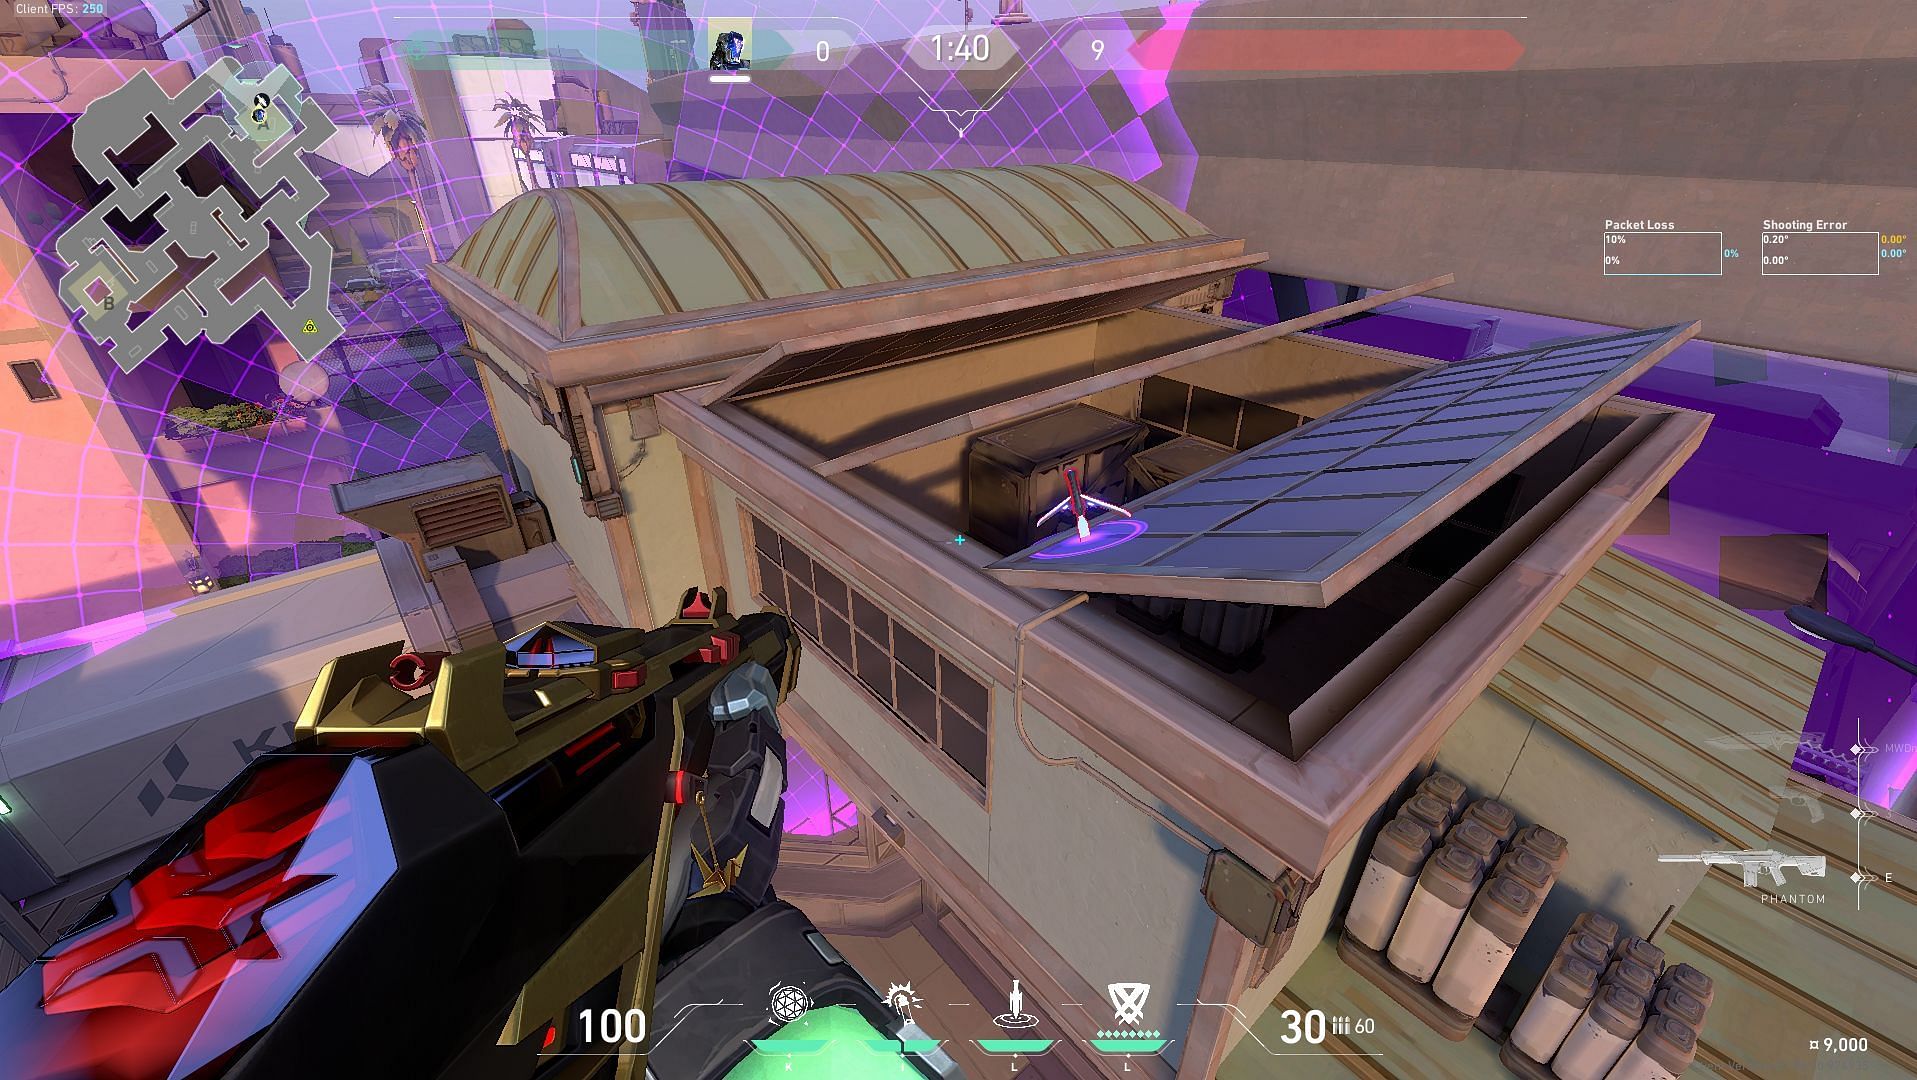
This Zero/Point knife will land on top of the solar panel above A Elbow, making it hard to destroy. This will suppress defenders around A Elbow cubby and the back site of A.
Stand directly on the top left corner of the grill in A Lobby, as shown in the image above.
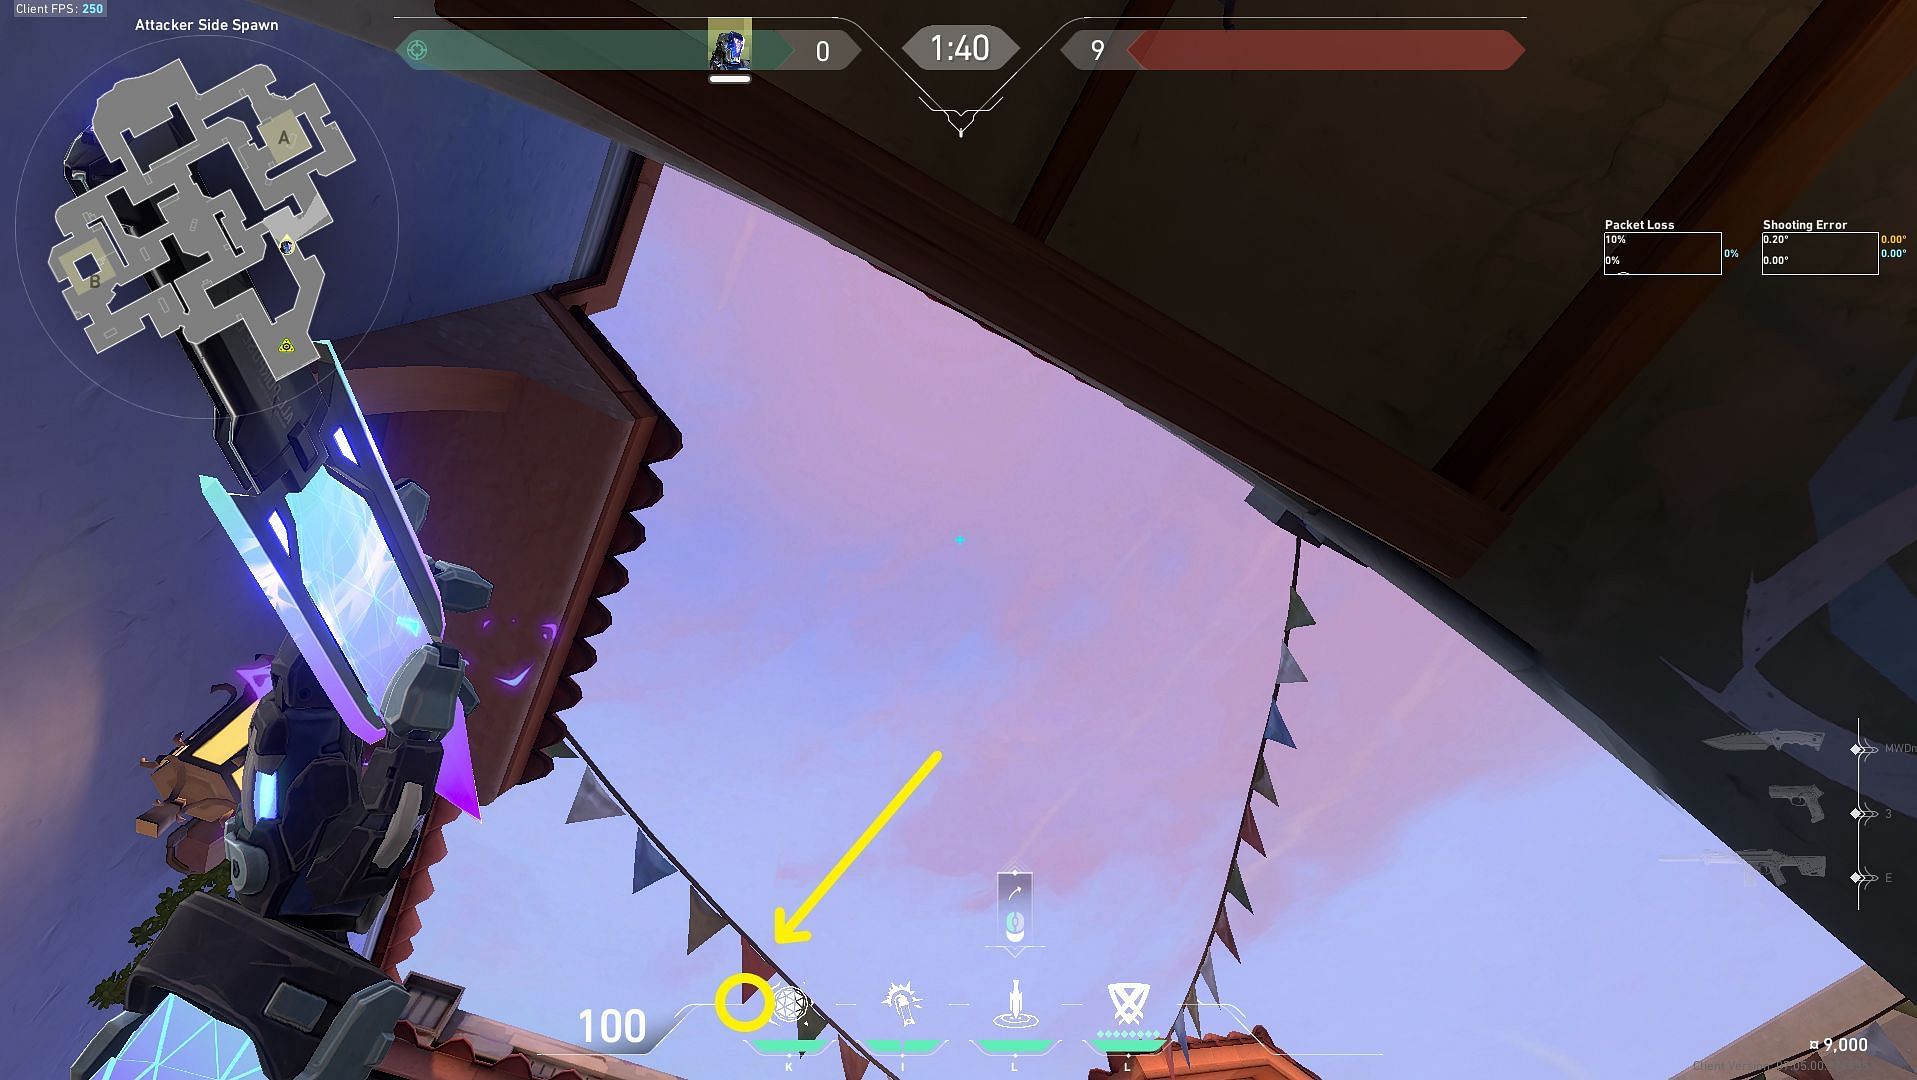
Now, facing towards the general area of the A Elbow side of the map, you have to drag your crosshair straight up till you can match the highlighted part of your HUD with the bottom vertex of the hanging red triangular flag. As soon as the barriers in Valorant lower at the start of the round, use the left mouse button to toss your knife.
All essential Zero/Point lineups for defense on Sunset in Valorant
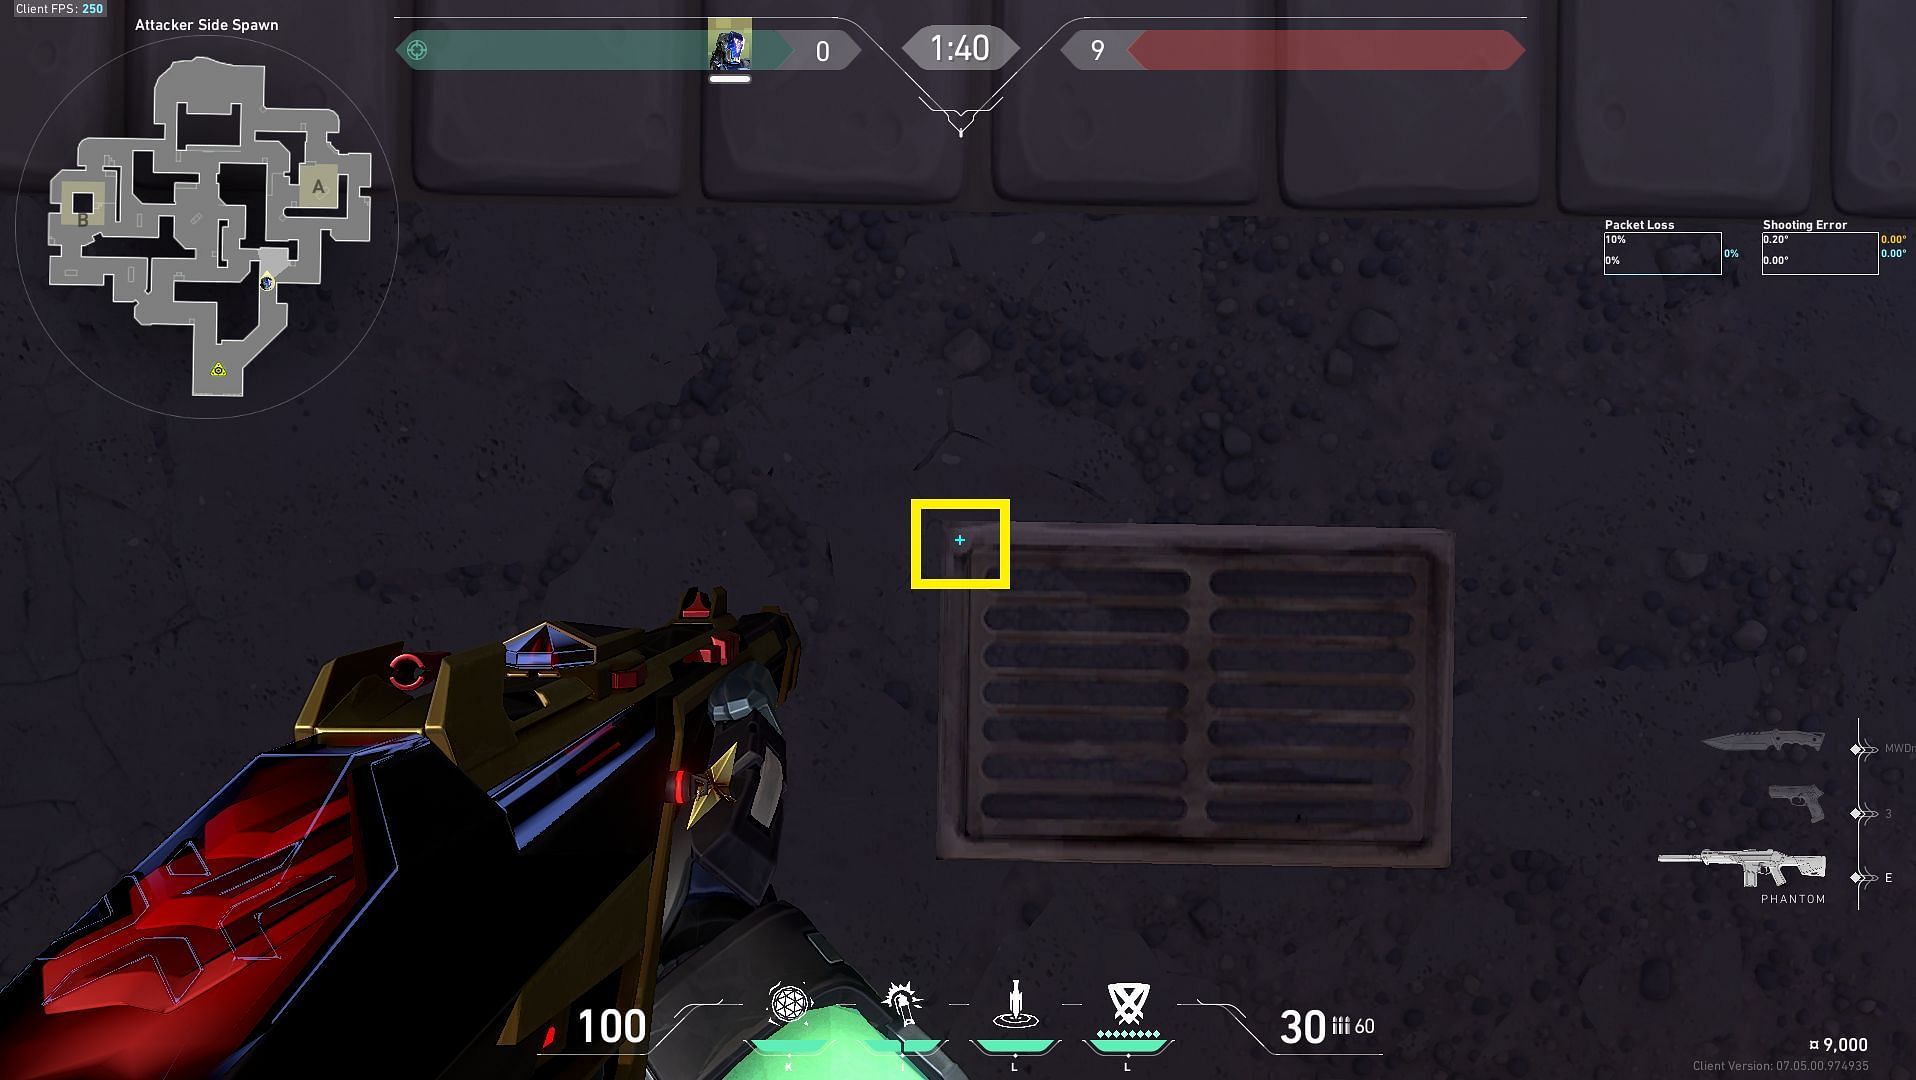
1) A Lobby from A Main
This Zero/Point knife will land instantly at metal panels on the roof directly above A lobby, making it hard to destroy for incoming attackers while detecting and suppressing those caught in its detection radius.
In the pre-round phase, place yourself into the highlighted corner in front of the A Main barrier, as shown in the image above.
Now, aim above the highlighted line while facing the arched opening on the A main wall and move your crosshair up until you reach the lighter part of the arch as highlighted in the image. As soon as the barriers in Valorant lower at the start of the round, use the left mouse button to toss your knife.
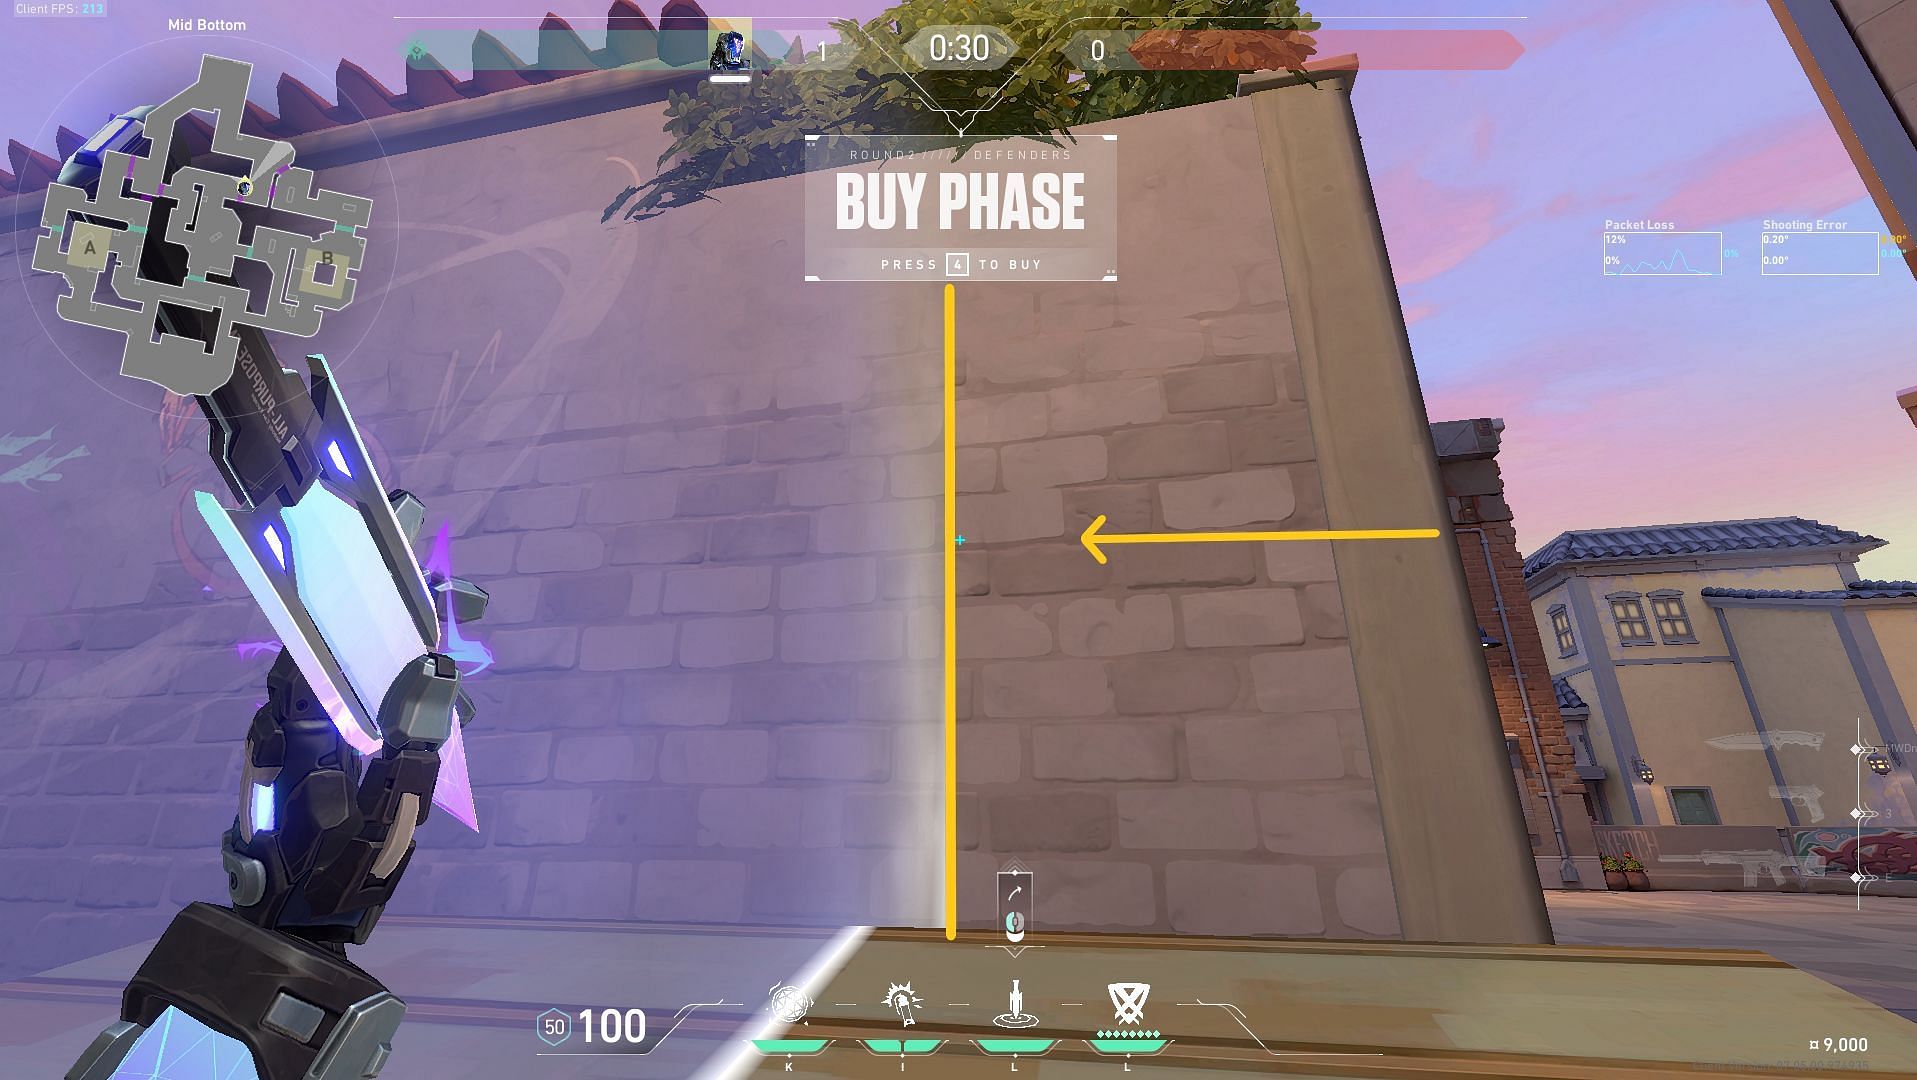
2) Bottom Mid
This Zero/Point knife will land instantly at the wooden wall above the Bottom Mid, making it hard to destroy for attackers peeking Middle Courtyard. Any attackers caught in its detection radius will be detected and suppressed.
Stand directly on the top of the circle highlighted on the pavement in front of Mid Top arch.
Aim your crosshair at the spot highlighted in this image (above the wooden shed on top of the Bottom Mid wall). As the barriers in Valorant lower at the start of the round, use the left mouse button to throw your knife.
3) B Lobby and Bottom Mid
This Zero/Point knife will land instantly at the wooden part of the B main window. It will detect attackers around Bottom Mid, B Main, B Lobby, and B Main and suppress the oncoming attacking force.
As the barriers in B site chokepoint drop down, get into the position highlighted in the image above.
Place your crosshair at the left side of the highlighted brown triangle in the grey marble lining on the B Main roof and throw the knife before the attackers make contact.
4) A Lobby from B Boba
This cross-map Zero/Point knife will land on top of A lobby roof. Those caught in the radius will be detected and suppressed.
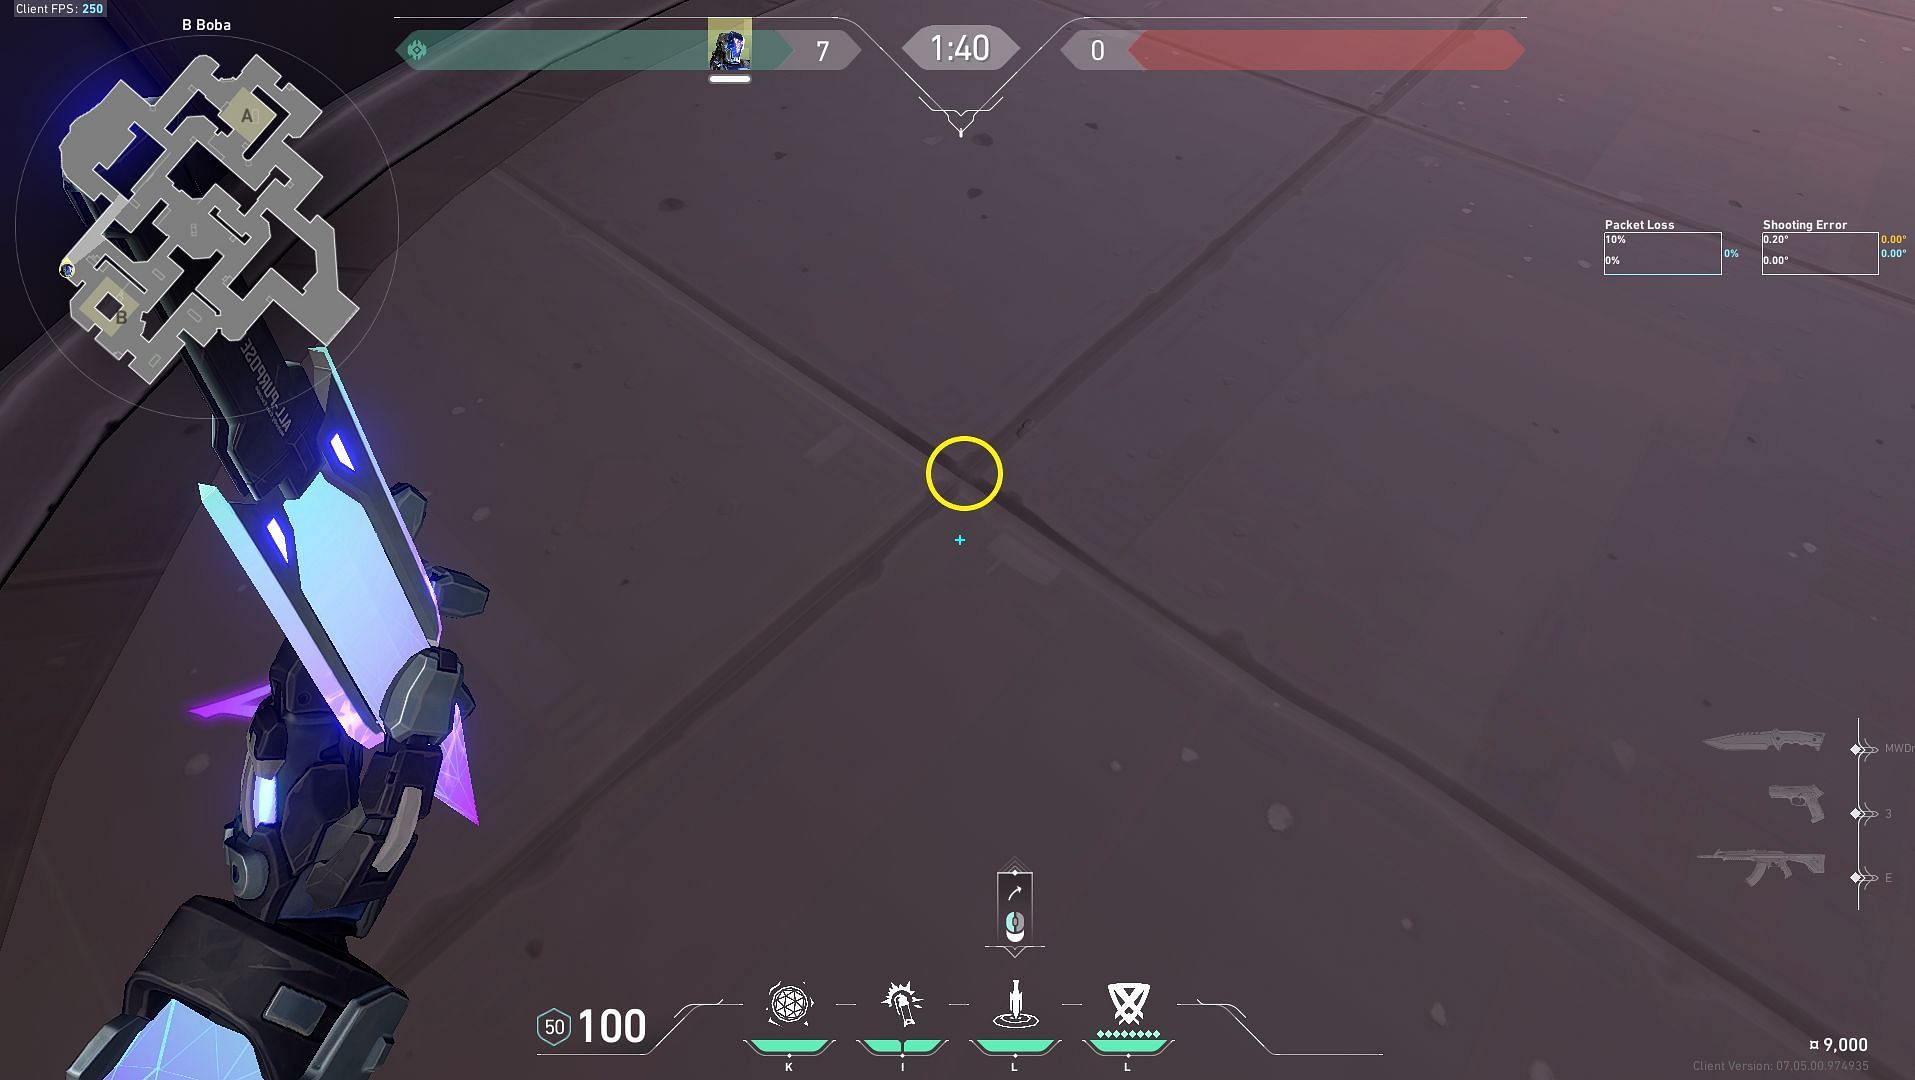
Stand directly on the top of the circle highlighted on the pavement in front of the curved black wall in B Boba.
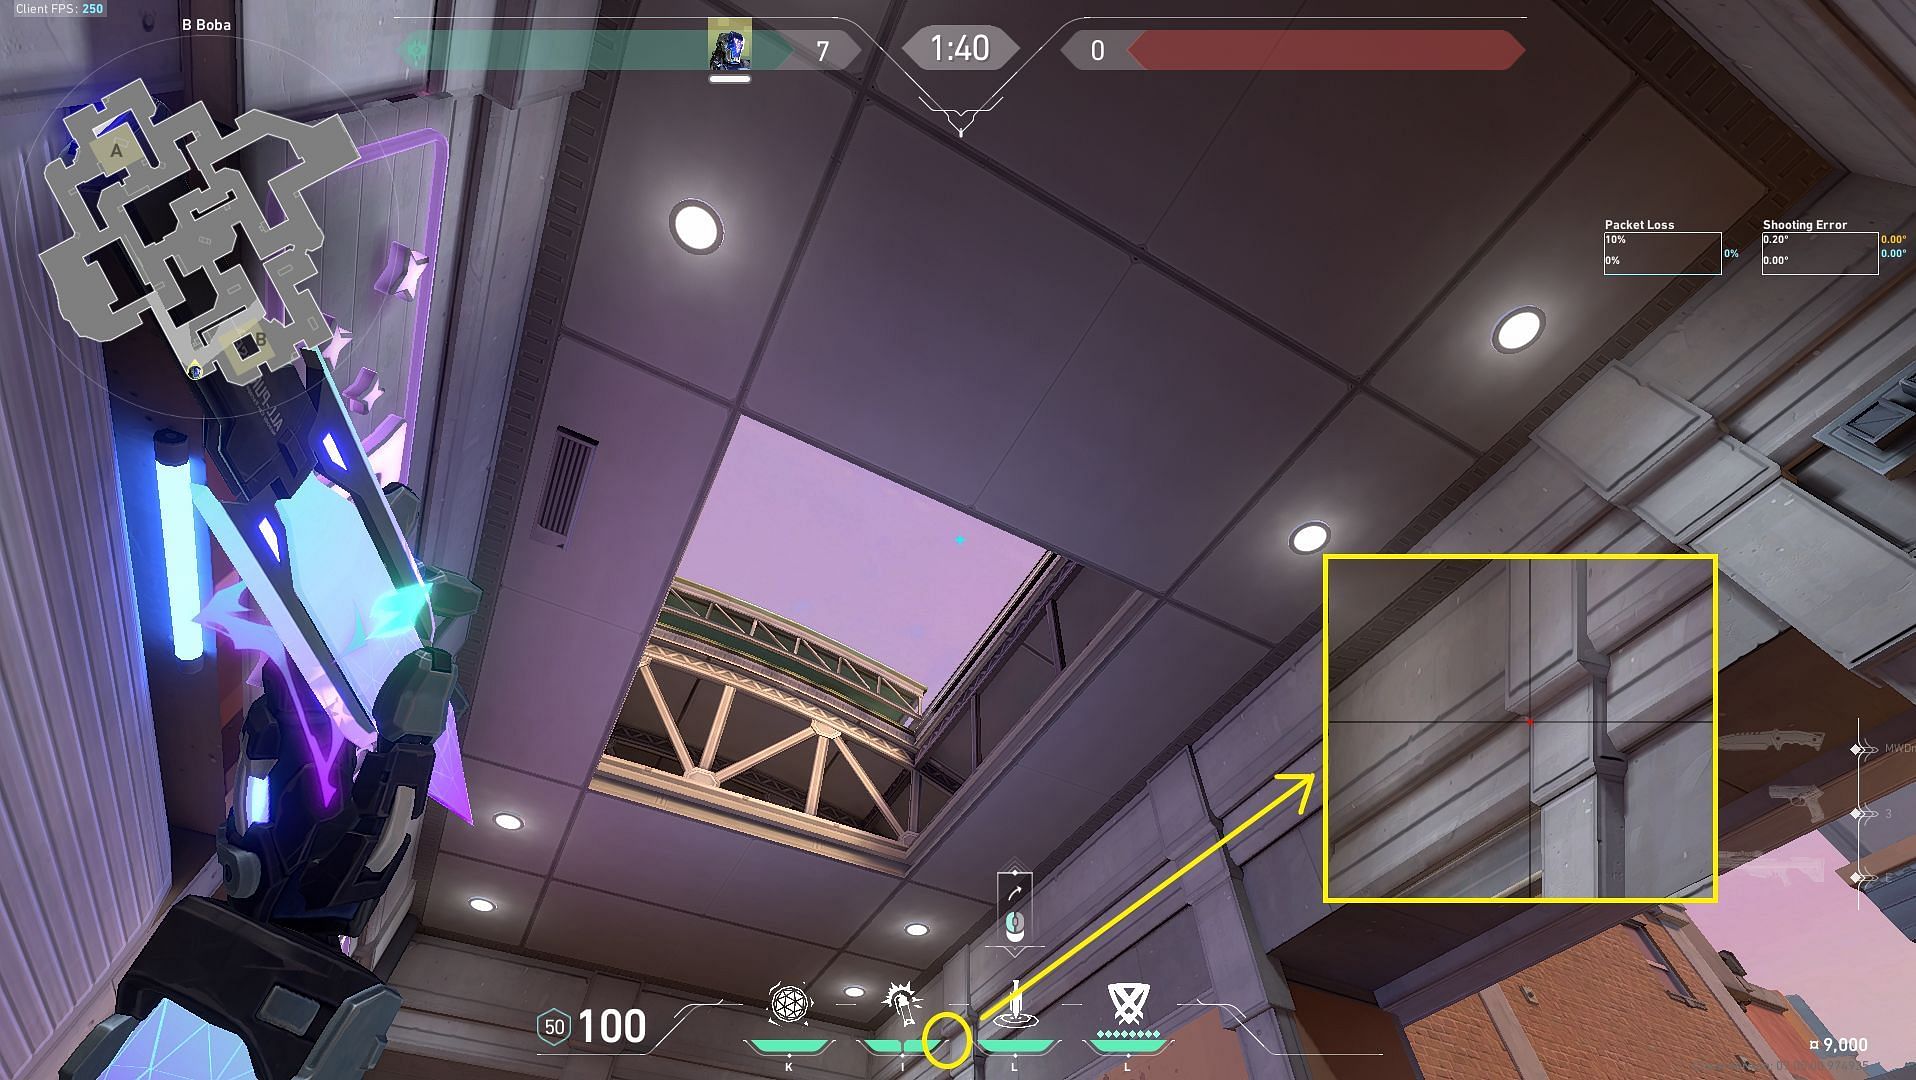
Now, facing towards the general area of the A side of the map, you have to drag your crosshair straight up until you can match the highlighted part of Flash/Drive HUD with the dark corner of the protrusion in the grey wall on the left. As soon as the barriers in Valorant lower at the start of the round, employ the left mouse button to toss your knife.
KAY/O truly shines in coordinated, teamplay-oriented gameplay. To improve as a KAY/O player, it's essential to effectively communicate your strategies and intentions to your teammates for devising and executing round-winning strategies that can lead your team to success.
Be sure to follow Sportskeeda for more recent updates and guides for Valorant's Sunset map.
