Many players are looking to equip an optimal Oryx loadout in Rainbow Six Siege to counter attackers wielding shields. With the launch of Operation Collision Point, Blackbeard has received a major change in his kit, which made him join the small roster of attackers that have access to bulletproof shields. The only hard counter to these shields is Oryx, who can knock down these attackers and make them vulnerable for a few moments.
Featuring a two-speed two-armor kit, Oryx has some of the finest weapons on defense, alongside a primary ability tailor-made to counter oppressive shields from attackers.
First released with Operation Void Edge back in Year 5 Season 1, Oryx accompanied Iana as the newest Operators for that season.
In this article, we will shed some light on the best Oryx loadout in Rainbow Six Siege and explore how players can utilize the character's kit to its fullest extent.
Looking for Crossword hints & solutions? Check out latest NYT Mini Crossword Answers, LA Times Crossword Answers, and Atlantic Crossword Answers
Note: Some aspects of this article are subjective and are based on the author's opinion.
Best Oryx loadout in Rainbow Six Siege for Operation Collision Point

In Rainbow Six Siege, Oryx is primarily a support Operator. He can assist his team with soft breaching capabilities and by countering shield Operators in the attacking lineup.
However, a passive ability available to Oryx makes him a flanker alongside his usual roles. This, combined with his two-speed movement modifier, can make him a strong roamer that attackers will have a challenge clearing out.
Also known as Saif Al Hadid, Oryx hails from Azraq, Jordan, and is a member of the Redhammer squad in Rainbow Six Siege. His primary ability is called Remah Dash, which allows him to dash through soft walls and knock down attackers without breaking a sweat. This is what hard counters shields in the game.
An interesting point to note is that after the new Blackbeard rework, Oryx was unable to knock him down if Blackbeard used his dash when he used his. This was identified as a bug and has been since fixed in the Y9S4.1 patch. Oryx can now knock down every shield Operator.
Primary weapon choices for the best Oryx loadout in Rainbow Six Siege

Oryx can bring one of the R6 community's most picked SMGs in his primary slot. The T5 SMG features a high 900 rpm fire rate and comes with a 30+1 round magazine. Capable of dealing 28 damage per bullet, it is a menacing weapon on defense and can obliterate an entire team in the right hands.
Although there isn't an obvious downside to the T5 SMG, players might find themselves without any ammunition if they keep on pre-firing several angles. This is largely due to the weapon's high fire rate.
However, thanks to the T5 SMG's low time to kill (TTK), it is always the preferred primary weapon in an Oryx loadout in Rainbow Six Siege.
Also read: Best Iana loadout in Rainbow Six Siege

The other primary weapon available to Oryx is the Spas-12 Shotgun. It is one of the worst weapons both in its category and overall in the entire game. The slow fire rate makes it risky to utilize in close-quarter battle (CQB), and having only a seven-round magazine with a high reload time makes it an option that players always avoid using.
For point-black-range gunfights, the T5 or the Bailiff secondary shotgun is a much safer option, thanks to its practical reliability.
Secondary weapon choices for the best Oryx loadout in Rainbow Six Siege
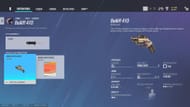
Of the two secondary weapons available in an Oryx loadout in Rainbow Six Siege, the Bailiff 410 secondary shotgun is a clear choice, thanks to its soft beaching capabilities.
This weapon allows Oryx players to assist the team with objective site setup without having to use his Remah Dash. It can also hit like a truck in point black range, making it an obvious choice for players.
Also read: Rainbow Six Siege Ghost in the Shell collab
Secondary gadget choices for the best Oryx loadout in Rainbow Six Siege
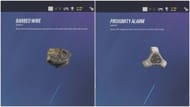
Players can choose to equip either the Barbed wires or Proximity mines in an Oryx loadout in Rainbow Six Siege. Both offer intel on an attacker's whereabouts and are beneficial to the entire team.
The barbed wire is helpful in stopping rushes due to its ability to slow down attackers. The Proximity mine, on the other hand, assists with audio feedback for when an attacker tries to sneak into areas that no defender is actively covering.
How to play Oryx in Rainbow Six Siege
Although Oryx is primarily played to hard-counter shields in the attacking lineup, there is a passive ability available to the defender that makes him an agile roamer.
Oryx can climb up from hatches and quickly traverse floors vertically. This makes him a lethal flanker when taking his T5 SMG primary into account.
When the preparation phase starts, you must assist your team by helping make rotations, lines of sight, or footholes wherever necessary for the objective site. After all this is done, go through default defender cams to get an idea of what attackers are present during a round and position yourself accordingly.
Also read: Rainbow Six Siege Maestro Elite Set
In case attackers are bringing shields, coordinate with your team to counter them with your Remah dashes so that your teammates are there to assist you in taking down those oppressive attackers or trade you if things take a wrong turn.
Additionally, in case there are no shields present in the attacking lineup, utilize your secondary shotgun and passive ability to relocate and lurk close to where the attackers can be disrupted.
Always remember that when you are roaming as Oryx, or any other defender for that matter, time is your greatest friend. Wasting time for the attackers is more beneficial than killing one opponent and dying early.
For more news on Rainbow Six Siege, follow Sportskeeda:
- New Reputation System in Rainbow Six Siege Y9S4
- What is phantom player balancing in Rainbow Six Siege Operation Collision Point?
- How to enable PC-console crossplay in Rainbow Six Siege
Are you stuck on today's Wordle? Our Wordle Solver will help you find the answer.
