

'%20x='0'%20y='0'%20height='100%25'%20width='100%25'%20%0A%20%20%20%20%20%20%20%20%20%20xlink%3Ahref='data:image/jpg;base64,/9j/2wBDAAYEBQYFBAYGBQYHBwYIChAKCgkJChQODwwQFxQYGBcUFhYaHSUfGhsjHBYWICwgIyYnKSopGR8tMC0oMCUoKSj/2wBDAQcHBwoIChMKChMoGhYaKCgoKCgoKCgoKCgoKCgoKCgoKCgoKCgoKCgoKCgoKCgoKCgoKCgoKCgoKCgoKCgoKCj/wgARCAAGAAoDASIAAhEBAxEB/8QAFgABAQEAAAAAAAAAAAAAAAAAAAUH/8QAFAEBAAAAAAAAAAAAAAAAAAAABf/aAAwDAQACEAMQAAAAxyKHNf/EACIQAAEDBAAHAAAAAAAAAAAAAAECAwQABRExEhMVIVGB0f/aAAgBAQABPwBdta6PIjvNMmfzQEPpHvud6GKVZpPEcrZ35Pyv/8QAFhEBAQEAAAAAAAAAAAAAAAAAAQIA/9oACAECAQE/AC6Df//EABkRAAEFAAAAAAAAAAAAAAAAAAIAAQMSIf/aAAgBAwEBPwAoQs+L/9k='%3E%3C/image%3E%3C/svg%3E)
Photo Mode in Baldur's Gate 3 is one of the features Larian Studios added with the game's patch 8, which features a whopping 48 pages of notes. This mechanic lets you snap any moment in-game with a robust suite of controls, allowing you to turn a gameplay moment into wallpaper or create intricate compositions.
This article guides you on the basics of Photo Mode in Baldur's Gate 3.
Everything to know about the Photo Mode in Baldur's Gate 3
How to open it

Looking for Crossword hints & solutions? Check out latest NYT Mini Crossword Answers, LA Times Crossword Answers, and Atlantic Crossword Answers
Accessing the Photo Mode in Baldur's Gate 3 can be done at the press of a button. Press the following keybinds to access it:
- F9 on PC
- L3 + R3/LS + RS (Clicking both analog joysticks) on the controller
Aside from this, you can click the camera icon below the mini-map to open the titular mode.
Note that while the Photo Mode is fully operable during gameplay, the only elements you can control if you use it during cutscenes or dialogue scenes are post-processing effects, stickers, and frames.
Another important thing about the Photo Mode in Baldur's Gate 3 is that it also works for multiplayer and split-screen co-op, but only the host can use it, and it will pause the game for all the players.
How to control the camera
After accessing the Photo Mode in Baldur's Gate 3, your first step will be to put the camera in any position you like. To do that, you must understand how to control the camera. You can control it from the camera control HUD or use these keybinds to do that directly:
On PC:
- W, A, S, D: Move the camera
- Q, E: Rotate the camera
- Z, X: Raise/lower the camera (without tilting)
- P: Toggle show/hide Photo Mode HUD
- Space: Capture photo
On Consoles (for PlayStation and Xbox):
- Left Joystick: Move the camera
- Right Joystick: Rotate the camera
- L1 R1 or LB RB: Tilt the camera
- L1 R1 or LB RB (When controlling the camera): Raise or lower the camera without tilting it
- L2 or LT: Toggle show/hide Photo Mode HUD
- R2 or RT: Capture photo
- Triangle/Y: Switch to Camera/HUD
Note that for console players, the HUD is controlled by the same buttons as when you're controlling the camera, so use the Triangle on PS5 or Y on Xbox to switch between the camera and the HUD.
The Photo Mode also allows you to store a camera position, which gives you the freedom to experiment with different modes — if they don't work out, you can simply head back to the saved coordinates with the click of a button.
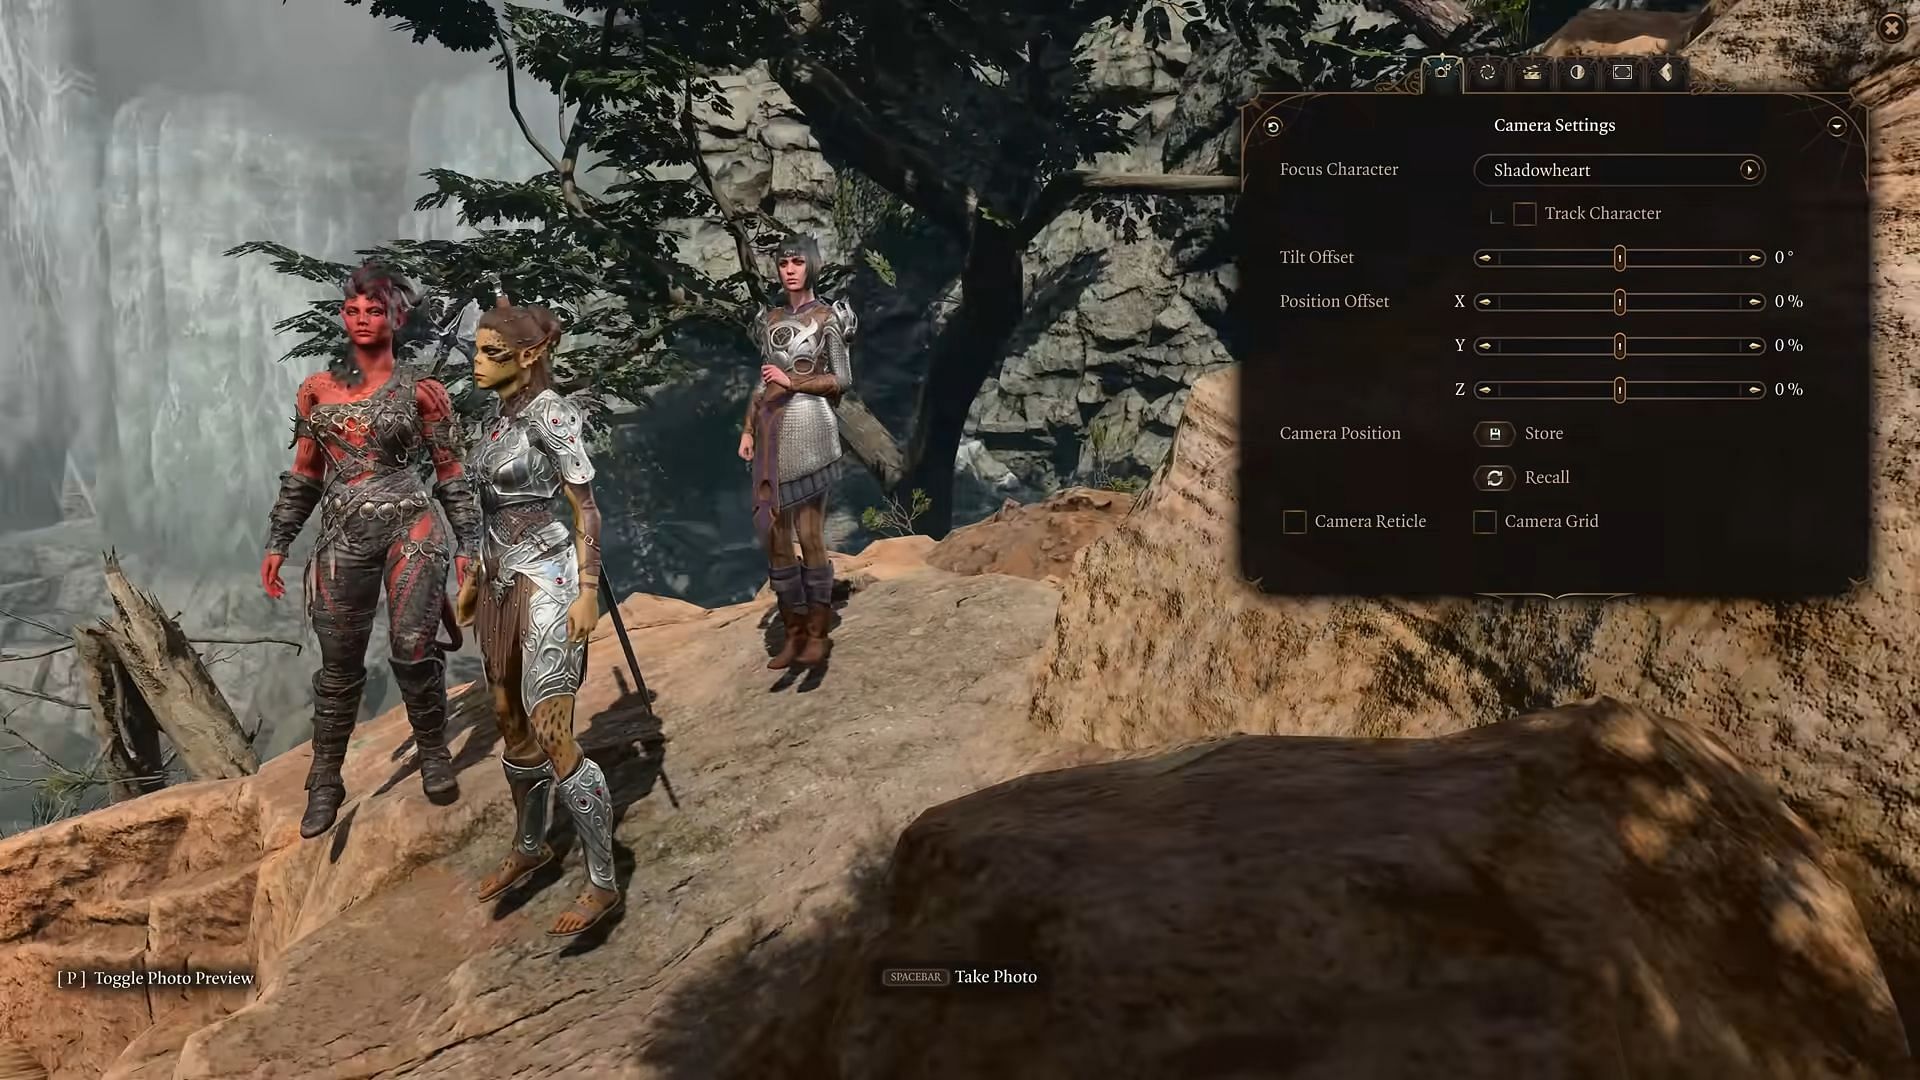
Camera settings
Here are all the camera settings found in the Photo Mode in Baldur's Gate 3:
- Focus Character
- Track Character
- Tilt Offset
- Position Offset X
- Position Offset Y
- Position Offset Z
- Camera Reticle
- Camera Grid
These settings provide fine control over the camera, such as which character it should keep as the central focus, if it should follow a character, how much it should tilt, etc.
Lens options

The Lens Settings tab in the Photo Mode in Baldur's Gate 3 will give you control over these aspects of the photo:
- Field of View: How much of the location is captured in the camera.
- Exposure: How bright or dark the image is.
- Depth of Field: Whether objects extremely close or extremely far away from the camera appear blurry, simulating human vision.
- Focus Mode: If you want manual control over the camera focus or not.
- Focus Character: Which character should appear the sharpest in the camera.
- Strength: The intensity of blur (images not in focus).
- Distance: How far away or close the plane of focus (the area that appears the sharpest in the image) should be from the camera.
Character Settings

An impressive feature of the Photo Mode in Baldur's Gate 3 is how you can adjust the actions and emotions of your party members to suit the image. Head over to the "Character Settings" tab to access these features. The first thing you can adjust is the visibility of different characters in the scene. You can choose which of the following characters are visible in the photo:
- Playable Character
- Party
- NPCs
- Enemies
Next up, choose any of the party members/playable characters on screen to apply the given setting below to. These affect the posture and expressions. They are:
- Expressions: You can select from a wide range of expressions the selected character will express. You can also control whether they look at the camera.
- Pose: Larian Studios has created over 40 base poses to select from, with many of them having variations.
- Placement: You can control where each character is placed with all three axes having their individual sliders.
- Rotation: You can rotate the selected member clockwise or counter-clockwise.
The last list settings will allow you to toggle their visibility alongside different quality-of-life cosmetic choices:
- Show/hide Character
- Show/hide Battle Damage
- Show/hide Helmet
- Show/hide Weapons
- Change to/Not change to Camp Clothes
Also check out: Baldur's Gate 3: All newly added subclasses explained
Post Processing Effects
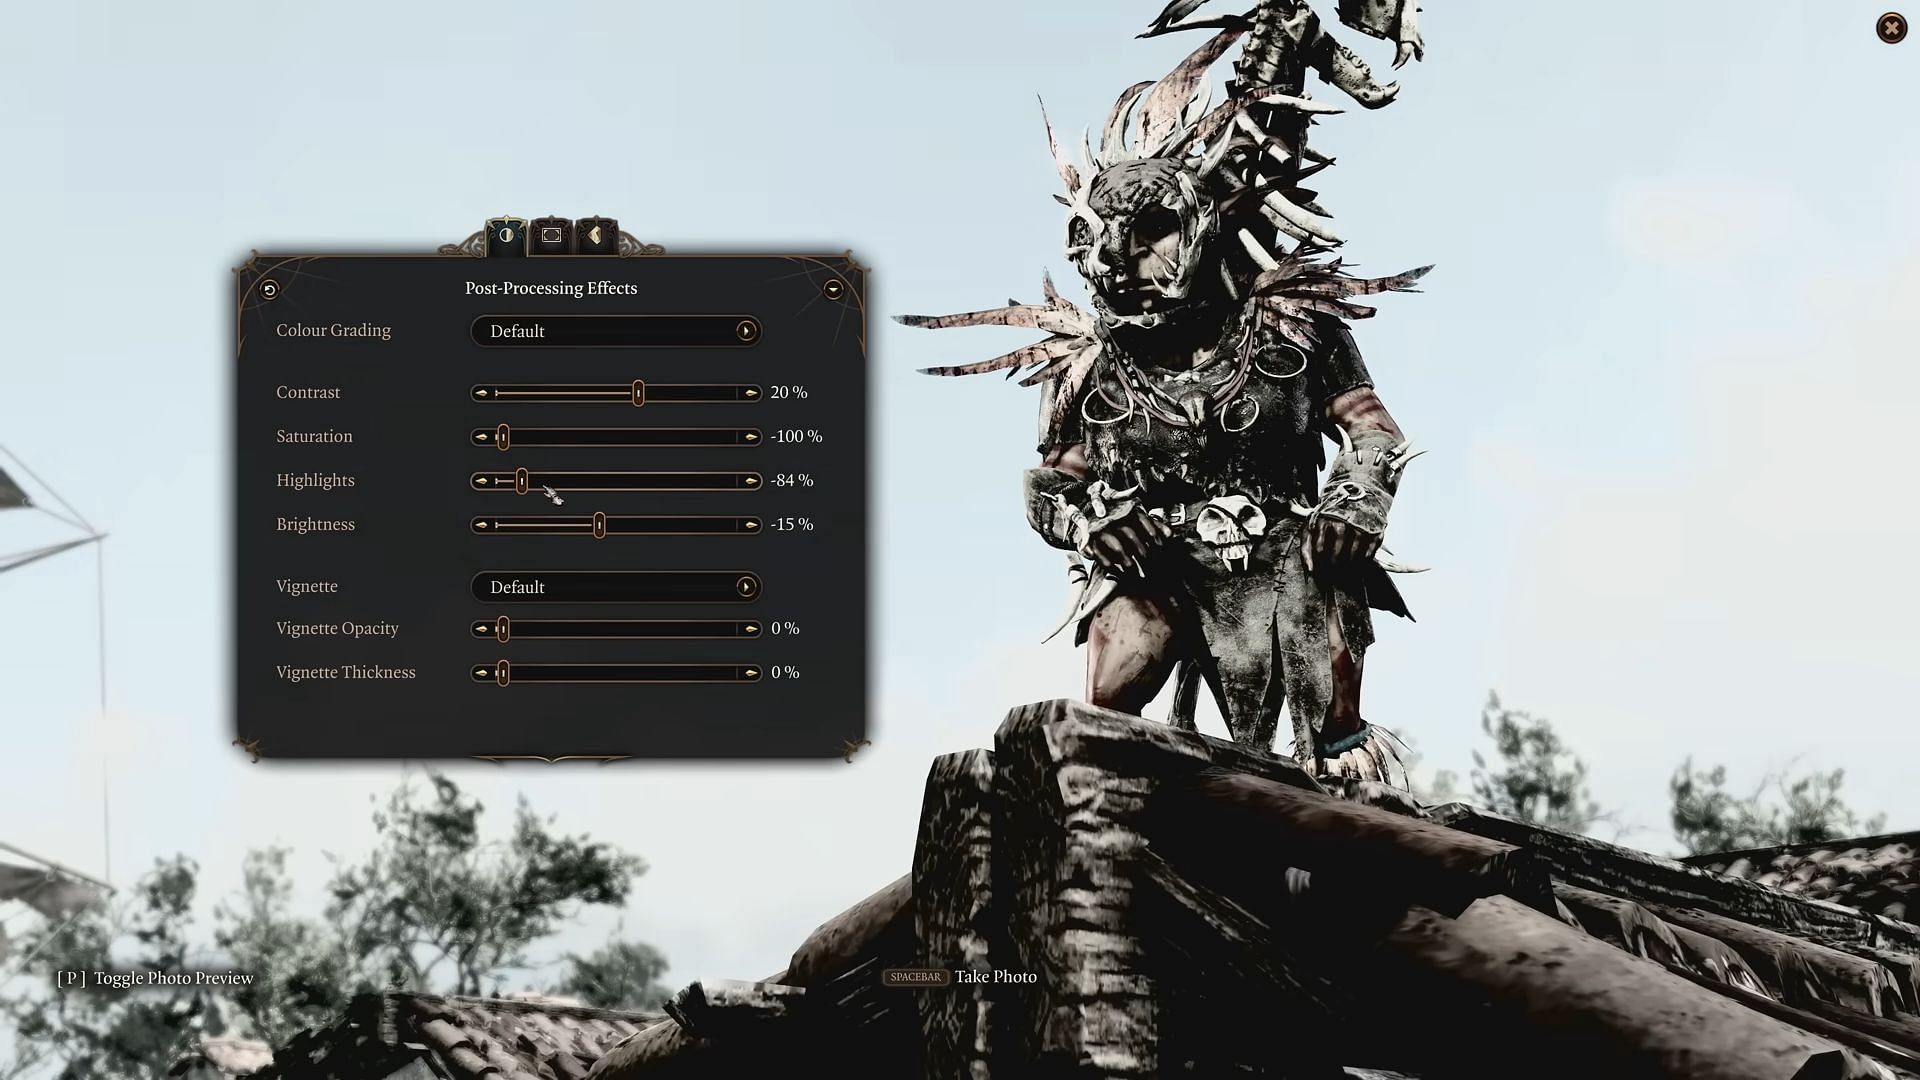
Here are all the Post Processing effects you can apply in the Photo Mode in Baldur's Gate 3:
- Color Grading: Allows you to use any one of the preset filters to change photo aesthetic
- Contrast: Change the difference between light and dark areas of the image
- Saturation: The intensity/vividness of color
- Highlights: The intensity of the image's brightest areas
- Brightness: The overall lightness of the image
- Vignette: Add one of the preset light/dark fade circular borders around the image corners
- Vignette Opacity: Visibility of the selected Vignette
- Vignette Thickness: Width of the selected VIgnette
Frames, Bars, and Stickers

You can also add different frames or cinematic black bars to the image in the Photo Mode in Baldur's Gate 3.
Frames
You can choose from a set collection of in-game preset frames to add to an image. You can also control its opacity.
Bars
You can add vertical or horizontal bars on either two edges to create a more cinematic look. Furthermore, you can control its width/height and opacity.
Stickers
You can also insert up to 30 stickers (although only from the in-game presets as of this writing). These also have a robust suite of control options, namely:
- X-Axis position
- Y-Axis position
- Size
- Rotation
- Opacity
- Mirror X
- Mirror Y
Where are the images saved?
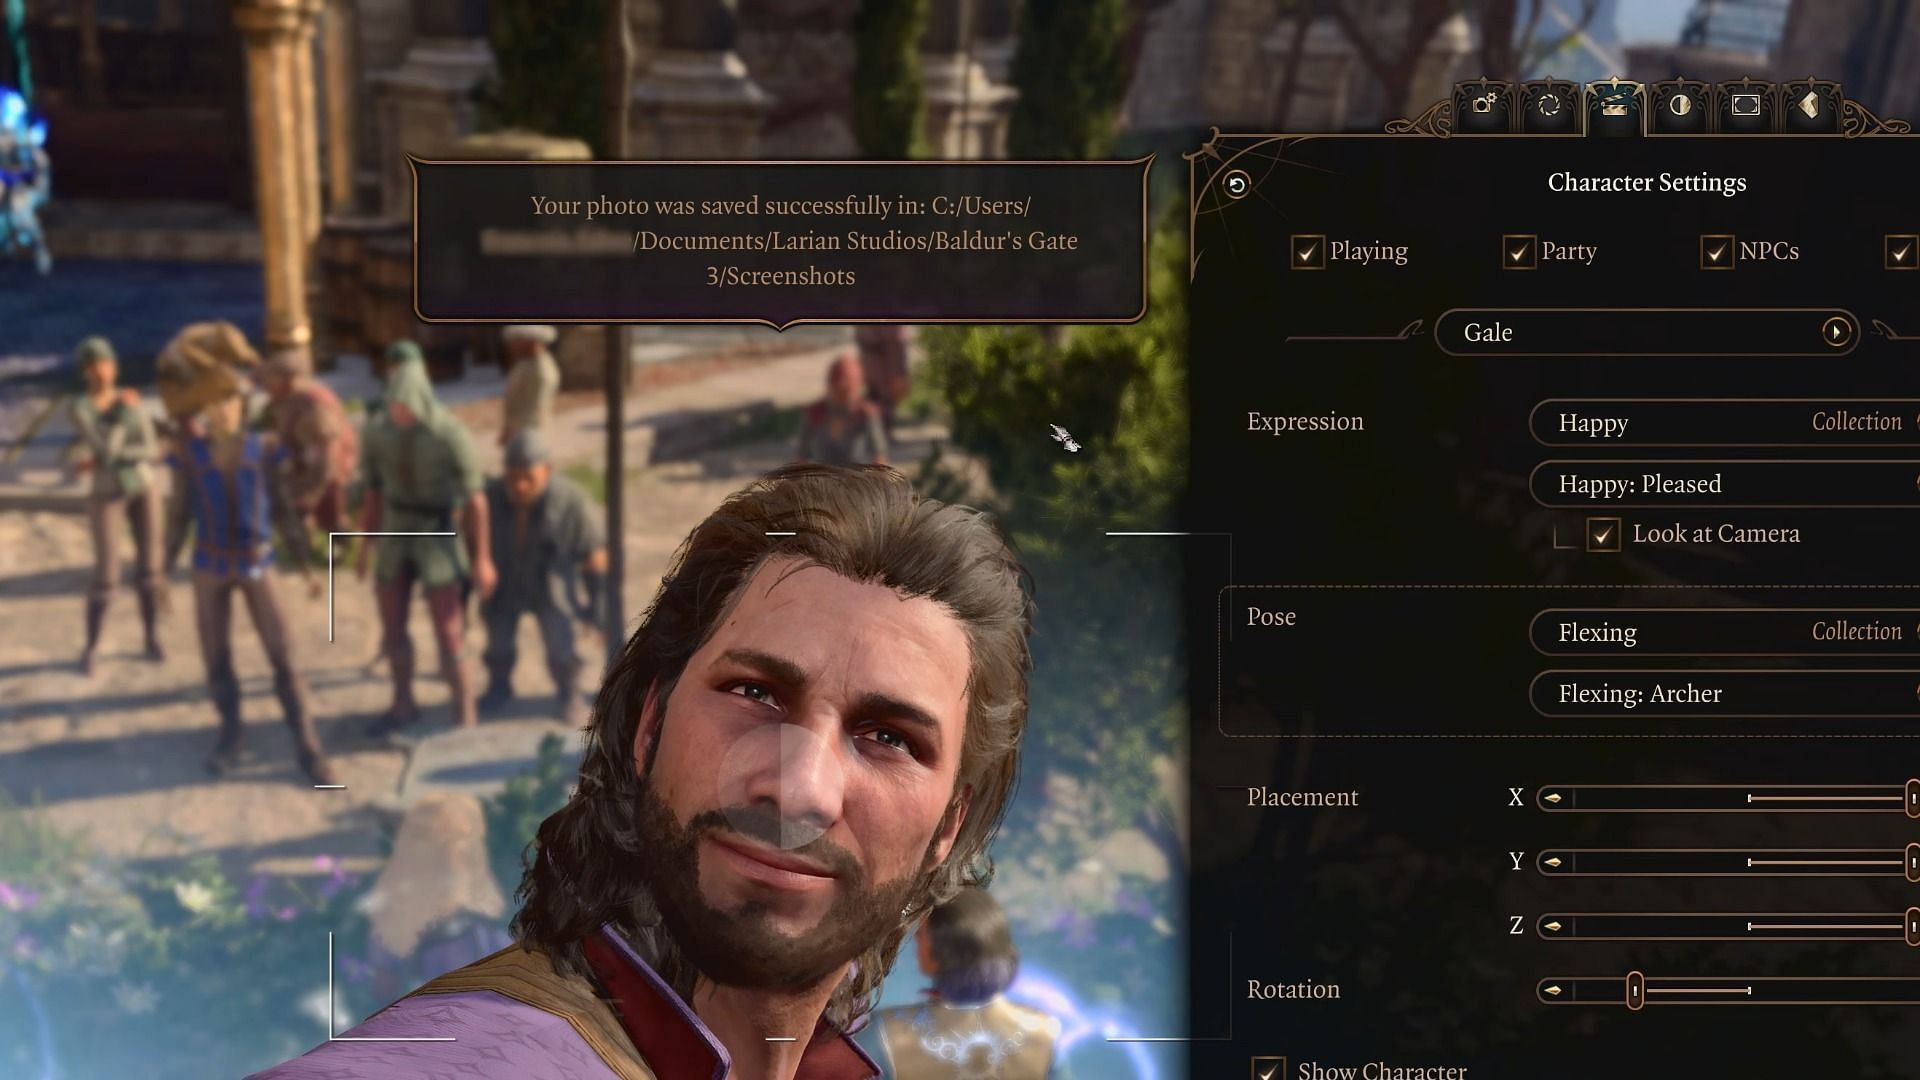
In the Steam version, these will be saved in the following directory:
- C:[YourUsername]\Documents\Larian Studios\Baldur’s Gate 3\Screenshots
In the console version, these can be accessed through the following folders/tabs:
- Media Gallery in PlayStation 5
- Capture and Share menu in Xbox Series X|S
That was all about the basics of Photo Mode in Baldur's Gate 3. You can now enjoy the process and create your own Mona Lisa.

Get Updated Baldur's Gate 3 Interactive Map Here