
'%20x='0'%20y='0'%20height='100%25'%20width='100%25'%20%0A%20%20%20%20%20%20%20%20%20%20xlink%3Ahref='data:image/jpg;base64,/9j/4AAQSkZJRgABAQAAAQABAAD/2wCEAAMDAwMDAwQEBAQFBQUFBQcHBgYHBwsICQgJCAsRCwwLCwwLEQ8SDw4PEg8bFRMTFRsfGhkaHyYiIiYwLTA+PlQBAwMDAwMDBAQEBAUFBQUFBwcGBgcHCwgJCAkICxELDAsLDAsRDxIPDg8SDxsVExMVGx8aGRofJiIiJjAtMD4+VP/AABEIAAUACgMBIgACEQEDEQH/xABkAAEBAQAAAAAAAAAAAAAAAAAABAcQAAICAQQDAAAAAAAAAAAAAAEDAAIFBAcRMQYSIQEBAQAAAAAAAAAAAAAAAAAABAYRAAEDAwUBAAAAAAAAAAAAAAECAxEABCESExQxQXH/2gAMAwEAAhEDEQA/AIsLtf47hcaxZUrUr1XN7VaoEj0r0LdzN3bS4AtYQ1wBsfnAiJF8q40NncMlImjMMti4uFQcrV6Ywojr4K//2Q=='%3E%3C/image%3E%3C/svg%3E)
The Genshin Impact Spiral Abyss 3.5 reset is around the corner, with the game about to change enemy lineups and difficulty. The Spiral Abyss represents the end-game for most players, as they battle against the game's strongest foes to get the best times and tons of rewards.
It is important to be prepared while going for combat in the Abyss, which can be challenging if one isn't ready. The following section will go through the lineup, blessings, and best team for the new Spiral Abyss in Genshin Impact v3.5.
Complete guide to Floor 12 of new Spiral Abyss in Genshin Impact 3.5
As usual, the ley line flow for Floor 12 in Genshin Impact will be normal. Enemies and blessings will help decide the appropriate teams for players.
Looking for Crossword hints & solutions? Check out latest NYT Mini Crossword Answers, LA Times Crossword Answers, and Atlantic Crossword Answers
Blessing of the Abyssal Moon
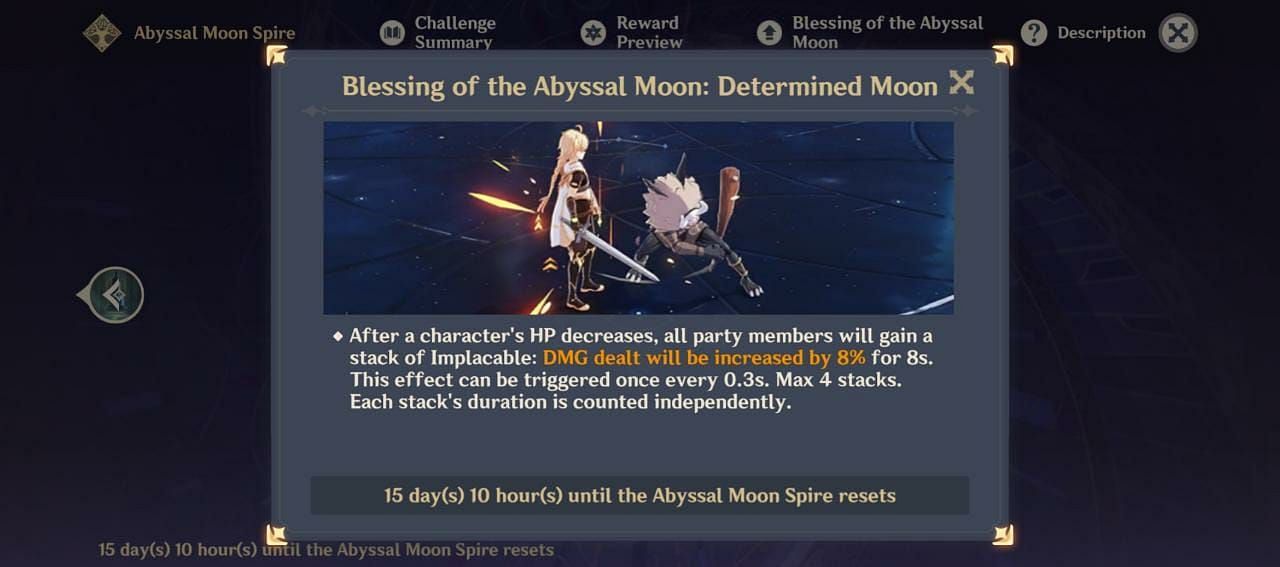
When a character's HP decreases, every party member will receive a buff called Implacable. This buff increases the damage dealt by 8% for eight seconds. The buff can be triggered once every 0.3 seconds, and a maximum of four stacks can be obtained. Each stack's duration is counted separately.
Chamber 1
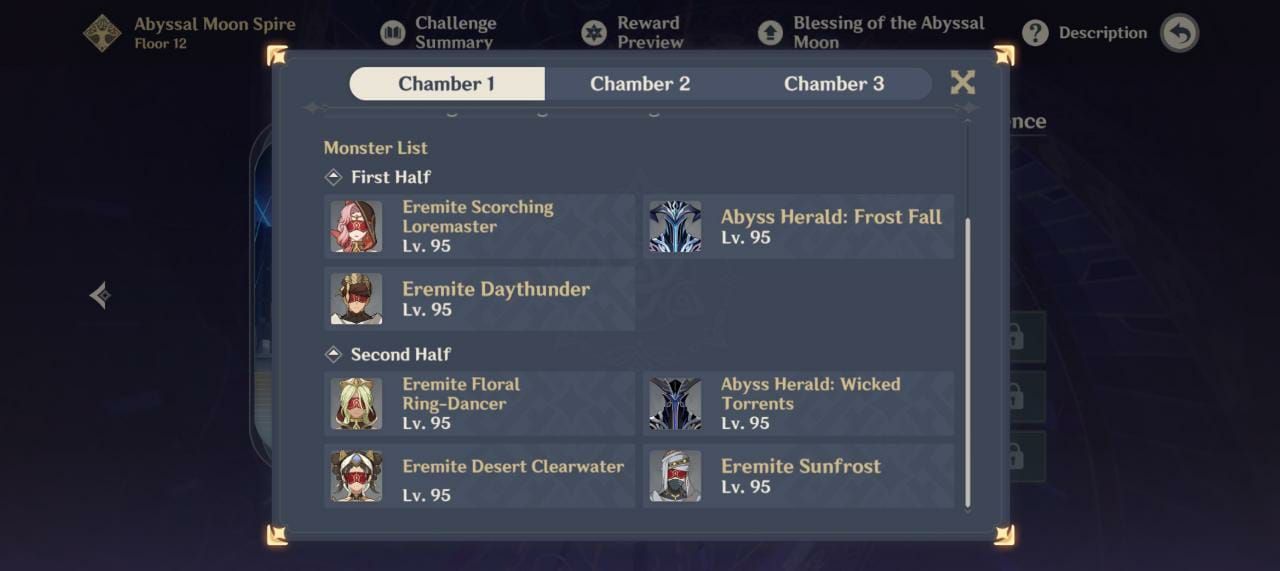
The first half of this Chamber will have two waves, in which three Eremites will spawn closely in the first wave. They can be grouped to be defeated.
However, players should try to take down the Pyro leader quickly as she can deal continuous Pyro damage and cause Overload with the two Electro Eremites. The second wave will bring a Cryo Abyss herald. It can be taken out using strong Pyro characters to destroy the shield quickly.
For the second half, an Eremite Floral Ring-Dancer will be accompanied by two other Eremites. Following that, the second wave will consist of the Hydro Abyss Herald, which can be cleared quickly by a Cryo damage dealer.
Chamber 2
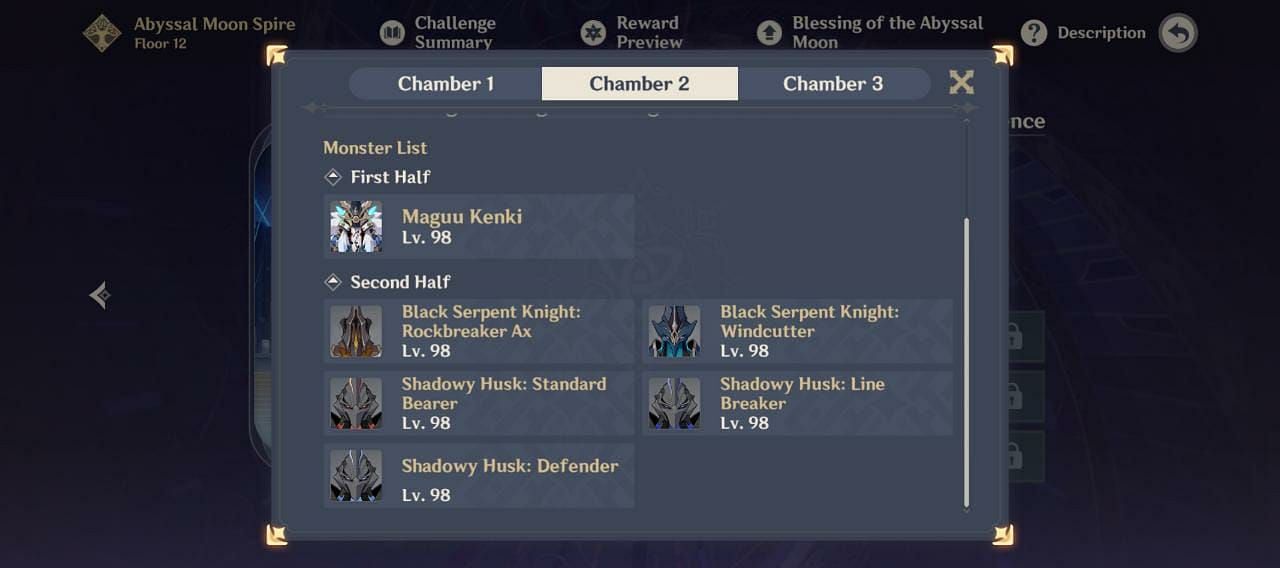
The Maagu Kenki returned to the Abyss in the first half of the second Chamber, this time alone instead of Triple Maagu Kenki. The trick to clearing this half is to know when to dodge and when to attack. Maagu Kenki also enters an animation stage when activated, during which it doesn't take any attacks.
The second half will have three Shadowy Husks, one of them being a healer, the Line Breaker. Players should clear them as soon as possible in a single go. The next wave will have two Black Serpent Knights, Rockbreaker Ax, and Windcutter. Both are tanky and can buff themselves if they attack a character with a shield.
Chamber 3
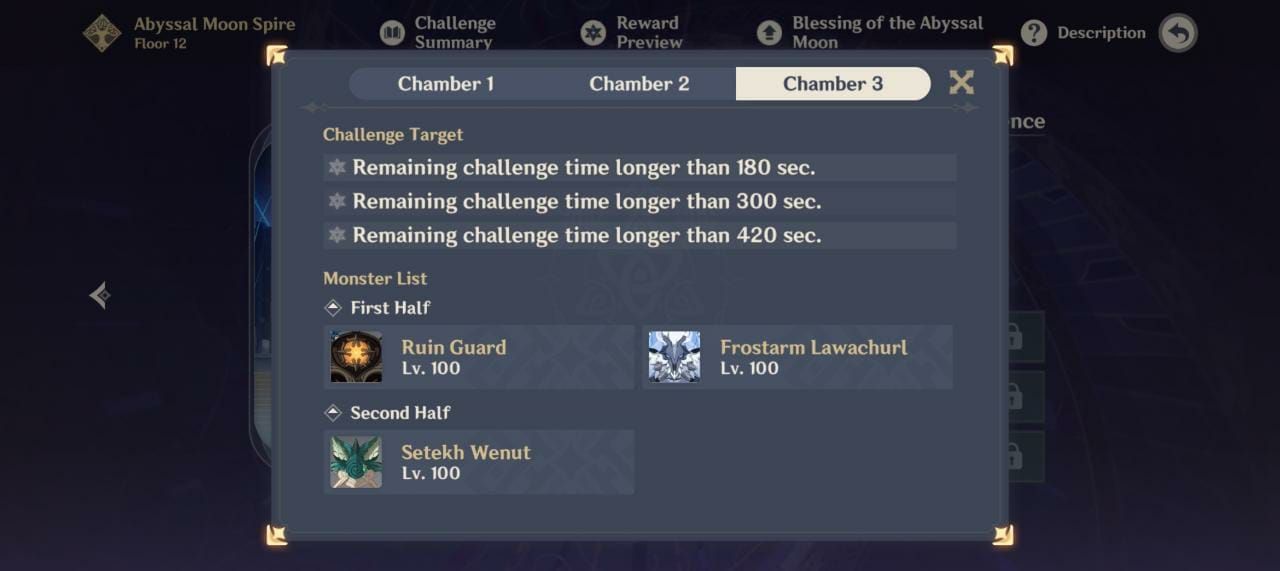
This chamber will consist of a Ruin Guard and two Frostarm Lawachurls in the first phase. The Ruin Guard needs to be cleared out for the Lawachurls to appear. One of the Lawachurls will have a Stamina Consumption Reduction debuff for players through its Condensed Ice Aura.
The last phase of Floor 12 in Genshin Impact introduces a new enemy, the boss Setekh Wenut. The enemy will constantly go up and underground for the first half without attacking. One can deal elemental damage during this time.
Later, it will initiate its Anemo Windbite Bullets phase, where players will require an Elemental ability that can be swirled with Anemo. Utilizing this ability will cause it to stagger and become incapacitated, giving you a chance to attack it for 20 seconds without any resistance, where a powerful burst can do the job.
Best teams
The Abyss is suitable for characters like Hu Tao and Xiao, who undergo a loss in HP from their Skill and Burst and hence activate the Blessing of the Abyssal Moon.
In the first half, most enemies, like the Cryo Herald and the Frostarm Lawachurls, were weak to Pyro. So, players should focus on good Pyro characters on their team. The composition could also benefit from some AoE damage, and players can consider bringing Anemo characters to group up lighter enemies.
Some good teams for the first half are:
- Dehya + Bennett + Xiangling + Kazuha
- Xiao + Sucrose + Bennett + Xiangling
- Hu Tao + Xingqiu + Diona + Kazuha
The second half could have Cryo characters to deal damage and defeat enemies like the Hydro Herald. Players should also bring in their mains and best DPS to clear tanky enemies faster.
A few good teams for the second half of the Abyss in Genshin Impact could be:
- Ayaka + Ganyu + Shenhe + Kazuha
- Raiden + Nahida + Tartaglia + Fischl
- Eula + Shenhe + Sucrose + Layla
For the last chamber, it is crucial to bring elements that can cause a Swirl reaction with Anemo.

Are you stuck on today's Wordle? Our Wordle Solver will help you find the answer.