

'%20x='0'%20y='0'%20height='100%25'%20width='100%25'%20%0A%20%20%20%20%20%20%20%20%20%20xlink%3Ahref='data:image/jpg;base64,/9j/4AAQSkZJRgABAQEAYABgAAD//gA7Q1JFQVRPUjogZ2QtanBlZyB2MS4wICh1c2luZyBJSkcgSlBFRyB2ODApLCBxdWFsaXR5ID0gODAK/9sAQwAGBAUGBQQGBgUGBwcGCAoQCgoJCQoUDg8MEBcUGBgXFBYWGh0lHxobIxwWFiAsICMmJykqKRkfLTAtKDAlKCko/9sAQwEHBwcKCAoTCgoTKBoWGigoKCgoKCgoKCgoKCgoKCgoKCgoKCgoKCgoKCgoKCgoKCgoKCgoKCgoKCgoKCgoKCgo/8AAEQgEOAeAAwEiAAIRAQMRAf/EAB8AAAEFAQEBAQEBAAAAAAAAAAABAgMEBQYHCAkKC//EALUQAAIBAwMCBAMFBQQEAAABfQECAwAEEQUSITFBBhNRYQcicRQygZGhCCNCscEVUtHwJDNicoIJChYXGBkaJSYnKCkqNDU2Nzg5OkNERUZHSElKU1RVVldYWVpjZGVmZ2hpanN0dXZ3eHl6g4SFhoeIiYqSk5SVlpeYmZqio6Slpqeoqaqys7S1tre4ubrCw8TFxsfIycrS09TV1tfY2drh4uPk5ebn6Onq8fLz9PX29/j5+v/EAB8BAAMBAQEBAQEBAQEAAAAAAAABAgMEBQYHCAkKC//EALURAAIBAgQEAwQHBQQEAAECdwABAgMRBAUhMQYSQVEHYXETIjKBCBRCkaGxwQkjM1LwFWJy0QoWJDThJfEXGBkaJicoKSo1Njc4OTpDREVGR0hJSlNUVVZXWFlaY2RlZmdoaWpzdHV2d3h5eoKDhIWGh4iJipKTlJWWl5iZmqKjpKWmp6ipqrKztLW2t7i5usLDxMXGx8jJytLT1NXW19jZ2uLj5OXm5+jp6vLz9PX29/j5+v/aAAwDAQACEQMRAD8AoBieKcDUYp4HFbGI9Wx1oZ89qbzRimAZpaAKUiqEKKN5AxSZpKGAuaej9KioFAy6CGFPUDtVNCVOasxtkUthMkzTc+tIWGabuoEOIoxSEgjJoToaAF2mmNx0qbtUTULUYwZJ5pcYoApT0pgNOaQd8UppU4zSAAOaQ4BqQCmumeaYWIwx3cninlRSMmKePu0ANUYPPFNc5ahjmkNMBab1NOpnegBaUAntSGnxvg47UgAJTTw1SSHCk5qIHihAOpMUClxQARgninNHleODSDjkU9eTmkAxFIB3GlU56U8+lBUCMY60DGGmK3z4xUgBoYDrgZoBDJuU5qDoKkn5UCowCOpqRjkGeaSbpipO1RuAyZ7igDi9S4uZPrUmlE+d1pmqY+1v9ak0fBn5rQxO4XP2OMj0qAtxzxVtB/okY9qglQEc4HvUo1Iwc9KkBG3pVU/K3BqwhygoATrTgaDwKcMYobAFpSOKKcBSAYM9jVm3bGAR1qEDmpovvLVw+JClscl4vB+1A1zRrqvGAzOPauWNejDY4nuR9qq6h9zP0qzVfUh/o6n/AD1pVPhKjuRdVro7Y5gj/wB0fyrnVH7sfQV0Frxbx/7o/lXJV2RvT6lmMnNWF7VXSp1rE1Zaj6VYj6VWiqzHUsaFb71PTpTXHOaUdKAJo+tSiokqUUxC08dKaKUUDQtFJ3paQCrWP4h/1FbCVkeIf+PanHcU9jI0DP28V2ZHz1xmhcX612bH5zVPcmOw+myDoacOlEgytIsaoqbtUSDoKloAr7ir1aiAeUDPVaqSf6z2q3af68H/AGf6VpHcT2OV1njVrj/eqlZfek/3j/Or2t/8hW4+o/lVCz+/J/vH+dektkefLdl8dD9KkTvTF6H6U+OqsSOf/UtVnw5/yF7X/rstV2/1TVP4dP8AxNrY/wDTZf50Jajfws9WBpwNMBpwrVI88eDS5pmaAaqwyQNS7qjzSg0uUsfuoLcUyijlFcXcaTNFFOwxM0UUmadiRaKbmlzRygLRTc0uaOULi5opuaM0coXFJpOtLSCnyhcWjNFFFhXClpKKLBcWmmlzSfSiwriGm040007CG0hp2aaadhDTTSKfimmqsSNpaD1pO9FgFzUbHmlY+lRuCRTURXHE0ZxTrG3a6mCA4A6mte4soI4tu4FvaolOMXymkKcpLmWxlI49acfatCxsLeST94SPbNT31hFEmYqzdSPNY0VCbjzGSsZY8DmrcVp8m5ql0+NNxLVPPIFUqvSlKTvZGlOnFR5mVlQKeKsrO4XbniquaaXpOHNuVGfLsatmw3gk1oNtPOKwIZCD1rQjujjGa5qlF3ujrp1VaxPIcHNM3k9ahMuTzTRJikqbK5y0OlSRnbVL7RilFwKl02WqiNMScU5X5rPSbNW42yM1jKnY3hO5cU5p9QRtU6msJROhC9KUClAzTgMVm0UJtoxTwKXFSJoiaPcMGs29sM8qK18UhXNaQm4vQynTUtzmvsxBwRViGHA6VsNbK56Uw2uDitnXuYrDpMpRw5NW0hAGMVPHBtqZUrKVS50Rgkc1q9kzZZBXPTRsjYPWvTPs8brh65fX9OCtmJc114bEr4WefisP9qJypFJirotJT/CasR6XK65CmvR9pFbs872UnsjIIpCKvXFq0LEMKrEVrFp7GcotbkODRipCKQirIGClApcUuKLAgApyigCnxqWYAUmjSJZs4fNkA6V0ltCsMYArMsbby8MTzWiJMCuGteTsj0qEVFXe4+TrVaTpT3ckVVkY81EYM2ckNL80K4qA5JpQrehrXkI5iwHzT1aoFB9KkAI6iocC1Im3U9WqAGnA1LgaKRaRqnSTFUVap4m5FZumaxkX1+YUyRdpp0XSlmGRWXLqapkGaXNNo5p8o0x4pd2KZnFBalyFcwpam5NN3U5aOQakPUmplbPWoRUimpcCrky1IKhVqkVqzcRkoqRaiVqkU1DiDJlNTpVZTUyNUuJm0WAaZK4RSSabuqpeq0iEKaSjqZtHO65eCRyqc1hshNdKdHaSTLVci0SLb81ejCrCnGx59WjObucYUNMKkV193oihT5fWsibSZlydvArohWhLqcs6MomNRU80JRiCKixit0rmWwUZNBoo5R3FzRmkxRijlKuLmkzRTTRyhzC5ozTc0E0cpPMKaKaSaBz1p8ocwtFGKMUWFcKKUCnYpWHcZRin4oFFguNwadTu1JgUrDuNFLilxS4pDTEpeaMUuDRYq4lOFAFPA4qWUmN5pM07ae1IVosMaaQ0pFNINOwXDmlFNwaUDAosNC0UopDRYYGjFKFp4XNJjSGKOamVcClWOnkVnI1ijx9OacKRRjinAc14h0i0UuOKaaoB+eKAecUymuSMYNO4iUj0pppqyHvShgRwaASCgUAVIqgj3oAAKmj+VaYBinCgQpOTRSUuRQAu33pQMcUA0E0gY7OKjc+lByaaM96FoCBHJODUlRhRnNLnLUxi44pRS4ppPHFIBx6ipKh3E96UMaAHmnjkVXkZgNwzUkL7kyRigBrrgHpTOCvvTpSemMCo6oBDSc0tGfegBevSgcUqqT3pwT1ouA8cqM0LGuaKfu4qQI2QKeOlJiiU7sZ7U1S31oAdilUjOKSiNSWz2oGSEcGoiZAO1SNnOKZntmgGMUtkhqczcjNHTpQTkYpAQyctTSwHFPkBxxzUODyQKBkyDcOuBTZlIT5fxpqDBqR2/d0gOM1hSLt/rTNKYrcjFT65/wAfbGoNMP8ApK1p0MT0GLJsoyPSoZTjhqmtTnTkPoKglO6oRoQBBnqaQHaeCadtO7OePSnDnjFUNDROjDGeamjzj2ppt4m55VqkjHQdqQCjrT6dgdqafakAh9qlg+8tQ5qWA4ZD71Udwa0OZ8YDFwf89q5RvvYrrfGf/Hx+A/lXJuOc16UNjhfxDGqHUP8AjwX/AHqmaob7nTfo3+FEtmOO5AnKD6Vv2v8Ax7xf7ornk+4v0rfsubWE/wCzXJV2RvT3LkdTLUCGplrA2LMVWlPAqrFVlDSBE3XFN/hoXrSHoKAJojlalFQw/dqYUAOXpS0Uo6UxiU6m5xQDzUlCpw1ZfiD/AI9zWmDWXr5/0U1UdyJ7GNopxfrXat941w2jH/iYJXcHr+FOW5MdiQfdFL2NC9KRvumgtDY5MvjFSnrxVWP/AFgq1TsIay7hU8I2yoP9n+lRn7opyHE0eaqO4M5fXRjVrgfT+QrOtP8AWSf75rS1/wD5C0/0H8hWba/6yT/eNemtkefLdmgnSpEpkfSnp2qkSPf/AFbVL4dP/E0tz/02X+dRN9xqk8PHGpQ/9dR/Omtyvss9XFL1pKM1qjz7DqdTD0pM1QD80ZplLTsMfmkzSUUWKHZ4ozTc0ZosAZoJpDSVRItLmm0UWEOzRTaM0WAdmkzSUUWAXNGaSiiwh2eKXNNooAfSE4ptBNFgFzQTTaKLCDOaKQ0hNMANIaCaSmIKQ0GloJGGmHmn0EYpgREU4W08qlkU7R3p6IXPFaMUjQwFDjBqZScdiqcFLcrWUn2WEqR85704TZ+9UTnc2abip5U9S+ZrQn88qcr1oe6kcYJqClUZNHKg5pD45CpqwWyuarkcUoJA5pWuNOwrNzTd1NZqaWq+UnmJUcg1YSSqAepFepcDSMzQ8z3ppeqwenbqz5DVVLk++lDZqvmnKaXKUpl2JuatxyEDrWfGatRHpWE4nTCZdjdsitCLJAqta7dozjNXlwBXFUO6nsPUcU6ow4HejzBWLibXJKcDUO8GlDVHKx3J6QVHupQ1LlYEgpcU1TTgaVgFAp1IDSZpWAfmopY1kHzDNPzS4oWgNFX7LFn7oqZI0RCoUU/FGKrmbJ5Ucrr1q+8sq8VzxiYH7pr0iSFJRhhmqx0qBsnaK9CjjFCNmjgrYNzd0zz8oR1FIVrsNQ0VdhMY5rHOky78Y4rtp4qEle5xSwk10MYLmgjFdEmiNsyazrm0KPjFaxrxk7JkSw8oq7RQSNnPyjNaFlaEOGcVatIFjTJHNWcgVM6reiNadFLVjhgDFGQTwaryyYU4NZ5mZXyCaiNNyNZVFE1sc0oQHqKzFuXJ5NWo7jPWh02hxqJl2OFM8irKwxntVFZxjrUiXag9aylGTNozii4ttHnOKebZGHSo45wR1qYTL61i+Y2i4sjNmmKqzWpTkVf80etISGFClJblWTMnBBqeKnTqA3FMRgDWu6IWjL0OcVKy5FV45RipPNHrWDTubKSFCDPNSeWpFQ+aM09ZB60mmNMR4vSoWjYHmrYanAg0rtFFDGKcKtyQhhxULQsKd0AwU8Zp0URzzVpUUDpUtmiZVFSKCan2L6U4YFS2VcYqGpFBozSg1DQXJBxTwaiBpQamwiUGlzUW6lzSsS0SA1LGfWoAaljIpNEtEuAaY8asDkCpBilIBFRexm0c1q+nR4Z161z0lsVzXc3VuHU5rndRg252ivQw9Z2scVaj1MJosCmbDnpV0ofSmmM9ga7VM5XArhKCnFWVgc9FNLJbyKv3TRzoOVlIiom61M4I6ioiM1omRJDKKdijFUQNpRzS7aULigQoFGKUUuKBiClxSgU4CpZQwClC1KIzjOKsQWskrAKpqHJLcaRT20u2toaLMVBxSHSJV6isvbQ7l+zl2MYL7Uu2tVdMkLYxVkaO+3JFJ1orqNU5PoYO2lCmto6U2DwaRNKbPOaXto9x+zl2MqKFpGwoyasvYSxjcw4rpNOsUhGSuTV+W3SRcECsJ4qzsjeNC6uzjBFhCcU+3szOTwa6b+z4x2qWK0RPujFS8SraDVB9TlZdNkU/KpIqs9q6nkV3QhXHQVRu7INlgKI4p7Mp0bHIG3I6imPFtrXuYthIxVN0ya6VUuTyFLZTgmatJblj0qdbbHam6iQ1C5SWH1qRYsVejtiSBV+HTSRlqylWSNY0zHWKneQWOAK6GOwRF5GTSR2yq+cVg666Fqmz53ooorzxikZpSp9KBTs469KpAMxQRxUgAoKg+1AiILyPSrH2dO2c00IAcZqyRgdaTGim6lelCkL1OM1OwGfaq0y5OO1NaiJxS0xThRmn1QgoAyKKcOBSYCCnY70UmaAEphPNPqOTAIoAMk1GTk5oLkA8UKaYEyHK0ppiE9hmnnPpikwQ0AZ6Zp4pjHb0pqsd3qaBk3alXhcUjGkBPQUhjmG5feoanXpzURILFRyaYhvammpKYaaAfF0qSoUJBwOanCHAzwaTAQUtOCU5VFIZGVHemlcfN3qV+tQOTupICSmqTk4pygFQaQDGaYC1HjnmpKYcZxQwExSMOaeQKY44zSEJ+NNbgUh60E54oGhCfSjgrQF5pxpDOS18YuzVTTDi5Wr3iLi6/CqWm/8AH2n1rToY9TvNLk8zT8dMUx6ZpI22TjPrQWOalGgd6enem5B56U4cDNMBc0qnDUzdnNNDHtQMtUxSQaaGOMGjnrSAQsc1LGeF+tRODjIp8JGEz/eFNbgYPjDJmUn0Fcq3euq8YZ84emBj9a5U8kivRp/CcM/iIm6VHdj/AIlrf71SNUd1/wAg+T605/CNblRD+7X6Vu2BzaRfSsCL/Vr9K3tOP+iR/j/OuSr8KN6e5dSp16VXSrCVgbFmKrCmq0fSpkPIpATqetOC5Api9KkWkA5PlOKmFQnqKlHWmIeKcKaKcKCkMkPFKtNfmnL0pMaCsvXObY1qVm6yM2r1Ud0TPY5/SOL9PrXc/wAX4Vw2lcX0f1rue4+lVLcmOxLGcrS0kZ4paSLQBQO3NIWx0p3aohTBkqtlcUOcMlNT0pZOqU4vUT1Rz/iIY1WX6L/Ksu1/1sn+9Wr4j/5Cjn1UfyrJtf8AXS/739K9OPwo4Jbs0U6U+PtTE6U+LpVkEjfcanaCcajF/wBdB/OmN900uinGpRf76/zprcroz1uiiitonDYKQGloqgsApaSiqGLRSUUALmkzRRQAUUUUAFFFFMkbTqKbQIdRTaKBC5paKKACiiigAopM0ZoELTSaM0GgApKDSUyWFFFFABSHrS0oFADSKQ9MU/HpQAfSgLFq2ZBBtx81RzE0+1BQ5YcU2cc1l9o33iV+9LSGlzVmYU5aZmnA0Bcl7UxjRmmk0JA2MY0wmnGmtVozY3vTgajzzTl6U7AmSq1SBs1AKlQVDRpFky81KiE8Cmx9eatROqms5aHTBDo4WA5qZeKdvBHFMY1g9TojoWYpCp61dW6G3rWRk1LGDWUqaZtGo47F5piTwackh9arKDQSRUOCLU2W2kI70+OUms4ufWpYnNS6ehpGpqaYenq1UlY+tSo/NYOBupovKacDVdHHrTmlHrWfKXcm3UbqreaPWgSVPIO6LQanqaqq9TK1S4jJxS0xTS5qbCHd6XOKZmmM9CQWJGIxzUD7AegzTJZtoqlJdjOK3hBsTsi1JJnjoKzL2JScjrTnuqqXFxnvXXSg0znq1ItWK077KrGf3ptzNmqTPzXoQhoeZUqWehYeTPeoGeoy9NJrZRsc8p3Jg/NSLLgVUBp4NNxBTLLTkCo/OOetQlqQGjlQ+dmlb3TADJq6lySOtYqNirMb1jOmjenUZrrPmrEc2R1rHSSrcL8isJUzqhMuzHK1TZtpqznctVZVOamKLbHLKfWnCU+tVwpp4HHNVyoLlhZDUyyVUWplqJJFKRZEhqWJznmqy1KlZNGsZF5XzT85qqhqUNWTiaqRMCKXdVcvSb6nlLTLBamlqhL00vRyjuT76cHqtvpwejlC5Z3U7fVXzKUPS5RXLW6lDVXDUoelYLlkNTw9VA9OD1LQXLiyGpPM4qkslPD1DiKxYZs9arT26yjpTt9AfFCuthONyt/ZqHsKBp0YPSrgk4oL0+eXcn2a7EUdnEp+6Kka0iZcbRS5NTIc1LkxuCOe1DS1GWUVz1xCUcjFegSxh1IrEvtLLkkV2UMRbSTOOvQ6xOV2U0pXRJokjjPFUbrT3gfBFdka8W7JnHKjJatGZtNLtqdoiDzTdvFacxHKRbaAtP2mnqmTTuKwwLU0ULN0FW7OzeRwAtdJZaYkYBYc1z1cRGBrCk5mTpen73BkBxXQ29oiY2qBViKBUHAxUwGK8yrXc2dtOiooaIwBTWiU9RUuaQ1hc35SuYVznFLsFTUhFPmDlICqnjFNMajtUjcdKiYmrQuUNwHQUFzSYpMU9B2FyaAxopMUDsPZ/SlX5hzTAM1Oi4FJ6CsULqyWQE45rFuLYJJgV0F1IyghRWRMGLZat6Un1JcUQIgA4FPCZqSOPJ5qykajpVORSiNtYlBywq08oXpULcCoc5NZNc2paRbE2ak3riqOacG96hxLsfO57UE0hHNKOtYHOCk08c9e1JjHSlBpgL24NLnjmlCkrmkKk9KBBuxzQ8zMeBgVG24HB4oAp2AeGb14qVBleR+NQjpT1cgU7ALjNPUetRhyWp456UCHUd6QUvagAo459aVRmhsAigBBTZFJGfSngc0NQBAEXufwp6KozgUrIG604DAAFACinBcikHSg5B9KBiY+bHagEduKSj3pAIetKpxRRigBGkC8Z5oC4OR19aTy13ZxzT8gUwGdTRImGAWnqgbkU4RsG3ZouAkMRVsmphTUbsad0pDQvamk4o3U0j1oBsGOai3A5GDxT3OMVEetIQ9T+VOpqUbsE0xjjUKjOSalByKZQAbsnrTXG7vS45zSNxQAwjHvSjrSE4oQ5FJjH9qYehp1NbvSA5jxEP34PtWdYnF1H9a0/Eh/eqcdqx7Nm+0x8j71aLYy6ne6YB5TAdSKVoyDxSaZ9zr2qViahGgwIxGMUo44apFYbevIpjHJqrgRyKcjB4pUXkClbJOaVFJINAE2BilKikzilGTUgNPApYk4X608D1qZFBQH0NUnqBzXjNDlX7Yx+tci3XNdr4x/49h9a4p+K9Gn8JxVPiImpk/NjKPf+lPfpUcvNpMPb+hqp7AilF/qlrc07mzj/H+dYUH+qWt3TObJfqa46nwm9PcvL0qeLoKrrViLoKwNizH0qRe1Rp0qQdqQE61KKiTpUq0gH4yRUg60xaeKYh4pe1JRTGhrU8dBTH6mnjpUssQ1nauP9FetKs7Vv+PV/pTjuRPY53Tv+P6P613Hp9K4bTzi9j+tdypyq/SrluREmj6UtIvSlFCNBe1RDpUvaoRxQDHofmFSuuStRL61IDuVD7047i6HP+JBjUj/ALorItv9dL/vf0Fa/iT/AJCP/AB/Wse3/wBfL9R/KvTj8KOCXxM0o+lPj+6aZH0qSLoasgcehpNIONRj/wB9f50p6GmaZxqMf+8P501uV0Z68KWkFKK2RxBRSmkqhhSikoFUIMUUZooAKKKKACkJoPWjFBImaKXFLQA2iiimIKKKKYgoopKAuLmjNJRQTcXNJSUUBcWkoooEFFNooEOpBSUUAOpQabmloHceCKcn3hxUWKerFTxSaGpF6RtyjjFVZjT2udyYI5quzZrOMWjSU0xtBOKaxxUbNWqRlcVn5oElQseabk1fKRcseYKN+arU4NRyoOYsg01jxUW+gtRYdwNAPNJSimCJEPNWUIFVU4qUGpaNIuxPupyPyKgBpwNQ0aRkaKSdOak3ZqgjGrEbGsZROiMi5ENzCrqRhetZ8TYOatLKTWEkzoi0WwBTHTNMR6sIwPWsXdG8UmVTCc9KljiIqyCtTRqrVLmzWNNFdUNO2GroRcdKRoway5jXlKLHFMLn1q3JCMVSZfmqlZkSuh4apFeoAD2p4BoaCLJw+Kkjlqtg05ahxRqmXVlqQSiqO6jd71HIVzFxpaieXAquZMd6rTTdauNK5EqiSJZ5c96zpZACTmorq4wODWZPcE967qVA4K2ILctzzgGq0k+e9UjKc01pPeu2NKxwyrNkssmTUJams1IDWqjY53K47NKppmaUGnYLkoFK3SmKaXNIdwoppNANAEgPNTI1QCpF61LNYstRtmrduTmqEZ5q3C2DWM0dMGasfTmlkC4qqJgBUb3Nc/I2zo50iZyo6UzNVzLmlElXy2J50WkqZKqI9TK9Q0WpFkGnq1VfM96US1DiWpF0PigzcVRaammWl7Mv2hdMtAkqj5nvThJQ4DVQvCTijfVPf70okqOQv2hb30B6rB6UPS5Q5yyGpwc1WD0oelyj5i0Hpweqoenb8d6lxK5izvpwequ73qDUNRttNtHub2ZYYExlm96nlDmNIPTxJXP6Z4k0vUgfsN2kuOoAII/A81rJKsi7kYEe3apcbOzBTT6lrzKQymoN1BNLlKuWElOeasqc1nqeatRNxUyRSZbFSDjpUCtTw1ZNDsS7qTbvbmmg5qVKWxLRKqALUUtvHJ95QamU5pcVKbRm0c9qmkAqWhGDWC9u0bEN1rvZFypFY1zp++XceldtHENK0jlq0E3dHMCEmrlnbguMjJrUXTSzY6Cr1rp6xkE9q1niFYxVF3JrGBVjHy1fVQKbGoAwKfmvOnJydzsjGysOFNNBbFMLVKRoh2aM1Huo3UWGPzSE0maTNOxVhG6VHink0000Kw0000400irHYKQUtFAWAdasL0qACnjipYWCUA1Smh3N0q4OW5pzIDTTsUkZzw7U4qNWxWhKmVxVCSIqauMrjsMkfPSmdKftpNtWUkMzRnFOIpppAz58NLGMnJpSMmnqu1K5WcgpHoKd0BpB0pRQIFbI6UpIAzQKikbLYFMBCdzZNJtFL0ozVIAA4p1NBFLmgQ5OGqUDnNRL1FT0mAm3NG2nUUDsMYc0gGaeRk0hGKQmAyBSdadSHigEGOKOlHag9aYISgkmg0lAxaKKSkAtFFFMB4AYehFKQMAU1DzT8ikA1QQ23FTdqhLkmpEJwc0gGuhJyKQsSMGpKQrmgYwr7mmPGf4SambpTRTERrGf4uKXy/epDwM0A5oAiHBpWXnilxzmlNAER4oA4pzrmgdKBiAYpCAeDTuKQ9OKQEZXJ9qUDA4o70tIYUw96fTCe1AHN+JRllNYtp/x8J9a3PEY4WsKA4lU+9aLYye53umrwMmp265FVdMfIH0qyTlsVKNBFjBJIp/lnApyDinM2FNAWK5Ug1Kq/L6UzOSM1KATRcAVakoxzSGkAE1ZtugPvVTvViJtqjHrTW4HP+MSWCqOmCa4uTgV23iwZMZHo39K4qX7pr0qexxT+IhbpTXGYJvpSn7tKP8AVyj/AGaqWwGbbcxLW5pR/wBEx6Maw7b/AFYra0r/AI9j/vH+lcdT4Ten8RfQ1YTgCqy9RirC9q5zZlmOpx0qCOpgeKBImj6VKvpUMZqZTzSGSCpBUS1KKYhScYpT1prH5hThgtTGhD1p9N7049alliDpVHVf+Pd/pV4dKz9YbFv9aa3Jlsc3Y/8AH7H9a7kHCr9K4eyGLyP/AHq7j+FPpVy3M4k4pw6VGT0pwbikadBwpj9qcDTZO2KAewx2wh96ltuUjHvVKVjkj0q5anmP61Udwa0MLxH/AMhBf9wfzNY8H/HzL+H8hW14nG3UF/65j+ZrGi/4+ZPw/lXpR+FHny+JmjD0qSLoajh6VJF0NWQO7GorE4v1I9RUv8JqKy/4/R9RVLcpbM9iXkUYpF6CnZrVHCIaQU7rR0qguJRiiimFxDxRS0hqhhRSZpaACkFLRQSIaWkzSUwCiiigQUUUUCCkpaQ0xBRRSGgQUUUUCENJSmloENopRSigBMUuKWigBMUtFFABRRRTAKD0oooAifOahbirDsFqtI241USWNJpCaQmmk1ZNxxNIDTSaBQIeDTs0wUtA0PFOAqNakFSzSI4UuaSikWhwNSqahFSJSY0ydDUyPioBTwazaNIstrLUiTY71SBpwas3FG8ZGik5FSrcGs0PUqvWbpo2jNmkkue9W4J8dTWQklSiXHesZU7m8aljeSYEZzQ84xwaxkuCO9K05PesvYm3tzRe4z3qAyA1SMvvTfNqlSIda5pK61IrLjiskSmpElPrQ6YKqaZIxTSRVITH1oNxx1qfZsv2qLhao2kqp527PNRyzhe9UqREqxZkmAHWqFzdYGBVW4uuTg1RlmJrrp0O5x1cR2HzzEk81Vd6R3zUROa64xscEp3FLUmaSitDNsM0uaSigVwzTgaaKWgEx4NLmmCnUi0x1FJSg0FJjlNSLUQNSKahmiJkbFTK9VQacGqGjRSsWmlphkOagLUBqXKVzlgPT1aqoanBqTQ1IuK9PElUg9PD1LiaKZc82jzaqb6XfS5CucteYaTfVfdShqOUfOWN9OD1XDU4GpcSlMsh/enBqqhqcGqXAtTLQanBqqhqeHqXEpSLAanBs1XDU4NUcpXMWN2KXfVfdTg1S4j5iwGrzz4samY1tbNSOFMzKeh7A/o351326vHPibdCbxFcxt0jjVQfwBP61jPQ0h7zsZekai9reQ3UahJUIYgfxDuD+FeuaNrCm4hJ4jmwv59K8Os3VZApbMrAlvb2rv8ARLgq9ku7JDL/ADqU3OOpM1yy0PWt3FKDTAeaUGkbJkqmp4zVdTUqmpaLRZVqeGqurVIGrNotMsK1Tq9Uw1SK1Q0BdR6l7VSRuauRsNtRJEsdSbM0ucmn9BUXIaIPK5pwXFSE8UxmAp3bJsL0ppbFMZ6ieQAcnFUoiJC1NLVGCX+7z9KaWqrAmnsSZpwaod1LmixoibNGaiDUuaVih5NNJpM5ooCwGg0oooHYQClApwFGKLjsIaSg0wkmgdh27FKHJNR4pwGKB2JcZFMeHdTgaeDSuBSa3INMaHFaBANROtNSAznQioWFaMiA1VeLJq1Ilnz4qYBobpTwRjim4rE5hq9KUsPx9KAMUm35sjrSEKxwpqAe9SP2FNNUgEpCMilo+tACpGSPlpMHNTwkdO9LIgJz0ouIjpCTjgmlOKbnnFMAgEm87jlatVWB7ip0bPBpDAnBo7Uj0A0CAc0ppOBTqYCHtSE80pphPNIBw5PNAOM4pBRSAWjOB2oFJyTTAKM09U45pNhzQA0dQakpUQd6Vlx06UhjcU5PSm05O9Ah9OptFIoRulRlgvWnscfSq7Ag88U0JkrSAjvUBlYE46UdqYeDTsgJFkYnBqXNVh1FWsUAIx4phalY81Ge+KQD6dgAUxQSae1IYjA0zIqQdKaR+VIY00gGaU0L1oKOc8RAgAH1rn487xXSeJR8oPvXOJ94VotjB7naaY2Av0q4Sck1n6Xyi/SrzA5qUWiVXIxRITgYpoXjmnAegoGJETuGasFgOgqFcZ96kFIYpc0hY96RuKYOTk00Jj9xx71LGenPeoqcgO3FPYDL8TDOw/X+lcTN0Nd9rqbrYMcHaDXBXHCmvQp7HFPcrnpSL0f/AHaCeKRDliPY1b2AoWxzF+NbGlH/AEZv96sa2/1Z+tbGk8wSf71ck/hN4fEaCdasJVdKsLXObFmM1MBxVdORVleQKQh6dDU0dRAVLHxmkUSDpUq9KiFSA4HNUSNkPPFSp1qBu1TRnIoZQ5etObrQgpG7VI0HaqmoqGgbIq4egqpqP/Hu/wBKaFLY5e14vI/96u2/5ZxH/Zrh4P8Aj6j/AN4V245gi+lVLciJMTQtNHTFKtI16DvQ0Hmgfd980DvQgKko/ekVetR9z61XkT+Kp7T+HHrVR3EzG8U/8fyH/pn/AFrEi/17/Qfyrb8T/wDH1Ef9j+tYsf8Ar2+gr0ofCjz5/EzQg6CpkqCDtU69K0MwH3WqCz/4/D9RU4/1bVBa/wDH2fwqluUtmexqPkX6U7FMhOYkP+yKfWkTzrjqbQDk0vSrHcSkNKSKQmmguBpKQmjNUFwNJQTRmiwXFNJRmkJphcWikpc0E3CigUZoHcXFJRRQIKDRRQK400U7pSGmISiiigQUUUnamSGaWkAzS4x1o0Gkx6oSM04J60wShRTHmzU6l6ImKDsaAuaqeac8GnrLxTsxXRNIoVc5qISL61HK5PeoD1qku4m+xdDKe9RyPjpVYEigsTT5RXFZiTTTQaSqJCmkGn0u3NFxWI8UoFOIxSUXFYQCnAUlKDTKQ4U6minVBohQaWm06kMKlWoqkSgZKDTwajFOFSaIkzS5poNLUlpjw1ODYqMUtTYtSJg9PD81ADShqTiWpFoP70u+qwakLGp5SuYsl6QPVcNRuo5RcxZD04Pg1WDU8Hik4lJljzDSoC/eoYTlxmrZXA4qXoUk2VJrgx5UVSmnZutWLhCWJqlKuK3hFHPVlIhdyaiLUrVHmuhI45SYpOaSijFUTcKKMUYoEFLSUtACUtFFBQtFFFIEKKdTRSigpMcDTgaZRSsUmSZpc1HmjNKxXMSbqXNR5ozSsO5LmlzUQNLmiw+YlBpQ1RBqUGlYakThqUNUGadmlYtSJwaUGolanZqWilIlBpQ1RA0oNKxakTbqcGqHdShqlormJw1KGqENTgaTQ1IlDU8PUGaUGpaKUiwGp4aq2405WqHEpSLG6vDPHc7SeJtRXAwJCAfpxXtwavDvFSCfxDqBU9Lh930yef0rnqI6KMtTJsUAkUKCT3c13Wjo32uyA5zIg/WuEt5meeNU4TPSvRNB/wCQhYAdfMQ/rWcfhZVW/MrnqivmpVaqitUqNRYFIsg1IrVXVqkU1LRqpFgNUgNV1NSA1DRdycGpFNQKakU1DRVyyhqyjcVUQ1MhrNoC0hqQvgVVDUjScc1HLclkhnGcVHJLVSWQZ4qIyVqoGbZLd3cVtA008gRBwM9SfpXOXesyTsTFL5adtq5b8zVDX7pri7fdKqxIdqAn9cD1qgHjXje5+i//AF67aVBJXe54eIruo9Xp2Nyxunklwbqck+v/AOuulikLICzbj6+tcRYSRiYFTJn6CuvtWHkJg54qMRGzOnL7XbLYanZqANS7q5rHrJk+aXdUIal3VNi0ybNLmoQ1ODUrFEoNOzUIanbqViiTNGaj3UoalYLDqKbmlzSGLSikzSg0AOApabmlzSAfnimGkzS0CI2WoytTGmEUXCx80Qylm5qxVS1Qltx6CrfahnGNLAUxnIxg0jdTQFzSATJPJOacCMHPWkKkcUAUwDtSYp9NpgKvB4pWZj1NIKDQIWkAGeaWimAq9T/KpF61Ep5qYdKlgK/tSCg9aMUAFI3FFKeaAG9qKXtikNACdKdjjNKuD1p3HSkAynovemsQOO9KCcccUAS0hIHWm7/WlIDCmA4MPWhuRxURUqeKmU8Uh3GqucZqQKBQDmloGkJjikp1IaQDSKQ4PUZpT1pCKYhhjB9qY8PBIJzUuRmloAqKp3DirYHek6mloERMMGm8U9qaeBnFAIljTAJoYUsThl460j0MoZikIpaKkZA55xSBuadL1460JGF5xyaAMbxIP3APvXLp96uq8Q/8e/41yoPzVpHYye51+kH92n0rVwKxtHb92n0rZU1BaHAUuKOtFMY0DDGnZpO9OxSAYxzxR0FHc0VSAM84pVJDjBP0pvU06MbmxSW4+hBrhzaS/SvP5zzXeaqpFvKD0xXAzdTXoUtjiqbkJpijD/hUhpo+/WjEjPt/usPetjRz+6lHuKx4P4/96tbSDhZfw/rXJP4TaHxGknWp1NQLUyVzm5ZXhR71YTtVdPuirEfakBMOoqRaYgyeakYYAoBEi0rdBTRQx5pgI1TQjgGoCasJwtIZIvQ0fWkQ5XPeg0AKx5FVb8f6O+fSrPYVWv8A/UP9KED2OTgObmPH94V28RzbRmuGtRidP9/+tdzB/wAeiVUtyIktKvWkbikU80jVD+hoJpW+9TT1FIB2Mxtn0zT7HlPxpjnEZ+lSWA/d/jVx3JZi+J/+PmE/7J/nWKn+vb/dFbvildtxB9DWGv8Arz/uj+tenD4UcFT4mXYegqdegqCHpUq/dFWZij7rVDbcXOam/gNQQf6+qW6KWzPYbc/uIz/sj+VSZqvbn/R4v90fyp+6too8xyJM00tTC1NLVokRzEhem7qYTSZqkhcxJmjNMzRmnYOYfmjNMzS5osPmHZpaZmiiwXH0ZpM0ZpDuLS0gNAoC4tLQKKQXDNFJS07BcKSlooAbRTu1JTAKa1LRtzQSxFNRu3NTY4qKQbTQnqO+mhETSE0ppKoQlKKdSYoAQ00ipKbQAzFJT8UYp3EJRS4opXGIBS0ZpKB2BqZmnkU2ncQYpQKUDNKeKVxpCgUuKQU8UmXYQUuKcBxQOtK40AHNPApKeKVykgFPApopwpXLQ4UtApRSNELSCg0tABS0goqQFzSE0hNNJqkhXHZpQajzShqLC5iVTUgNVwafupNGikWIdxkG2rrPzjvVWxyGyelWm25z3rGW5vDYglHFZ861oSniqM3NawMapnODmmYqeQVEa6UzgluN5opaKZAlFFBouAlLmkooAWijtRTGFLSUopFBSikp1AXCjNJmjNBVx1GabmjNAXHUU3NGaAuOopoNLmgdx2aUGmZpaVhpkganA1FmnA8UmUmSg0oY1EDTgakpMmDUuaiBp2allJkgNOzUQNLmlYpSJQaUNiogadmlYpMlDUoaogadmpaKTJc0oNRBqUsFBJOAOSTWbKUiUNXhOr3I/tbV2ZgCZW6n3NetXXiG1iQ+QGmk6BchR+Z7V5rcaPOt1NcyWcheVi5bG4Dvx+dYVFdnRSmo3uYOlWtzcXcbIhCDnnjNd7oTLbalazXJKxxsC3BOKytIJS8wMq2DntW6JSfvMSR6msWuXRGjm5O7PR7aZJ4UlibdG43KfUVYVsV5lHOWIwxBzwQa9KO/rIGDHk5HWncEywrVKjVWRqlU0mWpFlWqVTVdDUqms2axZOpqVTUAPNSLWbLuWENTIarK2Ker1DQ7lndVedjjilL1HI+RinFEtkBams3yk0pFQ3BIhkx2U1qkZSdkcNcYLsZJAOeg5P8AhShogTzI35D/ABqKVI1IDSZOedgzT08sgkJIcdTuA/pXqKJ85Jl6yeIMMK//AH0P8K6+1YC3jx/dFchZCMt/q2GP9v8A+tXVQELEg9FFcuIjqelgHa5cDUu6q4alDVy8p6akWA1KGqAPShqlotMnDU4NUANLuqbFplkNS7qrh6duqbFpk26nbqr76XfSsO5Y3UoaoA1ODUrFXJ91ANQ7qUPU2C5ODS5qINTs0mMkopoNKDUsQtIaXNNNID5kkuUhjCqhJoivQw+ZSvvUUkIf7xNMELdsYq7I4TQwHUMpzQo5qG3LRrj3qwWBGcc0hg44zTKQtk+1JnmmIdTCaevWnMqsOODSuBEDR9adsIqSNR/EBTuBDk0vJ/8Ar1LKFAyAM+1IAOKLgR4IPQ1Ip59KdlRwTTD7UgH5o57mkRlI560pYdqAAHsaM0gPzUfSgBaDSgHtTSR60AKTjoKF560U5QRnNMBjqc5pVORT80JHuJxRYBlTRfdpwiUfWl6Uh2ExS0AZo6daBCkccUo6U0t6UbjSKuPpD0pA2aCfWgGxrHHWmlxihyDUbUxDt/PIp4qEcipVINIQopGOBQeAcHmqz7s/NTAnJHtUUrALTB0pHRiOtLYpDo3AOam3grmqyR88nj0qTGOB0pDJc0dqjVuOaepzSAaygnNKKcKBQBjeIVzan2rkQPmrtdbUtZuRXFtxJWkXoZvc6nRuYo/pW2KwdDOYkreWoW40Px3zRQDR3plBQOaKTPNIBWpoIOQDTXfcdvagfL0piFOVGetLbyAyjjvSZpYwA+aB3IdVG6FwO4NeeS9T9a9GvgDCxrzebIkP1r0KRyVNxtM/jp5pn8QrRklCHrJ/vVqaSf8AWD6VmxDDy/7xrS0kjfJj2rlmvcNofEaiVMtRx9alUfNXMbliLtVmLpUEXarMfakBKnD0sh7CmL9+lPU0DJlpDRGcKKB0psBccE1Oh4FRAZBAqRBhcGkBKowKRqD92kzxQNAKgveYW+lTiobz/Ut9KEJ7HIpxdL/vf1rt7Y/6ItcOP+Pkf71dvbn/AEVKqW5ECd+gqNT81SHkUwdPwpM0Q/PNOApgp69/rQhsH+4amsxiMf7wqI9DVi1GEX6iqW5DMjxiMXNvj0P8654f8fB/3R/M10fjMfv7f6GucX/j5/4AP5mvSp/Cjhn8TLsXSpF+6Kii6fhUifcFamY4/cNRQ/6/8KlP3DUUP+vH0prdFLZnq9q/+jRf7g/lTy2ar2v/AB7Rf7g/lUprqijx5PVjiaTvSUfSrRItGaKKYC5opDRTC44UtNBp1ILhS0lLQFwpaQUuaVh3HUU0UuaBpjs0ZpuaWiw7i5ozSUCkFxaXvR1pDSuUFGaM0houSFOU5FNxT1GBQ2RJgagmIzUkjYFV2OTQhxCiilFO5dhMUuKdikxRcLDcUmKcaKLiG4oxS0ZouAhFJing5pCKLjG4pPpSk4pCadxi9qbS5oouIUUYzTe9PBouUg7UoOKKDikO44GnVHmlFA0x4NPFRg04HikykyTNKDUYOaeDSLTH5pc0zNGaB3JB70pqLNLuosHMPzSbqjLU0tTsJyJC1JmoiTQCaqxHMSkikzTM0maLC5iUGpFYZ5PFVs0xno5bh7SxoGfy8BTmpEud1ZG45qaN6TpotV3c0nkyKrSNUfm1Gz5pKNglUuI9Qt1pztzTK1RzyYopabRmqJFNNpaDQMSiiigQUUUUxhRRRQAZpc0lFIoWikooFcXNGaSkxQFx1GabRQFxc0tNpaYxQadTKfSGhaUHFNpRQUh4NLTBTqgoeDS5pmaXNJlJjwacDUYNOzUlXH5pc1GDTs0h3Hg0uaZSg1LKTJAfWuV8S60pSSGGQLAg/ePng+30qfXtW2B7a3bkcSPnp7V5drupHUJTb25P2ZTyR/y0P+FZ7s2gurNqLXLKdhiQr/vDArTtbscPbXABA6o2KwdL0ZFt91ym52HC+g/xp9xo0KgtG7xsO4NZSaZodhHrt9hVkkS4QfwzxrJ/MZq3FrNmABc6Naye8ZKfzzXm1vPeQOfJndlB43c5q6msXKgedEr+68Vm6cX0DmZ6Ql34bnbDQz2repTI/MHP6Vp2VvGzA6b4hlHHEZmDe/3X/wAK8ti1u2I/eK6H1Iz/ACq9DfW04/dzoT6Z5qHSXRlcx6wRqluBvMNwAOd8G1j+KkD9KjXW/JOLzTblP9qFw4/I4NcBY6ldWhAtriWNeuEYgflWva+Lb5Ti5WGdR/eQZ/TFL2Uu4e0sdhB4g0h32G6MT+kylP1Ix+tX1u0eLfArTL1DREOP0zXJx6/plz8t1aNGT3Vs/oatR2WiXLq8Myxy9s/Kw/EdKl0p9v1KjXS3ZuNrEUbYkV1I7MpBqRdbtjjhwPpWaum3wjAtNRlePsrMJR/49moJUvYmPn2Ftcf7gMTfoSP0rBwn0sdMa1J73+9G0Nctu5b/AL5NTrrNljl3B9CD/hXLtNGP9dZahbnuQolUflg0R/ZZT8l5bj2mBibP/Ah/Ws2qq+ybxlQl9t/18jqG1m1I4Lfkf8KBq1m3V2B+n/1qwjYTbdwjYr/eQ7h+lR7VUkHOR1BGKz9pNbo2VClLaTf3HSDUbH/ns35f/WqG7vrN7WYJN8xQgZHfFYsce/JCZA6nsPx6U8RJICI1aUHg7B8v/fR4/LNdFL2kmtNDixUsNRi0569jGMUW4Fmdsc8DGfz/AMKkjEYXiM/i1bP2O38lRthWb+LLMw/pTkswOi2x/wCAN/jXsKrFHyrqJlO0Kf8APLHHZjXSJJZ7R/pBHHdKzI7dkAwtv/3y3+NPaGTJ4gz9G/xrlr3m1ys7sJjKNK/tL/I0DPaA4E7H/gFAmtyT+/AwSOR6HrWYYZAOTB/49/jTSixJIZfKJ2/KFJzmuWcakVzNo9OjjKFaahBSu/JGus1qRk3I/wC+aeJrMj/j7T8RXM+f6j8zineecdPyrz3ipdj21go92dMJLPGftiflS+baEf8AH5H/AJ/GuX80d+Kf5hI4JqHi5FLBL+ZnTh7QAZvYvz/+vS77UgEXsVcuGI67fwFLu7lTj61P1uXYr6kv5jp/MtscXcZpRLbY5uo/8/jXNLKB6/8AfNPEoPYUvrcuxSwS/mOlV7Y5xdxfn/8AXqRTbnH+lxc+9cvkMepP6VIvs2PpzU/W5dh/Ul/MdR5cOM/a4fzpCsQP/HzEfxrmgrf3gfc07JAxu/Kl9cl2H9S/vfgdQkKHpdQf99UojT/n6t/++65hSw5yB9ad5jE9d1S8W+xSwX946gRqelzbn6PThEP+fiDn/brlxLIP7oHsKVZn9B+NT9bfYf1F/wAx1HkjPM8P/fdL5HH+vi/76rmDKx9DRvcdVUfjSeLfYPqP948IFIeKeF4BzQVB+tekeGIKkJwKiGc07luG6UCCgU4IAeKaeG4ouA9RzTx1qIPinb/agRJSjkZFQl80BiBxSsMQg5NHNSIhb2FSCMKB607gQopY04oPpUwGKCM9aQXIig4pCnpUpFMORTEiM5XHFPRgTg0vWhRzmkMkxntUaIMnNSKSTzSgc0XARUCmnYpM80ooAQr70+HgmmkZNIRin0GixkVGx54pvUUtSFxQaRuaKWgQ3H50Y4pW6UwuB70DFPHNROxJPPFPILLn+VQtx1poQKxzgnilY80xTk807qaYDgwPtU0fpVapYTzSAlOB0pCAT0p1MpAG1ccikKikzzTiOKB2IlUhjnpTsUpFIaVhjSDmnAYFMPWnL6UtgH02nU3vQMo6sP8ARJK4mUYlNdvqv/Hs/wBK4yYfPmriZy3Og0L/AFaV0ArA0Ajy0FdEygDIpdRrYSihVyM+lJ0PWmMO1OGDSAYzTsUhkUw6YFNGT1FSkYph+9TEJinrx060xmwMd6VD83NJggvRm3LdzXnFwPnP1r0u4Gbf8K80uBiV/wDervo6o5qm5D0pv8Qp5poGZF+tbMgpj/XS/Wr+lcSSD2qg3FxMPerul8Tv/u/1rkn8LNY7o2YjzVhelVoqtJjHNcx0E0farKdKrR9asr0pAh4obqKUUjDpQA9T8uKeKjU8YqQUDZNF3p45JqOM9aerfMfemIeelNFKaCuKQ0AqG65ib6VN3qK5/wBW30oB7HHMcXP/AAKu3t/+PVfrXDy/8fB+tdva/wDHqPrVT3RESwBxTRT8/KKQikWgHFPXpTAKkBBHFCGwPQ1YtOcCqspxGfpVjT3y34VSEzM8YNumtz7N/SubX/j6/wCAf1NdF4uGJbb/AIF/SueT/j6H+4a9Kn8COCp8TLkXT8KkT/Vio4ulSJ/q60Mxx+4aii/16/SpT9yoo/8Aj4X6VS3RS2Z6hYndZwH1jX+VTnrVfTv+Qfbf9c1/lVmuqOx40t2JQKWjFWSAooApaYCUtFAoASlopcUxAKdmkxRQO4tJmigUBcXNLmkwaXBoC4lLRilApDEFOWcIMGNG9zS4rlb/AMQXUGoz28GmSTrG+3eJQM/hisKt7aHXhEpSdztI3QqCYY/1/wAajmlCjiGP9f8AGuSj8U3oQA6Fc59pAf6UybxVcEgPo14PoQa5nfv+J38kO34G5qeqx2ssSCElmQMcHvk/4VXXWQekJ/OuN1vxfbNfqJrS6ikRArKVHHf19CKrp4tsf+eV1/3yv/xVVFzsRLD0m7tHef2yn/PI/nR/bSf88W/OuF/4Smwxny7rP+4P8aQ+LLHP+quf++V/xp80yPq1Lt+Z3X9sxMOYm/OozqsRPEb1xC+KbAn5luB/wAf407/hKbAf89f++P8A69HNMaw1JdDtk1KJjjDD8KUanECcKxri18UaezElpR9Up48T6aP+Wkn/AHwaOeY/YU+x2f8AakX9xgKU6nDgcNXF/wDCT6awx5kn/fBo/wCEl0wH/XP/AN8GlzzD2FM7M6nD3DflQdSgxzu/KuKPibTSMCV/++DTx4i0zH/Hxz/uN/hT55i+r0zsP7Sh/wBr8qd9uhK7t3H0rjh4k00D/j4/8cb/AAqRfEOmFeboZ9Njf4Ue0mH1amdWNQh4wW59qd9viPcg/SuT/wCEi0sY/wBKH/ftv8KD4g0tm/4+wP8AgDf4U/aTF9WpnVG+iGeT+VAvYTxu/SuUOv6Zj/j7XP8AuN/hQNd01m4ukA9wR/Sj2kw+rQOrN7CP4qVb2AnG+uW/tnT+v2qI/jS/21p5xi6hz9aPazD6rTOoe9gQ4LirNhLb3MJk3SY3EZGO1cVNrGn5z9rh/wC+qvaP4k0uC0Mcl2oYOxwqM3U+oFJ1Z2Kjh6aO1jt4GA/eSj/gI/xpskEC/wDLSX/vkf41iQ+LtD2f8fwz/wBcn/8AiabN4u0VgAL0Z/65v/hS56g/Y0+xr3MQhELK5ZZFLDIwRyR/SoQ5pq39vf2ttLZtviCkbtpGTuPqKTrXXTu4rmPOq2jNqOxKGpILiKdnWKRXZDhgpziopH2Qu391SawPDl6YbSUjoz7sD1wKzrVOTRHRh6XtU2+h1ZynDAj60hkxTGuftJDDGFVRx/ug/wBaYauk+eKkzKt7knFdCXzaXzarmjNa8plzstBwaXcKqg4pd1HKNTLIOadiqyNg1OripaLTuBU0m01KrCpAB6Ur2K5blcqaY3FWyoqNk9KakS4lYnioyasMlQlcGrTM2hmacDil2UEYp3JsG+jJNJRTC4UUU6gBtOpM8U3PNAxaSjNFKwBS5pKKYgopKWgAoozRQAUtJRTAWikooAKKKOtABSGlpO9AwzS0nalHSgoWiiikA6lFIKWgoWlFNFPqSkApaSlHSkMUUoptLmpY7jqXNNFGallXHZrI1zU/s6GCBv3xHzEfwj/GptV1BbRNiEGZhx/s+9eY+I9YcyvbWzkyE/vZAeR7D3rKT6I2pxvqyHXtU+0O1rasfK6SOP4vYe1SaBp0ar9qmI+XO0HouO5rLtbfgHtUzaiXt3gtlZolP3h0c/4VnJ9EbovanrLrKFtWKIPQ43e59qii1uaWAiRA6sMbgv8AhWNDC97LtGTHn5m/v+w9h/n21o5raAtFtYhOCyrkA+lZTnGO5UYOWwiGRijRMQPQirQLKvzxhvpxTI5baRwIp1yegzg/lVwCQDHyuKlST2BprctWUEZsxujXDHOGFYUtukk7FAqg9AOKuTrIQdjSRN6qeD9aqLbs52zbTjuDTuIfF9pt3/dTSL7ZyPyrUsL67ZwrRpL3J6GqQhdT8rnHp1rT0g4EpmaNW4A7EjnP9KuMrkyRdTUkXieCaHPfGRWhbyRSBWW4TnpztP61Vu1U2vk7VBcZDHnuP8KoW1u0hIikjdhwRuAP5GtkkYNs6yK5vIFHlNIo7HrWna+JL+LAkkEg9G5NcbC9xZFgnmxk8EjIrXs/tckaPIYCrjI8wc4z145qvZpmTlbdHXW/ieF+Li2x7itKO90q7GHZUz2kA/rXE3E0VvMI5IGiJGdyOCD7gHt+NSwJDOGdLgLjk+YpH69P1qJYddhKt2Z2q6TYyN5lq6xOf4oW8sn8qQw3QDQPMzxA8NL+8Y/oP1zXK24niy1uGbH8SNn+VWLfUr+KQuXYk4z5g44qfq773M6lSclo/uNi7ns7HBu5NzjkCT5j+C9B+VZN34mLEraw5H96T/Crj6nbXH/H/Zxzse4/+vTVtNDuDkRy27E+pI/wrSEVH4os5eT+ZDdGuZ7nT9QnmclkChCONvPOP0pYbuc7o/tDAN/EzdK1rLSRDZzRRX6JDKRyQAQR+I/lQuhhfmGpoRg8/wCW96lVqd3f8v8AgCVr3Of+2XJ/5bSf99UG8uc/66T863P7DTr/AGqnJx1H/wAVQdGX/oKR/mP/AIqtfrFL+k/8haFe2lmbSxI8jbvN2g57YqDB7c/StWKzX7MIZdRhAViw3MDnP/Avaq8+nSIFKlZgwyDG+RXj4qDqTbWx9RlWJoU6Si2k9SgxYDpt+tRlmPUsfpV37DdEfLEQPqD/AFpptJx96Jj+X+NefLDz7HsxxVL+ZfeVldscZH4UoLf3c+54qY206jJhdR7c03yZCcbXJ9DWTw9TsaLE0/5l94wzBeMkfQU4Sdwcf7xpxtph1iYfRaQQP08p8+6ms3Rn2LWIpvqvvFE57/N9Kd5w/uBfqKiMJAyQw9gtNw54RGOPVTUOlPsy1Xp9ywswJ43VMJcDgiqio+QHRjn2xTlRycJG35ZqXTn2Gq0P5i0JT/zzOPXNKbhOhcr7Cqxgnz80ch/4CaaVlXgpt+oqHCXYv2se5eWQdVb8zS+fzzk/hVJY5f8Anmx/4CakEcw/hdR7LS5H2KVWPctiZscAKPpSrOe/zfhVfZcY4gmb3KmkCTY+aNvwB/wqHCRSqR7lsy8dAPpTllGeUb8TVRUlI+SGU/QZpGWbukmB1+Q1Li+w/aR7njyOB61LE6B8nioVHApWXivdPlx8pUyEqcikHWok44qUUAxWY9KbUhGVqIDHehALQKTHOaWmAop9M7U5elICSNioPpUu7IqBTUgqQJKKTNLTEMJ5pKU9aSgYUUd6XFMQqHmnd6BiikMKWgU6luMAaTFJmlzQIWjNJ2oNAC0tIDS0wEIyKjCkn0qWkDUAPC4UAVBcR5bOetWAwNVZHyxNIbEVQO1FJuFG7PSmICM0D5TSZpV5YUASbiRTTTiMGkNAxaXOBSU3nNJjHEjtTTSSE8elKDkUgG45p1BFIakY+m96KKaAq6mM2sn0riZOHNdxqGDbP9DXES/fNaRMpbnQ6D8sSEDPNdK5yB05Fc14fP7kema6Vx8q/So6lx2I+g5pARilcZpmKoY8EUhyOc00CigBd2eoppxuxR0poPrSEKyg845pUxnmkzmmxZaTFMEWnH7rB9K8yuf9bJ9TXp0gIjG70rzS7GLiQD+8a7aBz1dyselNH+sX605qQD51rdmZTcf6XKPerunf69vpVOb/AI/Zataaf9Jx6qa5ZfCzSO6NmKrKVWj4qzHXKdJPH1qwtV061YXtSESig8j6UL0oNAxV6VKvSo16VItMCRaXvTVpw60ATdqDSD7tLSYxCOaiuf8AVH6VKain/wBWaEDOMnH75vrXbWRzaVxdzxO3+9XZWH/Hp9cVUiIFwfdFC8im/wDLIfSlh6GgofjApsVP7UgGKAGzfdqew/1lVpjkgCrOnZE3NUgZQ8Yrh7Y/739K5lf+Plf9011fjYcWn1b+lcof+PhP9016FPWCOGp8TLkXSpU/1dRR9KkX7lamY9vuioYz/pK/Spm+6KrrxcL9KpbopdT1HTP+Qdbf9c1/lVqotITdpdof+mS/yq2Y8V0xeh4s37zIcUoFPKelG2rRNxlFOIxRiqGNxS4pwFLjNMQwDmpAvrQBUiilcTYwrSFamK01hRcVyLZTglOAp1Fx3EC8U7aM0DinZpCuN2c0uynUGlcXMR4rltX0SAajf3bxxOtxApwRkhlYZPPrkflXW1Uu4hIXzziFv/QkrCs/dZ1YKT9qkcbHolqYgTawn6xj/Cql1o9pHdWuLSAKZUDDyxyM9Old1FApQACszWLYCS2GOsyfzrkcmeyebQ6Mo4+03AA7ZH+FWxpAC8XU/wCn+FXYyC5q2qjFO7AxzpZI/wCPmbp7f4Ug0n/p6l/If4VstjGKaq80hGR/ZRJA+0yf98j/AApv9kEn/j5b/vha2htwaaQCOKNQMf8AsluguW/79rTjo7E/8fP/AJDFawIBINPXBFAGL/ZLq/8Ax8f+QhTW0mQ4/wBJX/v0K3sDvUbAE0CMT+x3x/x8IfrCP8aT+x3I/wBfH+MI/wAa3NoC80rbe1F2Bg/2K/8Az2hP/bEf40o0eQ/8tIOn/PEf41tkYzSqRxRdjMT+xXx/rLc/9sf/AK9INIkx963/AO/Vb4UcUFRindiOd/saXP3rb/v3SHRpB/z6/wDfs1v7cmnhVyQaLsZzraLJnGLb/vg0n9iyL/DbH/gJroWA5xSDgjNF2BzcuiykD5bX8jWl4a06WI3ayShQkYdFjAwOQO4960ZAMVf8NW/mz3uenkf+zCplJ2GhkNrNs3eax+qqf6VFJbyi8tkaTKvIqt+7ToTz/DXWxWaCNRjtWfqNoFuLXA+bzkx+dOLEy5BF5UKRbt2xQu7AGcd8DipcUntSivUWiPDd27sramdum3bZxiJufwrjdLnC2q84FdfrI3aTeD1hYfpXEadGRAoB7CuOv/EXoepgv4T9TvNOcPAWHQkf+ggVaNV7OMRQKoOenP4Cpia3w/wR9DixL/eS9QNLTc0ZzXQYBR3pM0oNMBc09TUdOBpWKTJ0arCtxVIGnh8VLjc0Ui1vo31W3mgNS5CuYmY5phFN3Uu6naxDYtMan0hFMRHilxTsUhFUQMIxSUrU00WAXNNJoNNp2AUHmlpvejNMB2RRmmZpaAHUUUUhBQKKBQMWk70YpaACiiigYUUuKMUwExRilxS4pDsNxS06jFA7DadSYpcUDAUoFJindBSGIaWiigYU4dKbSipGOopM0ZqWMdVPUr5LOLJwZG+6v9adf3kdnAXk6nhV9TXnvibWmjZgrBruToOyD1rGUuiNqcObVlbxLrjIzwwyFrqT775+4P8AGuds4QzetXdF003UrSzElAcsT1Y1Z1zT5ChksRGkRGJNp5HrgdKylJLQ6kjNldrpvstt/qgcSOP4v9kVpQwiCNUQDf2HoKi0+EQwqFUbuwqrrGoC2/cQsDO333H8P/16xbuUuxZaVZLhrWB/3mMyP6ew96u2witYWJACDt61kWlpsgV04fPPqTU12kry45x6eleViJOU/Lod1KKjG3UjMVve3BLRAHqcccU+9hezUNDPImxfu54z6YqW3VbYeYxye59aHg+0oJZXKoSTjFVCMrpL5hKSSu/kR2mpXKjEqrIPyNWV1CJ2HmQyIepIGQPyqJZLKHiP96/+yN3/ANaoZryVhhIdg7F+f0H+NdkqsY7s5VTlLZGtE8EnMUoz6A/0qTa46FWrlpYZZOX3Y9F4H6U6Ga7th+5uJFA7NyPyNZ/WoJ6Gn1aTR19tdmBDGyHZnJyA35elNAWZ2bgbmJ54rDttZnUf6Rbxyj1UlT/WtW11TTrhsTPJbt33puH5rmuqGIjPqc0sPKGtjVtJprcjypnAH8Ofl/KulRY7poZXuYyHVQcDByAAeOg+lc3bQJM2bKWOf/ccEj8KnEd1AclSF9HGAa6ou+5yzj23On1SO3kV5JWlUQ89OxIHSqUFv9oYLbXUMgPRCdh/I1UOqK1hLBJG5ZgArA5A5B9M9qrxyBsLHx7Ac1s5K+hzKlK2ptG1uLVt0qSAj+5z+vStpTcTBFe4y+1cI678cA45ye9c1ZyvAy/v3iXPIRucfTp+ddRDEL29WSOZXSR9+0ce9EpdzGcLbhLGtnMF1GCMAruHlPhj+HP9KiVrd+I5Xhz2K5H5jmr+qWSTB5rpnjWEfwkdC2M/qPyrMWG1LYtbuOT/AK7Ax/5/OiElJX6/gZKUrbm15CtpUCQzRlQxZnIIBP5UyS13woqzQ5GSck9fy+lRlblNMSLLM5fcQjZAHtioBFdAfdl/OsoxffqRzsmGnv8A89of++j/AIUv9myHgTQkn/aP+FQrHdlgAsvp1NFzdzQBooZXyOGkEmCfpg8Cr9+9kxpyZK2lzLgM8YPoSf8ACpLmCRnVI8FY0Cg564HP65rDeaf/AJ6S/wDf0/41Xae5z/rJsf8AXZv8av2U3q2bU7p3N0wzA8/zpjwy9x+tc9JcXnP7yXj/AKbN/jUDXV6u4ebcD1xK3+NS6bOpVH2OiFvJNKEUDJ7k4qJYWVTnGT71zbXN5yRJOB/11b/GoXub3/npP/39b/GocEaKb7HWTqwi+9z9apGORwAeR9a5qS5vOQZrj3/et/jVc3V7nia5A/66NWTgu5qpvsdetq7Z+bjBJywFMVHUf/XrkXu77/n5uR9JDUDXd53ubr8XJqXDzLU32O48okZb+dMLOAR1/GuDa8vQCBcXP/fVQPd3o/5e7r/vv/61ZOn5mqk+x3YD5wuQPrUjNIMAnI9q85e8vscXt3/33UDXmoDpfXQ/4HUOC7mibPTGd85LGo/MO4nr+NeZte356391/wB91Xa8vieL66/77rJxRqrnrMdyQNoJHtmoZSzNu3HOema8vW81ALgahdAf79L9r1H/AKCN1/32amyK1PTS5C7iSMe+KaTK7cOwHU/Ma80N7qP3TqFz/wB9Un9o6mo+XUbjP1FTyhc3S21uehpBKMjGfpUrpv8AY037KezVzKwxUw3NKOtIi7ODTqYh5+7mmEinq2Bz0qOkNBRmikFMBwNOFNpRSAenNSCmLjHFPBqWAvSnd6bSgc0IGKenNMNSYpuOaYCAUppaQ0hCilzSCgcDmgY8dKWm54oNAwooGTn0oqhAT0p1NpcUgFpAaRmAHB5qPcSeaEmDJGf0popOooxigB6nmmyLzkjijdzSs2RQBXYYoQ81KaSjYBCM/WmhTuyafQTk0XGOBz3pQKZT1PBFIA6ClGNvvSUUDFAz1ppHpS0UmAUzcM4pxphUZz0qRjjxRmgmkFNCK99zbt9K4ib/AFhruLwfuW+lcRcDEzfWtIkS3N/QB+4H+9XUOMIn0rmPDpH2Vs9Q1dQxzDGR0xUvccdiIrk5oAznFK2cUwEKTQUHfFFAO7mlpjGGmMKmxVeVZTONvCD9aBDxT4gRKDSCnxDMgpCLEpDxLXmV+Nt3MP8AaNekqCUHoK871kbdSuQOgc/zruoHPW6FA0ZwwpVGaRutbmZSuP8Aj+l+lWdNOLofQ1Xuv+P5/pU1jxdp9D/KuaWzNI7o2lNW4jxVJKtRnoK5DpLaCpkqCPoKnSkJkwooWlPSkALUimo1qQVQx69qkHWohUvegCQdKB1pqninUhgajm/1ZqTuKbOP3ZpIZxl1/wAfDfWux07mzU+wrj7zi5f611+lnNiv+6KuRlEuH/V0kPQ0r/cpIe9BZLR60hOKRulLqBCeX/GrtmcTLVRxhxVm3OJBVAVvG33bX6n+lcmf9fH9D/Sus8Z8w2Z9c/yFcmf9bF+P9K9Gn8COKp8bLqdKkT7lRp92np92tTIkP3RVf/lsD7VOfuioD/rBTW6KR6xobZ0i0/65irxrN0E/8Se0/wCuYq/mumJ4k177FNJSE00nNWSkONNozRmmOwCnAUmaUGncGKKkWoxSg0EtEuRTGNNLU3NIFEfmjNR7qUGgqw/NKOabUqgYouJoB0pw6UUhqbkWDvVe5YK7Z6eS3/oSVYrM1suISYwx/dsPlGf4lrGr8LOrBr99H+uhYhlXYORWdq8i+Za5IOZk/wDQhWfDNcqvMM3/AHwaqX0k8lxbfuZuJUP3DxyK4mz27GGv3z9atR9DSLZfO264jBz0wf8ACrUdooH/AB8Rn8/8KFNCsyNhxyKYetWGtc/8t4/yP+FJ9kBP+vT9f8KfOgsyuAPTrTT2FWTa9vPjx+P+FMNn82ftEX6/4UudBZkOOelFWDZt2miP4mj7E2eZov8AvqjnQWYxeSO9BAzk1OLRh0kjP/AqabR+pkj/AO+qOdBZlcjOQTmggenSp/scmOJI8/71IbSQ5+eP/voUc6CzK/XNAGBxUy2Uo/ji/wC+xSizmPGY/wDvsUc6FZkSnnrUg5XpT0spc8tH/wB9inG1mxgbP++xT50OzICMDg0mBnJqb7JMe6f99ig2kw/uH/gQo5kFiueKTGSM1M1nOcfc/wC+xS/Y7gfwqR/vCjnQrFWXgcVr+EG/f32f+eP/ALMKzpLK4I+4P++hU+j+ZZy3gfAPkA9f9sVMpJopI7WEjaDWfqZzdWfvMv8AOs+DUfl5aq9xe+bqNiu4f69Rg1UCWbwpaKbLLHEheV1RB1ZjgV6iPEe5R19vL0W+YdoW/lXFadMArADPzmur1++tJdIuYkuI5DKpjxGwY81z1tawW8QWIv65bBJ/SuTEfFc9PBaU2n3OxsJfNt93T52H5MRViubsb97XILGRDn5TgYJOc9K6YAtCsyo4icZUsK1oTXKo9jlxVKSm59GxhIAyeAKpNqunrJ5bXtsHzjBlXj9a5v4gX8sX2e0jcpHJlpMH7w7D9K4dJUS6GOf/ANVRWxbhJxijqwuXqrBTm9z2hSJIlljKvE3AdCGU/iOKWuf0cQx2Ni0L5keXDYPbBroMVeDxLxEG2rWdjDHYVYaoop3TCilAoxXccYAmng0ynCk0Fx2aXNMpe9Kw7js0oNNxRRYdyUGlzUYpaLDJKYxpKXGaLCsRmkxUmKNvtQFiLFNNTFaYVp3E0R0uOKdijFMQ3FFLilAoAKKXFFIQmKMUtFAw7UUopQKBiClxRiloHYKKUCjFA7CYpaUClxSuOw2in7aXbSuOxHilxT9vFJii47De9GKdijFK4DQKKdijFK47DaUUuKMUrjsFQXVwltEZJDgDt6n0qSaVIYmkkIVV6muG8Ua4I0Mj8k/LFFnrWcpWLp0+ZkHiXW/Lcu5DTMMRx+g9fpXHwq00rSSkvIxyzHvTVaW6uGlnbdI55P8AQVPcSGEiC3x55HJ67B6/WsW7HYlbRErX0luslpagmRuXYfw+31qtYfaknPlM6A8MP73tir1harbplgSx9epNQatqH2MGOLD3T9AOdgrFy6FW1I9V1EWEZhgO66ccn+5WRa2zORJLyxOeec1Y0/TXkY3F2+0feJJ5P1rSkvYLWPFtFvY9G6A/j/hxWcpqK1NIxbem5asl2gRzggnGB3xTruREYgtkCmsruivIAJCozjsafcRq0ihABIPmLEc+1czpSv7rsjVVI/aWpAkclw6PINsYPyrjk1Lq1uH09sKDsIap45o3mCE/vVUEr/UVNcIJI3X+FkIq401GLSM5VG5Js5uODA/dswNXoZ7iNMMqyr7irFnBiFSwqXyRI2FIUDlmPRRXmK8nyo9FySV2QIy3DrGsDhz/AHelTvYqCY0k3zAZKAZ2/WkErTL5GmkpHnD3HdvZf8fyq5a2cVsuEX5jyWPUmu6nhYpe9ucU8TJv3djPNlIODDn6CpUsWbgwNj/drVXeuNrkfrVndJs/1h6Z+6K1jh4rqS8RJ9DMt9KmlYeXEQc9fu//AF66mwhksY9+pai5UDi2H7xj7YbOPxxWRHNKRjzHwffH8qcVCr83+FdlKChsctWcqis9DRXU7YTOZrBDHn5djkMB744J/KpYbnT7tljSaSFmOAkkfBP1XNYjsh5OeOmK09DxbpNqRjBEHyxDGS8p6CuqOpzSXKtDXbRpI2IjdZGHVYWyR9R2pILu70/ekabVcYZXB+Yf59KybTw9reozfanhkiLsXM052c9c+tdTp9m9pbGO81JrqQkHhPM2juAT0z657U1IyqWWjdxkmrST2EtvLCY9wADs3GMg8d+3vUNlA1wcQRyTH/YXAH41q29mhbfFZqf9uc7v06VamaNE/wBKusqv8EfT8uBVqfLpFHO+WOiNXdDFDCGt41+XAy//ANlTmnh8s+VHBvxwTJ3/AO+qyTq8EltCqwM0KZCE4FINStVHMJB9ME/0rl9jJ7oz5Et0SyRSuzEi1LE5zuH+NV3s5Gz8tv8A99r/AI1INTte8J/75P8AhS/2laZ/1J/L/wCtWqVRbItSRWOnTnIVLYj/AH1/xqFtJuif9Xa4/wB9f8avrqVnniJs/T/61K2qWbMFigcnHT+Z6VXPV7f195SmjPXRrmRgvk2fPH3x/Q1lvEoJBW3/AO+TXTDU4Idk3kkHJ25xjI/CsGRUb+IflSTm/iOmm29yhJGgwQkH02mmsquQfJtgfYGr5hiwCzjpnp71C6xsflYAfQ1mzoRQmCO/+otgfZTSeUmc+TAD6bauPFHkkbRz2zTCg7kfrWbRaKUsUZ48i3/AVB9nj6fZ4G/E/wCNaZiTH3hmoti56ioaLTM/7JEx/wCPaD8z/jTXsLfYT9lt/ruf/wCKrSZBnqMUeWrAgkVkzRMxDaQcf6NAfxb/ABpptID/AMusI/Fv8a1miQDjk0zylOCcVLVy0zNjsLd+tnCR9W/xonsbTAKWMC+4Z+fzatbKJlRj8KYkaM3IrGUS1IyPItFODp1u3uWk/wDiqla0swozpkC/9tJD/wCzVpmKBCDnmifawBPNQ0VfQxfstr0FjCPfc/8A8VTHsIGHy2kY/wCBN/jWuqIMnFNHU54o5RcxnLkGng8UwnpTh0rmLGydc1HUz/dqKmhAelJTqbQMQ0dqM0CgBRThSCpEQtk9BQF2NyRTweKcsQI681HLGUxznNJagTrwOOacBUcPEYzUh6UCFpDSA8UhoAWkFKBS0ANzzUjDIzTaKLDFWkY80mSKKLDHKwxRTO9PB9KBAR3prU8nNJQBGw4oVcjJpxHNFNBYTtS0oFFIBhUk8UvTiloIFACbS3Smn5Tg1JHwDQeucUMCMHPSjGRTzTWIpDv0EANOFIOaPxptCEAxS5NKBmmk0hhup2RTMU4jipGG6lzkVG5x0pu7AoAm7UlND8Uu4GgCK55jNcRdjE7/AFrtLkZU4rjL0YnfPrVxInua2gH91IO2a6yM4toxnNcl4ewUlH0rqouIEzSe41sK5xUDZJqZmBFNxQUJGNo5p9JQBmmAtITmlPA4plIA6VNb/wCsFQ05GC7ifSgCeU4OEHANefeIF26rcf75rt5pD5yYzg84rjvEy41WX3Oa7aD1ZzVuhjp1pp60v8XFI1dBiU7n/j+b/dFS2f8Ax9J+NQ3R/wBNHuoqWz/4+krmlszaPQ2U61ai6VVXrVqOuQ6ETRMelXEOapICCKuRdqQEy07qDTVowSDikA5akWoU61KtUMeKlNMjGakcYOaQCr0paap4p1AxVHNJOPkNOXrSTfcpIDjL7/j6f611mkn/AEFP90Vy2oD/AEp/rXU6RzYp/uCrkZxLbNlQKdD3qM0+I4YigskPWkznFNk+7SKeRQA5sZFTQffWoe9TQcuKYEHjH/jzsz7n+QrkmP72L8f6V1vi/mwtD/tkfpXIv/rYvqf6V30vgRxVPjLqfdp6dKYn3aclbmRKfuioG++v1qbsKhf7y/Wi+xSPUtAOdGtP+uYq8TWN4f1BI9Ito2jVmVByWxVyXVVX/l0OB/ECaz+v0ovlb2MHldab5kty3S1VTUVYZECn0w3NRNqyg4azZR/eySKpZhS7j/smv2L2aWqq6lHtz9m3fRjR/akOPmttvpljT/tCl3F/ZNfsWqM1TGrQbsG3LD/ZNNi1SMKqyRfP1JJxR/aFHuH9kYjsXs0bjVJtXt14Fs7Y64NOXVIHGVhP/fVP6/S7h/ZNfsW80VRbVI0Y77d8DuDTk1WCRcxwsR9af16l3F/ZWI7F0UvSqI1a3Bw8Dg/Wpf7Tt+0Dn6Gl9fpdw/srEdi2DUitVD+0rfIDRMp7AnGaY2pwxsd0bvk8bewpfXqXcTynEdjV3CnZrNTU4GGRDIfbIobVoQDmGUD1FH12l3IeU4jsXmbmsq7upFuHRZWUA8D8KyFgtmbMV9qzDpxcA/0oezsyTuutULHqTIufz21jUxdOStc68PltWlLmsb0N5JsAMpqK6vpg3yyZz6gVirZ2qAg3mrAeolT/AOJpy2tiMg3+q5YEDdImRnuMrXO69Pujs+r1ezJNQvZEu8bIvuqc7Bk5ANIl+TnKRE/7tVJ9Kst4aXUdYdsDkvEeB0/goi0qyLkrf6oVx03R5z/3xS9tS7oPq9Xsy4b9/wC5EMf7NH245GY4v++agbT7BMlr7Vh+MZ/9kpBZac3Iv9UIHbdF/wDEUe2o9w+r1ezJvt7c4hh5/wBio2vB/FBAf+AVE9jZZ4v9Tx6Ex/8AxFB02yAyb/Usf9s//iKPbUu6D6vW/lZOl4N/y21v0/uU4XMfP+i23/fFVYtPsg3/ACEL/B7EJ/8AE1KdPso0+fUL057lUz/6DR7aj3D2FX+Vk/2qMYItbf8A74pPtaZ5tbf/AL4qvHaWZ/1eo3jdvuJ/hRJaW6Oo+33WMHOY1J/lT9rS7oPYVf5X9xP9qi2/8etuT/u0jXaHH+iW4/4DUcdlavyNRuf+/a/4U46da551C5H1jX/Cj2tHuL2NXsxBcQE82kOfYU9biEpzaQ49ajfTbbBP265I/wCua0+OwtWXi/ucf9c1/wAKPa0e4exq/wAr+4eJbbI/0WKlM9vjAtI/zpr6fboQWvbgL/1zFOWztHAKahMf+2Qpe1o9w9jV7P7g862IGbVM/WkNxahuLNCPrSTWVsnB1CRfrB/9emmxjbb5eoEr3/ccj9aftKXcPZVOz+4DNbHraJj/AHjSCS0GMWg/77NH9nRFsDU8extv/sqDpaKc/wBqYHvan/4qn7Sl3D2VTs/uEkksyebP8PMNS6ZLD5Mvl2kABYqd+WJA96gbTkbJGqhv+3Yj/wBmp8FgsCH/AImSBCc82rf/ABdHtKXcPZVez+424TblBmxtc/7lQztapIrf2faFlOVOzkH1qnGvHyajGff7Mf8A4unvCvBfU48+9sR/7PVKrTXUXsqnZl1mDEMF2ggHH4Vi+I71LZbZGcKXkGCfXtU19qkVimZLmKc7QABGY+nvk1w3ivUotZeIefFCsZzjdu5/T3rvhXhOFkzzvqlSnV5pLQ9EsNG0zxBZyTbTFdY2yBD9w9iB6f8A16ik8KJH8v2qQMvH3RXMeEtca0uEeOZZnQYkCn76/wCf1r1WNory0juYGDq67lP9D71xVeaL0eh2p33OLHhUZ4vW/FB/jXTaVIVjGm3e1sJiNsYEij/2Yf8A16dJtBztwKhuII7lAC5RlIZGHVWHQio531G1dWPMfiyhtNftoTyvkbwfUEsP6GuDhfdc5B9a7L4uXLza9aecMTJaqj4HBO5+R7c1xNuv78Y7g/ypubk22ddCKhBRR6R4dlUiwUHJEo/ka7jFcB4bQpc6cgHVwf0Neg4rty3SEvU8vNnepH0ExxQKXFLivTTPJExRS4p1MBuKAKcKXFFxoTFKFopwpFgFoIpRQelK4DcUopQtOC0XGIBRgU8Cl20rjsRYpNtSlaaRTuJoj2ijaKdRii4rDCtJipMUEU7hYixSVKRTcUCsNxSU7FGKYWEFLRS0DEpwFAFOApXGgoC04D0p4WpbKSGAUoWpFWnBalyLUSLbShamCU4JU8xSiV9tJtqz5dBi9qOYOQrbTRtqfyj6UvlUnMOQo3E8Nsoa4lSMHpuOM1AmqWDnC3cGfdwKx/Gd8mn3lj58fmQMG3gde3IqS00ePULKO9sD51tJyHUd+4I7H2rzcTmDoTs1oenhsBGtDmb1N8YIBBBB6EU2RljQs5AUDJJ7VV0y0NlCyySY3ZKx+gHU+3X9DXP+JtZRY2y+22TqR/Ga6KOJVamprqclbDOnUcL7FbxHraBGkkOIF4RM8uf8/lXBqs2r6iGmbDN09FHoKLy5l1K582ThRwif3R/jT1mNg6NGA0zfdX+p9qpu3qaJW0RrXdlH5CwWjRJcoMgtyfqRWXp1t5DM02TJnnPJZqqtFcvcCRywZjnzAatX16LCLfId9ywwint7msmUiTUr9bCE8hrpx8q9kHr/AJ61ztqWkkMmC8jHJZ/X6U2OOS6nMkpLMxySe9bVtBHboGcZPZR3rir4nl92B10sPfWQ3ySIhLdMX/uJ6n2FLbQM8ytIMknn2HoKtwxNNIXlwT0AHQD0FX4olTnj0rijJ1JpM6JNU4OxDfTLb24kwCwOFX+8x6Cq1k7vbRmVi0nIZj3Oc/1piyC+uy5H7lAVhHqe7fj/ACqWf91DIBwy9vqK7HXTqcqOX2Vocz3K9rG0k8l1yvUqf0FaFtcebGA2BJnp6+4qEKI9MIzySAP8/j+lQMoEYIzkcgiuOOIlGbfRnRKkpRS7FtN8kpgTAI6n0HrURP2+X7PCSLJT8x7yn/CkuGfatqMCaRQZ2XjC9h9TVrTwsT7QAAB+Vd9KkoNyW7OSc3JW6IuwRCNQqgAAdBUzbQvLc55xVN7ocqDgZpnnGT5Y1LN6KM1uZWNDzEwMZxUjXMKAZJOeDniqMVncy/fKQj3OT+Qq/badaj5nWS4cc/Odq/kP8apITZW+2FnEdshLdggyTV+LSryUbpzHbK3JMzc/kOauRyGJCkWyBcfdiGM/lTrdGk5SNn5+83Sto2MpNi2+m6fER5rT3jjsP3aH+v8AKtVL6WC2SG2EdrEDwqDn8+tZzS28AInu41OeUi+Y/pxVaXXbGI4hhEjdmlbP/jo/xreKkznk4+p1lrf2f9nx/aZJpJI87lweck9/yok1nymKWlkQw7tjjjpk1zmmaxdXryxEbI/LyF2hR94Dp+PWtHUJbv7Sy+cY0LE5JGev59u1aqCW5zyi27Fie51G4UvcTpbx/r+Z/pUEK26gT7jcyZIDuxIU+1VvLi5Z2eVvU/4mrMEu2CFUiQZMhzjJ+7WkX0QOnyo0VlcWVuucDk4AAqa3uJv7QkRMMBCSQy9xmot05t7cZkxt461JZm4bULogzHbCwxk+9KVuVhbURdRvC3+pt/1p41C8A/497XH0NQx+f/01/WpQZv8App+tNxj2RXKNfU7tQf8AR7U/hU63Mj3Qcoi5t/uhRxn8KrSvKoyfMOO3NTxzTrdyAmT5YFXknjIFQ4rohNDLuQMkCS995GF+lU7do5mkQcbVLfd9Bn1qzfP88AmLnEbEc+v/AOqqWneVuuT8/wDq29PSq5fdLje427zFIFUwEFQfnLAjI9gagZ5D0+y4/wB5/wD4mtG6tEnm3o7hdqjGzPYd81CdNz/y0f8A74/+vUpR6lrmM5mlVhl7YAnsXJ/lVuK1ZrtYGmQE9SIz/jTbmyEJjkZpGRGBYBO351btngbViys5AGRwPT605Qja6KjKXNZmYFLlwJlG0Z+4f8ai8th0mQ/VD/jU1v5JaYbn3FQOQPX60ojT+82Pw/xpOlHqilOXchCyA8zR/wDfBpjh8cSxfipqyYlx95v0/wAaieJCv3mz9B/jUujDsWpyK7CVYFfzYfm/3v8ACnXFtdRW5milty/l7wpLAdduM4NJc+V5EC75Bhf7o9frWpPEklsIxI6kwLjK8feJ9ah0ILoaRmzknur9dxMdmcc/61v/AImqk+t3sQ5trbj0kP8AhW9No8j52yofwNZV7oNywIDJ+tcVeMIrQ6aeu5R0/wARyXTMHtowVBbIY/4Vp6hfy2+nW10UQifcQuTxjH+NctZW8tlPdRzoUkWM8VueIjjRtMA6GNzj/gQH9K429UaWLD6i8RTdGrZRW4OOozTf7WY/8sBn/e/+tVe5hlkkQxruURoAQR2UUwWlx2iJP1FCaIZfI4FKlA+YCgDBrkNhX4U1FmnN6CmYoAdTWHenUhpgMpwoxTkQseKAFjXc+D0qyOBgVGsYDAhjxUlS2GwU3aCeRmnUDpQhB0peoopCOMCmAUUg3YOaByM4oAWgGo2lVJAsnGehqQD0NAC0HilFIw4pjEoz6Ug60u3n2pDCkzg+1OxgUxxnkUCuO3j0NLnIFQeZx71OvKChAFJ1p1Jg07jAUppKM0gEpe9GcUZ9KBWFHFIT+FKKZIpYcUALnNIwGKRV2JzTC1DAeBxSUwMacXJJz2oQC7gOM801x8poK5OaXGeO1AEMbbal3etRvHj1xQi4ShgPOGPymgAAfNimp96pCgPWpGNAGTjkUjU/AUcUjcikMhl+4fpXGaiT9pce9dpJjbXGar/x9vj1q4kSNHw2fnkB7gV1p/1MYFcb4cOLh/pXZdYY80nuOIynHpQRS4BXBoYxm4dKVTUJBDkCnhgKLASZpG6ZpFOaDQFwpmf3mKGJGKdHjeSfSmgBULOHPYVx/igf8TNj6qP5V20f3B3rjPFi41Af7grso7mFXYwu4prGnGmPXQzFFO7/AOPtP92prQ4uY/rUN3/x8If9mpLf/j4j/wB4Vzy6mkehtr1qxGcVWWp0NcZ0lrPIq1F0qkDlhj0q5CeKAJweKev3SajzxUicrikManWplFRIOTU0fSgCeIfLUkoyhqKPg1NJ/q+KAK6VLSAbRRng0DHg8USrmM0i5wBUjDMZpAzjdQH+lSfWup0YD7Cv+4K5jUhi8k+tdPovFip/2auRnEsEYNNyQcipioxmoscmgoQsSOamQfu896hYYFWAP3I9qBjM0+FsPmoz0pY/vCmCE8V86Xan/b/pXJyffj+prrPFXOlW3+//AErlJfvx/Wu+l8BxVPjLcfSnJ1psf3acnWtjIk9Khf7y/WpRUb/fX6mpb2LR2GnSkWFuCoI2gcda0oz0IcfR6x9MQtZw7JCGK9BV1mMKZlTp128/pXztaX7yXqz6WhG9KL8kWp3UjbKDg948j9aWFx92NwcdQ5yf1qoknnJmCZ/91lx+hpjkrgyp067Rmp5iuUuSiJiGcMrj+7/9ambt6nZtfH941CSxXKSFvbGKbvw3zrsz/F1o5i+XsClDkgvE/oop2XZBvCyH+9jmlBUgmN1lweR/9enEg4O0Rn160cwthq8HALL7HpTpnG0ZVAP9nrUqq8g6+Yp79KgKp5m3zDCw9s5p8zGvMZHMFACyOc8ASk/1qWQBziTKejIf6ike1lLDOJE656EU6EKCUDFG9Cpx+fSi4roZv6Ju3j0Y02I4c5BhPXK8g1NMm4fOhfHQigCPbjzFT2NHMO5AWkkYhj5q9twwRSoSuQpZDjtTmGCRJFu9CDQiu2NkijPRcGjmBsnRmKHKo3qc02GQhjiaTH91un+fxpxiEaF3jK479hTFfzUJgmjkx2H+NHMSyZgrpkoMf3lOaYoEageaWHuahDiEAshj9dvIqcyFo85VlPYDmk2CGEbHBEZUH+IHOKJJHLYLrIvdSMUgYA4AaMerdKe6KMEbJPoelTcBn3G4GzPtkU6NVY/cWRv727FI2Cf3XyH/AG6au8t867h/eWkNeQ/eVbDSPGP7nBB/rTcCQnagJ7sppGmRHCedHGx6LJ1NM2MshLqD/toetAbDgmwE+aSPRuoqJlGAyox91PSpllB+RXXcOSGHNRkBCW2Nnvt6UhpjWLmMASK6nqpGCacq7F3eWy9z3qaFd6k7kOOoPFMkdQMbHVh0x0oAVSrNkhXPtximyFkYHeYgO3BB/OgCZl5KsPRTzQ8RC7juU+rjgUDQK6SPkKrMeNynmnruVyfNI/2XHSq7xNIoZfKlA5Hlnml3eUPnbaP+mnT86A06krBDyFZj22tTkkZkZQyDHVZFwahZGO1iB7GM0itl+Dgj+/1ouFr7E4O3HyEfQ5FSRurkE7TjoBwarudrfMG56lDmmKzE/utv/AuDRcnlL0obHyhkHqRupq+WSCQjv6pwagjkYjDbuOuOQaVsvwvlH2JwadwaZOYzvz5m0f3XH9aikRTkHJ/3DUSuyDHzqBxhuRRu8wkL5ZA64PNAJCqW+4Ng9pVx/wDWpnBXowI7BsilMq42tuJ/2hwKkWPjdgYH91sUbDGKQTk7cDsODUsrNj91uGe7DcKaGT+EFiez8U8plc5CE/3TmqTFexmanapd2zB9nm46xjafyrz3VLMwSMATj/br094MOAPLYn+9xmub8SaPIFaRUYA9QpyK6cPVcXZmdanGcfM4i0uJLO5WWMkMp6DofavW/AviRFREdv8ARZjg7j/qm9fp6/ga8lmt3jYh1XNXNCvzYXe12Jhk4ZfT3r1YtNWex41WF9tz6KuIerlRz1x/OqTIoPH86yPD3iSFNMlTUZgq28ZkEh53IBkj3IH6V5X4s8f6nd6pjSJntLVeEjUAs3uT6+3asZJxdjOnBz2LvxfX/iobYntarj/vt64q1cG4GPQ1LfahrV/cCW982eULsDOqnA9OnvTIZr6I5+ykN6+Uv+FHLPsdkOWKV2eh+G/3l9pgzwGJ/wDHTXoGK8EOp6wjK0JnRl6FAAR+VW18T+JhsX7Xc5JCrwMk+nTmu3BuVKLUkcONw3t5qUZLY9wxRisnwkuqDRIjrhzeEk84yF7Zx3rYxXqRd1c8KceWTje42ilxSVaIAUtJQKBjuKUU2lHBoGPpQKQU4VJSAUopyqTTxGaTZSVxgFPC+tPWM08rgVNzRRItmaRo+OKkNANF2HKiv5ZoEZq0BmnCOjmHyFTy80vlZq8sQp/lDHSpdQpUrmaYqY0eDWr5We1RyRADpQqgnRMorTcVakjwahK1qpXMXGxHSgUuKcBTuKwmKeq0qrUipUuRooiKtSqlSJHntViOLNZSkbxgQLHx0p4iPpVtY+KkWKs3UNo0ykISamS2Jq0I6lUYrOVRmiporLbDHNOFuuOlWc0o5rJzZpyIri2X0pj247CrfAppOazdVrcHBHj3xjf7Pf6cM8GNsj8a5Pwr4j1DQ7uX+z7too5GBeMgMjfUHv710/xvm267ZwHacWwbA5PLN/hXK+GdKCg397hVHzIrdMf3j7VztLEKy1TOunNUoKR2F1qtw0c1ze3B+dQHY8YUc4x25PQVw2o3suq3WQG8lOUjA7ep96k1e/OozhI8/ZkPyj+8fU1p2S2unWCTSn55PbJPsPauulTVGChE4qlR1JOT6mO0qW0SsQGkbhE/vH/Cn2VqfmnuDukbkn+gqWSzg88XUMxljbqSc7fb2+lS3t3HY24klwW/5Zx+vvTcrk2IdQvEsYQ7gGUj5I/T3Nc5GJb26MkpLMTkmpljl1G5M07H5v5e1b1pYrAqgoSTyE7t7n0FctWo5Pkh8zphBQXPMNNtoIVVpkkdmOFRAMn1PJ6VpNFZyEFkZG6AsvT8s0+3h2ZZyGkI5OMceg9BUzAHrThRjFWauZzqyk73Kc9g6R+ZasGX0z1rKvbl5IltFyskp+c+idP15rYMrW9yfLOV/iXsaqazbL8t5COcfN9KyqUlC84bmkKrlaM9iGALA8RA+VSB+FJdsJJST3wfyqs10hixnmrCo9w8TRozKfvHsB3rzkm3odjstxLp/nijPAUZP1/yaWOVFMkz8xwDdj1PYVMdKmuJ2eaVYweyjJq7badbxW4iK713b/n5yfWuqhh5cycloc9WsuW0dzMs2fymYI0k0p3MQO9TQ2lw7HzGWPPbqa2NqomBhRVK4vra2/10yAjtnJr0EjkuPh0+NB826Rs9WNaEIVPlQAAdgMVzc/iSJMi3iaQ9MngVmXGvX0pwjiJf9gc/nVLTcVmzuZHSJS0joi/3mOBUE2uWEIx5zTEdo14/M15880srlpJGc+rHNSRckdz71onEHBnXy+KGJxbW6Jx1I3t+vH6VTm1a8uv9dOcehbOPoOgrGjRjgNwPfgVbiVBjJz9BW8ZPoZumi2sm77xd/qcD8hVmAyNnyxj/AHR/Wq0bDoqD6nmtCC0urgDCOV/2uBWsTOSsbnhKGUXkxjbLlFUhDk8sD2+lb11DI96+7qSTgcnqazvDGnTwu4HzlmTKp2AJroF0y8xtuJYLePJxvck8n+6P8a1TXVnLN2loU1twD85C/wC8f6D/ABqXzBHGiROqlA3G0Bjn071oRaXaxR77iS4lUdSSII/z4P6moH1nSLDKxG1Qgci3j81m+rHApqa+yrmbk3uT+VcukOI5T8o5waEjvYriWWOKYljjJVun5VUl8a27sNsV4oHGAVpyeLVc/JDfMfbaafLVt8InK5fSbU0Y/uH5/wCmZ/wpwuNU5PlP/wB8H/Cq3/CTyY/49dR/75FRv4pZBl4L9R7haXLN/YQr+Zae41FwQ8LEdxsP+FJGbl7idik4BRQAQao/8JnDuHF5n2C1DN48sImxNPcIR1DFM/lnNDU19lIuN/UvahJEjxi5tZJZVTAbzNuBk8Y/z1qCK7t4w4Wwl+cYP74f4VlX3xE0aSJEZXuCCTmTjH0wao/8J7ouTm0THbDH/GhJ21X4mij1szohfQKAFtLkD2uB/hSnUIf+fW7/APAgf4VzP/CeaKXwtmCe2Cef1q1H4ntpMldGm244JDAfqamTUd/z/wCCaKm3smbLajAAQbe7x/13H+FRRX9nFIXWzutxBHMy/wCFY58R2ZJB09F/3pgP/Z6dD4g08SKz2duQD90z5z+TVnKrBbtff/wTWNCXZl9pNOPJs7sn/rsv/wATTd+mY4tLvJ7ecv8AhVVdUtpATHYROeeBcAfzasi68WabazvDcaZLHKvVSx4/WiNaM9IyT+Y3QcdWmbrPph/5dLz/AL/L/hUbtph6W18P+2y//E1zreMtJHSxk/77P+NRHxlpZ6WMn4Of8aHUa/4capI6JzZYAWK+wOmZF/wpZ7uJ3VhHfIVUJ8si9B+Fc23jHTwM/YZfxY/400+M9MP/AC5zf99f/XrOVZs1UDfa7ABwNROf+mw/wqCS5PZdQGPWUGsf/hM9Nxj7FN+f/wBekbxfprDmyuB9D/8AXrlqS5jRKxYu2FxlZY7tuOpK8frRemG9igjmt7oJCnljaV55Jz+tUW8V6bnm0n/Mf40L4p03JJs7nHtj/GuRo0uB0+0z/qr8D/fpDY2vaO/HH9//AOvTZPFul5x9luv0/wAamTxFZzAGHS9SYH+7Hn+tS3bcLXLtu/AweKlkIJ+WqlqpCrnvVoiuc1EFKelJSSI0kZCNg+tMBw6UGmQqyLtc5NPxSAdGueT0qcdKjjztqQUgDFGKWkJxQwFpAaM0lIEh9FNBIpc0BYPyxRj06UY9aWqAjltlnXDZBHQii3j8qLaWJPvUnuKTHOaVwFWlpo60rHFMQfSg5wD2ope2KBiHpSUhzml7UgIdvzE4qx2qPqakpoBA3rS5FMYc0EcZHakA7IJI70UxTzT6AEPXpRignnFLSATpTx0phGaeDQA1xlagIweKlZs9qic/NTADj3H0pwA4PU1CWNSRHI5oGO71JkEVF3pTnHHWgQ9UDE5NMdCvQ1EgcEHkGpgSevWkxjF6c1IDmlwMdKYTigBshOeKTdnrxS5yaa/WpGRzfcrj9WGLt67FxlK5DWV23bVcCZk/hz/j7I/2a7P/AJYJXF+HSBefUGu22/uFxxSe4R2I809TxTNvFRO5BODimMWY7X4oXafrSffXk80gXa2c5oBkqAjrTm6UinIpJH2jpSAU8rxSRqScjpVd5gKktZd7HI4qkgLUA+Tn1rkfF4xfIexSuxwv8I4rkvGY/wBIgPqtdVHcwq7HNkVFJUpqJ66WYIpXf+uj+lSQf8fEf+8Kjvf9bF+NSQHEyf7wrne7NV0NxamTpUQqWOuM6SdBxVmLpUCD5asRgheaBEqn5anXpVfsKnU/KKChV+81SR9ahJw9SJ97NIRZSphytQqeKlXpTGI1N7UrdKap4qWMevSn/wABpi0/Hy0IRyWq/wDH6/1rodBbNoB221z+rcXsn1re0D/j0U+xq5bER3NPtUfepV6U1xzuFCKGOOKmj/1JqIg4NSRfcoY0I6jZkUkX3hUhGRimW4w+PQ0AN8TjOkQn0k/pXJy/ej+v9K6/xLzo0f8A10H8jXIzf8s/97+hrupfAcdX4y1H0pydaZF0pyda3MiQdaib/Wp9TUveom/18f1NTLoVE7HRovM0+AFS2R269atSW0yv+7AU/wB1znNc/aQq8CE55HrTpbdEYAFuleXUwcZTbvuelTx04QUbbG2NwkAmj+UfxKasx4w21kYf7RHFcusAz1OKmgtwznqaX1KPcpY+fY2pEdZMSIyg9CtSRWdym7y4nkQ/31JxWLLCWA+YgDjBNQJHJ5uEdhn0NL6lHuV/aE+xvixk83fJDIjdMhCM0/yHUnO3aOzDmsK4jf7rOxbuSetRiHKgZOaf1JPqL6/PsdEHg75BPoetAMuP3YVk/Wude0wM85qJ4OPkJyKPqUe4fX5djqbeKVkLeVOmT12krUjrMVGI1+pGM1y8YkQDZIyt7HFO2MPvE5NH1Jdw+vy7HQeXJKNmJVcegpXgkeLy3hDH+I7M5rmZFZCrIzBvUU9TOP3gkcN6hjR9SXcPr8uxuR2rqAFWXaPVTipTbXCrvkgbb6qDXNIrszMWZietT7GC9SPxo+oruP8AtCX8pesdTW/ub+3hEvmWcwhYN3yitn9SPwq0/nBcvCf+Ada8y8GPIPE3iFUdwWmY8H0kk/xrtlWRmG6WTP1pfUk9blPHtO3Kbixy4yEkYdxIhH602VZU58llH+z1rHmjfZkzyEZ6FjUDLISf3rn6mj6iu4v7Rf8AKboEu/K7nHdGWiSM7w/kmPPdAf1rEEbbh87fnVkiUR7FlcD0zS+pJdQ+vt/ZNVYZnx5cbyD3U1J5Min5kkj9dua58yXMJGyeRfo5FTvPe+WPNupmyOPnNH1JfzB9fl/KaUscqP8ALEXXvuGDTQ5V9r+ZGD6DIrIVpyPmmk/76NNaGRuWkc/8Co+or+YP7Qf8p0C5Yf6pX9CBigl2JQ74/oua5sLKoOJXBPoxqa3nu4wSlxKrH0c0vqP94HmD/l/E31i+VhLEsh7NjFMCY43kDP8AESf1rH8+6Y5eeU56/MajkluFywnkBB4+Y0fUf7wfX3/L+J0Cq2eEz7g1IzBlwZWPswyK51Lu9fDG4m3L33Gmm8vWkLG5lz3AYjP5UfUX/MH9of3fxN8FlOFh2D+8vegOso5bcem1xisaO5uwny3M4H++aY1xdZytxLn/AHjR9R/vB/aH938f+AbkikcrGR7g1XZWfBDAjujLis0T3bdbmUf8CNTNPeiMgXs4Udt5o+o/3h/2h/d/EtmJQwMatF6kHr+FP2k9HVj6Hislrm9OP9MnP/AzSebdYBNzLn/fNH1F/wAwf2j/AHfx/wCAbiq6jgNGv5ioZYUZ1O1Zm7cc1TSe7WMj7RId3YsTUIu76A/Jcyqc/wB40vqT/mH/AGg/5fxNTzSg+fzEXvkbqmSOJiSFDZ7qazRqWpNHmS5fb1FVhd3jE7rmXHb5qawL7ieP/u/ias6umRgoOxK5pgiXBMilz2ZDistzdSZ3Ty4P+1UYe5QnbcSj/gRo+ov+Yf8AaH902U35ALkA9N3+NTLGRICFJ91NY1ve3yMWFxJnpyc1J9uvWOTMQSOdoA/lT+ovuL+0F/KbjIHG2Rxjurr1qCZIzCYkiwvqgGPyrHku7vk/aHBHPWhdSvnAJmbK9wBTWCl3F9fXY5zxBYFZG3bT7dK5qRDG2Apr0afUr1n3vKMjr8oH9KyLu4lnzubI9CBXZSpSirNnPVxEZO6RnaFeJcW7WN425WGFBJGR6Zp+oaNZWrxyWdp5bjqwZmz+ZNMMA3hgqhgcg46Vv2GozwxeZBIY5gNrEdx/kV0qPfU5JT100Oc2DNNdBnOa6ya/82xlkvhbSssqKhkjXjIbOPyFUft1sR/qLD67BVxUuxPNEw1jHHFdp4BsIpri5mZEeaBQyEjJGeDj3xWbHf2yLzbaec9ygq7aa7f2iKljOkMfVQka4559OlaxjMibjKLidwBQRSo7SIryffYAtxjmnYrsizx2rOxGRSbalIpMVaYiMLS4p4FKBRcCPFG01NtpwWi5SIlU09RUm2jFK5SFSpVxUNOBqWjaLsTA0jcimBqUNU2NL3EIoUZNOxmpY1FDdhqNxqJUoFSqgp2ys3I1UBiCrCoCKjQc1MprOTNUkhfLAFRvGCKlLUxmFSrg7FKaEelU2h56VpvzUTJW0ZtGEoJmf5Jz0pwgq9sFLtFVzkqCKqw4FSJF0qbbT1AqXItJCJFgVMq4FNBxSk8Vm3c0TQ8Yp4NQZo34qWi1JFkGnZqp5wUZJwPeoxfJ82TjaawnOMHaTsWpF7NNaXbkEH296qteRCPeZAF+uKz5LpIbiJImZvNOwyZzt6nH19veuHE4tU7cruVzE2uazb6ZarcXMoiizyzHAH5VwmtfFWzt0STToXuJVyA0nyL9fU/pVvxxZPLYyJdfvonIZ42fGADgEYIPcZA9a4C30Gza6BSALGo+Ykk5P41zU6SrztUvf8AjKK+IlS/vfFmoDVNYWJYEG2NFUgEDPqTwCT1rP1nUvtjfZ7c/6ODyw/jP+FSa7fiY/YbPiJfldl7/AOyPaqk1ibG3SadgB3GOR7V7NOnGlGyM5zc2NQJawmSXp0AHVj6CgW893H5k8mwgfKvZR6UWsT3commG1VHyr2Qf41ennitLYyy8IPup3c1TkTYqEw6Zb+bN8z/wr3Y1QtYDqcjXN5KwYnAQITgdqrv519eebcqR6IRgAdq6Gx8uJFAXkc1En0LWmoW1sIlzCmw/33AZvwHQfrWokSxJ7k5Zick/U1Ta8hVsYyR2o866uQCIyF9W4qIxUdEOTctWXDOA3y8Ed6qzX2w8tkZoS3Yk+a5/4DViO3ij+YIMjueTVE6Gdvnnn3xQnae54FX4IJGR1mYEEfdHapZ54oo90kioPc1lzeILSAEJukb/AGRSsFy3BpdpbAlIhu65bmrO5VHXA965a78Q3M3EKLEPXqayp7meckyyu3sTxSSUdirSludlc6zZW6sDKGb0Xmsi48SPgi3hx/tP/hWAF9aXGKLjUO5ZudSu7niSZgvovAqnjmn4z0pcZFFylFIao9adirVvp91PzHA5HqRgfrWnb+H5XI86VV/2VG40A5JGIox0q1bxySMBEjMf9kV1NnoFvHgshY+srf0FbVtaQx8DoP4Y121pCLM3Pscpa6NdSYLhY19WPNbun+HC+Dtll+g2r+da73NtZ/fNvAfWRgW/I81UufFFmuf3s8/+4u1fzPP6V1QgYyk2a1nocMC7pJLeDHp8zf5/GtK2gs1/1UM903vwP0rhZvGO3P2eCCP3OZW/w/Ssy/8AFV7cLhzNIp/hZwi/98itfdjuzLkkz1qbVLe0t1jd4LZlzmITYHX+6gLGubvvEd6SwtZ4oY/70MW3P4tzXl1zrd6QQrxxD0QAn8zmqDXdxMcyvJIR3c5/nTU4LZXJ+rN7s7q+1u3Zt91qBnk9iZCfx6VQHiG0H3kuAP8AcH+NcoZ5SNpcgegxTgjv/wA9GrSNdlrDQPXvCGpWVxpTXAs0lfzSoaYYwAB0APua6NNYkC/u1t4x6JCv+Fct8OLvTYfDqW8sAe9jdi6kZOCeD6f/AKq65NSAH7izAHsP/rVXxu9rnPJKLaSG/wBrXZHE0g/3Riq2saveLoOpEyuW+zS43DPOw+taEV7dySKi25AY4zg1jeP9SurDQXtvJVpL0PCpBxsGBk+/WplyrdIKcbvY8Xu76+uAfOuHKnqucD8ulU1Zc4Yhj6A1rppEsvEs7Y9K1NFsodNmeXDu7LtGOe4/wqKmIO9QSMW10y8uBmDT2Yf3nyo/XFaEHhi7kVjK9tDjsAWNdJ9runGILUgermowt2wbzbhYx6KtcsqrZRRtreHSoAg+WTHzSKu3cfr1pov4QCD82fU5q81rJcKVa9DKexjH+NYl5ZXMVw0cSoVHRlHX8686v7r5m9zrpS5tC0l7Buxs/Kkl1PY+LdXB9RmqJsLocsQp+oqS00+5kmGZip7EEVyuS3OixsWfiXUoFwk8m0dQRmuZ1uC61bU5btxGjSY+UA9gB6e1dR5AiIS6G6TGdxI5H4UyWGPkp19K6qMIw9+O5yVKrb5XscadHuR08vPvn/ClTSrvPzBfwz/hXVgx/wAWfqDSnyxyjc+laubZFzlxpsqn5od3+8T/AIU1rGbPywRL+Jrq/wB2/DDj69KRoYsfKcH61HzHc5FtLumOSqqPYGj+yrkdIw31Jrq0CqcOMj0qfZAR8pKmldhc48aZdjl4wq+1XtP0QTvuuWkWL0Tlj/QV0HyAYbBB6ipJIFaECCTYQOAelY1VNr3SoSjfULD7FYoI7SwCY6vI+WY+pOKtNqtwpxHDagD/AGSf5muYuZpYZGWSZAR6HNV2u2J4kY/QV5kk29Tsj5HXae2+FfpVhhzWdozFrZT7VoGu05wpRSU7NMBaQcijqakQAA8cmkAq5A5pVNIelN3UhE1FMVsnGKeOlJjExS0UUhCYpw6U05A4pc00MWiiimAUUZooAQdadSd6UmmhBRSA0Z5xQAhHPFBFKSB1pjPkYH50DHAYOTTgQelN5A9RQME8UAB4NKOlOwe9IoHekAzHORQWC8swA9TUjDjiqMllLPIzGRdvbNFgLZKsv7tlb3FOx8o55qpa280BIwGU+9TR+aJWMmApHAosBIOtKeKM4FIxpAIRkU3aGODxT16UhAzmgCB4Dn7wxS7CgqXOTQRkUxkVTQj1qEjmnoxHSgCSUZOfSmU4vkc9aZUgB5FCr60jHFOU8UAIVFREc1Mx4pmOKQxjcqa5HXVxdtXYEDaa5XxAv+k59qqJMiDQm23yV3DH9wlcPowH22Ou3I/0daHuCGiopV+bI71Jux05qtI7ZpoYvSlBNRqc1KMbPemIfGSagndixA6VLGcMKiuD8/FFtQIdoqxa8MQO4qDOKntvvnHpVjNBh0HoK5fxmvzWx9iK6VWLdeuK57xkP3Vsfc1tS+Ixq/CcofvVFKMU8nmo5K6mc6KV79+H8afHxIn1FNvOsR9DSr1H1rB7s1Rv1MlQDmpo64jpLcf3asL0qtH0AqyKQhwBZhUy9AKjj61KOtMoRx8wqSP1prjpUijCDNIRKhyDUq8rTE4FKp5oKF7GmrRmhalgPT71St92ohxUh+7TQjlNY/4/Xrd8Pc2i/Q1h6z/x+PW34cObUfQ1ctkRHc1koxkYoSlpFCKuAQaFGBilpR0oGhBTYz+9z2pKReHFMA8RH/iSp/11H8jXKT/cj/3h/I11fiDnRF/66j+Rrk7n/Vx/74/ka7qXwHHV+MsxdDTo/vU2Hp+FPT71boyJD1qFv9en1qY1E/8Ark+tTIqJ0mnrutY/pVl4A239ag0sf6GhHXnP51cY9AeB6isHuaJ6FZowCQBU0KBRSOQrdaazfdAINA0PESu/Wnx26xSbh19aYhKkGlLO7LzxSaGmJcIC/NMZQoG006ZvmFNJDDnmmloJvUVY93J6nimtCqAY696ehIOSelDc80BcjEYLD1pzxqRgHJqJpcZ5AboKSJ+BnrjmgCaO2DnJ6CmyQg5AJA9hQJyBhT1oD7RljzQAghWMEA5zTliBFKGDY5qj4giun0C+j084umhYR+vToPfHQ+tHQFuef+BbqNvGV0fMXZc+ft5++d4YY/4CGNenFMHtzXz34bkvpdcs4rJlSdpxsbH3Txg/QAHj0zX0RjdjP3hUQd0bV1ZjWh3Rn1qIwhMetWckKcj8fSmOMAHINWYkcMQByalkjDEc/hTC/wApIIpVz19KLBcU2gBBzT7lQwXIpJJGK4WiU/IM9RU21HfQhEQVSc0qIWxntSg5GO1Kmeg+6KqwrjDbgbmPJ7CmmIH8KsNlqiLYOCAMetJILimIbcHGaYtsX+UfWhGZmJbGc9qnEmzJzRYCKS32HCkZx1x0qNLfYdxYHI9Kl3sxLNnHammQMM5piBYgaDDg+9CHGT2zRJICRmgBxjAHQU4Rblb6UBg688VKjYHI4oHcq+RtAJ70RwgtntVhhlc5BpobqRjp0zQIdImR8pximNZ5wc8UKSwHepmlIX5etKw7jZYx5KrgDFQLCACcip2YmEbutRBuMetEUNvURV3DGAKRrfLFjxjtTlyPlHT1qVjkU7CuVTED0FSCEbOcD0pScHBFNVyzNkYHanYBotyw29zSywiADkZqbzRFljWbdTtI5JPFNK4epWmJ35JB+lQNHuFSk7j1FNc4FapWM27kJipChUH3p7MAOTTXbcuOlMRzuo2iJMckhOvJ4FVTFCP4l/Oty8QNA4IzyDVGC1EsyRrHlmYAfU10QloS0O0zR5b+WJLeNijuE3hSVX6mvW9H0Cw0yzWCKBJDj5pJF3Fj+PT6VPoViNN0m2tQoVkX5sHPzHk/rWhW6dzz6tRydlsAoopRVowEopaMVQWDFKBRilAoAUCn00UUix1NNFB6UAJS0lFAJj6BSClFJmiZIpqZKgWpFNQzWMi0rU7fVcNTgazcTdTJwaXPFQg1JnipaL5gZ6jLe9DUw1SRDkOL00y+9RtxUZqlEzcyfzB60CUVWJpM0+UnnLfmj1pRKPWqRalD4o5SfaF4Sj1o8wVR8ynCTNS4B7QueaKaX65NVt1Z+qzuqFVVsEfeGOfUfSuevUVGDmzSE3J2Ro3zDyOVL8g7Q2O9Y93cNalTG7kgdAmMevf+lRDVzaxbJjvkfhB2ZvQVgTXtzdRme4EfkvkYV9pQgZZTnnPHT3714eKkq/vw/r7joi7aMvz62sjujEq2Cd5qt/bubVrZQMFs7lwoJGOf0HvXMX14XjURblVc8E8/jRp9lLeKjn5Uzt3YyK4HTUVzSNL9EdBqWoTS2EIaX/WEoc5Jxzzk+uK5HW9R8pTZ2Zw2MSOO3sPeut+x28doLa6d5HjVmDdCMnsc9cc1npoGlPHEkMMiM/WUyFjn3B4rpwOOpUU+dO99/IJRbOS07y7aRJ5cLGhyxPpT7jWZZLs7Yw0R4EZHOPr61dvfD+o+YXliQWkfIw3JPqRSx6ezuo8sKFH3iOT/APWr3YVoVVeDuRYqyTQ21uZZPlhHIXux9K5q7upNRutzAnska84FdtLpEDgm7IkPYY4X6UlhFBbxkRxpGvsAKUrtWRcWk7tGTbWVxPbRM6GORflO/jI7H+laEGnAYMsjMcdBwKW81azg4MysR2Xk1k3HiM8/Z4ef7zn+lCjZWBycnodBHBFCRsRVOOT3/Oo7q+trYHzZVU+mefyrj7nU7y4Y75mAPZeKqEEnJ5NMOVs6SfxBCmRBGz+54FZl1rd5MCFYRr6KKzsUY6UrlKCBmeQ5dmY+pOaTFPRSxwASfQVdg0q7m5ERUer8Uh6IoYoI5roLbw8SB50pPtGP6mtW30a1hx+6Un1c7j/hRZi50cfBBLMcRRs59hmtGDRLp8eZsiH+0ef0rqykUK/OwVR6naKrSatZw8I29h/cGf1p8pLmyhb+HolGZWkk+nyitW302C3A8uOND6gZP5msu418nPkxKP8AfOT+QrNudWvJQcvLj0X5B+fWjRbiu2dXM9vAAZ5FX/faqcuu2cXERaQ/7C4FcVPPIGJZVGfU5NME27rGG+uad0FjqZ/EzAERJGnuxLn9KzZdduZ8hp5seg+UfkKyPNyekY9gtRmMM2cMx+mKam/QOUvPdccSbf8AdT/Gq82ZRyZX/wB4cVCwZRwAopEmReHG786OZvqOwoVwecD8KMjPK7vqKmjZpOILUH32k1YTTrqb7yog+lNT7hYgQIRkmNP+AmhhCP8AlqzH2Sr0WiAH947E+3FadtpECjIjB+vNPn7BY5oxlj+5jdv+A1Zg0+7lHTaPc11MdpFwCMAU9kWI+orSNRi0Nb4Y2UljJqDsVZnVF+705PSu3zO2M+YR+Nc34LZ2jvDCGCkoPl9s/wCNdAY3LDdgcfxMBXo0XeKbOOqveZas45DeQ5B+8OtZfxDAMOmLKD96Yj81/wAK0dOjY6hHkpgf7Q9KyPiCYI3037RIq/u3P3uuW/8ArVniHqiqK1OMmCjlB9aZBLKZk2pxnGSKdJqVlEDsy5/2VqC11I3OoRRJEQrN1Jrhnc6kbEaudwLNgLnrj+VNWBfKPALYGTjrVpQAH9cf0pxA8sgjPIHFYjM68jEMBkHGIzxgY69a51tR/eHknmutvoBPaPAGKF0xuHOOaw4/DtupBlllc455AFc1am5vQ3pTjFamTNqW5jzxVjTb0tcDGPoTWiuh2YjOYix93NbeheFdKubXzZbYlvN27vNccY+tYzoNRNYVotlJrq3dgZniVsYwxGaT7RaHBWWD67hXPR2fmHLEnHAJ54qL7KfSumnDlios55vmk2jpJJLJuS1vn6ioWktM8NDn2IrnpLY56YFMa37DpT5USdIZbY8s8JP1FOE9rngw9PUVzC2uT0p5tSG57UnFDOoMlqQMtD+YpDLbZ6w/mK5k23HHegWvtS5UB1Ae2YYLQ+3IqXzLUL1h+gIrlRa5IGOtSS2flqCoz1OBSaSGWr6S2mmVmhXIHbjP1xUTfZVjUCJPX1rMMd1O26OKVl9dpA/OnnT79zt8o/QsP8a8zklJ3sdvMoq1zodAYNZRn2rVJrn/AAw5a3UHpW6/BxXQ9zFajxzS0zPA5waUnAPGTRcLEqjvTxUcbHaN2Aadu9OlK4WJBwKQqDSKc08KDQFhFUA0+kAA6UjUMQtJ70Cg0hi9R1oHFA4ooAWjtSUh60BYXNJmlxSYoEGaXrTacBimhi0hHOaKKAG43d6QISM5pcc5pyA5oELt4GaF45p2MUgAxTGOzRgUmDS9BSGI3ApFbbnjNHWjNK4hyyEnkUjtubNJmkNMBSaTGaSigYAUp6GjFJnqKQkFFNopjI9wYnHalzUZUEg5x70/3oAcDTu1MxyKdQwEYcULxQaTpUgLwTimsD2NBPOaXvSGIfu1zPiH/Xg+1dOehrmfEPEq/SqjuTMz9LJW9jPvXdb82qnFcHpzYvIvrXcoN1rTluKI0HioZRgD3qTpUbjcBQUIpz2p1KqYp22mIQdaimyXGe1WFTHU1ERlueaEMiZAVzT7P7x+lEp+XHrTrFd0wA6mn0EWl4waxPGIzbW5/wBo10iWwBBkYDiue8agC2g29NxropfEjKp8JxZ4JqN6mfqahkrqZzoq3nSP60DtRef6tD/tUgPArB7s1Wxvp0FTJUEXQVOlcR0FuLoKmXrUMXSplNICaPrUo61FH1p27D0xkvcVK3aoxnIxUrdsUkBInQ03OGFOHSo8/vMUMaJBQtIOpp4qRi9qfn5TTO1OzleKaEcxrX/H21bPhv8A49/wNYutHF2fpWt4bb9z+dW9kRHc20qxbw+YCarR1fsXG0g0iyq67GINNB+SprsgzHFQqQUGKAGY5po++PrUhph4YH3pgGujOiH2cVyVx/qo/wDfH9a6/XB/xIm/31/nXIXH+pX/AHhXbS+A5KvxlmHpTo/vmmQdKkT79boxZIelQyf61PrUx6GoZf8AWJ9RUyKiUdX1S+s7pY7ad449gOAOOprPbXdU3Z+2ScdscflXc2ni210SFLa4BLD5xiIN1NTt8RtNI6Hnt9nH+FcM6VVybUtDqhVgopOJ5+df1RiM3Tf98ig61qZO43cg+gArt/8AhYWnbjuDY/691qKTx5pjNkE49Ps4/wAKXsav8xXtaf8AKcc2v6mBj7S/5U9Nf1RFAF034jNdjH480odenvbKT/Kj/hP9LBBEeT72y4/lR7Kr/MHtaf8AKcW+u6mwybpvpinR+INTAwLn3GVruB8QNJC8JG3sbRc/yoPxB0lj/qYwP+vRf8KPZVf5g9rT/lOHbX9UJybk5+lMfX9UcDN0wA9Biu8/4T3R+fkT6fZV/wAKifx9pZziKIen+jL/AIUeyq/zB7Wn/KYcOna/NpyXv9oW6wNH5uWckgYzyAKs2+jeJCgMOo2rq4yG3FgR7cVetNdn1ETNp+nS3cG4gmONsc84wB71x3hXxVeeGry40HUoHKwyFYVlJDRg8hT7EEY9M+/Gjg1a7JUua9kdOND8Uryb20/P/wCtRJoviZSN19aHPox4/Stc6vq5AP8AYd3j08t/8Kgn1m/hXzLnR54kB4ZwwAP4inyPv+RPN5HO6+Ne0C5gjvLuJ/OiE0bRHcpXJH55B4qjH4i1Tn/SF/74rtp/F1lGIIb+C3EsaYIliEhGST3HHWkfxjoWzm3sicf8+i4/lWbp1XszSNSHWJ4joskln4hgmhIWRJXwcf7LCu7XxHqinPnqfqlc1oer2dv47GqTJG1p9qklKtGCu194Hy+nzCvWB4s8PHObOwA97Rf8KXJUfws1qyhFrmRxreJtUI/1yAd8J1pD4o1PGDJH/wB8V258V+GGGTZaYT72af4VXfxR4aL/APHpp230+xp/hR7Kt3M/aUv5Tjm8R6mwGJYxj0SoZ/GGoQzQQLLG0sp/udAOSf0rrNS8WeG7e1aVbOwcgcIlomWPYcjH51wvgjWrG58ZX+q6vHaCJoSscJgDRrkjGFxjgLjpznPXNHLVTs2NOm4uXLobEfibUwCfMTn1Wh/E2pvnMsY+i11beJfDI6WmmnB7Wa8/mKlj8TeFyCTZ6Tn+6bRf8KPZ1u5PtKPY42LxNqQ43xc+q05vFGpn+OIY9ErsP+En8K4AGn6Vn1+yCnDxJ4UzzaaUP+3Qf4Uezrdw9pS/lOL/AOEp1TGA8Q/4BSf8JLqbdZIj/wAArtT4k8Kg8WOlkev2ZaRfEPhbJzZaVj3tl/pRyVu4KdLscbH4l1JGzviPsUo/4SnUt3Hk/wDfNdh/wkXhUE5stLP/AG7imya74WHS10vr2gH9BT5K3cOej2MPTrnxJq8Ly2McDxI21iWRMH/gRFWDp/jDPEdtgdhND/8AFVei8Q2JuWTSbNGQqCy2y7QDnqRj6VaGvvH97T7sc91rRQnbV/kZucb6IzF0/wAZZ5gtsf8AXaH/AOKpr6f4vA3mG3x6ebF/8VWufE7YO2wucD1H/wBaoX8SB+DYXQB/z6U/Zy7/AJC9ou35mPqMvibSbOO8v4oEt3fy1YPG3zYzjCkkdKoHxXqW3gQgnvtrqf8AhJdKkja21S2h4YMqXAzjg849eali1fwgVAaz0rcB3Q/41lKFW/usuM6dveRyI8WX+3BSA++DSHxTfsuBHAPfB/xrrJNV8IkjFrpY/wCAN/jTJNT8Jlf3dvpY/wCAmjkrdyuej2OXXxVfqOkR/DFLH4r1DO7ZCfYiulj1Lwrn5rfSz6gqf8akbUvCQ4+zaXx6KT/Wjlr9/wCvuDno9jl38V6g4xsgH0zTYvFV+DzHC31zXWx6n4Rbk2elfQ5H9ad/ang3HFjpm7P+1/jRy1+/9fcHPR7f195ybeLL/GBFAPcZpB4uv8ECGH65Ndd9v8IMR/ouljPuf8aQ33g4Hiz04+4Lf40ctfv/AF9wc1Ht/X3nHnxTfsfmSI0q+Kb6NsmOEj0ya65bvwgWwLPTz6fMw/rWddv4YkJ2W9onssp/qaajXfX+vuHzUe39feYEniy6cnMEX4E1GfEk7f8ALBf++q05Lbw+Tn90v0nqP7NoHqn/AH/rVQrd1/XyM3Oj2f8AXzMz+35weIUx9af/AMJFKeDCvH+1WitpoR6MhH/XamPZ6GOjIP8AttT5a3df18hc9H+V/wBfMoR6td3DnybUyY7ICTTjd6oxx9gl/BG/wrR0+406ykb7M3DDnawary6raoeS/wBNtaxjO2rIc4X0Rm6dKRcwjVbC6aBuZFiRt2Ogx+Nd14f0vQdQd5LPTtRTycHfcbkXPtzzWJba/YR9fMz7LU//AAlFh6z89tgx/OtFzXTRErNNI9FWNmRmCkqvUjkCm1znhHVYry4njtfNK+XhmIwOo6/l+ldLiuynJvc8utCNOVkxMUYp2KUD1rW5gNApcU4ClxTuFxuKAKfikxRcBMUuKKWkAmKCKWimFxuKAKdilxRcY0U6jFOpFpiCnCkopFJjs05WxUdFKxakThqcGquCadupcpSmTZpDUYalLcUrD5hHqEmntk001aRDkRmmk08imEVRm2ISabmlNJ1bHc1MpKCcpbIlXbsgzS7se1N9fakdhGhZyFGO/wDKuapiqVOPNKRUacpOyRFcXZhmRNpIbuP6VzGs332VXWWTfInykbsZyxxnpzxVzXV22JYsV3gBcN0f6+ma4PUgjzB4ZXmym9yTkg9Ofx/nXgVMW8Vfoj0IUVTJrq4eeM+dO4Vssq8lQe3HvyP85qW11NIpIlMri280SuFPzqemQ2OTyayTGcNkMVI4Puf8moRIwfcPk4wP5VKlbYpo25r9V+3QiXzUncSKcbcDnGRjqQR04qva6n9lhe2ESiQHPmAkMM9x7YrFMgPtJnr2NSyKzvHIrAsOeueO4NTUtPSQRVjfudYFwFCpt2jjJyTVzS1mlYF1IiAwDnBIPpXKFmYLsHI/A5rrdDk3rFFLIysBkn+mK4a8VTjoaxuyTxBNPDZrcRxiSOMbcM+3Oe/TmuMutR1WXG5ltlYZAiXJx7k9K7nxjDNHo8rSMWjyNpHTvXLW8KJDkgE+pr2Mrm5UFfoxPQo6bah1eS4zNLnh5DuYfiaqXsW65dZHlZRzjP8AStqwGVm/3z/Ss+4wL6U4J4FehcaObZds7qM4DHrT8Vfi0u4ubmVwFRGYkFj2zWtbeHk486R29gNooV2NySOaAqzBZ3E+PKidh644/Ouvg0y1g5SJAR3xk/mafLd2dvxJKufTOT+Qp2JdTsc7b6DO5/euqew+Y1qW+gW8YBkDSH/aOB+QpbjXoYxiJCfdjtFZlz4hmfIRwg/2Ez+posTzNnRxWsFuPkVEH+yAP1qKTUbKE8yKzD+78xrjp7ySY5eVm/3iTVdy55EjH2AwKLoLHV3HiBFOI4/pvbH6Vl3Wv3EnAkIH/TNcfqeaxPMde9J5zHgliPrSuOxZkvBIdzO5b1Y7j+tRs4fOS5H1AqMBOu8D8CaaQCfk3MfpSb8xpAflPDBR9aC/1b61YggvHGEiwPUgCrUek3D8yyYHoKXMOxnq699q/QClJjPd2/ACtq30WLcN+5j7mtGLToYzgIFPrilcNDlRaSycxQt9TVqLSrph87BRXTGJIT6ilV1JyinFF2FzDt9GjJHmEt+GK0YtKt4sfugD6kVdKu/IXFNYFf8AWygfzphcabZIhkEHFAlj4Cg7qFniZyqhnxweamQID9zZTJuNVywwFP5U9YpM9cfjUM5uOfspiJHZs5rJubjUQf3rMg/2en50Ie50SwqgzLKFGPXFRyXVjEuDIrn2+audjjZyC5LH3NaEdoCeOmM1pGwrHc+DJhd2Fw8SkRiTGTwM4Fb2z5uWTH1rnvBkIh0mbBUAzE8n/ZWtzK7yPMX8Aa9Oi/dRzTWpe0pFOoA+YhwCe/p9K5H4pQ+ZrVgMggWanjtl3rrNE2G+kPmdEPauZ+ISO+uRBdmFtoxkk+56cevrWWIlqXSRxotVOD7c1a062WO9jkxnGf5GkaOTj97t/wBxQP55NW7G03SeYGJxxlmJrhk2bo0Fbcsh7/8A1qR5CIm5xk4qZbXYp3OeTk4FV55bWNQpdc57vWdxkivk/RRUZbOfYf0pyy2pjJDqWxwA9QZwGPU4pNjJFIMbH0FdX4eTGgB/9qRh+CmuQDZiYAV1ukbl8OAgkEQTsP8Avlqyqv3SoaM87jMnaCMf9tD/AIU4iQ/8sYx/20P+FWPLYdP50pDen61egFMxyEYMSf8Afw/4U3yWwcxJ/wB9n/CtBIpGXIxj60rROc/KPzpWAzBGynPlof8AgZ/wpxjcndsXk5++f8KveS542/rSGKRRgBfzpWC5U8pjjMa/99//AFqPKYf8sh/33/8AWq2UfpgFqTEu7BVSPrRYCrgqR+5z6Yf/AOtUw3FRmHoP+en/ANapfLducYx6GnYdRyM/jSsgJ0jzHHkY46ZzinLHmbp3p6/dUd8CnQkNIB71SJZzvhJT5YyOAa6Gc5kJxiue8JH92w966WWPcAR1rhluzpjsQBucVKMAVGsbBskdKlx3qWyhoOTUlNBp/BouAqnBp4JNNAHanKe1MlscDmlOKKKBDSMU5elHWkIPagY40lNwadSBiYpQKBS0xBSYpaKAExSmkfIFHPemgAmgGkJFBGelADqeqjAzUWcEZqYnigpCN7Ui+9Lu2/WgnJzTAWmt6UcgUA5oAMYpvWnEkduKMZGRSsAwcdqVj0pGBBooJ2FFJ3oBooKFGSM0qgE0npRGRuosIaRg0lSOKgkBU0IYpj9DiojaO53GXj0p4cj3qQNkCgAxg4pKuQtbhRuXmoJihY+XwKQEJ6U/APYUxulOHSkCGOuOlNHFPamUhi9q5vxHjeprpO1c34iA+XFVHcmexk2B/wBLi/3hXfwEfZq89tOLmP8A3hXoEHNmCPSnLcUQOMVGwAIxTgeKYzA9KBiinCou9G41QBI/IFGajDZbmn0mMSQZXjrTrIYl5PNNkOFJotmxMp96fQEaGflFYPi8f6DAfRzXQH7orB8XD/iWx57P/St6XxIyq/Czi3461G9TOM1E/FdZzIp3v+qX/epO1Ouv9T/wKmfw1jLc0WxvRfcX6CrC9aqwH9zH/uj+VWE7VxM6kXI+lTJUKdKmSpETx96cU3Nmmx96lXrTKJEFSN2picCnP0FJCJBTcfvM0q0vegEKKcKQClFIYuKBwGpwoPQ0Acrrx23X4VqeGj+7/GszxCP9KGPSr/hg/u8H1q3sQtzoY6kRipOKjSnEjmkUK7EnnqaE+7TCfWnx/doQIKb/ABDNKxw4FJ3FMB+uD/iRSf7y/wA6464/1I/3hXZ60M6DL9Qf1rjLn/U/8CH867aXwHLV+MsQdKkT79RQdKlT79bIxZL2qCX76fUVN2qvOfnj+opS2KiO1XTGe0F8RujHyNgZK+/05rEW2ik5CjaOT0Br0HTir6U8bjKliCD3BAqhp+h2klyUe6Miry6KoUjPTnJ/lXgf2tGM60KunI/vX+Z306CfK+jOJkgRm3DB9sUnkw7emD9K7vVND0yKSNIpjC7sQA2Gz7AHFOj8IQlDJLeEIB08oKQfzNdEM1wzpRqt2UtEravpojN0JuTRwQt4Cfm4+lNaCNeRyK6e50CaAExEXGO0UeT+Wc/pWU6pG7LIsqOOCrQkY/WvRVmYO6MwRwduvpil+zwnvir/AJcTc7m+nlGnCCM/xMP+2Rp2QcxnLBGD83T1FOMMOeMH8K1DBEAMMT/2yNRSRIvQ7vrGadkLmNbwu8kdtJFalAudxLKTz+BrjPiZ4f1G2vhrw/fW0xAl8tCNhUKvPXgjH513fhZAVlxwvptxXR61GjeFZPNjEsWZN0f94bRkVnNX0NacrPQ5/wAJajNN4P0+4jZJY4oFiYiN3YFfkOcHPUVlas895fO0z7gvCBQQAPoazvDscmlWrW9jPNFC53Moc4Y8ckdOw/Kuu8J2dtc6/bf20zGwkO2Rx8u35cDJHbOMn61vd4f3pH0eCwDws3VnZq3zOOuLURkP5bOXO3aO59f51keJ45rfS5GgVAMYfg5wfSvadR8G2dpBq11cXhCWkpgtkAGZXIBGfwI6e9eb61bR3DLaHlZGG8KCcJn5untx+NRCtTr8zNq9DDTjOs1rY39U8NeGIv2b7DWYpx/aCt54nVQWknchXhI/ujGP+A59c+QWeuTxxIrxRSqoABIIJ+prSkl1A2KeD2kJ06PUDcqSp3Alducem35sY6k11cukaY8Sx/ZoiqgKP9HbIH1xms0m9jxMTWpvl0voc1pmq2l/dQ2whmS4lYIiovmBmJwAMc/pXU33hu901BJfWUsURON5GR+fau10DwhpS3PhfW9OgSF7RWimCrjzMqyhmzzkMevXmul8ZPNe+Fr2DSkFxd3AEEK8YDk/eOeMLy34Vg69nYX1aMo8yufPXjNorexiggw00z8ADnAHX88Vb0HQIdPsVLtm5cAyE8gH0Fdbrfw0ubGO01u+1KCWW3dWu0KERouT8ynsFyvX0LVonQYAo3XkPPOQvH5kitoOMm5HLVjKmlA45oIlOHwPem+RAemDXXHRLBxt/tCHf6bQf/ZqF8KpIpMN9ASOzIRn8s1pdGKucibWPsQaVLeE/ewD9K6W48M3UCl1CzAdoQXOPoOf0rJaOIMVcsrDqDE4P8qFZg20UfskLccChrONeRgj6VfWOLGcg/8AAG/wqRYoj1IH/AG/wp2RPMZX2e3xztz6UhtIT0wPwrVktIv4WTn/AKZv/hUUtuq9GU/8Bb/CjlDmLXhF2s79xbKC7rjO4gD8q7H+0NQhieWQp5S9T5jcfXiuX8MQ41AMuMEEdD/Wu6tUzp94B02rn/voVMtBrUqrfX5h8zEbJt3ZErdMZz0qsuo31xGHgZPLPAxM3+Fa2lIfJTsREf8A0E1nxxsEbAyN5pWV7Amcf40c3epwrdqnnQwKhIctkElhyQP71YBso8cbT+FdP4xgC647MUAMcXJz12L7VkxW8bf8tYR9d3+FXFaBzGelpAeu0H3FL9hhP90e/WtM20X/AD2iH/fX+FJ5EI6yxEf8C/wp2FzGa1hGvOFI+lN+ywY/h+laxihHPmRD8W/wqFreFm+SSH/x7/CiwKRn/Y4j02j8KT7JGDyFx610MHhy8nUMixAdi7Fc/mKsDwvcAlXlth/wJj/SldFanMmzhx/CaT7BEeQV+mK6N/DzIeJ4Gb0BP+FMOiyLkAxN/wACI/pTSRLkc/8AY4gcMFHvij7Dbk9FP0rXubBoUzKgwO+6qqxRdniHtup2DmKJ0+PsFP4U9LGA9QoPoavrDHx+8ix/v1J9nibpJEP+B0WDmMz+zoTwAoPrUcunxpzhSK2fs0S/8tIj9HqOaKIfxx/g+aqwcxF4dighvFcIXfOAAOnHWu2t5pYyWNuRGvJJcDArldEt9l7E6YKlx0Oc16HYRAtMpAOYnyD0+6amWw0ytDfSyIGjtiyHoVZDUR1GSUZt4NwHBIZDV3Q4gDGoAAEpwMcfeqqkQjmuQiAAsDhRinGKvsK50fhtpns3aaMpluMlefyrW21U0VdumQ+pJ/nV7Ga7aeiPKxGtRjcUtOxS4rYwsMoqTAowKLhYYBmjFOxS07hYZijFPFGKVx2GYoAp+M0mKLhYKKMUvSgaQlMLqrBWYAmgTRFgokQseQM1kahL88gPDBjXnY7H/VoKUVe7sduEwjrScZaaG1ilqrZTiSxjlc9sE+44qdZMkDHWtXjaK5VKVnLb5krDVXzWXw7j8UU7BxnFLXRGpGfwu5jKEo/ErDKKfijbV3EMpM08imkUxXGk03NOIppFMLiU2lNJSbEMkYIMtwKrXc/lRlt0Yx13HGKkv7uGzt2kndVAHAJALewyRk1xeqXf9ruZLJvKUqFdWYDkDPc8DrzgdK8/GTmotRkbUYpu7Rsz65sdtsTRkHaWkGMZq9ZahFcNmXLAj8686+0zIQkzFjHlcN2HoK0dMe4nkBWNjn5QwHA/GvmsRDm1bPRjbodhrtpaXtuRJL5ccByWx0BGcDPHXbXml/bwo8hhld0DFQxKguRgcYz3z+Feh3NkL2xSO7VX2jJ+bAJGcE4rifEGiTW67o03xg4YqRhT6DgelYYaaT5bjMgzImIZI2XPysQTkY9KqtIWJBYgFcocZPX9O9SSu0d190s7Day7Sf69f8KrXbqsjMNrZOM45P59K7UIlW3MkTyd/UngU2zAadVkLbTxkU9LPzLETpMiAtja5IGfY9PzxUK5jXc3U9Rjof8AIo5r3VybHU2dnAqPiUtluAV5T39fatK0SLT0BDsXc8ux4rnNLkndpCkeI15YLwP89KnfUnaIwkIyEFSWX7ue+a4Jwk3a5ojV8VTmbRtxGSHK5z/sk4xXKJDfzgBAUj9SMfzreuI2jgjcSrHjKjchbtkHqOKx2s7u8c+dq5jjx0jixn24NetgMRSo0uWUvwYmizaQG1hKzzxhs55PNVLjT4JrnzpLmN0znZnGf1qlc+Go9+6O+aVerEx4P55qCK205FOYQxHdmJrtWLpS1jqVGm5G6t/HbqFigLYGBggCmi6vbjOw28C+rOCf8/hWbCmnN961hI+ldb4X8FaHqVut7PHKysSvkrIQox39f1qKmPhSV5oJ0eVXucxcWV7cH5762bPZpTj8gKwrtZba4eIyKzIcEp0NfQOmaHpWmxMLDTrRMjG8ICxH+8ea0hYWLCNpLO3eNcKAyDg4rzZZ5FPSDt6kcqPmjzXxzgfgKaX38MTivpsWlsJWSO1gMWSeYwCM/wD6utZhgtllcm0hWJW4cqCBxRTzqEn70bfMGmtj5/trCW4yYNpUdW6D8zVn+xLhCC00IJ7HJ/kDXrnijRIr5DJaTQRXEahSmzCt37cjr715jJfyo5VmXcDgjFdn1uU/g/4JtShGa8yGLRblnANxbqvchGz+qitAaNpkSZuZnmf0Lcf+O81Xa+eZ1DOQvcBDW3HEBDlI0Unvjn863w83O/MFaHJaxRuLfSUhJSzXO3APlnrj1qtZ2kSIMKoz6VrX6t9kk3NgYAzWbBLaQr+8mBPoDmt7GV9CZ40iGU5FKrluVQimPqduoPkwux7ZGKpSalcN/q41T681VhGn5UjjJwKcEjTmaYKPc1i+ddSnDysB6DihLUk5Y5PvRYDWlvLKNSA3mH2GapSasAP3MB59TilS0UgYHOPSqt2oicRRrukboPejQEh66hdSuEUDcxwqIOTWna6WzDfdyb3P8Knj/E07S7FbdNx+aVvvN/Qe1bEagDIoE32K8NoqIAqKoHboKdJbg9lq0CMe1RswJ47VZJmT2ndSVbPBqsWbeY5/vdj2atliCOeao3lussZ9ex9Kh6jRmPBtJaMD6HpRG8pYAyBR/sqB/PNSwsXBDffU4b/GnNCCdw60RetmWdf4dwukgGThnJIJJOa0d0e8/M34L/8AXrM0FUTSot7HLbjgD3NXlMYdiQ559cV6tJ+6jnktTS0Up5s53P8Ac9B6/Wuc8bOX8QTKp4SONRn/AHAf610OiMn+kkK3CAfe9/pXN+MG3+ILvA4BVefZQKyxL1LpoxRGSeSTxVi3yisCzKgG7C9aFG1cml6QzsOyGuGTNUVJdYtSAi20kxJ/5atkfrmtIkiNVAUDPQDFcjEu65hX1cD9a7IgbVrNvUpox4tXmacQ+XHhn2E85xWgw4P0rAsF36hCepL5NdHs4ak2Noaq4jP1rr7JdnhrGP8Al0kP58f1rlNpEefU12Dr5Php2AJAtFGAP7zqP61nUehUVqcX5eQKR046VYCby3lhsjkrtOce1ez6F4dsdI0VI5LeGW6kXM0joGJJHIGe3bFeRmedUsvgpTTbfTqddPCSm7X07nh8a/KOKkMew4OPWtHXbRLLV7uCBW8pH+UdeDz/AFp0Xh/WJ7N7uLTLg26jJdhjI9QDyfwrvhjKThGo5JKVrX032MHSd3FLVGSR6dKYQc8ClZyMDy3yeny9aGcg4ZHBHBGK67oytYbJ90EjmmRgkZHc087mB2xsfqKbGZEODE5HXOKLhYmC+3WkK47UNJlc7XH/AAE0BgeOc/Q0rhYAfnBpLdhvz7UrA7ge4ogXDE+1K4rHNeEm+Zx7112elcX4Tb9+4rsgelck9zeOwEc0AEGl60DmoKIypB5p6jApzYxzQAKYmKnWpQB1xUYGKeDimhWEwacPejdTtvy0CsAHrRQaKAGmilNIRQACjNAFHegBTSqpOOKUDmn9qY0hrrkfSmnpUnamkelBRCVOOKQH0qUd6aMA9KCWMzUyDPWo1G5vapgMUDRG/wB6lU07YGOTTWAHAoQMQmkHFFFMkfuyD60LnHNMBxUg5FA0I/IqM07JyaSkJiDrT8DNIBilY4FAxrGmg4PFKvJ5oZcDincB+c8U1wKBS59aQDdi46UYGOlG7GaM+lAhD1pcUg96KChxUY55pMUmcClBpMYhFMPFS4zTGXJqQGDrXO+I1wBjpXScAVzviLlAfeqjuTPY5+DPmr9a7vT2JsB7CuGg/wBap967zTB/ohFOW4ogM+lJtIzmpTTGPOKYxhBxnHFMaQKMGpi3ykGqrxfxA8GhAKGBbI6VKKgROR6CpscU7AK3KEDuKijz5i4HepR0qxYxiS6jXHelsBeki2xRn8KwPFozpYPo4/lXV6iqrGiqRwa5bxUP+JU3s4relujOp8LOHNRN0qZutQHoa7DmRVuh+5P1pnan3P8AqT9ajHQVjLc0Wxt2/wDqU/3RVuLtVO1/1Ef+6Ktx1xPc6UWl61PHVdKsJUjLCHrUqkVB3/CnJTAsZ6YqXqBUCdKn7CkDHA05aizzipFoGh4oFLTaAHilPSk7UDmkBzWvj/SB9Kt+G/8A2aq/iEfv1+lT+Gz0+tW9iFudFHTjyaavX8ad3NIpirycGlj4Xmkj6mhxkUIERMSZaeTwKQjFB6iqAs6xzoE34fzFcXcf6g/UfzFdnq3/ACApvw/mK424/wCPdvqv8xXZS+A5qvxk0HSpF+/TIPuD6VIPv1sjBj6rT/fj+tWTVaf70Z/2qUtiom5CZEsS6jKZ59qfZ3WIj/eB6+tXdCCm0IbBy2AD34qW50Jz88ELIh54Hevj83ymrOpKrh9ebRo9jCYimoKFXS2zILe4z15OckmtBoxdp5cjI0HGdw4z+NJaaTNHjEAY45JYfyq/ZQTRs/2mF0UjA3LxXHHLK+Eg8TVmrxWiWrS8r6JlSxEJvkgtGc99lgS+kgtLl1kRQxCZKgHpkHgU+YyhNl/bxXkWPvBfmA/mPwP4VZis1gu7xjwzy53Y5IwMU6SUKmHUmvrsNVVWlGSd0+p5tSKjJpHOXun2rxmTTZXKHjy2PzD6Hv8AjisZo5YW+Z3xXR3kSFjLGSj5xuHf6+tU5kWXKyqEnHQ9mrqXYxZzV3rcFldrBfM8CuMxzdVb1HsRV+PbOUkim8xGGQVbINUfEOnW93avazuqOTlMnJRuxArktPk1Lwreg3cPmWkh2koflb0wex+v/wBcZ8/vWNo0eaN1o/z9D1rwqNomG3OawviX45Wzsf7B0Zg18XY3Ew6RAgDaP9rj8Pr0r+LNY1LwrY/ZZLC7sdQug21riIrsTjLKejH0IJHf6zeA/AjxWH9r6nA8l/Id8ULkfKP7xz1b69Pr0mcuhtSoSvdrXsVNC0rWrLws1/fWpkEAB8oHE3l5ABIPuemc47V6F4G8VX8dvBp0n2e0sZpAJPOjVygJ5J7fnmqmpJPrlu1npLDCvulmY7Y+P4DxyckHHbHJFZejaDrl1O8ItVgEbbWkkcbB9MZyfp+lVUjGrC05bHvYOv7Sl/tD9NDs/EHijTiNQsks7a6tkj8iG4cYZAFA3DHHUZ4xxiuK8JaK2vXl60dxLZ20QUDYincxz1z3wP1FdnF4R0u3h83U2M20fNlyide4B5696u6c+hxAxWcMNtk5yieWT75Fc9NxpQcYbkVqsJ03TivvOSPw4lOsrd/2upcR7cm2GR7/AHsZwSK1ovBNqysBq160g4JXy8D8NtdeUQRfO5KAdSe31rDmu9GSYIbGM7T98QgY/rQqs31OH2UH0IrLR7rRVU2l5JcoCS0coAyfbAHb+npS6bLeJGbeIC2WMliZE3MxJOPbGAPXPtWrFFFcQb9PuSq+h+dc+4PI+gIqrMLiOVY5YxvwSsiN8pAx1B5HXpz9azfvO7OilLl9y2g26umvJxY3EUfltGzMpORIAQOmOnPT/wCtnD8TLpOjQw3lzHb2yvKsLEIACW4H5evpn0rXufM3AsMvtOMDpkYzn+lQ+TZyTw3F4kZaNcQySsDjjqo6A+p61MKnLKyLnSUouL2ZneTbsfljiKnuAK4Dxp4vsNJu5bKxsobm9Xgsw+VD6cckj04+tdl8RdSsNP8ADV3c/wBsR2N75Z+zxxbWluHPAAB6KCcluwGBya5fwX8P47NYNV1yGWbUnxMBMDtiJ56d29z3/Ouzmb0Wh5NbDqhLV3NTwro+owWC3WpXkw1Gf55FJysYPRAvQY7471s3DylNmp20V5HjAdV+ZQP/AB4fgfwq9sySc4FIXA4cHFaWORu7uc/eaPaywGXSLlnXvDJjeD7HGG+mAfasB0nhciRjjp0FdXe28bSGSAlJO7Dv9fWs24RZwVnUJOBwezVSIkjLVmYDD8/Qf4VG6MZB85I7jAp8sT279CF/lQjbn5pkl3wzhdQXIzkMK7m2AFhdnGCVX/0IVw3h9wL1D3BNdhayFrK9JOflH/oQqJFxJdHYbUz08pv/AEE1Ui5Lj/bNWdGIMKDGf3LH/wAcNUI5CC+BzvNF9WHQwvF6f8Tg5/uRf+gCstVYFhuxg9MCtvxapGpjP3tkWf8AvgVjuNsjj0NOL0E0NLMo5YH8BSIszng8Hp8oqxbWzzyKoXcW6CujtbRLX5IUEtzgbmP3U/z+f0pt2EkYUtolvJaLfsV85toVfvfj6dq3beLygBYWkcP/AE0lHzfl1/UVymrSyDxOis5cxSRhT+R/mTXfv8xwgwfWsYVOdtdgi7tlBrR5D++nkf2X5B+nP61HNZWqY3Qqx9W5P61fyIkyTk1l3N0ryOodSy/eGelarcsrvbW+4gQRgf7oqE20WTtTaP8AZOP5VL5wIxj9acr7vStLGb1IFhkBzHIfo4z/APXqGWFD/wAfEAB/vpV0qc5B4pdwPBqhGTNZkR7oHBB6HGapgyxtiQr/AN81ttb4YtCcNnJHY0ySCO6UqRsnH8J6H/PrUjM4FiAQV/Ko2VyxywIxnAFPeOS2kKuCO3Ixj60obIY98VQbEukALcwE9N4z+dd9p6KXmIHHlv8AyrgtMI8yAj++Mj867iwmJlnz2icAfhWcti0Lop/0iHH/AD2P/oVV+Bc3AH94cD6VJoJHmQtjJ80/+hVVWTFzcHHO4fyrSPxC6HZaSudNhzz1/nVrbVfR8/2Xb5GCQT+pq4RXVTeh5db42MApcU4CjHNa3MxhHNBp+KTbTuSMxS4p4FIQACScAUXGhuMUoHNJG6yAlCCAcVUvL8QRTMqbmQHbz1bsPzrnqYinTScnvojWFCpNuMVqi1uUyFNw3gBiueQD0P6H8qdiszRtFi06SS5aSWa9nUfaJncneR7dABnAA7VY1M3C/ZTauoPnoHVh99DkEfgDn8K25hOEebliy3ijAI5GafijFO5CMLV7RowZoxuTqQOo96wLq+Mmdx+bufWu82jFc/qvhxJpDLbHbn7yD+lfN5ll823Okrp6teZ9DluNpO0Kzs+jKtpd/wDEutkz0yT9cmtbTS8xBwSTx/8AWFUbDQp/lEpCxj16/lW3YsIrl4II32oOZu27+6K86jg8VWmpNcvTXTS3Tqd1evh6UXGD5ra6ev3FueJ42AcAHAIHpTApNSbSTk061jkmvktxHtRlz5pPyhs4CnuM+tfUQlDC0UpNJJeiPnJRliKjcdWyPaACegHelCZGaiv7M3d5bWUhIR2O8euMcH25rsb/AEi2FkfITa8a5BH8X1rixOb0sNUjCp9p2T+7/M3hgJTp88d+34HJFajK1dKVGyV6qmcTgVCtNK1YZKibhSQM8Zx61XOiHEzNWu1tIkGSryMFQ44z15rH1bxAsdpi1kiE5yrMwJCnjkY68ZP4Unim+iaxyAFuA2w46geh/GuBvriaOXIQoMhCy5GSvUdcdSPyBrzK2Jnzvkeljqp0o8q5kJfXj3DHzHYqDkDLHJPVuSearQ3UsLFomaMkFSVOCR3FQyM+/EgIbpyMe2KYx57jFcMql9TZRsa1q8FwPLlLpIejDpn3roLO9gsoY7dWXeU2tIpAXOeucc/nXMadaNPFMyt+8jAbBOMjvUIlLsQea4akFNtXNU7HpdpeW81qGMnzkcHIAz6dc9K5DxBqF1drJDbynG45w3Lc+v1qklw3kLhiAOB6CrXkzkKfKY7x90L1rnhSVOV2VcoC0njtJhhZnbGdxxn3Oe/Haq82mRW1n55Zm3LkrvHzf7I+vPrWjLJImdyFmBwU6Z7Vk6zHcSyRv8hiXneDk/T6VvFtvckpaY07XLnCJE33gQNoHtmtFLZbiR8yKigAkHGP85rMPyL06/lStO+3GMk9SBye/NVNOTuho22v44ozFaoiKeu/+Mds1k+ew3YYDndkYPaobu5V3XyxhNoUk/SqykDL9cfrSjTSQNmsbuWdQsmNqDvwKhM8oBJbJHQ9MVVjdkYOp6DPNOlkEgBGQ/ehQRLZegZpdyhs5HNQx6NCV+eSQkntgUumsoYs7YZfQ1qwqSinuTXdgoJykmhqTitCpFoNsd2HnGO4Yf4V0eg3sun2i2ds7eWpLEsRnNVLcZ3fUVuizgMSmGMD9xgMRzk45/n+dZZryQjFW3L5nLdmhb6jI5jDnadvODn+Va63ysiGKNnGMfNxn8+grC0yxEEJDuCeuTxmtKyaSOc+b88yjCouDj69q8FqNyTRkn8qKQqSFUZY9+v61heI9RNpajiHfM2GYD5hg4PHqPXjqK2Ps8Y+eZFZXfhSNwYnqcdO1c54ts0jbzrWLc2SAgPI+UgbRz3xwKlKEp6DWhnvriixuJUkUyxqdpwK4aTUI5XkllVGkdtxYqOTW5Y6b5it9s3JHjBVQNxBH/6qrwaFZswXYW/3mNe1gqcbSa6FwqRgryK+nzmdWaKAOsYyx2dK3goCY61Pb2kFpa+RBGEj7jPX8aqhsx+5Nd+CkpOTRlKt7XbZD9Qt45rSSOQZV1Ax/WuNtrTbKynkqSK7WZWaNvlbt2rnb+BI74DYQpGcHOCfpXanqPoMWGNAA5VT7nBoMKn7iMfYLj+eKsoFChUTA9hgVINxIHSqsIqCFlOdg/E/0H+NTLCTgs+P91R/XNWPLJ6mkMYwaVguU7sxxQszMWx2ZiR+VR6La783EgwzfdBH3V/+vTLpRdXiW6gbF+Z/p6f59K2Ix5aYFK4dCyCMcUnnnBCDPuelZOoarHbpgN94445LewFU01GdxwioPRzuJ/Lp+tFxKJvvI2OZD+HFR+cynh8+zVifamyc5H0qaG48w43c9vek2PlNhZlZQMYb0pVOc56Gs4MT3+hq1DJuX3700xWKt0n2e5WYHCk7W+hqxHycEcVJcxedAykdRVK1k/drngj5T+FJlHZadHHHYwL8zZGfTqamyoLZQj6tSacVFlbErklQeTTt42sRGo9ua9Sm9EZNGloJVobj5MElR1rmPE2ZvEF+ykACZl/Lj+ldb4bw0MnyLzIo71yWsMJNZv3A4a4kP/jxrDEPUqC0M4oxTlunt1pXUiyuSf7hH6GpJMBaZccabOfbFccmapGDaR5u4eOjr/OupnOIxjsprm9NUteQ+zCunu12xsfSPP6Vm3qW0YGkx51KED1Yn8jXRlPk981n+E9OutT1lYbKEzS+Wz7QQMD1yfrW1cxPbytFMjJKjbWVhggislVi5cl9expKD3JtIuoLC8jku7OK7tyCskbjse4PY+9ep2dvpr2PlxKsunSqv7mQZKY6Zz+H5V5G6FkBHQda6251a70y+iuNVk8+3aLy/KgURhTxgn+907+p+leBndGpWVqDfN1s9PLTv6HdhEoq87W6fqb2r6Rp80kU0EUUE0TKyvGoXIHY47Yq9famvADcdK5Vdf0+6yILrYDzsm+Uj8en61ab9xGl3cSRLAOcl/1NfnuJp4tONPEJ3W1739Ee1Sp05JyTJdA0iJr+XVdQjDzSuXijYcIvYkeuKl8ZeJY7aHyHUTMfu2+TsbtmQ9x/sj8axL3xpDAStkgmk/vvwo/Dqf0rktU1ObUZzNdzeZJjA4wAPQAdBX1+V5XicTVWJxqsl8KvsumnQ8vE1qdOLhTd33F8+bUL83F3LufIOSOBjoAB0HtT9TsxEkcy5xIWyMcD0/rVOKNhlhnJIIA75zWuD9psWVzxAjNt7biP8K9913GuuV+6tP6+Z4kp+/qYoXnAPFP2A0qAE4B5qeFQS2cfKM4zXoVMRGCbfTp1OmnRlNq3UiKEKQOlKkWeBU4AK4JBPtXoGh/D/wC0aek+o3EkE0gysaKPlHbdnv7VxYrM6OEgp1ny3+f5FxoNtpanmzRHceOlNRCAxxwBXR6xos+m6jJZTbXlGNpTkMD0xWWYcI2RXVQxMKqUoO6ev3kypNbo838LNi7YeortlPyiuD8Mti+Aru0+6KJ7kx2H05eRUeaepwKgYmMnrTwMCmilB5xigB1LSY59qWmhApB6VJuOKoz7kkG3pVmNy6+hptDJM0tN74pw6UhAaKKdgYoAavek2kmnjiloCwiDnmn00U4UFIKBRR1FADep4NIUHrQilW56U6mAIm0UtGeOKa5496QC55qNjk08gEc1F3piYtFFFMkKcppmaXPHFAIVutJRRikA5TmkYUDjmkJ9aBiBT1p20k57U4dKM4ouMbRS005oEIVBPWl28cUUooHYaVpO1PzSHkUBYaaBTTxThwKQBuxSFs9KMbuelMII61JQA1h+IV/dZrcrH17m2Jqo7kS2OZjOHX613mktutyK4EfeBrudCbMP4U5CiW8cmmOAOtPPU1DJuz04oGIelEeQwwOKFOaVc547UwCUZO7AHrVdpADxzViRW5P6VVkRg+cHBpxAkVwfWrenEicEHBFU0XA561JGSrBgcYNDA2rthuIzzXPeJju0xx7g1qyv5hDEZNZXiEf6A+e1bUt0Z1PhZw7feqJxgcU85LVE1dhzIr3X+peo1+6PpUlz/qn+lRIcqPXFYy3NFsbNp/x7x/SrkVUrM/6LH9P61di6VxS3Z0ospU6VAvFTL0qQJ+rCpFqOM5AJ6ipR1oGSLU/YVAtSr90UDYfxVKlRH7wqVe1ICSm06m0wQ/oooFIfSnCkM53xD/rl+lS+He3+9UfiH/Wp9Kd4cPzEf7VW9jJbnSr3+tOFNHU09eopFjx0pjU6mvTAae1I3al70MOKYE+p86JOPYf0rjrn/j2f8P5iuu1E50mYewrkbn/j1f8AD+YrrpfAc1X4ya3+4PpUq/6yorb7gqUffrZGLHHpVe4HCf71WexqvP0X60pbFQ3NIaudPt440iaRy4cEEDGMd+1Mn1jWbqeSOC3iZeSCmXJHr1967LwVHaXmh3ljqFszwyPkSjscdM9R0B9KsaN4btbLzXW4YyKSidMFOoyPXk187ic7o4WtOnVVpRt813+R6CwlSpSi4annSatqkLKzNG2D0ZBg/XDV1l/PJFDZ6pHbSpE+CytxhTjP1Hf3xWpLolidUF5cKrBeSmOHbtkVW8RarCspl1OUxWSghIQMyTnvgdgOmT7+xrzMZmcMdUjHDxvo7+afS1tWb4fDToxcqmn9bj/tSncjQxuTyHJIK/T/AArM1C+83Vo7Y4WIYBKgZJIz1/EVC13GzJJbqEhIAUBi3GMdT14rKu5QusBmPAYN+QzXnYGrUc3G/wAKdu+5ONi4Ri11auTXbkTmBeTuH+f5VfGh3N6g3MsKf3j978PT61m6fLnUVkbltpY/UmuqivMQlnOABXdjc5xUGqFJXk0rvz7JGOHoRlepLbocpeaPDaz/AGdo4jMg3rIF+99c1yni0RRaTcpOpKyDYq+j9vyIz9Aa7fUGa5laUnDj7vtXnnj131LVLSwt1/elORn+Jsgk/QD8jX1dCM1Qj7VLmsr27mCfNV30JtJfxt4x8OWtiwivtOspVeyur0APCV/hRurKcAEHI4HTFey6BNcppFuNYtfs96qrHKq8pnGMqRxjj8O9YHgu+eCK00mzto38v5Yxu27UzlievTP6gV1mpqkLrlTPIT8wUYrKsp35Ue1RnGUVNMZbw2qRxwJtRTlnzwCDkn6Z5q1Z6tYXMD/2XNFdLE/k7bcggMADjI44BH51598TNO1jxPpttpmjwlF89WkaRsLtAP3vUZI456VteEbCHwJo0NlqjlmlZpZb5UPlBz/Cx6qAAOTgHHbpS5Wt9yak+Z+R07af9rYSX7b8dIlOEX/GrsUMUK7Yo0QeijFEE0c8SyQyJJGwyrocgj2NYN34w0e30/V7tblZk0w7JgnO58cKvqScr9QfSluQdFUcsUcq7ZEV19GGa8p0rxjr+lPp2teKbaSHRddlYwqw+W2QYCsD6Y5IP3h8w9D3sHiXTJfEs2jJcgXyqG2Ho+VDfKe5AIJHv9apxcdxtNbk8uk+TJ52myGCX+6TlWrG1zxjpmk3cNl4gE1lMyeYs3llo85I6jJ+vGOa3tR1m0sW8t2ea5P3beBTJIf+Ajp9Tge9c54m8JR+N9KH9twNYXKbvsxik3PEpxkP2OcDI5x2PegV30NV4nu7W3uLeVZrZts0bxnIdeCD7jFJ/wAfcZtjABvVvvrmM9ufXtxx1qbwfp8mkeG7HTZpxcPaJ5PmBduQD8oxk9sVcubYkMsbbVc5+h7fripb0utzSNR31Pm3xB8OtY0jSF1e/GYlADxg7jGnTk57Cu38J+N9Qk0yJpRJJJEfLkMUhG4jHOMY5BB/GvQvF2mXGs+GrixgkQsflkR8jzQD0z1GfWvCfC0/9n6hf2dxFKTGQu0jBGCeSPXBwf8Adreg+bVnn4uFldHs1n4p0+/2x3sKK59R5T/gR8p+nWrF9Gmxns5PNjHVSMOv1H9RXmjXts3Bglx+H+NXdP117V0WNJmhH8LY+Qex/pXR7PscKn3OkaXJI9arzIJVw3Ud6QXCXK+dCQc8kCpIzuAI4rREsqSR+cpikx5gHynswrDl3Q3GzkDnr2rpLiMsM5w68g1k6sgkiFwFww4celJiRN4XtGuZ2kWWONY/vbyRn6YFdlbWuLe4j86Il1AHJ9QfSuC8NXE4vmghaNEdTlnGeR7V1lobtAQZoS3rtI/rWclfqWnY1bGze3VFeeAgRFTtJPJUj096qnS3QMTdWoBJYYc9PyqIC/2kme2Of9g/41WumvX/AHb3Fsuf9kg/zpW8xpi+KdPkMcV2ZIpI5DHGGRs8qmCCOo7VgPAXvpU64cjA7810V80x014pXidFnjZGjBGcocg8+vH4VDbxxW8r3MxAJyxOOBnmuarjKWHajUla+iNFTlNe6hbeOOwaCAuourglVz1OBkgfgK00iEUe1eCTWfptnExXVL8IbqXBQyf8sVPCqvoeefUn6VozzKjYJx710RlfVkSSTsjznUyzeLJFH3vtIUfmK9FWQIhLnC+vc1x1xDDb+JbzULttsMJVlU/edivGB9c/l9ahvNeS9JWSOdY+yKBj8fWs6EG7vuzKK5b3NvUdato2IjDyt6IN369K5GK/mOpySxjBkY5RskY98VPJe2hXlJ/yrMtriOK6aRlbyznHqPSqrLlcfUUm3Y221C8A5SH/AL4enpqkiEedZvt/vJn/AAqiuoWzdVm/KnC9tQeBN+Vdd2Kxt2uoW9zgRSYb+4/Bq3v5xiuZkmsZV+ZJg3ZgORU2m6r9nn8uVmkh6BmHzD/Gi3YPU6WLnIHepHthMgOdsi9GHUGp4Iopbfz7UhsLuZfb+8Pap7ddykr+Rqea5ry2M6SAajE8UoC3ca8c8OPT/A/h9OYdmjkdCeMcGuju72D+0xbQuGvkUvtXpgYyp9yD+lUNfiSVFvYVwknD+zf/AF8fmDUxknsEotboh0O3mup0W3CllIc5cLgd+pHrXa2dpKjSZMfzIVGJByT+NcJoNzPHexJbxI5fK5dtoH5AmurtpNQR2JitmI6YlYf+y05K4k7Glpljc2whL+UMOWJ81TgbvrUQ0q7EkrARBXbI/fJzx9ajEupnLGG0wf8Aps2f/Qailn1I4BgtB/21b/4mqinfcLndaMkg0i33lCY8odrhsHJPODVrFYvhWC6S2eW5ECrJjaI3LHjPXIFbtdUNEeZXtzuw3FAFOxRitLmI3FGKcaSi4rCYoxS0UnIZg6g0mmXaTx5Nu5ww9Pb/AArM1KaSSNzGjGMyhsgdV35z+VdVdxQ3ELW8xXDjGM8/UVxGoyT6bI1pOc7fut/eXsa+YzaEqVnD4b39H/wT38vmqvxfFb70dfJfJFFCD80rqGxnH40ltILu6DuCvlZ2Ie56Fv6D6n1riotXZpyRlm6ZrVtrmaZsI5+bjCdTWUc8qKrt7vbqXLK4qHaXc6mS5hjJDOMjsOT+lTgVlWMLWsEkjwYZELBmPcdgKm07WLS9043iSBY04kB6ofQ17+GxEqkeaorX6a6etzx69KEJcsHfz0/Qm1C8jsogzglmOFUdzVvSnS+ihcny1k4J67T0/nWNr1vNe2sN3aJ5trFnfIpB25x2rb8Ln7Lpc/2lHhlUCSPf9ySMnqPxz9OPWuDF5nGlJxT8l6ux0YbCSqPma0Wr9C6dNufMlRYy3l8nb6eo9aqxWzwKUkjdGLM2HBB5JrXh1EwuJFP7sgBh6f8A1qbeajG8yTMMsnCivD/1jq0arp4iFrJ/fb9WeqsqjUhejK6f9fgQpptzbMLyXaIcLmNj78cfjz9Kklmgjmm4VFYqcDsQcj9RVt7uO5iX7W5CA5KDvWBrUSXVwDZDyo+NwJ64rknXxeZ0+eEXfVOy0tdWWu7TXQ6KUKOFnyVGl2vvf/hjRM1tFbvclBJKG37iOVHciumEyhBznPOa5exEItDCy5c/eJ/iFW45jDbRJuyEXZn1x0rxszVen7tdvnT69rK1vuOyjGnVV6WwtrZpJfurj92p6Dv6VdutLtGgKIojfqGyT+dZJ1IWUwdgWR+Tgcj6etUtX8RbpdlvKPK2jPua3qZtjKtWM6c2kkvS6Wt111MPqEIpxavuVrtxEzIpBI4yOlVILSS1E8jwXQRiP303Q+irn8+Kab+J3DouTtwdx/i7mqeq6hcXMawea2ADgs2dufQV9E87k6iUbbbv06LzPL/s+XK3Hrpb59TzrxDdzEyLI8UjK7Ay4w7jPGR3GAtc9Pci4u8yCOLoAEXC5HHT+ta/iuW2SWOKzuvN8vIc47+7d+/AGBXNPMML8oyOuO9d0Krqx5u5lOmoyaOh+5GrXE0TKoz8qjdn8unamSagLxoozFEBkYyOSfqKyjI8xAU9ulPRiCAqop6HJyK5nFddxpHQ2lq1tb3Dvsj8zr0xjuKyJLcG7aGBkJPP3uB7ZNH9rSiFoHRWTkA46/nWcXJYnH4VMIyTbZLRv2e7T2KukUiMcNyCfrwc1qx3MKZZFKhhl+pJ7DvwK5GGTgh8g4+XHr71eSeaQnLbVYbcLwMVlUpuT1GmkaV0YWUeWOTk5DfzzVcRh8FsEDrxTEGehwfpmoZ9TRYdgKj6imk1oiXrqRXsNsyZhZCQcE7htznnkfQ1Wm05o/LeclUl6GNS2D2FV7+6SWEmNys7Nhg3K7R/L+tJYyTr5SCXdbwMGCheQc9/X71bqLS3ALm1jtpds+5GPITAO0ZPXnr7VnOdp+U5XP410Hia2W6t3uDPCbmIYxFyH9Rn2B/z1rJt4VayiKKzPklyRwvNbR+DmY0rq5Cc55yTRubcGOM+tX7W3gEg+04ZCeMHp9fQc1YZdP24EaMy8KGY8njrjGc81k5pPYVjLZgkqSqT/cb+h/z6110K/Klcx50IvX8ohkJPIXA/Kumjb7vNelgXv8iWi5aqCefWt61aN1VGIT1wK5+0cAjPdqmnle2EgjVkK8F2HNcWbrmcF6/oVFaHSiRdseAMDPbGfamR3kSbgpOSeR61yA1GSRiPOLBRjg8n0rV0/wCZfOeNnwMgD3rxnR5dxtHVxSnCALg55B5psbLCzBHLZJJLdTWBea40OxDHsc9euKk0u8SXc0pzKeck9B9azcGlewWNiQBoJZFVSSrHOOc4Jzn864mywct3HFbepzahAZEjZGSVgqgkBhuAAA9s96ZdeHb/AEq1MtyqNHnJMbbtv1rtwteFKlKEpJOTVl1Y6lGbi+VXsUJCdh29feqRulJWNJIFk/uqdx/LirAbzFY+nH6VzelRFtRaQ8Llse59q93CwdGn727Jo0nax0VzexWxHnTBd4OPlJ6den1rEurmO7ug0Th0UYyFI5/GpfEMJL2kUQZ3O4AAZLElazNNR0MilSGDkEHjBwK6IyvvuaSilsdLpMKiMyOoO7gAjtVa8iWK52p93rj0rQtz+4QLjIAH41mPvaRjIctmuPDTlOtJtnLC7kxc1FcOkcTMewp+wZxzVXVVzGkC8GVgvHp3/TNeg2bJEGkREo07j5pDu/DtUWtah9njMa8t3x39q1XK21sTjhR0rkmzc3bSscgHA+vc1m3YqKu7haxMWaW4YbyOWPRR6CpF1K3ibbFCZT6k4FUb+Yv+7T/Vr+tQ2bwrKVlbaf0pTmoRuWoObsa63fm8GLb9DTyCjZU8URDgSqpKZxntmmSXEfnhC65Y4AzmuSlinOXKzapQ5FdGpFJvjBI68H61Ztm5wao2IyrL6VaQ7W46117M5mjWiG4Y7msp1CTyrjHzbh+NalsQwB/Gql9H/pJbHBXFUSjrLGQLZWw2rkRr/Kl84+UeF/75FRRSERJwBhOgHtTPNfyjjP4V6MHYlo6fwu5NshwuDcD+Ee1cHeyl724dB8pkY5/E13Php3EFtuYgeaT+GK4VAWXJx71z1nqVFaEZ3H0ApbrP9mTAnqR/Sp1UY7ZpmpDGmsB3auWTNIrUydKT/TYsep/ka7C2vBp9yLiS3juYQu2SGVcrIuOR/wDX7HFcxo65vE9ga3tTO22mXJxxx71z1EpxcejN4r3rnf8Ahiy06y1+LXNCK/2bewtE8QH+pckH8BxjHrj1GIfiVbRO9tqEIGXPlSEdzjKn8gR+ArkPh/qF3Z3s0UKTT2zKGkiRS2P9rFejW8sUsqeYFkjDCRCeRnsa+AxtatlePjWm3KNrX6tdn5o9inSjXptLc4i80TUba3ti9nL5bN8zKNwBHY46fjVzxSfM0snJObhcfQK3+NekS6yoTCYGB1JrGt9O067P+lQ/aRv8wLyFBxjoO31rpwfFFPkcsRGzT0tre/5WM6mDm3oeTx28srBIUaR/7qgk0gguJXW3VJHcHiPB4Pfivb5vtEFq0Oj2dpCccF8Ii/goya5YWstjK7XU0dxeTHfLIrZyf6AdhXq4PPI4u7cUuy3f/AODFReGhfc4O70O9tLH7TPGiIWHykgsM9OKowxjevyjrzx2rsPF90q6esRb55GBA9h3rjxKEBY9AK9mlVlOi5y8zipVJTjzSL+l2suo30VpAVEsz7E3HAH1rpr/AEk6TBPa3yGMlcl15Dj29aPBWu6LJPC7WqaffxgjzYmPlyA9Qck4/wA8ius8Qn+0rF7eQqrsCYpT0B+vpXxdfM5YfExjOLUXvf13Xc7qOCVWHNGV2eaadZpLJawErF533nY4A645rtrr4evb27SW96J5dpyjR7d30OTW/HaaLp9vbxfZLZrrysqHQM5UcbiTVzTLwrAsPnPOE4EkmNxHbPqcd658wz+pO31d2V9U0tfPyPSp4dqztseYWGlXEGrWEd9bSwpLMi4lQruG4Zxnr1r2ppQoyT0rmvENtaXTwXkzy+dafOoiUEtg5xz9KuTXXzEZ4xXnZzmSx0Kc1ur3XS+hVHDNXFaGNtalufJLu1v5LHGQRuziuUsPBq3oupbq4aFWJMSrg454Lf4Ct5ruRdzoCVYYOKLWSckvMdi9lrnw2bVsMm6bs2ku+i7G8sKpR1Pk3QTi/TFd9GfkGa880VsX0f1r0FBmMEGv1qpufOx2JR0p69KiUNkelSisxscKcvrTM4p4poB5ORUbNjPrSk0yXAGcDNAXGNz15ojYq/t0pAc0dKpiLIOKf1GajQ/KKeDSBCijOaM03nOaBjjkjFOGe9NU0769aAHLS0g9qWkMKO9FFADJD0FImaRjk5pyA4NV0JTuxwNIQD060UVJQ08cZphqTAxmmVRLCkNLTDQICDUchlB+QAipl6Uo45pAUzeFG2unIPOKuA5Gaga1SWUu4P0BqbgcDoKYCigjIoFLQAR8040xM5zzTmJHNJjA0h9qTcCOaAc9KBhSjpSHrRQFwNA6UtANADSAetJ2p5pppAIDgc01uadTG9qQ7hjNZOuj/RmrWB9ay9aIa3bFOO5Mtjkhw1dp4dbdb++BXFE4bFdh4ZP7n8KciVuaW75jThTGHJxTxgjihlBsA5xzUiDApntTg4B5xSKQ8AE5IH40OgZTxTd+RxRk+poApldpxipIo3kbCjjvUvyiZS/Sp/OUR4jBBPeqEMzsYofrWf4lUfYZMf54q/KP36k9xVTXlLabKfQf0ranujOpszz89cVDIMGnucP7Uxua7TlRBcAGFz7VVXoKuTjFvJ9Kpr90fSsZbmkdjasubVP896vQ1n6f/wAeyVoRnkVxS3Z0x2LK88VMlQRHmrCdRSAmh4HNSDrTFpysCeKBomXpUgORUa9KkAINIY4daeKYOtBkAbbSGTjpQBmhelApiHY5zS9jSZycUdqQHPeIP9Yn0p3h7iRvqKPEA+aM+1J4f++31FV0I+0dN/EfrT/So/4zTxQih9IaQdadTAbjvSHoaXpSUAPvj/xLZh/sVyc4/wBFf6V1V7/yDpf9yuWn/wCPV/8AdrspfAc1X4iS2+4KmH3qht/uipx96tkYsU9DVef7o+tT9qgm+5SlsVHc6nwyxiR5EYqxwDg8EfStO41ExXqRhiHkH4GsTRH2wN9RUl/JunVh95R1r5nG5bSx2JlCa179VobYfGVcPP3Hp2exr73WXMjhyORg8VzWtaWs1+8rux8zkFuce3WteGYSKDnnvUN6rzGCKFJJZnfakca7mY46AfhWeWYangKnLa3Rtk1sZVxNT3vuRkwWxtoPLV9wzkD0qvqL5kjAXEjDk96Zqt1fafOYptOngfJXM6FMkdcZHNb/AMPdBPiq9uptTkeGztYstJGRw38I5H1J+lZZnQw9Kp9chK0evm+j+87oSnKl7GS1e36/gZGmgC6lc8hcKK1wVdh5rgDsCa5i4kvbK4ukVA4hkYFT8hIBwTz0+ldPqdg1oluyEssihh7N3FZ08DTlWjOVVpyVlZWeiXUbm407Rjp/wSd5dOVQJEkkP+zxXJyadGnim6vyuIXgWOPcclTk7v0C111zo8iWKyhg8vVlHTHtWbbaeNW1K108/wCrkPmTH/pkuN35khfxPpXt5d7DkbpVHK2923+BzzjUlJRaSudB4C02Oy0ybVbnCyXQ3KzcbIR936Z+8fqPSumg/eKJmXDNyARyB2/Gqt+RcXkOnx/cUCaYDsgPyr/wIj8lYVfc7VJ9K1k3J3PRjFRSSI/vzf7KfzqRgGBDAEHqDTY12qB37n3p1IZmX2i20unX1vZr9jkuYnj82AlCpYEbuO4rxeX4Wa1Z+Cmu0uZW1VCJWsFOUMag4Xjq4ySPqQOte9E8gDvTqabQWPGPGvxPn+IPhPw/4T0TT0TVrhgLzMY2RlOmzI4B5YnsBjuav2vwmNj4m0DUItQluYLV0e6WQ4O9FyGT/ZJVRt7D26d1pXhPSdL8Q3+s2dsEvbwAOey922jtuPJ+lb+abk2Du3dkcUUUeTFGiZ5O0AZp9NU8n0PIp1SBC48uYSD7rfK/9DU1I2CCCMg8UJkKA3UcfWkBnGA2t/I0ZxBdHJHZJQOv0YD8x6muF8Z+G4E1b+24k8sXW2G6x/BID8rfQ5wT649a9LkQOhVuh/SqOpWkd3bT285Pk3SGGTHYkYDD3/8ArVpCfLK5M4KcXFnlp0hAPv8A6UqaUn98+nSnQ3vlTSWt2wS8gYxSjtuBwSPY9R9auLL0z1rvVnseLKLi7MprA1m+5SdueR2P/wBetCEjgj7rDINKwDqQeQahRDDmMdPvL/hTJLMrDoaoTqBKVYZSQYP1q3ncuSKiu490XB5HIoZRz2iypaa68N5G6xK5US4ymCOCT2+tek6lDbxvGxjRQIEZmPA+6Oa5GzgD6nDMACHUowIznj/CtPUrx4tlk9tNcReWEV1APyqFwGyR6kdycZrgr4mnQlapNI6YQ9qvdRptBGJFXy15zUNxawSPGQihlOeepGOlVxNb6oVck7I8MFyVIcHv3H0oe9UxoTxjK8V4WKzqScqdJ+9fTT0OiGFWjkie/kglt2it1CN5kWEPshBP0zWfcrLdWcscClmKFT2xUd38gWVGYNnIapLfUuSu1FMpJIXgZNeTjcZLEwg5r34v5M6KVLlb5di9dhJtLjhn5RgNwyQcg8cj3FY2tTSKkt5DGGnRThyB+745b3OMAVPbBvPmleVlRDkoxJy3t6fhVLXLkzqtpMcR3PCnPKt1HA5xxWmHxNbE1rVJXXbpp5ehFSnGEHyrU5Sa8mvZIluJmL5CCT0Ge/rzWgxjt5IluNq7wQXByAQcEdKL3w+0Nl50cwdx96MjGPoe9TajPHf+H7Yov76EbmPcno3+Ne9HNIwso63dvQ85Uaii1Lda/wCZNJawB408yImTG3Bzn07Vk6jZtBa2s4wVkUZ+uM1Xsp9jhZHKp1DYztNbV5Mz6PbRmNWRoVP4gcYr0PbqrF82ljk5nbUn/soKVLkBWAOfSmTaf5J6Ar6ita0vYbuDch/h+ZT1Fc3d6wft4MDl7VOAvTcCOa65VoQSd9y3LqX4rVCpzgAc9a2dGitWs7i2kCSCQb8VzkVwZyW6R9QoNa+grBJO5ZpFuF5XB+UivIzTEc9CUY39VvdMvDVb1VFGl4agNvdzxRynyl+ZO2M5zVu+ne2tbpo9ocLiPPTceB+tZ0TPaX7Mp+Vsg+1R310ZMBu0in/x4V83DNcQq6qN3VrW6bb/AHntewi1Y2LKwt7SxWKFN8g5aTGWdj1Yn1NUxEpluLOTiK4U4P8AdP8A9YgH86t2t38ixg4J6n0HrUks9mmbhgAsfRm5/H6115bnMqEZQqpybenr28jLEUOd897WOR0uAx30UcykFZNrA9jmu/urW3WCzKxgMYsnHf5iM1xFzem4vHuOVLHIx29K2NDS7mmSeWSQQKDsDE4fqOPbOfxr6mniHV5bqzPGVVObjFXNtbSM/wAOM+9Vr+0hPk/JljIFBJrSQ57VU1EgNbD/AKaiuyL1NTrtCgjt9LgSJdoIJI98mtCqelP/AMSu3ZjgBTkn6mrUciyIHQ5U9D61vTl0b1PLrL32x1VdSvU0+ze4kVmVcDA9zirNRXtul3aTW8nCyKVJ9PetG9NDIwU8WWpkVZYZEQnBbIOK0r66JgjktZFKupKuDkE155qVhcWupfYpNokJAVicKwPQ5rb0SG5so7izvZUETjfCd3Af09s142NxbUHS5uWT26ar/M68FTk5qTjeK3N3SNYnktZV1JIUvIo/MIiYlXHtnnr29xVW51B32zFvnQ5XHauVvp2Fyu4nG4VYmnLfIDwa8DFZrWqxguazW9j6ClgKcXKSjozpJphdSCRjgNhwQe3asjW5LaS8toJdxeRWKnr0xxn6fyqtFdLDGEU4VRySabZ2lxqF9HcgqkSHK7x978PTFcH1rmrOpJ+62zdYe0FFaNLfzHqlrbQkJEpb1PP8619Kvs3sRlXeQuPlwAMCuP1W9lt9QmiKx4RyMKc/rWx4burbUgbYXP2e+Y/Kkg+V17gN6+2K6KdKtSamtrp36eV/JHPOvTmnFu7ta3XzO8urq3jtBJPIFhlIQHrkscD+deV6PLImqPAGKCQsjDP14NaviySSxudMtRcCa3wtyAp4zuIGPyP51izGS18Vusq7HW6O4D3b/A19HVxKqK3X+rniQpON3Y9Z8Muo0W5tc7fM4J9iMVqT4vbiG3T5LeFBGxHHBIOB/wB8iuX0i6WGSSKTIDfdYeorUtrmNIyvnKrE5J6c/XNfDY5VY4lzh6r1ta59PgPZzw65nrszfvHtXKW9mi5iG1to4+lUniSM4KnevfdVRNS2XEMNu0LRvkZRsnOM/hVG/vy0rxo2EBwT6mvoMvpRq0IzxMU1Ha92299fI8zGYh4eco0JNN722+XmaUl3GrKoO4k44qXNYViTJdqx+6gLE1qW1ylwrGMn5Tgg19JhKilHXTsjxZScndltWwcg4olmIXHODUYNKGI6GubNsrp4+lZ6SWz/AK6Hfl2PlhKl94vdEizxy2ao+GVvWuV16xaFGmtnJjZgoQ/eyfT1ro7uWFLbfPtjEfWTp8o4AqifLuLqKYMrW8CCVcc7mOcH8AP1r5DC8PYuM7zaS7X/AMj38Rm+G5W4Xb9DkdLj1C4uPskETtMWPDDGB756Vt6zoeh29j5Wu+JxaXOMyJCwY/TbgsRV7SkMhlupPvSEgHvjv+v8q87+IdhMmoEQWJYSHKyLGT25ywPzE5/iHbg9a9OGRSsqvPb0S/U86WaqpJwjG3zOO1NIre8njtrj7RArkRzBSu9c8HB5HHaqAyx4GSasvby+XFK6FIZM7ZW4U4689yPQc1XcPC7o6skinBB4Kkdj716iTijl0bL+wIytDL5q7VJONu1iMkY745Gavadpt1ezQx21rcSvMWMSxoSXxnO31xj9Ky7dirBlOD2x1FfQvwwjiufDWkaiUHm2UU1uAqgfekBJ4x6enc15WZ436pT9pa/T8GdeHoe0djxLW9Ku9I1GS01KMx3SYLLkN1APUcHgiseQbHUnITOASelerfEjw3rd5q+pa59jZ7IMAoDBmVFUDftHQcf4155rtqkAit4wRKIh52WyQ56j04//AF08Fi1XpxldXa1t0ZdXD8rb6GfbMJWZmOEBwvv71dW4jWQQhsv2GKzEJQ4UjipYNsamQFQZT94nk12uzOGUbGm1xtQnYWccBc4yfasW5SaQ+YybWPUDtVtpDkdCo6Nnv6fhTVfJyzMT7k0oq2xBlv8Au32tz+NKs+x8qSGz97NW5bVXGd23HXiqkkCxsB5oORkEdua2VmAq3OxgflcjIYMMg/40gnDSFiuATztOMD0FVtpPX8KnsbaS6vre2iAEsziNNx4yTgZ9q2jST0LUbuyLJjuBHDK7HbPlVLNgHBxyfxHWovtLQ4UHBU5yMH9e9ej2PhM28tjY6nDNPb3CkzIk+I4ZAMlwRzyFHB/vVZ8UeDILuCP+ybaKFIdv3EUNtOQ2TkbsDByxz15rpeCly3aKnRq003ODSXU8wSUSSoVULlhnFdZGMla52802Wy1e2hKymOQqytImzI4JH1HQ+9dOkZBFVhociZk9dSWIhF3nopzVaOGXV5Y0WWLGcYkbAPfJycVYlDCzlK/eCMR9cVNo3hbVdV0/7bawohGSru+CWBycevAx+defmdanScZzdl5m9Cl7S6KMMQjuTDCys2D8oXj2/StWyednYCJWYKAVXp1xk+nNRWOl3FxrkVmvmRsCJJGfJKjp39Ogru77Rhp+nxpp9s8jYO9l+83fPFeDiMZSjOMG9WarDTcW+iOBbzo7+e0uuS/z/N/StnRdNn1G3misyjMvOwuBkewNMu7d44WM7B5VbIynKA/w5/8Ar0tutjDbxtPcTQ3ZyyMjbNhHQgj6jr64xRXrxhS5lv6X1MqFCVSo4pf8MPfT76PWLX7TbyvcrKroDzkg569K9D1MKYGSVQQ68g8g1z/gvXLi9sp5NVZDc2shhMu3buGPvemTz0rWvUkvJd8cqCMgLjJJ+uK+YzLETqVUmknDqn37Hs4WgoRsndPucfpXhw3V3eLLJ5NrExw45yCMgfgMZq/beF7Cz0kQxW5uLyT7jv8AeTJz26Y6n1xjnitiMeRC1u84ZAfncDtnkflVltWTyGSBFiiHV2PX6mtpZ5jKs4x5npbT07tau5o8NTgm7bmDevpvhOxWdY0utXcbIflyzMewHYdM/wD6q8/v9M1Cwvi2sD/Srn/SHOQT83POOh9q9HsNT05rudbVFfUmjPlXUyZG4DhR3A79qsajHBf3DXE6KZoUZUWSMOrFiG5B69MfjXrYTNZ4OpzV025bt7+SS6I5pUI4iFqb0XY84s3+Qj3zSSQSSTExxO4/2VJrurfQbfRjJJDA1xey7jErDeIl7cf40zw1Npws1hvgyu/IkDYAPoRXtRzSHtJVqUW4/n6I8eph3TqKLau/u+8taF4e0jUvB9vK8W25bcGmBw6sGI/L2rj9P8LzX3jE6fPJsht4jKZVH3lJwCPfj+ddQh/sUXtvbXe+3mk34fHyt3wffj8qy01+a2n3W4QuPlLtzuGen6V5kK+PpzqTpS5ozu433V9evbax2Oth21Ce8d7dfIb8RPCthpvhaSe0ln+1RFR8xz5hZgvTt14xUHhf4aW6aM114ikkSVkykEbhduR/EfXJ6fz6V1Vtewao0NzISTGwYIT91sdffGeKl1u1k1JLZRdgWgcO5Vc5KnI79iOlebTzjGOKw9SbTu7ya1XkrLyO/wCr0tJxV10R5D448AXXhZopzOt3ZNhWkVdpVsdCM9D2rnLPTbW5Mkki4SIb2xxnngfia+hvEL2+saXJaXADwzIUz6HsfqDz+FYXw20C30UobyKN7oxs8pIyMlsKB9AP1NejhuJP9jl9YV5p200uv0ZP1RKonHY8Fu7uecGFwqRI2RGqgBcccVoeHtGN+xnaRERGwAeSW69PSve/EHhvR/E+tC4u7FGkjXy2k3MmecjO0jPWtAeH/C/hrSZ7iSzgSFEyxkJOT2ABJ5P512U+IMPSUI8r5pW0Vnuc8qVSrKV+nV/oeNDTorYl/Mkc+irj+dVZ5Y0df3cgzwM4/pWlqF5LKJGt7VUBJIVnJwPSuc1Ke4Cqs0UQJ4BUnI/WvqVK55/Lqav9otEoVEHTvVWS/leT59vA6YrLTLDLEn6nNWbOMPcRJjgsB+tO5SgehsXCkDdwO1MIkEZ+9zUro5DZzwO9CWdxMkRjiZhJIIlPYse2fWuv2qhrJ2I5G9je0ZZF0+EncDiRgfwNcJGWKjCn8a76CCS2010YqXhgn6HIyAa4pUJIABJJwAO9YTmpaofLbQZHxIhfO3cNwHXFdlp2i2epWIlhtd0GcfvGI5/E81y9vZXUzTCK2mcxHEgVCdn19Old3oHmWeiQxTKUk5JU9Rk8ZrxsdUttPXsTiLxgpRVvPU6h/DWjWulrbwWNvsIyW2/Mx9d3WuStfCkF7rslndSsLZ0ZxtOG68CtG58QmKyEe8M6/KBmq+lx6lHfWl+8Uhg5Yykfez1r4nC18ZQdVupo7pXfVdVc9ZzhOMLR10enRM3o9NtvD+gjTNNUCadhG0pHzOT1Y/h+VPttAt7KwVTNK8wJZpCcbiTk8dhVbVblbiaBw/7vesisPYg1bu7tmTYDnPFeHWxdSrT5JO7bbl69NT1YR5LOJh2wuLy8SK3g3fvNrhmzhe57V1M2lrbafK4nk81ULDGAMgVT05ksYSOPNY/MwHJ9qh1jUnmU2sIZnb720Z/Ct48latGGHglFbvf1epy1JVYQcqsm2+n6aHC6i039swtNPK8LHdiSQkA/Qn1rShuE81QHU7uAM9alvNIu7+3Z4rfcsPzl88ZHb3PqBUb6JMnhlNRgVV8l96jPI55H07V9dTxNGbUU0krLS2+p4tWhOcU5X5v07mB4rs5WmF1nfFgLgdVrmNRYeUqoDuBCt+tej+RJdaUt08LG1lG3cehP+c1g6H4He/ur661K4mi062BKSJjfJxnjPHHeuqpmEKdK0na2n6W9SKNObtC2v6HPaXbD7PKUGHGD9a9X8OEyeBEjuWIkRjsDdRl8D9DXltlKdkUfJLEluMY5rutDuB5Ftb3L+XEJS5I5wMccV5WZxdSC8nf5JG+DajUavurfidpcomrXkas2yC3HzHpknHAP06/WuP13WX0vxCy6bOs1soA8oqCvPVff6+9ad5O9wTb2dzG0RHzSBwh/Xn8qpLYRaftdEhcseSrbsfWvEy5QpzvOHM2rJdPVt7P0Pdrvlh8Vkjca6E1pBcr8iyIGxuyV9j71WnusjO7nGDWJquotDaPICMr90Y4zVW21+3z5eo2xjcEFgucEdceo/Wni8grOPtaMbvW6T29O4sFmNOpJqei6efc6+GcRwqM8nmobi+EUbP1Irk73xTbhy1pbysp7SELj8s1VuPEDy2yNNGg3n92iZ+nJqcJw5i5Ti6sbRb7q5pisdRhB+zd5dDwrSzi8i+teiQZaEY9K84sGxdR/7wr0ayOYV+lfp9Tc+biWB0FFFFQUP5zT6Yp4pwyaQheppkykYJHFPBwc05iGXBqgRWoaniM560eXz14pgPj+4KeKZjinqKQ0PXk0n1pRwaWgBg61KOtNFOHWgB1ApKTnNIB1MZucDpSueMetR4poUmLShsUlFMkeD1waRzxTV4NB60WKuJ2x2oFKelIaBBTSKfSDrQAAcUUvejFMBPpSDilNNpAOpV600U8HA6UAONQkk1Jupp6E4pWHcZS+9I3A6U1Cdwz0oQEvWij6UUCCgUUnegpCmkNBppOOtIYtNajPpSMaQkOArO1hB9nar4bFUdWb/R2prcUtji2GHrsPDAzD+Fce5+c/Wuu8LN+5/CqkSjWb7x+tKKa33jTl5FIoMZFROMNz3qbGKbJnHAyaBiJwKkHTmoE8zPTj6VMTQA2QcZ61GsuD0zUvekeNfSgBXcNKnriotZQrpN0pOTtJqSUhNh9MUaoRJptyRzujNbU90Zz2Z5oeRTOlPB5IpjV2nORyndDID6VTX/Vg1bb7sg/2aqR/6sVlPcqJr6d/x6j6mr0Z5rP03/j2/wCBGr6cAGuOW7OmOxajNWozVRKsxmpGWR0pqH5/xqFmO/APFSJTAtKeKmBqBelTCpGPFQsp872JqZaGHIoAlRu1KKZH1p+ME0mAZ5pQeKjJ5pV60IZj+If+Wf41D4fb9631FS6/yE/GofD/APrm/Cq6GfU6luHp2aRwN1I54oRTAPzUgbIqAdafnFADiaQnjNIe1B6UxEt1zp8o/wBiuWnH+jSf7prqpubKUf8ATM1y84/0eT/dNddH4Tnq/EFv90VYH36r2v3RVgffreOxiwPSq8v3TVg9KrznC0pbDjuaVjc+TNEjHCSAj8e1TXN9bqxJlXPtzWNqDYji/H+lUgN7nnoK8mrV9jWlKK1djNuzbOgm16D+zoYLXT447tSS92ZGLPzwNudo4x6/hWf/AGjcmVJPPkWRc7SrbSPXGKoWyPcOFhG8k8c9akWCQXOyQbGU4IPauGVm25a376ilJt67l2+1C6vI4oru6nnRGyqyyFgv0yeK3tN8QnTvBF7pkSCOa7kwrKOShHzEn6DH41zA2rO+DkIpxnuf/wBdLJIj3CK2fKTCnb1x3xXNWo06sVCS0TT+7U2pVpw1T30Og8N+HZdejnf7R5KcoZCNxycE8d+35mug1VTFFDaPIsjwlV3gYBI4Jx2+lV9K1C30nR4FlfY837zZHksAx68dABj3PpVK4VIEHkvujLl1Oc8E5rxMXOupqpPRJ3irfJu57dBQ5FTWrtr8zYnusW5XPPSk8DRKBqOpSEKhbyEYngImdx/76LD/AIDWPd3Sw28s0nKxozkeuB0ro47Q22i6bo7YaSYBbgjHKgbpTj0Ynb/wOvT4dVoVGurX4GlSFpJs0tGjdreS8kUiS6bzTnqq9EX2woGR6k1oMh6Y6DJpFfgD+EGnxSAzP6E4H4V9CxDdp25PSm44qxIwDKCe9RTH58UhEQBLMccKMf5/SnEYot3DWzsOrOw/I4/pU7IHUYPIoGQ0U4RsSQO1PEYBXP1oAqSt5KK7D5VcIfxOB+pFSrksQPrTNUtzdaff2ysVeaJgjDqCVwCPcHmoLC+Se3srpTlLmMMuB/eXd/SmBbAJ6ClZSNuf4uBShwJCR0NJJIPL6cr8w/CkA4x8HJ7ZrPvMbgjsQk2Y9w/hbGVP+e+KvSShunSs7V0eW0dIiBKw/dk9BIPmQn2yKdgPFvihqenWviBboXCC8liX7RFCdzRSqozn0yCOvoaydE8b2bAQ3ZkQZwCVz+Ixn8qyviJaMPFN5LGu2O72Xablz94Ak+3O4VjWl3HasftUbR8cMPmU/jXVBWs7mFShGo/ePadOuYrqMSQSLLGejKcg1YuFwA46g1zXgu5/4lsUQwzoC+QcjJOSPpzW7NcbZdr5AYcVy4rMlh5JSXuvr531v8jhjh+a6XQspnkGo5IM3sE+CyKDEyg/wsV5/DaPwzSOzRqpLFgWxk449uO1W4lDQiTLYPIGKzq5lSlGUUnfXbV/IcaEotS/MS6jjt8PAqgryuO9RPepeRcgrKvUH+lV5nmRiIQSc55FVme8dtrRx47nPP6V8nPCYrEOzUpJbNpnowlTit0vmQrc+TdEg43/ACt7+hq/LMBIkCAbQNzH1NNFlG0LAou887m5pkNu0b5kbczHqK68Pk2InVh7SNl1fl+ZNTFUlFuL1R0+mhPs8zsqkeSBg9DkAf1NYt7ptt5wdNyqeqg8f/WrC1PW9R0/UHhilX7OVUqhQEEY/PrnvTrfxJHLhbqMxk/xLyv+NfTSo4ao/Z1Iqy2PLjiZRd4uzNSWHEy4Y7OuK5K4LLqMvmFhvbzFIPIGeMGuqaUsHIJxt4I5rO1TT/PsVdUY3OcRgHHHGc054ClSTdKNm9f+ARVqzqJcz2HI7y4iDvM+3OSOWH4VnSSiwnkMqZEoOFHTI4P6YqtbXsqXVuzOyEKAGz0GateIbiSa1C3JRyHDQyKMMR3U+vrmvNnl9GqnOKt3t95pTxk3Fxb16GAxBY44GeKvWt4diwPnCD5fTFR6bZteTKnIjzhn9KTULRrC42O24HlWAxXXGnLlb6bHLFJvlfUtWl21q+6MjKZGD0I9DWWDzT2kyNwPUYNNihlmJEUbuQMkKpOB61ldpWZKi1oXrSXYpUMSOCM1dtLgx3sBBPLYODjrxWJC2JBW7HZpFYrc3IIYkFQTjAyP1xmrpxcvkSoPmujYivPtjBCMTYyMfxVBcMTywI9a58ztgFSQQcjHarcWrXQwJZWlQdnOf1614mIyxTlz09PI9XC5jyLlqq/mdFCskpX51RT69T9BV9GjXbiGW4ZOmEJGfr0H51H4ZP2iK5nVG8ppm8piOSoA/Ste4kMEUsswZY0XJyK7MNkUOVSqS+7/ADNq2M5vhWhi3CJLJFe3aJHDu2lByenGfXoeParsOttfajZ29rEI4I4yhz3Ayc+3WuRurtriXJJ2gnaD2FdN4WswkAvCwZ5AQAD90A459zj8q9agoxtTpqyR5HtJTqafM3rkTvCRbyCJ8j52XcMZ54+lU7tpoWtzNIJU80chMN3/ADrUbLDAqpcSxqdskZfH3TjO2qx2Ljh4O92/I7qNNzdiVdWleV7NJP3BXd14Aznir0GuLDLHZG5jW4CAiNjhiMdvWuSmd4LhHlXyLdztDv8AKPWoZ9ajvNTUm0jlg/1YQoCzDPr656V5+VVakIuVa+lkr9tWXi1RjaPftbc9A/tG4x94flVGfxDNFqkNoxAEiZDe/PH6U0CG0S3hiuJJg68+YuGjP90n+Ieh6+vvk3VgJ9Y+0TSFVi27FHU456/WvRqZth40vaqd1+P3HLLCS5uWMUb91Il8qpeRRTAcjeucfSuev7iCxnNvJK4ifMi5y2zJ6euBg/nSanqiWc24ljIFPlqGOM+4rkru6lu5mkmYu7f5wK4K1ZZhGLStHz3NJSjhNI/F+BtXnzpujdZE7MpzSGSTarbTyK63wRpb2uhzLfWQlt7zBZzgFCMgYPtzWdqVhaWt88FvIpbAZpDysC56t6nrgfyr5jEJQq+yi7r7/vtsz3MNX56SnJWKWnWEtwC7gtGo3NkYUAdz/wDXrXl0nVLvR5Lq0niWzXgmN8Mecdac/iXT3sJrUrL5bIYshAN2RjPFczY381qm2KRghIJTPyt9RXVgcJOs71E4uLX3dbeZx4vHwptclpJp/Iq3Gj3HlNJD+8KHDIOv5Vn6ZZ3V9eBLNW8xMuXGQEA5yT2rttOvIrpmKjZJ1Zf61cfUV0yJ8ssUc58tiRxluMn/ABr268pwi4w1fS54dKUXVXMtPI5C4mN74mtI1LlEaKJQWLbRwSBntktV3xXEB4m+2KRJvdXlVf4Wz0/ID8ax/DKSS60jBv3iBn3E55xgH8yKTULmZLorIT5gYsfc+tYqlKM4tPRK3r3OydVShJdW7neWN9BeXkWmqJHuZpFWMpgKhPBLd8Y5wKmnhnt7l7eeJlmTJK47ev0rjPDN9Np+q2t9F8zxSAnPfPUfiM16b4r1QXlol1YIwu4xuUMOATwQT+P8q4MZXq0K0EleMtN9n/kVRoRrQd3Zx/IwtLvWsLh5I5AZxvVRzlcjr6dzj6UizZPWobCZdS0mG5CFJSOh6gg4I/PNY2q6slqvlxkNOe393613wWt11OCfNfkfQ6ixvvlmSNlwW2tjk0+G7e3lLRn73BFcl4XnytwT97Iz+tbgl9a6o1nGcfInS6Nv+1Jh1KgfSq8+vSwxtISoVeSSKoSbpGcIQQpxiuf1triVxFHBMUX0Q4JrvrYipe0E0u5rJK9lH8CTUPEd9qDPHJLiBv8AlmFGK6LT7uSDS0jz8zptwR29K5PTtLmLCW5XZGOcHqf8K6JmxgDqBj8a5uaUpOV9hWWxq2uoNFGeVCKMc9ABUg1Z5EV4yu0jIOOtYN8kk5is4wfmILn/AGa2YbLKjewUY6AV0xxMI+7J7Dbpx+JIwjoWlM8bPaB/LYuFZ2K5JycjPIz26VFJ4V0aV2kNoQzEkgStjn8a3p1SKUBCTxzmmZFaRUKkeZHRCSaujJi8J6R/z7P/AN/W/wAa9N8CwQaZoL29suyMSMQpOevvXGxSDPoK6zRJFOnKqv8AeJJ9q+Z4pjGGEWm7R6mAXNNry/yOhinU20hmysGMHGctnjAxyT9K5zVrO+tbcm3sNJs9NdWV0RAJkBHr93cfQZx2J61r2UiPIgHMcJ+QE556En6dPzrE8RaidRuVihJaKPhcc7j618xkVGdbEJR+Fayvt/w52YqXs033OBk8JaKvS2kPrmUmqj+DdEdyfs0oB7ec3+NdVIuGwRyOo9Kqgu1wwGPKC/iWr9JUacbabni8rld9jAfwho5k3+RKW6A+aad/wiWlk5EMg/7amuhVcvjIAHJJPQVXlulMj2mGLN125BA9SR0rZQpcyUtL+XYdGkptc2iflcwn0DSbeaOHyyZpTsVd5JOav6p4O0afZI1oq7IwD5bbBkew61Lp2m2dtefao90koBCuz7sZ9K0Lt1nR0kUNEVxhugPrU81CpiVTgrRitX6mzqYWVWNNJqK69bv9DAj0XQYFSzisreaXkkn94wH1otvB2kqUlhtZw8fIZZTwfWn6do/2C4Nw83baAvG7nvW2xmeykjtphCT1fGfwraosLRrKClo/nqzWu8JGrGEZNR7+ZRv9NlupUkS4mjYKFY5yTjufcipri3jntfs0hkMOMYDYPvz1Oe/rU2mRmFy13O07lcAt0Hvjufeo7q5gtw7zBkUEDP17/StquJc6iw8btdH0Lr1HipKhSk5Jd9irf6baC1vLtrNXLJtVmGRHjkbR0XnB/AVQit4L62gkUKqx25jfYoBRwRh2x1BHc9K3tQlvoVjl2eZbLlWi28sOPTrVu/0yx1C0dgPJuUXCSIccHpkdxXh5tj6GHUff36x1s10eongIw+B3dtV/Ww6+0vSNT0yNorVYcphlRfLJ9en8+fY1r+H4YLbw7Fb2o2wQlkAHUcknJPU81jabZ2MNr9nDmKZQS8qtjcfXHTv0xVOS/bTRJHavcXKP/eUKM+vAFfA4udevzUYtyindX1+7y8jthCC97Zk/nQDxFhWUvj5+OSBnqfxq7darN50jQsQGUoR269frXKaZFM9+1w6mMnglhjH9a2o3EbBmUMB2Nenk+VOvOcq8W0o2Sel2+3oZYuqqaioy1bOf1RHSR3BYbjlgT1rOS4dkKRhmH3Dxz7V089rDcI3mNLuyTnzP58Gufv8AQ5ImMqTyiPOCsSb2x9MjNXVyvF0k4KLcemzt9wqdWhKXO5WY+0vybWO1GFVWIOB1OfbrW/Hq9vbKtpHJifAByeR/9f2rl5bP+zrZpY/tLueRI8ewJk+mTzWVbec138o+7yWNLD5IqylPEScW9lbW/d+QsTmEKUkoWfc7O/vGtbcM5yxYHyyMZWq76gbjkgKp+6o6AVhAFU2tzRFKVUDPSuzDZZSwb0fNLueLjsfUxPurSPYttEwDzwMQySHp275rbPifbYw7svKg4Qdj65rBsL3M1zA2MABx/WqtwyJdCPoX+ZR6jvWmJwNKu4+1W2vyfQzw2MqYa6j1Nk65eaiCFWQRnqq8A/U96qWpuVuPLnhZYgCQWHHX1pbSbbhRgAdhUuoXRESheeckZ6CulU6dNWpR5UcdSvOrO8tbjdWuA8aR++azVbFR3M6mb7wOelRXMvkxliKZcVZWNezmmtlEsEgXedrcZx6Vsadqc1i5aJsqeWQ9DXE2d456nIkByPTB4rfWTgVk6FOd7xWu5u6tSnypPbb5nXS3UF5bmW1O09WiP8J9vao4ZmSdt2VOwA54ryi/1G7ttRgaxllidGLZDcEe4713WjeJ77VYUNxbQKkQ2+aw3Fj6D2/OvEx3Ds6dT927xfyaPoqOYQjS5q3T8Tq7GeR5MjhSc07WItFmnhbXrmNwpzFBNLhQemQg+8fc561hNfysD85Uei8V5zq+pwajqhLjAPyxkfewO/4+lPB5DNVOeU2n5b/eYrM6deTjCOnmdl4ybRGCf2NFsc8u2SqYx0CnvXAahEkl1AsjbkOSdh56VsTRYjYgetYbLi8Bx0RjX3WHoewpqmpN26t3Z5sqnPJslEmnwSFJITlSM/MxI/IYrd8P2+mSeJNMS+ikFs7gPGoILE8L6Ec4rmraGe+1x7S0TfNI+FUkDJx6nivbtF8HabHpcDX1ldm8CBmmkkGC3XICMe9efnOMjhKSbb17NXXmjswVNVG+Zf195JrmiaesimwJQEjKliQRnnryDW3LhUto7aMM1vlo41GNx2kAfrVWG3glLG7lby41687pD2yfWp9OkL3xVbeUfKck/wAA7E5r8+nmWKr8sZTclG7V92vNnrKjTgm7WuZg04eTPbTTbmW3fdJjGW7/AIZ/OpYtKtbbxdbzWkKRxeUzFAoI3AqBgHoec8elXDYXc105jKGI8MT3HcVct1WCWaaSRVEanLt0Hqa6sTndfEzXLJrTla9dL6GcMNGEfnc5LW5JJdW1Oeyhijit3VZblZGj3NjBBI4ODx27Vg32s3EKEtPCwccZfJ/Crer6g+owSWumHy9NiPJYkNM3q3484/GuO1b5pLZR0AJr6GhgI1Ic0pWlFLS7bStpe73ZwV6qScWro0Y7yWUnGWbtj1rr7bX59A0gmaYSjaCIHOQxPZfSuc8M2WYjdTD5Sf3a+vvTPE1rJfJI6MQIRwOxPUitXgqFW0Km3X+u7POp4lxmrd/+GXyOt0rXrHxBE8Vm6xXKfN9nk+VuT1B6H+ftWoblk2mVXUg45B64rxzwpbX0urfabSBmt4xtkcnaBntk9T0OK7q88S32n28KrY3F+kh2jCNtH/A8EZ/OvDzPh1KpbCvfo3+p7uHzSKfJUXzX6nWxTSO+VUse2TgCrtpCDnzVMo7xRjCn6k9fzqjaXGniyW6WYMXXKxTfK6n0I9RVL+3bhsq0/kMvQIQFb6EV4uGwVTn9lLTU3xOJpqPPHWx0V5c6izRxSeRptgx2M5O58ew7f0pLO0n0iOSC4ZbmzEvnRSAcYK7SCO3XP51iWcpfc0rl9x53c5q2LqW2jKxsXgPWM84+le1WyycaLjTt6JW/He54tHMabrfvE15mm00cOhrb2kpjSNTtwAeAfu854rM15TP4bbT7e7WyTZiSTG7gcn06nqfrVSe9ghtHlaVI4l5YnqPbHrXA+INek1FDBDmOAt/EeW+v+FeVg8Jia1Sz0s7ttdf1Z69etQpwTWt9vQTUpNN+2W8OjTzuFwkkshBDnP8ACP8AP+OzLcpFNHu6bq4axgaGcykgyF9y46Dmuku45p/MaMM5Tk4GeBx/TNfWqCglFu/qfO1FeXMtDfS+jZykYLjoSKmjfYCFZjk5OTWJ4RR57yRSCYwoLHtXXajp0kkIfT4DJP08tB196Vox1M25OXJcwHY3erRQnmGD9449W7VYNsjaj57AH5Mc+uev86fHpN9pKM+o27RSzHgkg5H1B96p31yYHicHrkH8a3lWi/4crpLdde5pyT5lCK12J7yGGePZKgI6gjgiqCaWjAI0jbFfcuOv0qO/uZDMsK5Vn7nvVyKVY2hidwZXIRR3JqqM5v3YMxcpx0R4Ja/69D7ivR9POYF+lebQnEin3r0XSm3WyfSvdqHXEvUuaSisyhwp61GKepoEx9FAooEAoNFIKYDkGTUlMAp4PHNA7i0UgFLQgAUo60lIn3uaBklFBOOtFAEbA7qQ096ZQiWANLSD2pTxTCw4DIprcfWlpDQAmfWjtRSAcUIB1Jinbe9B4NADeQaKUmmk0ALnNJ3paTNDAD0puTilNISKQCg5petRg4p+4UAOpCMigHNLQAiggHNKKTNKKYB2opsjY6UbsikNATTG5p3bNNxk0hgKD0pSMYppqRiGqOo827Z9KvVS1M4hJCk/SqRMtjjZQPMP1rqfCp/d/hXMTLiVvrXTeFh+796qRMdzab7xpUBFNY/OfrTicUikPNFM3ilJGKdxjqhycnJqQEUjYwT3pAxnenIcjBqNm2jJqF5i3AGKGCRanXKii4H/ABL5FPeNv5UxWPloKnnizE2CMbCP0rWmRPY8zfBJxUTcCpX++31qOTpXccqIR0k+hqpH9wVdUZD/AO6aoxD5KynuWjV03/j3P+9Wj0Tms3TP9S3+9WgTlMVxy+JnRHYniq1FVK3bK1bjPIqSiVlJbjpUiUg6GpI1zzQmBMvAFSIeKjJ5FPWkMmU0pqNW5qQnigB0Z+YVI3Wok6imzThJo1/vUgHHvSA805qYv38UDMrXvup9TUOhHEzVPr3MafWq2if8fB+lV0M+p1nf8Ka/NKxwfwpmcmhFAOtOpp4NOoEFKOTSU4cCgCzKB9ik/wBwiuUn/wBRL/uH+VdYBvs5f901ylx/qZf9xv5V2UfhZz1fiQ21+4tWP46rWf3F+lWR96to7GL3A9KrXPCirJ6Gqt391frRLYqO5HqhxHF+P9KTS7Jr2XyTKIS6MQxHcDoKNTBYQAep/pUhkKRgj5WBBBHUGvDxl/bO39aGUnZ6DNLha0ubUP3H6+laOpR4ikmXmUtuOPQH/AUtpEk9kGmYrhhJkdRj/wCtUckwYAg5BrFq6uzKbblzoypYZYo45JEZVlG5CRgNz2rVuvs0ogFu5eNY8YIwQfr60/WdQ/tBrOLaFt7SEKiAcA4Gf8+1Ztu2IhWTgpSU30NYVZKDj3JnkKQxxZyR1P48Vc0+9VB5VyWMJPY8r9Ky5n+YH1p8Z4BNPERWIjyz1/4AUqsqM1OO51UNm9zqum26t5lvLMrs68cJlyD/AN8gf8CrrrVvtOtXs5zttwLZMjvgO5B9DlB/wCuO8GzLFc6jqVwT5Gn2h69Mt8zfjhB+ddV4WR10K1km3edODcPu6guS2Pwzj8K3y/CfVqPL8/v/AOAfRxqutFTasbO7AzRHwg9epqC5crD9Sq/gSB/WpgeBXYMeTUM11HEs0szqqRJvdj2AySf0pGlHmFM8gAkfXP8AhWdbf8TDxC9gp+VfLlmx2jXJAP8AvMQMdxu9KT0VwsS+Hbv7Vodlc8/v4xLz1G75v61rRuVORXKWtyum+EpGQsBYiSMkjnETlT/6Ca6RHGAQcg1Ul2BotxzL5r54zg0sswBG3k1T3gSfUf5/nSSSYK+5/oaiwErOS4ye1c1ps00emCOUgmC4donxgGJZmRh9VAYfTae9bbzokiKxAZshc96ztOt01PwrdxRPH9rhvLzYpfG7M0mVPsQ2PY4Pam3yq4WNWSZYlVnOAWVfxJAH6kVNmsZLk3ejJLtxM8IkCNwQ4XcB9QRWqrhkV1OVIBB9qbQCxcJtxjbwPp2/Sor9Hks5Vhx5u3dHnpuHK5/EClaQLcLGR99Sw/DGf5j8qfmgR4R8VY42lsL2BDtYth89YpB5icduTMB/u1w7AMCGAIPY17X4j0RNUaTTXYoTLLbK7L90kefC2fQfMv4kV43NbS2t5La3UZinhcpIh/hI6/8A6666T0sM1fA93caXqqR2q77a4OJIiM7QOrKe2M/Q9PSu6v3DNujIIHIwelZvhW2s10iKSKCVp5kDSyleF7hR7D0H41aGnvLKRGCoPTPevjMyX1vFONKNmt/RdX2CEoR96T0LLXqmOMscOAMg98VoW2oMtrs+y3MoVj8yKMHn61WTT0kwZWDKvpzn8avySBIiF4x+VepkmAq0m6s9E1ZL9fI48XXpyXLEp/ajcTMv2aaEgZ3SAD8OtTQr85zWauo2yzPvuUx9ant9UsWc5uYx9TivolOK0ujzZNNmmRxz0rM1e8Nha+aAC5O1QehNaQkV1DKwZT0IOQa5Xxg7fabeMn5Qm7H1P/1qmvVVOGj1Je1ynqNyt/GkuxlnQYYADaR+eazS1XNIujBfR/3HOxh9a0NW0RyxmshuB5aPuPp/hXC4OtHnjv1M7X1IdH1UwEQzgvH0THVT/hWrq19PZi3kEJOSDhhwBnp9TXIOrIxV1KsOoIwa7GLUoL7SlSZg8iRDzMjrx/PiuPFY+rQgko3Wz7o6KFJVbpuzOY1Kdbi7lkiUxxs24Kf4c8kfTJNJLPILFLfeXQNu2leV+h7j2qK4/wBYcdxg1HuJTPcUorlSS2MLtO/c1ra7S1tYTFMJIyAXXG1oznn6ir7zWGpRZuo5QinAlXOFJ7muYzyR2NWrbULuzQC2mdADnj+RHcfWtpVZulKmuppCcVJOS2Ok0zwvHHLNLeMZbQr+6K8bs9yfb9c1d05YtLgnjtR5ksrEr6hccLmuftfEtxHEYpUUoTnKcfp0qW78Qs0EcNr8vGS2OntXz9Wli6lTll8Lt6aHpRnh4x51uvvC6sLKyto0z5955gEjBwFjz229/wDPTpRqN0ZdNSNjuw4APtzWXc3bTR/vEQyhtwkAwfpVq1dJ1tlYZAf5h9B0r26bdNWve+55c5KTvFWRbttJebSfOA/fMdyDPVayH3RsyuCrL1B7VvXurSws+zAjI2ooA+X0NZVxcieDylhRUDbt5GXY+5966avs3Fcm5no1dHceH5fsujW0KxsrKuX3DuTk1keJdbe7X7IgOxXyzFs7sdOO1U7bXp0h2yIhyMccfSsh59solUkODzWEqk29dkK8pM0bWylcB5FKqei45avSrbT1sbKxgAAcQh3x3Ykk1zWhRNLHbXchALHCrjr1yf0q74l1+zurB0sLs+fHGicBlOQecE9e/SuuhaEfaMuklFOTOhI/KszUp4oHt2ldETcTkn2rG0nx5LpunXUf2ZLm+kiMKTSfdQHq2O7f5+vI3F1LdStLcSNJIepY0/rLcn7u2zNJVYqKtuzW8S3iXmpyyW7s1uVTbnIGQgB4+oNV7C/NhcxTxoruvUMMg/4VG2l3iaRHqkkRWzlkMMbk/fYA5wO44PNJbWMtxIEjYi4DBVj4+bOf5Y/WuarUVRNyaa2ZklJzTvZ7nb3c8lzp8N1GpCSqGwe1Zd5qF7A6LK20sgZTwSR71o6QXtLRLG7Ch0JAx0IPcVheJ59jQqM7thXPbAP/ANevmcNGMcRyKKkvv07nt10/YXb5WivcSGdy8pLNjGTUcTeVKskYBZTkBumapx3J/jGR6iplmjP8Qr6TSKsloeBq3dnU6f4t1mHTporm8kFpHGREsUURw5PAJIyByeeTWQs9xcFjPKzvI5dvc4/wFPm0u4j01r2aNRAtx9nB3DmTBJx646H0PFQQHGST0FYRVBzdSEUn1sludNSpVcVBt2L6IBCVHXt9azzI6rtkOSO/qKk8/CEVUnct061qmc7VyRp2wQjsjEYypxXaG4tSmnWrkytcRblZjkZUA8/57Vw9na3F67JaxNIyjJA7U+zlnttetY7ncphYJtP8Ib/9dc2Lcpr3JWcbu3y/zOjDpL4o3Ttr8zotCjgt9RvVYgOZSgA4IXqOPof0rUuNI09ov3kO9h0dmO7APTNY923k3JfABLbtw7/5xWlNc7ogVPBGRXgYjHVaii4Nrv6ntUsJCDbau2VNH0+KO6BdsxIxYAnr6Ct3UtR8m2JQbnJCqueWPpXN3sEbJHJ5rRyJzke//wCqptPMxkWe/K7EGI2Y4x9R61pKXt5xqOV7dP8ALvcmNN0oyjy6Pr/Wxt6dG9tZpHjcVGXPqTyT+ea4rW4CdaaO2jZmlwVRRkkn0rr7i6JTahKr39TXO6wNrw3sNwI7qB1Ma4O485yD04Pr616+GnUavJW7L/M8aqqftPcd+7/yJdDt7qwkuI7yFoicEBuCPw/GrM168paK1BY9N3pWl4m8QaZ4iltHSO6hulTbJJtAXBHfnkBsfrVLTUhhZE3r5mN3XljVwrSqJTlHlb6BXhCEvcd0YM1rqQmlG6aNUHHzcnsO9OgstVXy5yZZEUhmXefrg/liu4tJI7KXzo1Iu3J3SE54xgAA8Dv+fsKlmXBChgzFQSR2JGcH6V2LMZr3EtP6uKVVOKstepwukxalJfn7S8yRNkv8/X/Oa6KWDzYvJVzEBjJHXA7VZuI41lXDYKDJA/i/ycfnVWxkMuoKDyMms6+IdSXMtDOTu7o3nHlXD8BScfljinXF4ttbtJJuIHQDkk+lRyI0t3M6tksBtTBJY9MD3NWdS8KhLWC91W4mWZmAitomwo7nee/Hb9a5FWpQklUla7su79P8wp4eU4872Rw+pWWs3VvNqbO0Ku2VgDnO3oD6VigasDwbn/vs/wCNeoXgW4tpIW4VkK8cY4rjRosf/Pzdf9/DXt4PEOpFq2xvRlzJmMravnk3P/ff/wBeu/8ACF3cRaQn2lnDBmyWOT1z/WudGjRj/l4uf+/hrR05HsUMcc8kkRO4pJ8wz6+tcedYKpj8P7Ona6aep6mCrwo1Oaex31hcw3MHktuEZ4OGKkj045re09lhTFtbRRqP4nYKP0ya8+sL6JH+ZTGPrxXUW4t7q23zILhAMcDccV+d1sFXwkvZVU4pv1v/AJnsSqU6q5oNM534oXIea3m067hmvMFJFhQ4VexznGe3r9K4Kzs9ZuHUedPDGTje0h/lmvVXbwmkbvMEQAfMTG/GPwrCvJdHkmNxot/cXEcgKshjwsYxwVJAP8+9ff5FWgoRoyhNW0u46ff27HI8PCb5qj08tjh57LUl+0A6hJL5a/uwkhO89xip9Hur02EtrdqYlRcq/dvY1aXTAssjrdSeaScuvynB/Opk0KaKFys0r7gUIL5IHBB+tevmUqVlBPfY83Heyi1Ci3Yi8MadLPpl/PfTzWoc+WgjPKnrux35wPpmtu1so9MsAt1NJPcFc5dyST/QVlwONNsraMu82ZXcb23Y4XGfxzU9vFcahOWbed3oMk/QV8/iKk41HTTtG+x5bTUm2UNY1G4vEhUxusMTE7UXkk9uvOPy5rI1PUtRnjihsbee2hjOdwkO5j6nBxXR3PhuI2pln1G5iKqFSND6fjyfU+9Z9jpEUd3HJcXVy0anJUuSG9q9ynUp1L1oq7Xl+R11Kvtfea1/rbsYO7W/JLtcXSnjCmRgWHqParumNqN/eWttexMyKpUyOTnHJyeeT0rqH07+2NYWQyFbUIAVU4Ix2+h9qkstHj07WvMZ5o1UAKhfdGQehUH6fpUTxrVOadlJLbrrsVRlKEJTjPll28mbN1E6SWPnS7oUwrbiAw/Ef596brF1DbuJomHlsuOvWm6xNYLC/lPvcDk85/E1ykVje3MgkCyeVngN0P0r82q/vpvlTXke7hk4wTqSv5mjpk/2h7lriVoo3Qqsg6rngY/Ouf8AFNrf6dfpDYXd9cQGNWLNIeGPb09PzrcC2TWc1q8s8Mikh2VclcHqMfTrUFxocc9pHdWl/evEBhndzk88Gvv8iws8PhXKtGzb0u1tZJaGWMVOpSc4JNd7/gch52tDnzLv/v4f8ab5+tH/AJaXf/fw/wCNdJ/YxwM3t3z0+emNpSIQJNSuUz/elxXrOaWp4vKjnhNrX/PS7/7+H/GkafUlheSS6uBt/hLk/wBa7WXwoyIJItZjuDjdtjuQ2R+VVr+NRA0PlgADbjFeFjs9hRivYtO+9unyOmngpVLp6FYSvN4OsPMmMs08u5iWycDP/wBaqcWULAjvTLb93bxxAnZGSFB7c0lxcRwHfMdsZ4LenvXFheblc73cm3970/A4cY71OVdLL7iPUb1bWAseWP3RVbTbwXkYIwr5wwz3rD155hdnzeUI+QjoR7VFocwjumDOFVlPJ9a7OVWuzBQVjcmufs2rnB4GFb6YFX7o+aqH+JGyP5Gs8eTdnMgDEEZK9T7VbdfLjChmYBQMnrVYirCqlKCs9gm1dNEsczp0NIl7HBOv2ov5Tn5nXkr74702qmorutyfSsGtLExsnex0+m6RayCSW4nHIBgMWCGHOTn8uK1tMsBb28kk0Qbe21XZOCvtmuGsfGskcSW2o2cE0QI/exL5co7ZyOD+VenTa6Z7aKOU7oFVePXA4wK+dzBYyMnFJuL7H0NB4WyndJrvoYWj+EIp1uru+lNpaqW8lcDdtBJyc8Aen9KyLgKhKwSiUY4boDWt4i1xrvTp7YKsETLggDLN9TXO2gzGhySgUBa9PAqsrzrPfp2PKxlSlP8AhL59yS00u3D7pUEshHfp+VaCuI12ooRR0UDAFV4XZCcAHIxWP4pgmn00tEzhozuKq33h3yK9JydSouZ79ThSlUdpMfrniBI7eaG0fdL91mHQf/XrjraXdfRbvm3OoP51Y0+zmvYTFbpubOSc4AHvTrbSr2DVLfzLeQosy5dVJXGRzmvVpRp0rxvqd8VGkuVHWS/6puOo71lQ2txNqB+zxO5EXG0Z5zXS2NqJiS+CBxg/1rTS5itVUs6xqBUV8Yovkgrs53W5XZbnnN3p8095dtFEyTxHMsZXAUcDO7oPxx+New22vXk8dtPFttgtukaxKo2rhRkAfXNc14d1mzs7/V54GtXluGDG6YsrRLjG35lA6g9D6elaOqa8dQaOJAv+jpsUKMAD3PTNeNjq069WNOVN2XV+aV9D0J3VH2kZWl1sdl4TnS7he9nuTNdqSojPAT3xUk+qSR3RPTsR6iuB0y7nsJXkglId88dQM9ePwqaa/uLhx5kpLE9c4r5vFZLVq1nU5ko/l5WOihmVOFNRabZ6DqOpCytGYEZA4+tefeI/FTsY7MQZiZd0nzY3HP8ALitW/H/EujV5xK6OFJDbs5BPX8DXIaksUt8WYgOhwPcYz/jW+U5ZT5OeSvK7ae2myHjMXUjU5Y6KyGvqKxwGOIFPMOee1bGnaPb3sMIcsXU4wuAWJ9642Wf7TekptVR9wHpXZ+G7XV/L+3RW7eWmCDg7WIJ6evSvWcIYeLm3q31f5nJzVMQ/ddrGrqlodKRYpIzDgYVccYHpWTcfaZIo55YJUtWbarhTtY+x/Ou5vrm18TaNgYWTGRn+Bhx+WQR/9esvUZAug2Vq+D5LDIPqARXnUcydVxhJWlezXbS9yq2XqipTvdWujMsnit7JY7ZPLjTJCjj3rH0LWob+BriVTbxSsxjWRgSOeeQAP0FWry/trWJnuJVVB17/AKVzupGK48h7IBY7jJVQu0dfSvY0lute558PhaOwixcANG2YyM7quywRHT5UIH3cj1yKx9NCWNjHD5gYqMk571Vn1RpJNkb5J7Co5SLu+hs6VdN5BQnJQ8H2q295tU5PFYVmotY8k/MetTtcR9Cw5p7Gdru4+SSO6Ekcg4bqDVLwx4RTXL29tZrw21xCgkhwoYOCSCSMg+n50jOnn4Vs54OK1tGWeG7S9to5GlgOQUBOAeMHHY1z1+fkapuz6M7cNJRknJXRRbwhPpM7HU9jgNiJkJ2nvn/61eiaP4UtLO0cvIz3EnJZeFHoAKqXl5HrbqBGQIYy00TDGHJwP5GtPSb7dZLGWy0Xy++O1fNYzMq/IoN2ktz26ODjNuS1i9jm49Dj0F5IoHaSJzkMwG4cdDXZaHbra2od/wDWyDJz2HpWZcgT3KFiMKwc/gP/ANVVdt7DOzRXe/cS21ycAZrOWOliqCpSmovrfrrogeDVKo6ijf8AQd8RtQit9IgV8b2lyo74AOf5ivM4vPvpS0UUkoQZIRSxJ9K6nXdPm1/V4HuXcRRpt8tBwDnqT2z+fH411ul29loNl5NnFukAy4XGT7sx4A+v6124fEPB0o0Yrmk97PTXzF7FSn7V6JbHkE15cws0bkq46qy8qc+9XIYT9qgu3c+bGQQpHFb3ixIdTunuriWMShcAwj5R6DJ5Y+/5VhpPbwja7GR16qD0r6uOI54RcI8sutv87Hi4h2k+U8NThhXoOhtm1T6V58vUV3nh5s2cf0r26mxvE2KKKKyKFFOHtTRTl60AySgUUZxTJENKooHJqXFAxq8delOXr04pccULjIoEPIxTce1OOemc0HpQihlLkA5pCaYM5oFccxJ+lCkiikFArimgUd6B1xQAHgYoApT1FL9KYCUUUUAFAGKKKBB0oYcjFBOKCeKbGmIwplO60uKQDDxRmhgQelAGT6UAI3B60HpS7c5z1pdtIYzHekAzT39qVWwo9aAGjjrT6iZiacDuFAbi+9NZ+cUjH0phoEI5zToySKQLketPjBC4NAxx6Ypeg96TGetDHAxSGI3NIMfjQTmm96Qw61WvR+5b6VZqC85ib6UxPY4qdgZXGeQa6Lww2APrXPXQAnfA71v+Gfuj/epzIib0w/eUhqSY/PTTzQWtGMFPAyOKiPU04EjvzSLHZzj1pDSZpw5pCGkbhjtUcsQjXcDU4GKZMu4CmK46BdyKfQ1PLyrD2P8AKkiXbDgdc1ZvFVLR27hCc/hW1Mib0PKpOHb61FIM1NcD94+PWovrXczlGIMZ+hqnGPlP1q4v3yPY1VQfKfqazluUi9pnEb/71XlNZ2nnCyfUVeU1x1PiZ0R2Jrc9auIelU4utWVNQUXEPFTRfdFVUPFWENAIkY/MtSg8VUcnctT5+WgZKvWpD0qFTUmaQEoqvPE0kqMP4TzUmcU5GxmkA9jxUaH56dnIqE8OKQylrn+rX61T0Q/6SfpVrWz+5X61R0ZsXLfSr6Gb3OtZsn8BQDzUWeR9Kcp5oRQ9jzTh0FQu3FPU8UxEgpW4U0zNBOeKANCED7I/utclP/qn/wB1v5V1kbf6I3+7XJzfcb3Brqo/Cznq7ojsv9WPpVr+Oqtj/qxVr+Kt47GT3A/dNVbz7q/WrZ+6aqXX3R9aU9hx3LPlxyRnzUDYxjPas+6Ug8fdq9JIscOWOM4rNkm8xsDO2vFxrftWYNNzNSOXbahD3TFZkEpA2noKmMnA57VSQ/Ma5FqJIsSOPmx1IxUiRFYSW7dqht8Elj61beQBFB7mlcb00KNweh9KliJbaB3poTLHPIpzI6IxhyZSNqKO7HgD8zVJN6LcuEVKSTOkhgaP4cXKplbjVpX288kAHH4FY/8Ax6vQk2xLFGMAfdUfQf8A1q5TXYBbDTtPhb9zYQQKy+u6aNB+iyfnXQGQtqlugxsEMjH65QD+bV6rXupI+ijHlikie7bM1sgxlnJP0Cn+pFWTntj8azp5D/blrGOgglc/XdGB/WtGoLMA3Lf8JXdwFjgWcJ46Z3yZ/mK1vCdlBdXOtTyb/MNykRIYjKiJCB+bt+dcxfNLH4ylmMeLYwi3MpYcuQHAx9Fb861vCviPS9OOqx3uo2FvI12GAnuVjyPKjGefofyp1tIXRSjoUtes1trLxJp6KQuJmjyc5Eke/P8A30zflVzQ7iQabDDcNuntybeVsYyyHaT+OMj2NVPEOr6fqOsMbC+srn7TaFCLa4WXBQnk46ZD/pV69i8oWOow/wDHtqUEbMwH3ZQgwT/vKB/3x70RleMb9R2Lk04jVXY4AYD8zj+tEsvKf739DWXcFrqwngVtshQqp/unHB/A/wAqq6fqRvbKylZSkj8ujDBU7Tmr5Q5C5eXMaalYxkfPIzkfghz/ADre8C2cX9gLNLbx+ZNcXEpJQZIaZyP0xXEapJGt/DfzZCWUnlhyeMvFIWH1wkZ/GpdH+LHhbTtKs7M6sZZYYlRtljLy2OeT75rKvpGyDlNjVDHYXEkYUKsd6oHAAAeQenbD1f0oD+zo41JHl7oc5P8AASvf6VwuseMdC1s3twsrNZPLH5peNkyBtDe/Qda6Hwnq2nzQ3cdpqsF/AlwRDKrcshVT82f4gcg/TPeqXwoUo2NjUH2pa3HICTJkez/J/wCzA/hVwtgj3OKztRzcaLdrAf3nlOEYjowBwfzFOnukeytbpG+V3iKkdw5C/wDs1FjMx9cjZNWvJI+ZGtIrhFU/MzQSMT+YcD8awfiN4ag1e1e/tk/0uNPNDx9ZI+Ayn6DBH/Asda63UVB1zTZM8+XNGR6g7D/NRVLTrmGLT4YWmQTWTGIq7jdhCVyR7rz+Iq07WY7HnFjr0jQWlpBDHEseEck53+49PWtFryYJh4CyODgpznt/WsnVdIWw8YfZYyBCZBJFlwAVPIGT37e5rogYreE5BMJU8vjI9vrXLUqUcvjJxj8Wvr5XOKth5VKi7Gdeve2hkjjkmZIyFBCLg5GRjj2rEvbu9mVVu2kC9lI2g11du/2o4JJwAc468VNcQKYyrYKnsRmtsLKWKoKbdn+dtDhxNLkm4o4En0phrrksLZpjvijI/wB0CtmKwsoIi1pbx56MxUbgfY1xY+TwcOdq5NDDurK17HJWUGoWdiboSNFECHERP3wPbsCKg8QXJvNQEiZZTGNuPTk/410ctreSxOUjMkHIHIyPw70vhrTkspZ5pAfMI2pnoq9SPzrw1mLk3Umr8t7LydvuPQlgrQUIvfc4mFysyMuchgRiu3ay1ZIEZC0sjnAijUM/Qnpj0FVruxik8RWsyIAg+Z8Dj5cY/wA+1dZpt8wuz5aqzFSoVhkZNdEs8lR5HSWj1f8AkRRwKbakc7rOm6to0MN1q1q01m21mKFGUjjglenpmqXiYQaNbx2MZjfUJk826CDCws3O0D2z+WK6nxlrc1z4GurS6aOe7jlEJngyEZVkGG578YPbOa8pmmkmleWZi8jnczE8k1tTr1cwUalWyUW9F17XIxCjh24U93/TDOTUbnk4+tOB5q9rdrbW9xbNZOXgngWQZOSD0IPvkGuyU0movqeeotptdCbQ7G11GGVJZZEnQ5GMYK+v+fajVbEabKYC2/euVkyMMM+nY1Tgml0y7WS3eNmClSeqt/nj8qVribUblVmffI5CjPGDWqlHkaa1IsVKUqQQcU0jBxnNeq23hay1nwhpZsIh9oSIl5EUBnYrzk98Nj8iK48XjI4ZRctm7HVQw8q90uh5hIGTIdSp9CMUQzGCVZOoHUV0nj6/jv30edAA72EZkH+1kg/yrliDsyQducVpQqOrBTaszOrT9nNxTui9Lc751ZTlV6U93LcmqUWFwo7d6m3VujBrsTDlSKidTg96lhVnVyuPlBY0wtSBGvperzQWAjjJ3qTtb+7nr/n3qjcy4wgPPUmoInC/KOM06NFdGJJyM5Oad9EmFhFanBxmiFFPPUe9X7HSZtRZ3gaNVTAcsfX0/KpqVY04803ZFQpupLlirsk0lludQto7qV1hU/e+9tA9vSuug0n7Pcm8sZPtA24jfghTxkH8v1qjeaRa6RpSbGEtyzgtK3Bxg8KOwqnb6utpCVgt8Skcu0hOT9BivNqylioOVBu12raWZ101HD1LVV0vfW50sjxSqslyfLmX+H3rlPEBM0it2BbH6VUfWLi4kcSCMem1f8aiklklAV2JA5ArDCYCrRqqpJqy6HTicbSqUnBXuzX8NR299a3Gn3BYEt5q4PtjI9/8ahudFK65aaZa3CSy3BRQWUrsLE9fpjP41W02WS0v4Z4uSpwwP8Q7itO5c3eqvcgbVwuw9CMf/Xr26k06NlpJHnpx0ckaniS2/sxv7Gt7iSaxtpS0e/uWVST+tYBfblT2q5ql7PdXDtO+9+MkgDsB/QVmNDNkyg748ZJz0rjoRcIJSevXzfUdSSlNtbdP0JMl2IXtzVW4u0WYoIuhwWBP8qmt2AlbkdPWql1Dscyhs7m6Y6V0LfUxe50MMSG3BhmAuFcBXjfBGTyDVPTtduobuVHgjuXlOH4G5se44PerGoTJceH4bo/8fJwoccHI4P8AI1zdqxWdWBIIz0NTKMaqtJeRpCrOCTi7HXtqllfR7Pmgk6bX45q3BC/2cCORJdo6A4OPoa5Bm3DnrkH9auxzyRxsY3xtGf1x/WvKrZWnf2b+89KjmdlaovuOgVS0gLkM4HCZ4H1NYN9fT3EpExwFOAg6LWjo8i+UzM+WzyCear63YM3m3UO3C4DqPXHUV1YXCwoPXfucmLxk67ttE0NL1EXFttkYeYnB9xVfUv3nPRY13En+VYemTAXSZJAbjj9K6G8097lFJkMa9SAMkmul+7M40ktWUrHbKx7Qp8zH1p8LS3l9ujyDnPX7opPIktrV0jSUg5JYpwe1dD4fiS40DdNjzcsocDkDtWNfFRpLmltsdNGhKo7IbdXzIUhhPmzcAmpr3VUttyxkNKevtTbOzSIHy+XI+8TisG9ik/tHEyMkgX5s+n9elClFy5b6mSou3M1obWnymUtPI2VHXPc0aZNH9rkfP7wNgD2INVnuEtbBI/4mGcD+dZwdopGkI4cEgHoR/nNXZWZCV5Hb2F+6a5ZpAoYmQBifTHP6V0Pii+aZreLDAIC2SMZJ9Pyrzq2kltdStFjlMTALmTjgYwTz7Zrd1XWIpJlMbmeTG3jp+debPBueJjXdrRVvM6lXUKDordsu7/kbPpWdFEXI+YLU8AlkiJlATPYdhVSdXMimJ8YNexhp1IpqmnqYU72djRjtEPDMxqUaYW/1cg+hFVobtUIE3HvWnb3UGARItOVetSnyyepLnUiymthOCQYnwv3mC5UD1Jomuk0iN5ororKuAUHGT6f/AK67HTYdRikLW8MqsOuflB+uetZ1l4bg1a/MohjVFbcZCMgH0A71i84wkbyxKTUe1nv0aex6+CnBNOrCXN0tt+Jy2pK2pxs0oWNp+GLjrx6AjmoYreOxt0gjIwowdq7R+VdX458GWZS2u4by5SQSgGNmBD9+MYx0rCljKz7XQjaM7j0P0rqw+ZLHRjLCzUUvs22t27nXi6zlZRla2tvP9Spaw+QsrO+5twKg+lTxagsMG6NgXfuOeKozwSyXhdpyIdpUxjv/AIVNbWkUKoFXhegrPM6sKl0pXd1fsrK1jy8ZWU5ayu9PTYtWtklwHeROMZx68+lbGmbLeIug/eg4PsKy7eVkfB47YqPVL1tNtBMnzbztKnsexrzG5Sa5nqedUXOrXNTVDFcRO8igHGcgc5rnH5PHA7CtG0ke+06J5Pl38k49/wD61Y2txXVrOPKkBgIyCOCPY16mBxMaVNqV2+xVH3E0zp9Gi+z2nmM+Gk+bGO3as/V7tJ7qNJZQyKSMIeRj1qD7bLJYwJH8rFQGJ9qzTYyG7YS5L/xe4PWuOS9rV9pPZsujOUJ85qW1zNcailtBp7FBHujLL8gH94np+HWujhG12jyWXDMM/wAJ7j6VDbtFbqskEoeRBsddvb0rHvdXmt3uDCCQ44x1U+teLicZCnJUaVNKy3s7t93fc91U3i4RctLb2GacljPKfOl3GV2kSSKUqCAemQeOQa3kjRtPcNdLNbPlQw5K+2RwcHof59TwN5fXMk0J25kjz8+cFh6H6c/nWrpmpOlktq5yh+6c9DXXVzaqqSXKua9/kuh1U8LTcPZpafiZvjPWriG9WytYfKjhQJ52Ml+O3pXNW1pLdyb5mYju7HJNeteHdFn1EXO6zW5cgBkkA2qpPUk8e/rxUmnaJo+oTzWEtosBAYRvE+cgdwRwa9PCObwbq1PdSV7N697287nJUwMqs5Sg9jysw+afJgG2FfvN61qqLi3s0bnyV4G7k13Gk+DvPSbylTCErGTzvIPOM9h61kX1kr2WTIrK5K/L0FbU8HSxSlG6k1ut7Ppc5Y4WvCLnF2t5nJM3fjJ9KoSMt5M0XBiQfNnoafrUxsUaNsCToB/WsnRbTUdQuzJp9vNNFAMzlBkANnGR36H8qyUFFO/upfI4FTlNt7st6kEljCqoPlDIBHGKzU2yTrL9nSMRH59owCT0AFeq+CbG0l8O3H2qKKaV5isodQcYxgf1/GsnSfDUC+NXlYf6BCROIycjd0A/MZry1m9GDqU5J3jr6/8ADnZDAScIyT+L8DJi8PX+nWf2+8tmiSZuMkZXPTI7VWvZhHBg/wARxXo3jLUVOiyx7gplZUH1yOP0rzBtM1PUYZrn7HOllGCu44AJB689vpmlgcf9YpOpVtHWxNfBONRQhqLptyLp5EPBUZHuKL5JHXy4+p4rP0LMd9Jj5l2kBh06ittwS+QMk16V9Tzpe7Kxx93YXcZJMLkeoGa7vRNTEmlQiXh40Cn3A4FVpo2iYq+Mj3ptnZoELeZt2ZbGOtVKTaFKSmtRmr3TSZRQDLL8uP7oqzbqIoUQHhRjJrPjQtO0jnPZR6VbLE8CkkJuysi2ZMLweverkDo0GWCnHByKq3ptvKto7VJPMUfvGcj5j7DsKOI0AHfrUxdxSVmSbY1Z2jjRC3XAxmp7WVVDg43AZAqnvzSRqRJ5hPHQCrlqIvrc/e3Dbx26Vh6hd+aWUGr80ypyTWJqEbEtPGML3H9aSSuXFalXTbf7UphbIQNvdh6k9PyrqUbHtWbpwVZ44o1VEdPMLdzWpbojTRLIX5DMwA7AjvWtbEuo0nsbRpzqO0RTKFXLHA45ovd0auHI3KBIpHsc1BdTwRXd7bSnbbvueFuuU9PqP8Kqavq4NhC0e1pmDISOQOME/rkVg7vYzSZdg8QxS5t4jKMc/NwrY/GsueRmvFcuV3MQSD1yMf1rI018Ssx6gVeGX2v/AHWq+SMUy07SOz8L+F7fUo3d7mCGcN8iPwWrurJ7vR7eOyu0SS2QEK6A5GTnkfnXArMjQRmL7uK1tP1+Gy8hP9Leb/ruQo+g/wDrV4eY4WrXWjvHtZfnc9HA4mlTleSs+93+R1FzbHPmQRkMxyCQRmud8Zk2UMH71HkfcSF/h6f40y+8Q3d5OUwuwD7zEkmuP8Rahd3MiW0Q8x1B+6Mn8q4sDllenXjUqWsvPyOzF46jVounB6v/ADKhJliuJZDFJHgoUJy2T04rOkuzE8UaYHlZC4PSs0tJG4lQkOpzUmHnfKj95y2K+nVNJ8x4/NpY0m1GUrjea1fCy/ar1xI21VQkMe7Y4Fc9a28tzny1+Ucsx6Cu20kLptj5G7MTEO+f73rUVk+W0NxRlGL94fKpZ/3hbI7VUvI5CwaPjPBpy332u7fA4xxTdRufJiCIf3jnA9vepe2pjFO9iOzZo7plJ3DOMkV1Gnatd6bg2kxTcQCvVW+oNc9p0a5A8s7P7xPJPrVy8lERTZgbQW/L/wDXWcoKaakro1VRxfunX2XiKG6naS4tBFP0M0PQj3BrestS08Rf6qF26MyjDH6964K0QRxjsSBn64qjqbudwhkaNh/GvBrycVlNOprB2f3npYfMpw92auvuZ6TLNDO+bN8k8FSelNaxvHyRjB67WGa8ssPEd1CkkTsrSgjDsOcenFXr7W55IsSvMgIxtDkZ/KvMjklTmtKx6k80pxiuVNnZ6rq8OhqkOxWuH/gDcqPU+lYd7qk1/GN7hUHSNOF/KuFadhMSc4zwc5ratJy0YINe/hMBSw8bJXfc8XGYypWfZdijqOpO88kZOFjO0D3qK6WdPLuXgnVJYwUdUJDnoceuMDOPWqSRPcX7g9N5LH8a6WS8W+gtIig8mzLGL/eIwTXoJyg/c67+hzc8I/Ernhw6123hps2q1xPeuy8LnNsMdjX0E9jeO50QpaZmpBWRYDinimVIo4oExQc0GlI44oVcnmmIE61NTcYHFFMYpNIKKUdKHoIfmkNHakpFBSEUtFAhKDxRSHrTJFApB9404HApoPNAxSaMnNNZuelOzxmgABPpRmgGkNAmOpe1RHjpShj0pgOIzS9qTPtRupAJT16UzPNLk0DQ+mEe1LuFGQaAEpCaU0w9aQXA0mKWg0ARuOaACAaVutHamFxtLiiigBy5AoJOabmnUhjgc0jDmkBwaU0hjdvPFIQQKdSHpSYxlRXQ/dH6VPjPSorofuiKBM4i8z5zfWtvw02E/wCBVjXv/Hw4961/DZ+8PerlsRE6Wf7wNB6U6VcsPpTXOFNJbFDBgml2mmR/fFTUWHcaRQhz2xS5FGeM0guLUMjkuMHgU59xGRxUcYBPNNAXLNixPGRU+oowtJTzjYf5VWtTtkGBxV7VGzpkrL02Gtae5E9jyicnznz0yaiY8VNdcTP9arucGu45UNj++KqqRtb/AHjVpT+9XHrVQjhx/tms5blIu2xBjOO2M1bQ8VSs/uOPpVpTxzXJU+JnRD4S3EeasKflJqpCcmrIP7v61mWWI24qdHxk1UiPFSB+SKALDsDtNTIcqKpg1YjPy02BNnmpgarA81KDxUjHMeadnkVEadnpSGTg1HIPnFKp4pWGSDUrcDN1v/VAehrM0tttwT7Vo61zF/wKs7SU8y52+1arYze51AfDgHuKlBqswO5CfSp0Py0kUOblacvTimZ4p6/dFAh9HUU0U4UwL0PNsfpXKycrXUwf8ezVyz9BXVQ+Ewrbkdl9wfSrQ+9Vaz+4PoKsfxVvHYxluO7Gqt39z8atdmqpc/d/GlL4Rx3Galu+zRFecHn8qoKeavao+21iPqf6VnowJxnkjivFxn8VmcifzP3Z9RxVcnn2ppJBz2JpeqsT2rkStoFupaiOEApWbLD2ro/AckJnu0cK0nlgrkZ4zz/MVHqGlxNrsCQqFhmf5lHGMcnH4VxPGQhVdKatZXv+J0RwspQU49Svp+lG4iJYztMVykUEDStz0LYHGa0dJ8Ja/Jf2lw+mbYYZVlInlWPO3kepHOD07VoaVrGr6LqN4kJsvJmIl8oqSoOAvBGCDgD1FaKeMZdQ0uXUbzR2a1h3rmG4DA7eSdjYyM8ZzmurB1FV96Du9HbsetDB0oOPdFO98+Sy1m8vBAsiXMa/un3KFhZSRuIGfm31rWUm/WpP9m3XH4sf8BVeGxVfDRs7kgb4GEx6DcwJY/mSap+GLz7VdW82eZrTn6qwz+rV7lvdOi2hrsT/AMJER6Wo/wDQ6l1gSmHNss7S4wDG+APqKrStt8QcnraHH4P/APXFaoas2hWPJNf0S6e4vPET3Vw62hhDRA5UhiEJOe45oj8ASeKH1a7URhbG0W5w5IMoOeFx3wD+gr0/SbKO71nXrKSINb3VrAXAxnJMozz9BV3wvoD6cLlLqFyoxGmCMMikkYw3TnoRxjvwapV4QTjLfT9Denonc8U8E+Bpzrmo+UJLeezhDhQTz83IweScZxz1r3LwrapfeCrWzuiJIwhhDKc8IxCsDjgjAI9Md6u6JpItLu7vJIwk9xtXGc4Rc4yfXk5/D0rSsrOGySRLddiPIZCo6Anrj8efxrnxFaM5e4rIJ25ny7Hnh0DVrfVbgRBpG2BgpGI5QOCVborEY+UnsfqcyeUWupx280FxDdkO3lsh/ecgAD1OWI4zwF9K9eqJ7eF545nijaaMEI5UFlB64PbOBUrEu+ornmt38PWu7qzlu7h8yhmnjX7qlgNxJzycBUGMcAdeTXCfDj4dQX17ax62VtrTzDFPIVQMpCnuQf4gBn3r6JIyKyoNK+zajNNAIjBNlnjbOQ5OSQfQ+nrWlHE8ifNuyqbte/bTyPEJvCQstVj01BHcW1zeRRqQgwyF+pH+6Mn2rqtO8LWfh/xPPZaRsghWFLh1UsQrEuO57gDj/Guyi057vxjPdOsYjs41VMDI8xl6/UKT/wB9VFrcCWut27LkyTwSF2Pchk/+Kq54j2skvImr7zvsVbBiYHDnJ82QE/8AAzWZpmE8KWSyfN5AjX/vhwB/6DVnTZd0dwP7s8g/8eNZ+lyBNAdWPC3kqc/9fLAVdtDGxoXzhtX08Z5Cytj2wo/qPzqfSbO3ub7U4JrSxuDmO4AuIQxww28H6xn8/eudvNRQeNNOtSfm+zSH/voj/wCIFW9U8xdW09o7qe3ScSW8nkttL8bwM9vutyOeetKpTco2LSsa99pHhKJSdasNOsWHK4m2E/QAg/pXFeILfRZL2xPh1Lx7SRnWSZmYxlhyApbns2e3StDxNoVvcaDdx2kKi4C+YGPLORzgseTnHrXFeBdWBSTSrh8I7CaBvRh94fiP61zVKbp0/avVJq68ur+RFX3otLc3Yle2vP4DBIcABcFTj1zz0q9doqwqyn5j1FLqNzbQwBIVBbqZCc/gKqRXai4gaRfMjDAsh/iGeleHUzq9aLpXjBPVd0ciwt4vm1fcSCCQ7pGX5BVmPIJ4710HgrS7bV7yGHUJWgtmk2s6kA9M4GfXgZ961PFseiC6s59Lsylpt2lIycug6M2eQSSK9TC5xCvG0/ibaSXkr/kYTwjg9Njmb+ZNI0yznvpNsd65WIjnbgHJb07Vz/mGyk+V2khc5LM27Pvk/Wug8Wy6ZZLDHqEQSM5McZXfsOBnI55IrnkVLm032Sk23Rf3ZUfhxXzWKnKU5VlFpS30smumx3UUk+RtaD2m2uxB4Ip9tNJMot7ZWMztlnXkgemPzqgiHY6yA8dD6VKl5BpkYe6kkUsDtjQHLD61xwpuUrQ1Z0z5aceZsv8AjOzWy8LAPOiyGdI1hRsk8Ekn8vzrh7WyEpzNPFDHgsSzAngdMevpVnXta/tTyUSDyEiZiMPndnGM+/B/Os9n3qT1Yda+nwFKVCkozWp89i6iqVLx2GsABioZCQRz0p5Oaawz1rrOaw8HcnPY1IjhIvkUrNuDCQMQQPSmxPGsEiMmXOCr56Yzkfr+lMzSQWHFzIQWABAA4GOgxW3pfibU9K0uexsbgxRTNu3D7yeu09s8flWEDzTuoNTUpwqR5Zq6LjUlF3i7MIYZbqdI4VaWaVtqqOSxJrb8SWcei2kGmb45Lvd51wytkKccKPzNY1ldy2cqT27bJl5VscqfUe9RMGmmZpXZmb5ixOSfxrTZFPk5OvNf5WHQvwRgZznNS5qMBUHAqxbqpO4np0FFzFlqwnt4Irn7SxWXAVFx1z1OenYfnVNiAeDkdjUtwodQxHSooogxwgwTzSWmotByDc6r6nFW7yHy9oT7j9faoUQxeUXGDv8A04rQlxJCy/lTJbsygCQMg49quWGqXFj5ghKlZMbgw9M/41SjXemaQ8HBqakIVI8sldGkJypvmi7M2pNRuLi3jjnkLgc5I5/OqrNVeOTcvTFPZiY8qCTnFRGEaatBWRM3Ocryd2OsXt9tylyh3OuY5BnKsO2PQ0623v8AKFLAUyzt/MYs4OPT1rVhAXjgCqbHYFiMLRs+Mk9PTNXQ4X3qjeuTGByCTxzT0fdbIzN85JBXHQcYOffJ/L3rJhbQQ7nkZz1Jpiu6GS22sfNwV5wB61ZgAGGIBHpT7yNXKPEdrKc1SVxc1tGZsakspAww4xT44kupBG8gjBBIY+oBx29aS8uNjHb8pzn8apW1wI5MkseSTT1sWrN3LEskkca2b/diJbjoSe/61nyEox29c1e04C5vX+0FiCC3X3/+vVaTaXYqMLkkZ7Crj2E9B8cu+NT3JqZS/msB3UgjH41WtgBIBnjJ/OrQlChiPvEnn9KljSJ7K4aJztPUY61o2cD3cwJ+6PvGsq1QNKpkYKhPJNdDouoWsjPDGCuzox/irOXkS9ESXtrb+baxFEDklmkxgqq8nmq+q6z548m1JEfd+hb/AOtVPxTclbuJYn4MRDEHqCf/AK1YqSc0Qj1YbpXOs0K9NsrRMcwPyy+h9RWpaSrFbzrGw2M29ce4ri0nYghWwAOau6Zf+WRC5Gw8Ak9K8/H4Rzi509+q7/8ABPQwOIUZKFTbo+3/AADoYEt5GN1cxrI4bMZbqmDxj05GaSW3nv70s+1F7t3NVmZrdVRnjAGT98f41bsryEROVnjO0fMVy2P0rzacqyk5RTbenoj1K8Kbik2rdi5cWtmMQugeVwOnYDv7elZmuL5l5AgPJXBHtmrluIkSS7DOwcbiW9PYVk2skt1qIk2kktyQOBg162Gg4U/ebb8zw8RNSqe6kkuxa1AMb8qoJOAAPwrW0yzEADy4Mh/SmWyxNcu6sHlY8n0HpVyZcoFBYE9xXVShzySbsc8WpNJuw83Ja4aIKQqgEt2J9KjlIDHHQ80iwLEpZB8zHLHqTRcuYrZmUO0vGAi7ia9DCuH1jlg7Rt1/P7zsoU6dWvyRdo936DUQ3UYCZUk9+1WdKhN5q32NOGJ7ggAAZOT06Cq2hb4LTfchlnmJdlbqAOAMfr+Iq7a3KgtKGK4z0OOSMH8xXm43HUqc6inrJLRrqzso4eHO7+90T/N/5HottrCXEkiLnCjO7sat6I8VvCsUQCxqMAf1NcJaXUkOnzXYTcGPloM43H/OK6jT7yC2h8xpU2j7zZr83rxqN2jezf4o9/kj7PmluS67HfaqwNrbObeLO3dhSx9QD+n/ANeq1t4YLausd4TJbJGHYjIDE/w5+v6V0VlqdtPbJIJFUMSqhuCTnHSrbHzlKbiu4YyOorso5jWw65Irltp5rzPKeFhOXO9Txm5jX7dLHDkoJCF+meKsYMURGRnGCK0/F+kw2WtA2bMhCK/XOPr+X61lXLNK2VC/N719bTkqtONRXs9Tx61Bqb6FYF2udyDKAZan6i0M8ax3C5jJBI9quNJEkCJGgXjBPqaqXSpKwiPRl9a6I0/aVFTg73tr5mKw/NNQg73sS+fFbjBYx20KjAUZwB/M1NLFY6kYp/tHnRdQoPP41BKBNEqiMRMeHZqq2yy27sXlH2eMALGiDPpyfbiuuOIw+Goyk4c0l3fy2XmdmFVNp0uROfm3+SNO7jjigBQAlmzk+3aorWVlnWa5EOyQ4jZM5B9GB/nVee4+3WarbrmeNijjP60yS3ubWKL7SUDKhPlyIW6jK4IIxzjnnp0r5ueZNydtui+Z0wy1OCUrXu72/Q3H+ecpbxlpHPRBnJx7VFPYPqMPlIFEitgllBxg89fyqhpmqyR2UsdvmO5aQLuX7wXuAfqBXR2Mn2nT2uERI5g53OFxvP8AePr9frUSzFyUm42t/X3ErLnSkmpamDHodgiTteW0ZuISNu12GR64zjH511vhiX7EpGnmUW0ih5Pl43BeRn0BqtpLWd0JYNSkQPLkDdHtIPYrJn9CK39Ctv7OhNqZVaNWzG2OoxyDXJDMKtKfO1o7Nrbbt6nrKklC25meI9Xm0q3XUrZnKyM8cqDkElSFJHsf51R8M3wt40j+yEpgm4uGj4z/AAoD6Drx3PtW7q1ramMpNkwlwwVTjnOaluriz/s0xzhYrdV5xwEAr0MbntOtT9lRi25Jr0udMLRpqLV/60+65UEs4tJI9MiEjMfKBDgeWnPPNcXqNpJoVslreMG88fu3GCgYHlfrzT9P8W2lrqU8NlHcNZp8rSMQCfcDsKzfHOv+F7iGD7bcanqAVypgS4ZGiYfxbW4P1qsnxmMwE3Dl92T10u/m76HNWqcsZcj027HBeOY5pZ1aOPdFEPvgc8/0FN+GviWPQdXlS64srtQkjf3CD8rfQZOfr7VT1nXYJb95dLW4S36bbhlLN9doAqt4am0VNbMuuxSvZlSQqdA/GNw6kdele3jLV6M+eLaa26/8OeFCclVTTSf4Hrbzpa6nIFC+VdDIdejN2P5d/pSRzLD5zgfOT19R2H61ijU9GuY4bXTLy3MZYCGLcUIJPAAODVtxtgbzS6TqMkHoea+Cr05wdpJr1R9JQUKiumF5ZwahcW7X/wC9hi5WAjIdj3Yd/YfWpNc8RxafCkMQSS+wfKiz+7iIBO58d+OB6/nRZL9oQ73WNMZY5OSPr/SopPEvhfRIdkUizyKOIraP+vArpwqlNpcrly9Ft95hiEqd7NK/U8ysrhxd4YlZGf58jHJroDJtHP0HvWT4n8RyeINVSYW620Ma7Y0ByevUnuatuftFop7tivs4czinJWfbex8pXjFT913RbidHm8vcCR97FTXM/lOQoB3LiqNtGIPnY4PfNTyqZpPmbaAMj3FPZmDV2QocMM1o2IRZv3oBz932qukarzj5veh2xg56GncdjTkS3V8hcN65qrM4LnHIqKG4WViHwG7GkbAbCc0xWH7qZcXPlxfTpUV4JEtZZEGSoz61QjZriOLd94jOKTKS0uXAsjyZmDAjsRVnClCjY2njFSNHLMpmZmklPJLHJNV7lxHLbbxt4BYevNJN21G9XoWdWsDZWcV3ZMTJAOUY53L3/GsZPErlzmAKCMcNnn8auX2pNKuwHC1z08K7ztAGea1jFKz7F05yR0jXdrqVqqswzwcHgqaINIiaJnck8HHpWNo8Ja5TKkgEZrp9QlaG22xDk8VnJ2ehMm07I5mKFo5JVwcA7c9jWxaWp8kBjjc2cUlsoMYhkZd4k3YBz1FWGhe6uCu5o4U4yOpNJyuDbuXYv3UYVefYVWTzP7Ui8wYyCQPwqz50dsoRMcDHrWbe34juUkYkOF4z6VLiOJf1LUltkKIf3h4z6VzbTyzO+3JcnIbPK/Sq15ctLIWPerWiMolYsAeMVfLZXLXuoZDp8rHbjg1LHZXEc0S7QGY4U5710KFQuRgVVkmT7TFKy/NGOgPBpxcm9COe5E1rJapKMqqyAFwD055x+GfzrSa4S9sJmiBxggA+tY+qXEj7pEDEY6DtUOn63bwoUeNwW5JHIzU8jKfvK6LWiuTNI/ZU61oPNAv7xvnc9PasO6vo9hjsuDO2TxjApxZECFHLHvmk1fUfKdBFds0YCrtI60GQSzh36AKCPoSx/kKrabIZEZ2AHOAAKimlKXMgQ9sf/WpaWIW5f1DVfKQqp+Y9qoC8lmgHLEknJJyapW1vJcyF5M475rWszahdqsCwOOalxL2Q/TbQMfOf72a14wi9FX8qroQq8YAoM6g4GSfakokuTe5eUoB0UA9eKqTSW4yI0UY6kDFU76/SNAFJ+bocVBauJIMnkMcmk0+g4rqxrQT3UrG3ARG4LdBWxp9lFDGqn52HUmqiyYAA4FWYJ9pBP4Cr6ESk2eG966zwm37oj3rkR1rqfCbcMPevop7HoR3OsFOFNFOWsSxwHPNSA+lMpc8UIQ/qadmmLTqYDj0pU6Ug5FKvAoQCHrQGxSnmk2g+tPcQ4MMUm7mk6UUWC4ooJphJqTA20ANPSkBzTu1NHWgQ6o6kINNFAxBS9OtB4puaADnJpX7CkNJQxMcORSDrSr0pcc0IBaKKQ0xCCnCjFIRzQMXvTWHBbNBFIQSME0guNVuRT6iwRxzT8kCgY6kJyeKaWIHNERySaQCyAhetRjNTNyMVECASDTAWigtinjmgACHHNPaP0oXjvTwcjmkMrZ5xinZzTyACcCmMcUhhSYzRnjigcUgHCobkfIcipR2ol5Q5oEcNfr/pL/WtPw4MM/4VR1IYun+tX/D7YkYAelXLYiJ00wOF+lQHJPNWnOVT6UwjNJFkAOGGKf5gx3oKe2aNo9KYDGc54p+GIz2pjrg5qwhGzBGaQ0RE5poIFSbB3qN1K89RQIlgcbueKuXzZ0e49AtUIVywq7ec6PcjP8NaU9yZ7Hl97/rX+tQPyoNWbwfvn+tQDkc13nMQLxIp96dYWou78ws+wOzfNjOOCelIQQ68cZp+nuU1DK8Hef61lU20Kjub9t4dWPP+mbt3/TL/AOvVlPDyf8/RP/bP/wCvVYXEoPEhqYXUyj77Vxu71Z0pW2LcXh5P+fwf98f/AF6m/sFOhuhx/sf/AF6z01GUHljU6ajIevNSOxcTQ0H/AC9D/vj/AOvQdFjRiTdD/vj/AOvUI1JwOlP/ALQZhgqD+FMLMeukxZ4ux/3x/wDXqeLSUxj7QP8Avn/69VlvinAQYNWEvzjhRRdC1Jf7HXr9oH/fP/16cNKz0n/8c/8Ar1D9vYtjFTx3cg6YoVmGo7+xsj/j4/8AHP8A69SLohI/4+P/ABz/AOvTo72QjoKmS9kXsKLINSFdFI/5bj/vj/69P/sUn/l4H/fP/wBepTfSkdvyo+2yn0/KlZBdlG88NC4QqbsKc5+5/wDXqGx8Ki1n8z7UH4xjZj+tagu3zlgDSi8wcsuR6UxWI30gPj96Bj2psml+UufOBH0qz9sQj7hFRvcwkfOGI9BSHqV4dNMucSqB9M1MNKI/5bj/AL5qM6sI2CRRKq1OupM2cxrQrA7if2UwGfNB/wCA0f2W+OJB/wB81ImoqOsefxqVNUjB5jP51WgaiQWDiMrvH5Vm/wDCMsx5ugOf+ef/ANeugt7+GX5Vwr9s1MwKgseauMmtjOUb7nNJ4V8iEsb1TgdPLx/Wqv8AZDckTDj/AGa6a6kxbnB61mxHLMPY1tCUjOUUY76XcAHbsb6H/GqF3Y3KDDQv17DP8q2bq+2syL/CetRR3uSdxyMVta6sZXsc9qqlbSMMCDuHUexrHc4K13/npIhDAEehrNuba0ll+aCP3woFceIwTqy5kyGrnKBgYzntxTRICmG4NdNLotkxwiugP91v8c1zup2i213LEj5VTxk8njNcFbCzormlsCO6g0eHS4bC/tJHBZFMmTkOCOf8+1P84JqBY4PBwayNC1tXsGsLl4xEi5SRmC49jmlS4hlZQ11AuzI3GQcivjcVCt7VqetuvkfQ4R0pQutC27NIJpdu8sRHGucb2Jwq/iSK1ZIkisdO0yA5jeULkDG5Izvdsf7TjH0IrJtJBd38UFpID5fyq8ZyFcggsCODtTcfqyVrQlH1+Ty1Cw2lusMajou45I/JUr6rJMK6VL2kt5a/JaI3kk5XRf1xjLZi0UkNdMIjjsvVv/HQfxIrE0aNtOv3kjXbYrcvEmMnYDgMD7bsH8/ap1vPP8Q3O4gQWUAXcf7zHLH8lA/OrHhaVL7QHndd0V1PK+1x1UyEAH8K9prlQPYu3rBfEdkSfv2sy/k0ZrRhkyinPasnWGWPU9KfHOZIgfquf/ZalsbjzImOeVdl/JiKi10gS0Nrw2yr4qnGfnlsl49Qjn/4uuxrz7S7lLfxbpTSNtE6TWw9yQrj/wBF16DXDiI2mXsLSUUVgAHjrRikdQ4AbpkH8jmnUgCjFFJmgBqIqbtoA3Hcfc1y3il8a1ae1u/6sv8AhXV15nretJdeJtWcMPs1hEkO7PG4bmf+g/CujDxvMNxujSbrWZvW5nP/AJEYf0rN0+Y/Y/KHIfUZyeewd2z/AN9BfzqzopZNHtPMGJDEGcf7R5P6muZtrqWbTJzanbMPtJVyPuAyMzv+WwD3FemoiaIb+4D6mdV53W94oU/9MwQhH0PLfjXX68+23tZQAfLuoTz2y4Un8mNcebcPpf2deC9qFHHQgcVvXly114OS4UBnaCOUAnHzAqf5iuivTS5bHTiqShy27HS5rw/yV07xhc2LfIqzMkZ67Q33G/AlTXtUEyzQxypnY6hhn0NeQfFm2Np4mhu1GFuIgSfUrwf0xXLGN9H1OKW1y/FdTTRKNjMWOCM42HvnNa1iIZrESu7pMpIwelctcObxLa5SYrBcN+9wSQsnG7I9ecgemK27S3sLNC9lePIrjDpIQN34YzXx2Y4BUG7fLT82Q8R73Lb8f0OkhvBFFF5MpKqOMHocc/jXZ6KG12yttNikKRGcKzKucAAE5PboOvt615dNcW9naq0cnmuRvYA9D6Utnq2taRbNeaNqSQrcKryxrIjNvA5+U5IPf9OwrjwuHqc3tIOzW19rk1a8Iq0tU97Hb/E/wrFp/gpbnc0l/HdP5nzfejDFQ4HpjH/fVeT2erX9nD5NtdSJF2TOQPoD0rrH8cavdefBqcNve/aYGtjPNGQ0YdcHbt4AzyflJOPpjj72wnsrp4JAshXHzxNuVgRkEH/PvXsUHUqJxxVm91/XkediJQUr0nbod94Z0TU73wwddhvra5iec281vMrZiYAEcjpkEY+tYdzpl/rOvxWc8DWvB2qFLAADJIPfpWf4a1O60fUI5kSV4C6+fbhyizoCCUbH+R1r3zXfFPhvW/DsVt4fOn2Vy2yUtcKIXgOOi+rg8HqCCeua1nCjSi6sVaSQ6VT2toN6fmeIav4Ou7ORI4VZ5ipdBkYmHX5fcd16/XrXNW8Ek7P5asdi7mYDO36/jxXoPi7Upr/TYhFd2+yGUpJEkqliw6OvOSvcEdM1ymk6vf6Pqs15aSZmlTbI0iiQSKeobPUHAzRRrzq0+dqz7GeMdL2toKySWxhnknqDTCWHoa0rt0vdXNxPHHawyyAyLbx4WMHqVX9cVBfWnkXMsUMguIlOFlQEBh2Pt9K6Iy7nH1IXhlSKKWRCscoJRuzAHB/WotwGRnvSssu0Aq3HQY6Uj28n3gje4xTT7sbtcUH0pwPBJ6VEIJc/cYfhUkttcLFuHK9wDzTuhDV+fO2pEQqR83TNMtYpN/zKyrjuKs7H/uN+VK6BsjIJ70Z28jrTjHJ2RvypDG46qw/CndCTHpK0hlVu/KgdqsW3yrkjDHtVVEfO5FY9uBV5AN6ORweoPrUtoT0I7yQfuvY5q2r1Uu0b7Rtiz5UigNjnHNWrpoTdSm1DCEt8gYYIHpS59bBy3jcYoCggdM0yYEYJBFOwxPAY/hWp5QmtN0inG3k46GhzSE9DHiyRhQSc9BVyG3c4cnbjnHv9Klto44VzvXJ6kmpGkVgdjqR7Gk5dB3I0Ux9HJPqaUynd83FNZiTxzTEVnky/yIvrxmkhp33JtzSTpuPyqOlSSyBRuHH0qGRgGBBznjirLxefEqxgtjklRSuuoEsco8oHOeKYLsF/LP4GoMqse1e3bNVMFpOTye3enFoVky3dBJlw3B7MO1UTBtLDduHripN7g4PNBztLYOOuau4ldBbyeTgofnCtknv0qPtVoafI1qLhZLfb6ecoYj6Zqk+HjbZKobgdeaUZxd+V3NeR3XNpckjbDMOORTrcgONwyAea6TR9O0u6tNt/IkN5GArbZAAQRkEdjx+RzXP6miWV5LGkqOvIDAjn0P5VhTxMKk3Bbo0qUZQSbG3swkkAQbVAwR71Y0pmxKsZxIwAXnGarmxIsDdfabUgY/diUF+TjpTrMFUJIxk1qpxkvdZlKLhuRXQeOcpIGDgcgiiNGI3EECrMUscl9I1xIpGAMs3WnSX0UccsYaFweNwYZFO4txII2B+dSqsCMkdagVyKdFdmaTDSLsXJVQeFz6VBLInnNtYYPv3p31Ia1sW8GRTJ0VRgn+lT2bOisEJy+Bgd6r7WaJFUrtVhu59e9WbS4hFyjb1EYOPvY4qW9C09Dpbb7RdbIZmLRg7pCBjj0p+k3CC8njG0gXEwA9tyY/karvqtpBPb+TPEYw2WIbt0/wAaoaZcwf2tcyiaNYmlcoSwGRnIrFkNHXqCLiR8BVK4UipxkNkvkHpxVBb61IyLmHH++KZc31rHA5e6jUbc/K4J/DFVKV9xay0sam7t60TPHEiMzbR9361lWUsVqGM93Ad5ypMqnI/Pirwv7N1x9ptz/wBtFNZXvqg5XF2Z0h0O3PhS51aQF77adrBztRQ2CMDjPXrXIeaXEcScDGTWvba0IdCk0uK9t3gKt99wW5OetYCXVvASryx7h6MOa+bxNOqqsnPW7uvTofT4GVKVJW6fmdDZOdqLIxMafdU9BVuWdZ5IoIcs+7oPyrnEvo5sATog9d4rb0e5tbWaOVJ4VkRgwLSjk+/PNZUkoS553v6Gla848q6neWl6ljbRWE8EyXG3ALKME9yDn61oWF8HkOOT0Fc++v2t/bKl1NaGeL5opQ4BHqOvp/KpdNvrJGH+mW4OeT5q/wCNePiafNO6Tu993rfp5HVRjFUmm/8Ahip8Q7ZrKWDUUlMomby3ifoDjgjHbj/Oa4iS7dr+JIHQoYvOJBHHJzn8q9H8TWWma1DCDqdtFKvG7z15X0/OvNvEukXOgQ/abVtNkgJx50M4kdecDIbp+Ar6jLcZzUI0J/5Hj4qk2m5P3fvY5rhssxO2MAYU9R9asWcRmlS4lGFAIX1OcYx7daxNNuY/sDy30quCQQoYF/506wvpZtWnt/NjFsJAfMZwAM56e3HavVpUXFOala35dRU8J7aDrxlypLTu1s+u51MnlShY1DLL0AHOaq2kV5PqH2GCzW4nkG3OdjIB3z0A9c10mg22m21zd2+sz2EzSYeF1lGCo6859SKW2SDS7rUbnQpoLm8WMeWkkq7VVm5xyMn5T+VfNV5yVSUKTdna93o72/C5vhny01KaV/JanKtpOraVqksf2U7l+VzkbSOuQe9GoQ3H2mSaR/m4DqTwOB3q83iptVk8q8eKOYnY0mdoDZI59BjH5V0k3h23eNnOrWUsgGRuIGT9c0RpOMnCs1H8b/M3eLaipQjf8PzOJtLO4kAdEO0sMknGRXef2VdR6SLgRqkaqMoDyB3NYWjun9uRwS3VssSMzyAupzjsD9cV3Gp63p0WlXO+7g2iNgQJBnpUVZfVasYU9ebf77aHLXUsXFueiW33dTzm8WW7hlhDIGTszEBv/r1k+DfEWoHWHtJr5Gt0Q4iZgxYjgbD/AIcVs3umyeIbcrp2p2VpaOh3NK43SHsPUDrmvPte0lNDuxbG8tby5UZdrcllQ+mSBk/SvfU6NaDw87PytsTQx2Io4fkaVntpqj1271ffatI8co8p8HK+2c/TmuX1XXDOrmK5Lxvn5ehUYHB9fXNcvbC1tgJ7LUpZJWGHDrtVvYgit9YLGew8nfAspXIZWGQxryaGX8kpxo7NdVZ77Js6pZhyQg5vfR229TnZ53jt5Ftx+8mY5HrkYrl9etHhuxumWVmUFtoPyt3H16fnXoOm6ElxDI1xfRwS4wm1lbH5mun8PWWjafBpUUgtpHl3i4DuGBZlCtwTxkLyPWuuliZYaPNU1fbq/wDhjOr7PENxhLb+vmeByx+Wm5gSO9WLXT5brTbm9gUvFbsqyAdRkHnHpx+td54h8Dz6Il5cJc2d/awx78RTAMFJPUH0A7Z61w6ajPaZFnst0ODtUA8+vPevZpYiNaPNT1PLq0uRe87PsYkpOdykgiugtvGevJElv9vaSP7oMqK7D/gRBP61i3AeWZpG5LkknHemTQlYY2XJJznFbzp06itNJ+pjCrKD912PR7bxx9kt1NzaxzsOCVPltn34x+lcVqd8t5dXF2UUTzuXKqMBAf6+9UDIZIsMreZnO72pYoy6sTwVHp1rGjhKNCTlTVmxzr1KiUZu9i9piRG4QSHLHOB6V0iYBGMYrl9OAi1AscbQuRk+tdEJo+AXXn3rSe5y1HqLfn/Rzk7QMEn8aqXuqCIIiFXYHg+1R6hdGKF8DLH5QOuayYrG6ngec7Q4IwhIBapST3HFLdnTWl3JPADIfnJ7cVKIpScs2BjvWfbLc29rbB1iUMfv7gSD7jtV24u03bVdceuaWxNuwoUQg5cE1Uu7ppGVUOAOvvUdxcLg/MD+NZjz/NnNNK5UUdJZXsgtGiny27lSOSPajTow2ZCCRkjOO4rKtLlSOWA+prasr6B7R4nkRZFbcMsOalqxLRcafYMKcGs/UJnuPs9ssJMrM0itjquOf5Go4ZI5bxUeQeXu+cgjhe9Rte28Ouz3FsFCKDHGB0Hqfx5rKUm58kVra/l5HTShGEPaT22KlywX7p5qFDvPvW1Y2VhdhzM230KvgisiBUS6ZRIpQEgMT1Fdd9Dni09jZ02NYQZmHOPlzVpTuDFzkHmtPTTaXOkJFO8ZAypy2DWebNFn8tp0MQ5yGHPPSudy1JvdmaIJfPLxBic5z0UfU1YWR4o2Lyl2HfpU+pXkaKI0dABxwRWNe3IWPAYH6Gi3MWm2E17kk7iGH61RmuWnYsT7VHI8bRKw5frknpUUHDtnp25raKSLRLJbsArqcZ6irW8xMGVQnHIByKq7i3Vv1qVW3jbyc03YCebVZNm1Tip7aRhaxuzliecHtWJNGROEPy5Peta3ePZGrSDAdUxkdMUtFqgsrG7E9u9mckBv51zN/AhZmh4Pp61Lft5NwyRNmPqBmoRvJ+YYqrkJW1QyxToZ96KT1HYetWLedVnKt8yqcAnofep/OjFkEODJkgk+lZoSR5gIgWYdh6VO5re51bXYjsN0QGegHpUmlwCdHml5JbisSMPFYFZiFZ3ACk9BXR28kVvEsIkTcOPvDr61m7GUtERag80ETeUoXAJDEZHTP+NM0GN/NeeT7oQKD79TxW7dQ2n9leYLiMzLzgsPmHeqWl2El5FK1gFaFTk5kUDPpyeaiUlFe87IIXmrRWoy5WKa58wIu4DGfWnpjIHrVZ5Y43ZHkRWXggsARXRaBolpqlhJc3N5Gg5EaCQDJHdvbPasq1aFGHPJ6GlGjOrLkW5x2sXYkuordcCNWAJHrWghWNQowAOgqv4j0iXTdQtlnmtZYmyyywkAMB2I7Ef161JvW8tkgj8pGDg72IP6U6VeFWCnHY1xFCVGXJIebuMOF8xSx7A0SX4UbY8+5q9N4dSOwD272yMi7mZpRuYYz+dYunpbzyBmnXywexFEKkal+V3sYVKUo25lY8vPBrovCrfvGFc9IMO31rd8Lt/pDCvppbHatztV7U4daYh4FSDHasSx9KKYMhufyp+RSExRTqYDTgeaaAeKU9KKWmAmfUUoNI3Sm54460xEhANNxilU5xmn0wI8U7NNYjPFFSAewpVHc0L1p9MBBUZODUoqFvvUAwJzSHikOaUUwG5yaDxTyKawx9KBD0xjilFRx9TTiwBwTSAXoaUYphOTS0wH/SkxzSCnAigBDSCg9KBSAQ8cnrSHpSnmm4pAIQCeadtA6ChRyaHBI4OKpDFFRuuW4605VI6nin7RkE1IEYjwMnrQBnvUrfdNMXpTAcfu03fjjtTutRbTvznikxjieaa3anEc0YqRjRS4paKLAANEn3TTcHtRJ9w0xHH6p/x9yfWregHEzVS1c4vHqbQn/fn6VT2IR2b/AHE+lIOlIDmJKFNIsVUZj8oJpWiZeWUinRTNGfl6U6S5d1wcUAQkcc0Y+XNNY8U8HI9aAIznPtTWyV5NPY468Uh5FMBkRKvirVwf+JRdZ/55mqyL+8Bq7cL/AMSq5HrE38quG5Mtjy+5OZT9ahBGSKnvPluGHvVY5UH3rvOYRjnB96ban/Tz/v0jHAGfWmwcagf94VjV2KhubuQBn0p6OGX3qJiNpFKnQVybnUh4AqdFqFRk9an3he2akokCZ61NFETknoKqrMd2T0q5HMoTjmiwmySFASc+lOVe1JFKoHIxTwy56iiwXAJ8wxVkDAqNB681MKaQmPhPODUw6VWVgHAzzVjHfNMQ9egoBpqelDsOR3pAPyKWoFwGzU4oAD0qBnBBFWOKqPCpJIyKQyswzLmrKHFQkENzUwHFNCuSjpxTkU4OaVeAKUHnHP5Uxijj61ettUaEBJvnT0qlSugYjIpXA2bpY7y1SSzJODyD2rMkR4N7P0Cn+VWtJlMVwFyQrDBFRavLC0UyoTvHBralK+hlUjY5ZyxLZPJNLH3pQNxk9iDTlFdK3Odksf8AFUDH98frU0fU1Bn9631rQRZdsFOe9crrhV9aug7bMbSDkDPyiumk5K/WuT8SukerTF+CQvP/AAEV52ZP90vX9CR4hsfsAYSzNeeZgqMbAmBz05P+frE4CqST8oFVI5Plq9pdjLq+oW9kpISRv3hHZB94/lx9SK8SnT558q6l04upNRR2fgG1aDQvt067ZJ9wiHfYT1+pwPwVauaZMqJqN3IcBp3JJ9EG3/2WtK6ZEaO2hULHCoAUdB2ArnIHLaI0ZHzTXLxsP96U7v0zX0lNJLQ+ljGysikLgvJc2ZP76babj2UjeV/Evj6bq6zwzhPDVjtG0MgfH1bP9a425kEeo3suBuZ2BPrhQB+grsdLBg8PWCHgrDEv6CtK0UoK3U3qRUYRt1JfEZ2w2U3I8q5QnH+1lP8A2aqdhcAX99AeCGWQD2ZR/UGr2uQtdaRdQxjMhQlM/wB4cj9QK5l72NL/AE67ziO7Tyifc/Muf1H41lBXRlEv+KWc2drNDIY5YLqORHH8LZwD+ZFeoeFtbi1zS0nXCXCfJPFnlH7/AIHqD6V5frCG50u5iXl9m5P94cj9QKoaNq09jcRahpzhZto3K33ZFPO1v8e1RWw3tYXjujeFL2kGluj3ikJABJ6CsHwx4nstdi2xnyb1RmS2c/MPcf3l9/5Vv15DTi7M52mnZlUX9oTj7TDn03ilF9bMQElEhPaMFv5VYwPSgADoKQ9BaKK5rxX4stNCXyUxcagwykCnp7sew/U04xcnZAk27If4018aLp22Aq2oXAKQIe3q59h/PArx2cSJ4euorfc8t7I3JOTsGAzE++D+LCptSvri8uJbq9n33c/Bk6BB7DsoH+eav6UFl0vUZwmAPs9rChH3Yy/P4nbn8BXsUaHsYXe7N6kPZQt1NDVZZksX+zlUIU5dv4BjsO5qjDAtr4IuH2BZpbFnk+pQnHsBnpT9ccvYtboSJLkiFcdt3Gfw6/hVjXyE8PagijgWzgD/AICa0tsYGIHxcog6LF/WrDSY8E3SqOUWWNR9HKj+lZ0bYvWUdFhTH5t/hUk7lfC8cB+9c3LFR/s+aXP6D9a66qul6ndiffUV5nSeHLyO4tpRC2Yw3mR567H+b8MNuXH+zXI/Ge3D6TYXOOY5jHn/AHhn/wBlqz4YlNnrca+Z+5u42XYezj5v5bvxPvVn4pqH8HXLYB2SIw46fNj+tck4ckrHn1ocl4nAeG2Mvhu/KhmNu6Ow67R0DD/0E/7wPap4bgq4LDK1H8KJ0HiOW1mUPDdWzxsh/iHBI/IGresaa2nahPaF8qhDRv8A3kP3T/Q+4NedmEOZKS6HlY2nzQU+xZuAU3IRg+npVM5XBpsc2SRNIeerYyaS9jdELqSVXrXkaXPKi2tDT09bSaOVbm4ktrgDMTlSyMfQ4GR9aqu0qFjJ82DjcO9QW92jWh81WJUhdy46844z7GhrgEcHipjFpttlylsrFm2uVJbecEGpJblcZ3A/Ss+EhmYb1yf4TTZmEY5rTQnqXRIxBZhgVDJNUy/cGTxiqtsPNkJzhV60JIlS6iM4LD5se9W7WUGMlTnmopIxnhR+VRErHyNynv6U9Og5PmRoFY5YmKsVf07VUZnXqRUMcm45BzQzZP8AjUq6EtNCXzeAc0B3K5PBp1qREMkcnrUszo3YA+opsV9bD0lUwYYAnvSvKrIMYqq7Y3DBwO54B+nrUKKJMnzgpHO3pmhILLcubWIyGAHpSAZBDtn0qJCyRZZs0qN5jYFAXEtJW+bgBQcY96nkfB9jUTlUHUClzgAsQPrQ9Qb6kqtinklhxzVTeCflOcVLHKc4UDd70WDzHead20sRSQIjSEySFc9PSmyMXByRgHP1ojYbsAE0r2HzaaC3E8aSeSGBPaoBJscMOg9ad9m8uVnRfv8Ar2qKQETDP3VOaq6ZUXoasbBtpxtyOlRzSTiFgpMrdBwOB61SW4+cdcVcFxheOlLUzaaJbNGhUz3bDYoyVPOBWot5GbcrAEMb/wB0cVg3UhmjWMswQnJ296sQRmEENIfLH3VA2hRSlFSWpLT3L8cZKMEwDg7c9M1SsbH7QWEqusrMeQcEe9NM4YKYn3L2KnNMW6Yv+6Yhh3zUq/Qtpl6a2gtUaSeVsKMBVGSTVe01FEV1MZMS9zwRms+ZmkPzEnvzVSRmiGSxVXOMdAcU0mtxrUv3CxvKzQDCnnaRVW5LQbDgZ4I/Oq63ckEyyRIJQQUK579qfcPKQJJSueAPaqVxpNM2YZEeEvGc4HKnqKoX7zJekTIpDAbSrZGPWiGUyNljkn06VPd2gki8xBmQYIANJaMLqO5HbhO6hifWrElvGqg7imeijn9KghQNHvU/Kf0qlvk87aJGJzjmmrkrVmobUbN4fgdeAKxrWI/ahk/LIdrfj3q150m4LMxIHVTwKRwDIgjZRxyeuKqL7lp2LEBWNgrEDsGPerFwgkTMZQtn5sc1mtFE5xM+5RnnGapLbiORjbyScdGAx/Klo3oKybvc2Y9SihcwzcFeA/r9ahiuPMZiMBM/Lj0qraolzArOMnoT3qaXy7chXUKOoIo0Gkr2LsSvLnZ0Hr3p8S7mAZtuSB9KigvY2XbHIpYc4Bq7Bd2qxO0tsZZs/K2flH1FTcTuivCZGmMMas8gJG1Bk8dela0miXhtGnOwOMYizlj/APXrI+1ylTGVYoDkKBgf/rpj39zPGqTzySKOQrHgVlUVRtcjVjam6Su5JtjomEmMjKk9vSgR3MLt5ULSg87kGf0pEfA4AxWtB4ga1t0itbWJDgB3Yklj69q1MlIox+bJGSUbevJPQdM/n/OrtgbORV+0XDxOeDleM/Wq11qM11/rWOzOQgJ2qfYfhVNm9yaynByVr2NadWMXe1/U0pi0MrKwGBypHIYdiD3FCyehquuqyi1S1byRGoIBMYJAPUA4/HPX3qss2O9JU9NSpyV7xNmOVQuG4JBK+9MMr5yvJHUVQkuI7hIlAAaJNrFeCTuJz+RA/CojdLbH5y757d6n2SYKo+hrmUTI3JUr6iqzyImxZpME84zgGqNvevdF9oKJnGSear3dvz5YJKnlTmqVNCcruzZqPJFuyjMW/QU5bjYPmOB6msXT3aGdoJn+TG4E9qllkjuGyhbaOAOlU4CdtjZW4hLKwcF+mBVq2liE6CYsIWYCRgoLbc/NtyDg46Vg20vkKxcgc1LJesqLIVPk4yGAzk+9S4J6CvZ3Re1F4Y7uYRszQlyYyRyVzxnGP5CnxXHlD96CQO4qjEY7gi4ZX2sOB2H1qR5FZWU9CMUlBLQUqjZcN9E8ihW5PTPFOuL0DALAZ7muflV2zkYK8DjFKiOzZkYEdMHqafs1uO9uptfboVBMkigfXJqhcakzKFt2EeOxGTVTytv3grA/pUSiOOZ2KEIvTd3NWoILrdF+HzpCXacsSO2KsWUj3V6LdAAn/LR2OAo7ms+SLzwJA6hSMACrFoqxKQGy3c4p2REpj7nEUzDepUHGVGAfzp7vGIUPmLkjJA7cnj3qnezLgo38Q4NZonbbtPTOaXL2GndGu02R97IpEtnuT+6247knpWcspB5qRZ3SQOhKsOmKdmhbslmcwSGIKy7f73U05ZgwwDzXQ6jfeGL/AEVVFnqsOrKuQ6yo0O78QDjv6/WubaIC7KwRzMirlmIBC/Uis6c3Jaq3qVUio9b+hZt0M3y7h5h4AFXr7TpLSMOWDJ69D+VZ8DxwTLJJk7OQFbB/Wrw17bkpbbwe8jZrS76GLvIx5V+ckd60rSFHtUeSTaxO35jgVnPPHJMSR5KdQB82PatiGeKdUtY7ZmzgL+8HX1ycUSY7tbkMqxicK8zMgA5HOK0P7LhktGltnkkbGRyME1QuLCZNxaMoV7lh0/Os+K9mtJSYpMHuM8H60r3Xuid3sWnhnLbfJkz6bTT20y5FmbptiIOdrHnFWbXX0WQMYXZiNuBzyf51e1K6llsJIXtnjDDdnep5BzzipcnpcL2Oa+dm2orMfQDNR7JXmCBGEjdFxg1q6ReCyuC7LvjIwy5xn0pl9ci5uWnjXy22hTg8n6/57VV3e1hqditGTA5ikI35wR1FTKIpGIY7D29KqL+7mSQxrJtYNtYZBx61E02933bVfOdqg4A/Gq1sNq7uWXLIMHBbPXtirCWtxJC0sPlOq9QD831x6Vnb8rg84p0E0kbEIxUHg0rMC1cfu0Vc5k6tjoKWOVWjw4G5eaPNVlw4BNV5JIogWfIUelOwk7lkyKygjqKaCzDII4qqDFPbu0chD+nTH+NLbkqMFy2eh7U7B0JwoJ/fHP04qaTbEECOGyoJXIO2qjvg4NPRRtyO9Id+452x9PWnIw254xUSncSAcgUOygct+FAeRK2W5A59qquWUktI+0fwjqTU9o8s8bPBEzgZHJC8j6mqyytO8nMZkDBSeyj2/wAaGNDvtDDG7czkD73OKdJNE8rIh+ZRyBzj608ME681MGVLMww26gE78quCT70lJ7D5tbkFtKsbneN27A55q6Wfadj4Yc47GslnYTBdrKRz9an+0YI60wkru6JPKmkJZ8ea3HHRR7VpWaw2iIWVA2eGbrmqaXII44Apk0xliUqeOxHNLfcz956GjdFZZhLgb/Ud6qajaSzCMoQIx9/1p8Zyq8nYAAMZyfqabLLtP3z+dTbl2KiTQ2CGP93uKjggnIpkwisJYyjb1Ycr6VXF2cMqOy5GCDxmq75fk8k0Wk3cLtbmtZx6be/aJZ2aHYpbk43Edu/Jqq4s95EUEjLngmQA/wAqoMjoHA7iq6XbwuskeHxwyE/eFTyu+5pe60OmvLCO1023v4PNNs7bH3clD/hwfzFRQRJeERLcQxJLkebITtXjPOATTNM8RPFok9vPblg5dhjnAIxjn6dayoLkyHcx69h2qIqTupadipculte/qbviTS7DTbfTzaztNLMpMysMGNgBkYx0yevtWZEI3wFBU/7JxUswa4tAuQ2wfIDjI+npVSBcgjlWHVe4qqUJRVpO5nUkparQy7oYmce9anhk/wCl1Q1AAXUn1q34fYC9A9RX08tjsR3S8gGpUYYqCLleKeAQ1YGhODk0pIFC9OKQ5JoEPAyKcBSIOKcBQA4UuOaapp2OKYCN0NNC5FPHSjFMQDilJzTeh5p2eOKAEp2OKbS5+WkCEHFO4OKbRTAfjtUcgwRinFs0mKAI6cDSMuKBQIXn1prntS0BMvz0pgEYPXFOdQcZqTjHHFMPNCATApaKR+BxQAnINL3po9zRzQA+mtzTqacE8UgEopcYprAnpRYAzg4FG45pR0560h60DFyaKKKBkh4GKjY4pc8YpKQrCBs9KcKaq4pc0DFxSGnZzSGkA00Y4zS4oYE/SgdhKRh8ppaGPymgRx2tDF21Lox/fn6Uut/8fbU3R/8Aj5/CqexCOxi5t0NPHFMg/wCPVaUUkUL1PNG09hRml30AKVG3FNJwOKXcaRhmmBG43DJNC04ik6CgBqk7xn1rQnP/ABLZx6qR+lUDywIqxM37h19RVw3FLY81vxi4fPrUEpzjFWdTbF46471WYV3I5iFhxzSR8aj+IP8AKnPTG/4/vris6mxUdzVZgW2g9KmQ8YqFLd92CMD1qx5exeoIFcZ0ocCR0p6IfWmR/NirPlkqMUiriqoA6VPCBxwKiVdoxU0A5oJLO0NTXiAxjrT16048kUhodATn5uashcZPaqy8UsjuQABx61WwE9oqhy8mPxqc8iqYYheBViGQOvvSEPztGabTmxtqMnkUIB1LSE0HmmA6kLEClFNagYgAbrU5TKcVW6Gp4jngnilYUtSREO3k809Izu5PFAIAxSh8DFAlckMYUD1ppxmlVsjJ60wgE5qUUixZnFzH9aq6oQGmx1P+NTW2RcJ9ar6iQVf1JrejuRV2MW35d/cU8dRSRDazflTl9a6kcjFQ8VABmUmpxwoqLbhzWjEiU8sB71y/iC3jn1acMyFgqsFPXoK6bPzLXI+K9sesGQNh9qnr7V52ZL90vUDOYFGweO2K9D8AWi2+m3GpSqA8pKJ7Iv8Ai2fyFefwhru6hiiAaWRwif7xOBXql8qWOmwWMH3I0VB79q5MBSveb9D0ctpczdRiRyllaRzyx3HNYNncxySrFG2VTUHz36ozfzP6UeJtRNnZeVE2JX+Rcdvf8B/Sue8LyGLUQJQwgdw8ZPdlyvH/AH1XrRkubl62ues5pT5Otrl7VX2/b2HUPJ/6DXbXzGLS7ZB1Dwr/AOPL/hXDascPqSnrvP6qD/Wuv1ycRx2Kd5LhFH4c/wBK0q6pG9XVRRvK+RXG3WnpJcNpk2EjjuFkic5AWN2+8Mf3cn/vkV1Ub8fif51yfi+VotYspEbkQvlT0YZGQaxgneyMkr6Gy8VxZXc9jfAC7tztfHRx2dfY/wCI7Vy8waxvpYADtJMkXuhPI/A/oRVvxRrN5dazEZ1a31GyhWFlc/f5JO4e+f6iq1zfWmpQIs7fZLtDlGflQfr0INa020k2a0pOKUmMkuXCefauwmjBZGRirK3sRyDXWeAPi0LyGG315N0hUfv41+YH/aXv9R+VedX4liLvC2yUDLKrZDe47GuItJQLWIqSsijhga58TTjVeq1FVqKTs0fa1je21/bLcWU8c8LdHjbIpb28t7G2ee8mjhhTlnc4Ar5p8BeLBDeiC+uZ7WaThbuGQqTx0YdCPqK6vxfrKaHbrc6nNPfam2fIWZ9wUdmA6D8P16150sPJSUe5lZHXeKPHAhtWeKU6dZH/AJeJF/fSj/pmh6f7zflXk0fiC31XW7p7WBo4Yo0RSxLSSsSxLMT1J4ri9S1O61O88++naWQnjcxIFT6DdG31C8SGVAXRGLEZ6ZHH5iuulSjRalIpVVTd+h25IDma4YknhU7D29zWxolw7NLCR8pZJnOem0OoH/jxP4VyludmZ7l2JHQuf8gVqRX8a2FzFHI8R8tnaUJzI/QKueg9z6epr0G+aOqNpT546o6K0b7bqhnOfJt8rH6M/Qn8Bx+J9KuayS+k3qDq0Eg/8dNQWh8uO3RQAoiAA9OlGpSYs5/+uL/yrLqZWOWhlYzOY+ZJIokTPr838uv4VZklWaSNYc/ZrVPJiJ/jPGW/TH51l6eDJvaQ4wqp8vpjOP1q+WAGBwB2Fde7uzsXvNSfQpalctZCxulzmCdXOO45yK6H4lTBvBl1sORIYwPf5gf6VzGu4bT3z2INdTbiPUfA8ctwokVbdhlhnDKpXP8AOsatm0cuI96VjF+H/hRtLKalqAIvCP3cef8AVgjqff8AlWt46svPsUvYl/eQZ3Y7oT8w/A4P0Jp/hrWRqdkFkIF1EAJF9fRh9a2lCzRSxOocFSdp78cj8QSK5pRU4+TOZ04VKdlszyqIbmGT+VXyw2bXTepwMHjIqrNata3txbqxAjdlBPcDofxGDTFcEbRz756189ODhJxfQ+YqwcZOL6CtEodvKQKD2FMEEgBkK8DvSp58auYWLbhkg81Is7eQwkyAOSKy96+gNshSIwzeakm1iMYAqSW581Qkyh1znjiq0M6SWwfJ37ypGegpZQy8xjI/vAire4rO/vF6XabcFGIQjG09agt42aYIj7B1ODVWMnvk0shbKlR8ynIOcGnqJaaG2WRFwASfU1mNkyEvjk5weaYk1yxXMZ2k4Lda00ELW43ojEcE4wc1O25HwblRZo44yCuPpUTyZ+6DzTLjAYhTkVBlhzmnc0RdiSRkBz1PepJ3ji2xGJ/MIzvJ4qpFcSCUqQAB3pgvIrkggvx/s0NAk76l+JlYjdycdTzUN4zLLldwXA24OKlhVMDkgemetF9siSNUA+bk0uawlo7sm06N5cG5C+Ww+UZ5qre3McMpjgBUDrUtyLiO3hK/uww4B61kPlnG44z7U42auVFXdy4VM8eGJ5qww2xopJwBjJp0IRY1HcDilCLPk9MHk0akc2vkSwxrjBGM9TUU6qJMRMGXHUGpXbzYvIx06MDj/wDXUChrRmWdCQRnI5/Kkt7XC73JSSIwCOe1CblAJGM1HHco8jKOcDK8dabIXOSciqsLVaE0t0Sdi8cVXXzJDlwNnvUeMcqfrUoJ2460JFXSWhI8ibcbcEd6jWSSR0jhdYwTyxGcfhUcYJkBOMA9D3qeSCNmaRmEeRwqDHtxRsNWWjG6gbnTmCqqSAtkOMkD2xUkeri4h2nar45XFQXTTGJJJHLFT1OKq2qRSXW+YbVVSTt45oWsbvcfKnqbMd020KgVFHZRTZZIoh23kcAVmyX7b/3CKi+4BJpgdtwY854xQosTptF+2lMe9nGWPC1RuWElyxCYPc+laSRZiRvUd6zmkjN1Kp4GcA/SkKG+hct5zKpMwDMOMkVFdTqoHyfLnkdaSdfIiDq3BbFVJJA5+clQe5FCBR1uW5oSsJltT5eRk46Ef0pRc3kkKxiRVx1YHk0y3jhkt/IeTeh5DHjFUxqqW3mW6xmUrwsnQN74pXb0QcreiJmkmtYyyEhyfmBOQ3vTIpt43dG6nmnXdys9spXBycke3pVa2RZGOCFI7d60W2pS+G7FF+Le/ZbpQ8XHK84961Y1tLh90UpWNhkcd6y7izZkDsAxHUCi0kxHsA+6cAUnFPVDbTV0arwRhCY5MuOueQarRIqzbnYr6FRnmoYZ3GVC5xzn2qwCysGcAcdqVmtLhsS/aPsxw8e9PWMfrg066ZZwMDKdjVeaQTPEhIz0qw08SssbcEDBx1pS2ItbUo3btFDEsdwd27PlryOOOauQmQ2+Tna3JUjFNa3MToQVZHG4YIJHXg+/H60sl00MYKoCO4z1oWqKlJ7CS3bImyMAqQQc9qZBIHOCwU9h3NSLGJovMYAE84HSqtxGBjZxQlccWti0XxIeTgepp6tv4FU41BA3sc1YjIzhWosTJ9i0gEg+8VP5ipHidEyGRvQiqCylSQD34qY3P7kqc7hnFDVgSbYhzIm8Nmm+ciDMhwM4zUNm8cZYyMVPbnApxkR/MHysGG080LsW3qXIp0VThQuerDvTWkDnjkVmwwGNshnYdME8VaViADQ0J6bFlW8tTtGAetSR3CIN8pUDsWqgzyEk847YpJYQ7DeO2RSstwtfctT3luxA86Ns9OaliQSAd6ofY4JGUSKQvT5eKlZ5bZdkIHlL6k9PrSsgbS0RbnQIjI44YcGqFw11FCqW+/b6dsfSqEc8ry7d7AFTyT0qxFc3eSJZjs7fKKqxai4l2DU7xbN96bTkL93Gfxp1vc+cu4dR1FQz58tSzEuRzmq9hv8AtMvlru+UcZx3qHBW0FurmoZS+7OFGP1oQZQEcj1qrJFJkgYOe4NDkgoE/dlVCnbxk+pp7Ilk7MTICTx0qUTKOMgE1TEUjoAJOQc9OtRlWc+UuN3cntTE7MtXDvszCDn0Vc1HaOzbjK659M4I+oqSPdb7VWUs3qRwBUqwwuzOyjPUmhb2FzpIqu6rKwJDZHrnFQPtVtx6dqi1F1SYBBgYzUlxH5Ue7JKkd/WnYq+hH5u5j2FPR8NnJx6VUXJ5PWl83bnOOB3o3Yehoo5J+XnAzTxcui/I+Aeo7H2NU4bmCRcxPsfb8yS8E/7p6GluF2S7DtyACcHPBGR+lDtsxcruK8hZiehp3mFVwelUw2Bkk1PvAbbnJppCY8MH6EY9a0LaQqqkZ4rHji2MdowD0FWd5UYZjyOKTCUebRF+9nkuMFpHZfQnv3qhNbl1G8FVPRsU6eULG7rnC+velW6860Qq2Sc4Hofeps1sCbtoSW1xLtPK7D0GOlTtqc+CGIc4xlhVZYUESMp2nHPuar71J+dSPxzTsmK2ty2k7Skhu/fpUkltOIlkiDrEDtL4woP1rLy24Z3D0BqzJPcSWX2cyv5QbeFzwDTsGzNfKouOSfU1mOu2VmAAzUcc0j8KxDYB29as2kpE4SeI/NxllyM0tUSk43EWdNuwryPSoZpVAzyo9asXscQO5AEcdqz2znINFy4tMtQF5UJB6HHNT3UC+VkswGMEHBB96oG6kSNVGCS2efTH/wBepFuGut8MaNJIqbiFGcUPuh63v0LdsYlAVVAAqG5PlF5FjCHJ+bcTn8M1Dp0wlBVlZJB1JHArQkWJLaRwOcYGfWi9txbO7M6SacoG4yRx7U8ytHbRHeTkZb65oMdw1vJOgHkoBkmqrgvtyVAPQ9BTVmtDTRmjDKxTHY88UrhVbLnA96bZqFiCswOO+abdRR3DYcnjsDU2M7+8XY40YcjYO56Cq0SiORvL24z1HenrMZF8mRQwPQg4IpY4JLcjeAY2pfMG3qLIeRgc1KkhT7wzVcXKfaTGPm44PvTJS7ZzkfWqsTrsxtwxm3SZBZGBA7/hUkB2x5kUYPY1XAwMqfwqYZZcdaLFt6WQyZi0gCY8sggqe/pzUMF0LVQjuFUtkIRzTwhZiCSuPzqG505kAktgzy9TkinpbUaa2ZrR3skcQwuOM4YdKd9tUbTHt3MMn/Z9qo3qtbiORGzlQrH3qCO+ePfm3WUNnLEdD2zU200FyX1SNVSkjF3256ljVZpgblTHygIzWUJnkI3nPsOBVmJmDqMFs9h2p20G4W3L9zcKyPlCc9KgD2phGwSBkOQrAEZ79KtSRBQ27kYrMsWR/lc5bOcGotYUUmtDREqGPcEA+lUw0TTbHQKxPysOKLtjDKAvCkA4qpLIjna7bR9Ke41GxpGa4tXBV9wbjDDA/DH+FQ3hlkeKaHPmBcON/U+o9KRUhmiVZJSSgyJTwRVM6yE3RLBuKnAc8ZHripTbfui5X0LuqDF29LopIvU96XWP+PpvpUeknF7H9a+kex3I9BtwyqD1qfO4jIxUVuT5I+lOjfLYI5rA0JhwKkXhfWowM9af2oExV6ipKjAp240xDsU4ZqIE561IrUAKM0tBNIOaADGTSmikNMAoooFAgoxRSjOKAEFLSUUwAe9IQKU0ZpAJjFLnFITSUXAdu7UU0dadTQBTW96dTTimwEoAyeKDjFCttpAGSvBpQaimyRnuPSiIkrz1pW6gS5ozTDQDQMb52eNtN6mpCAQfWgID1pghFJp4PNAAA4qNH3GkMmzmkNJ0ppY0BccRkVD5QDdTipQTQ1IBQcGnsCeajxSmQhcKKQCtURbnNMhafc3nKNvY09h6Uhib+aeWG0mq7GpRgpTA5fXubs1BpORdLVjXR/pP4VW0w/6UuKroZ9TtbUZtRRgg020YC1NKTSRQMcCm7jSZ560N6igBwb3pQ9Rg0vegBSxoBzSClApiE5LDFWXUlG+lViSGAFXlXMbbqqG4PY831VcXkvruqm/StXXlVb59nTJrKau9bHMQN1NRv/x+qfYU9iMmopuLpT/sis6mxUTcDknkk1OoBGM4rP8AtMWeH496sR3EZ/jUVxHSXY8DhQPrVhDVOGWPP+sX86sxuu7IdMfWgbJCMnpUlt1PtTUePHMi/nSrJEpJEi/nQItA07NVRcRD/lqtIbiLdkSLn60AXVqwmBHtPUmqUVxF18xfzqb7RF3miH/AxQMmMYP3T+FJHCwbcDj61H9ohxnz4v8AvqmtewLw1zH+dIReIDDFQyrhuvFVhfQMfluI8fWnC4gc/wDHxEfq1NAToad/OoBNAD/r4v8AvqlE8I5M8X/fVNgTgsT0phPr2pFuIT0mj/76pGeLqJoz+NK4Dwc1LGOaiSaFU+Zsn2pkl2qrmNSTTuO5d9BTlqlHdqVy2Q3pUb6iyHAQH8aQGrRWdHqJ2AtHz9aX+0nJG2JQKAubFkm+XPYAnPpWdfzwlnjVgWzTH1aSK1l+VQGGOmKwluVchv4s5rejHqY1ZdDRcAYx60xDxUc1zGseXdQcZ5NVTqNskYzKucdua6DnLx5A96aT8wNZr63bIoA3MR6Cqba2v8MRPPc4qrhY3SQG+lcn4qRDrBkIyfLUVZOryEMzBVX86xL28a6ujLKOMY49BXnZhUjycl9SZGp4ItN/iizYfdTdIfwU4/Uiu51qfN4BnhT/ACrm/h4itrFxKeqQYA+rD/CrviK6MInkH3gCF/3ieKvBxtSTPfwCtRTZzl9eLfarcM7fJGNij8eT+Y/SrmmPEqaU0ygq0s0R9iSCv6gVz1zbPCouInJYYQg9G5q+QzeHSyH5kuyQfT5U/rWGDqe1xM5dLfgc2Eq+1xE590bOuDy9Rm4x5gjf684/oK2fEs2NT0WP1mZz+Ax/Wuf1Oc32jQ6hF9+D5Jl9OR/UD861PEjn+19LfPA/qy16z1sew3zWsdbC/wAp+p/nXI+Nn/4mNpjqIXP/AI8K6W3fKn/eNcp41b/iY2h/6ZN/MVnBakrQ5u+ld5BOGO9+d55Oact4wUeYoHv2NMIDPsYEoxzx2Nesw6Ho1yiJDovmEKMv93jpnBI9KwnKVKd4vR9DmfPTneL0fQ8j1K5WLTrmaOA70TAOzgE8Dn8a4eN/LCoDkCvq2y0PTTo82kPaRC2df3sOOGz3OO/HrmuE1jwFpEEP9liJmSPdJFNkCSMMScbu4Ge9F3WnZG0YSrSsjxiB3kkjSEMZWYBAvUsTxj8a3vGdrrlhf26eI4pI5TCvlbnDAqOOCCRx09fXrWf4m0C+8N3ieYWMRIaG4QEZPX8DRJd634w1K2hmle8uVTYgICqi9SeAAO3NS+ZSsZNTjLka1MqSbFaXhWRzrCpHG0zTIV2quWyOeB+Br0Kw8G2Oj6TcNclJLyWF4/tEg3LEzLjKjtgnr1+ld74K8A6V4Tg+1Am5vtmXuZB0GOdo7D9ac1Km02aVKU6TTlueV/a0bojtj26VBLdmUeUgyZPlz2546969n1PSLBriS6n0iO5DkZJReffr1/CuX8Zadax3eli209bUmcj5IwowNp7deFP61TrydlFa3JlVm7KJKZALuJM87GOPxFQazJt0+79reT+VUoLjzvEc6A5WGAKfqTn/AAo8QzBNMvCTwUEf/fRx/Wui1mdFjC01sQufVz+gA/pVkvWfYP8A6KhHfJ/U1PvzW1zdS0IdYO6wkGQM45PbkV0Xhib/AIt5qAJB8tJl/wDHc/1rl9Tb/RGGcEkVqQXAsvh4y5/eXkpRfcZGf0U1zVZJXv0scdadpNvZL/MwtJumsrtLuFshD8wB+8p6ivSrO5VmilRgUbDAjuDXkZPl+v0Heuy8G3zTWMkDn5oW4Hop/wAmvPwFbmvTZ5uXVW7036or+NbNhqziMYWZc5BxyvH8ttYahlA4OBxXUePH2/ZZhjPHP1HP/oIrlllWZflbJ64rlx0eWrfujizGDjV9dSxFKJgIAwjXHJJxuP8AntT2jEW4Nz2INUfL/iboO1SI5c7AcZrg6nC9BsUCqp2DAzircCHZjHGetRb1j34DDPGCOc02G+3SJHFKCOeMU3cGmxy24TeSTnPAzVOV3jKsDz71durcSDzHwG6nAxxUC20k37uFdx4ODxx681V+4R7skjvt0Y3A7s4wKhvJWcFYnwD97mmmMxS7JV2kdc1XnyX+QmmlfUtQSehbggJhJP3s4q1HYOjRvckLAepByRVSxmmUESDvgECrj3b+VsJ3DpzUTctkQ207Fi8gtly2QB6iq6zjyzGmNtMDg2xQ5P1PSmwIcggZpJNCurD0JB5pLkBrhGBJBAyOtFyxXbxgVAHfzU2csegpjvfVGhqqy3McRZDsQ5DehNZDsVYgjJFaMt7deWYWART1wOSPrVOSMYB/OimmlyscGloxyXG+MA8EVLZMzXKomMvxycCqjERYAQkH171bjZAqKvEg5x3FVLQOVFm5f7NJ/rIwyYyASTz26VJ9pe+lhSQRjnaCBjrWQZT5rhskseTnvmtVLVDGCpKvweOOamUb6iaUVqTtbx29zv3KrBeR6Cq05zMqZyp5LAdBTboFcuxJY8k+tRoCkGewoirLUVvtETfI/HIzTzNPHGTb4DehGfyqJmlZVOwEZ/SpImyM+lWPYSJxsDA/LTPNmeQkKWUdcDOBU6puc71wrc5HepIFjtixVyFbrQ9g5khjzCUbcfu+wqS0n+yBlXJV+o9KaFhWQsjEg9Mg01o2Y/KMk1Nlawr9CKeGO4l3rvT/AHcUtvbmJ97EszHOSMcVbEJRcnrUM0pjXLcgdqd+g021oW5ZcptzggcVh+S69VP+NWBfK4yx2moZL0iVRj5FIyw5zQr3HBOIuHliMYJGOeelT3FxG9xAiANHAmMepOcmp78xSwRSRdWHPbj3rOhjEbyyuTgADaO/WjfUOa+pSkgZLuRhuEZJYDtipwqN2GcYzVmSaJ0YBgCRkZ4qiGPGI2Vv9k1erKTctyzbrGkiRSdG/i7ZrUubZYolkUBGQYzjqKw5t+7BVmUeo4q0l1N5AUSELjkHnIqWmTKLepZW7DKAc/QDGfxpF4kLbQFbv71NbjzACV+oxTbvbGdueCOR6ChMi+tkRSMQ2e9EsnmRF8EPn14qOaF0QFt209OaZEflAJ6dqGaWsrliyH73fIMgjG3PSrKwqJTM2DI3FQblVMyMAPrVi3mXCsw4Hek7kp3JJw6xxuykKrD8P85qCbb5KvvXJbAQencmlmlFwGRidjHoD1ptvBGgOBlM/Likr2B6ajEm/dgLxjjFNjczBsjAyQKbcSqJGUnGOABTjMSqbl4AwMCqQdBCpVsZoUkEgdxRvD9CDTocMTjqODQF+5IiEqB1p7oiDAyT6UpcqhVRjPeomyOppApMjaNWGHAzS+UhQIoxikY1JG22MswKgdWPT86SHdiBdqbVqXCwrIZeVXv6+9RriQ/KwIHUjtVg263EZjZm2t+dANj7xxEI/LUMcYqrai5aYM53rnpgAgVHGHVWEkmdrFVJ6kDvV9XVJwP7yDB96laINtELKVjbb3pn2qB7RkJG6Q7Qfof/AK1NnbzHz/F0qpJYGMGWM5UD7vp70rJvUagupH5caspYqAeBk4qztjgfdJyMfKMZBNU5UjZV+0OVQnGcZrVeCH+zljhkTCcjJ71oypSta5GVEo3gg46UWUqLcyqFG/A3VEiAoNrYI9OlVWtrpL3zLfGTwQT1osibXTVzUmZQ2VJH1qN4wgABLd8k0jxSM2ABn601kYLhjnFSSvUdHdKr7BE7v7dBSXUUhImi4IOWA/zzSQOqghR8x5J9atKJMZ20XDZ6FCOUuxLHJHFXIZUVcyMFUVBcPDvO8fMOOnNQWsYedpDyi/dB9aLFSV1cbfh7y6WOJCMgDp0z60+9V44RFKwZkIG7GKVr2aO82RojKhB569qS9leVdzhd55IHSncV3p2IbaIOcuwwK3pdMgvbJMgQyquF2jp9fWuYjilt282dSqdRz19hW3pGoTXSSsUUYOBjsP8AJqZaaot8yT5XoZhgMDbdwLIchkPQ+oNVrzULuKR9z+YzsX8x+Tzj/Cuhv4QyRsFVWHy4VcZ96m0Oy0+a11STUYJWuIIw9sw+6rDJO4HqMUnUUY8zVwhrK0jCjizbo2xg7gZUjmnfY7lnXyombHXGMD6+lP1C+ku2GflVenr+dQ2LSvN5ayOsagg4PAB9qu7sKxPGQiq0gwrZHUHpRIpkO8DKL0x3qCdRFmJG3nORj/PWm28zR5DHj34xSTuTZrVFhjtBDrkHqKbp9kuJXWUYycR9wPehyHGVOc+9N4ibqCxHWiVxK6RamO1FTjqMUwRFWHHIpYZCP3hXdgYHfHvTWmZo2dVxtH8Q60dQVyWcIck7eepqvKpUDB4+tO0aRoNLniYRFpSQBn5hkYJHtxRENzSBm3BQMfWnqnYVrFe2u2icqeUz+NW2uQ6t1HOBUVzZyQr5u0FG5yDmqrFmBAHB7AUK0tjTlT94sraTNJvndTn3yanjsJpixiKgD+8cZqpCbiIMZMt2wT0q9DcuOUJ3EYI9aUpNbEyck9CxDaW32cbsNMOGz2PpUYu1iURwNwvQ4qKOYicswwxHrUQXdI20dT0qFHuK/clYszlvXmluMNb43EMDTpQyQnjmqg3SDCdaqw07rQ0ovOOnGOFCRjB/nmsWVj575wcDaPY1oJeXUK7VIXI64BNVpEDKWP3upPrSgmrpji0nqNt7j5SrDA7UrSMvzKCfSo2xGMqpJ96sRIxQNtKA9jVNJDslqFrMzL8zDd94gVpW159tt9kkkYIfao4BOO9YjSeVKwArRa2jt0bYoznt3qZQTFJIXVENre24gA3rktxwB/nNWp0QIGbLbhkYqrDI7lmZgS3U45+lOuSyrknhRgULohNW3KrZV+OhPepo5SgP+eagzIygsAB1HvT42+XNVa4XsIj8M2funBz61LaX04LjCFMHOV702NQ7yb027uu3IzUgMUYxI7Mp4ycmlJJoLraxCW80Ycbs1Pb3P2eEwjLJ1+lNQRoWCZ+bpkdBUU3yMoAJY9AO9DV1YV76Eclqsju6F0JOQBggfhU9lCLZgOSQOSepNTtHsAxwfSqlzdGHJI3H+VHkVeUkXLuVmRjHy+MAVj+W8fO08VL9uRl3bsH0NJZX4W533AKxMMcDhaFfcqCcVsPOJ0HzHgZJz+lVWAllfbgAHoKvXiL5jeUAEPPFZ8LCG4csCwPUDtQJO5XitZY5JGKsVAOcDgA1PtR89MnvV2C/SFyVw3Yow4IqheyebdyS28bJExztJzj/ACarVsfM5bm1rQ/0jPqKrae226j+tWtZHzqfWqNqcXCfWvoDsPSLQ5t1+lTRYLE45qpYtut0+lXIuMmuc0JQadTAQaevIoEKKdSAUopgJ3p1JilHvTsIUe9OHWgjoKUUAHel/lTSVJwTTsheM0IA6UlAbORRSADmkLYB9KCaYTmmA4HIpRUanBp4NNE2FNNoYjFFIYUUUUAFLmkoGc00A6ig0VQDWGQajU+tPfOOKr4bf8wIFSBMTg0KRnNKQPSkVcZoYDuD16VGTg8dKR9wbAzS4I+8MUgH03zBu60mCTTXTbgg0DQ4yeo61GoweKQkk0q5pgTdRTScUoPHvQeakBUOe9KaaKQnmgYrE0gPFISMUgPBpDHBj3p9RZp6njmkwGyJleKQDbGSakNRyZKcUIDmNfJ88E9xVHTsm6THXNXvEP8ArV+lUNOk2XKHGea06GZ2doJBakMPmFOV2xhhzTrGTfbk0p+Y5qUUIvSl7UoHFNLL+NMBAMNT6YWWkR8cMc0CJKO9Cnd0pxHHFAxuMGr4/wBVWefvVeT/AFX4U4vUTPPdfGzVJBng1mv0rV8SjGrv9BWW3SvQWxyvcpy9TSSDMsfulSuKZL/rYv8AdqJ7FIxJrmaOVl3dDTRezdmo1RMSq/Y9aphhXG1ZnVF3Rf8At9x2fH4Uq39yP+WrVQ3e9ODChMDSXUrkDAlalOp3R/5ams3fRv5ougsaP9o3P/PVqBqN1/z2b86oBqXcPWnoIv8A2+4PWVj+NKL6VeSc1QDgd6QnJ5NGgGl/aMh//XSi/fvWepApdwo0Avm/lPQ04Xsn96s9TT8ge9GgF8XsvrTxeSf3qzw/vSlwBQIu/bpf75p66jOp4c1mFsDNMEvvRYdjcXWLsH/WnFP/ALbuwP8AWmsISe9OD5PWnoFjbGs3ef8AXNUq61dZGWB+tYatUisByaasKx0C6/cDqq1Yi8RSHAZdo9Qa5ffzk1IJR9KNA1OrnvGkxukLIeeazbm+5Ij/ADrK84nkk+wpA5NbKVlZGTVy00rNkknmmbye9Q5ZjgCnrE7cAUXCw7dShgOT0qRLVypOCT6etVXinjnKzL8vUEdMVz4mu6UbpakSdh7zFlJwNo9RUBmDqVXuOvpVlwhUr046d/yp9tY+ZHI33dqkqO7H/CvCnUbblIwT6s6T4ckJqFypbLeQMc9gf/1U3xQ589UHeTJz7A1S8Hzi2163LHAlDRHPuMj9QKveM1CajHuHysSfzFezRn/sza7M9yhO+EduzOfmbcArfdBzirtmnnaLfwAcoyyA/wC8D/8AEVhzs8R3SMzIGxgdcVvaBOklyYsjy54yoyMfMOR/Jh+NcOAnyVlfroceBfJVXnoVNPnlhgnWNuJkIdD0ZWH8+tbOvXG620u5X/niHH1BU1a8NeCNZ1iTzLeIRWZJCzzfKrDPbue/Tit7S/DVqniaz0LXAZ44XkhBBKBwyb1PBzjAx9RXsxrwSa3a/Q9yn7qs+gtjLuQ49j+lOi8MHxRrUURuBBFBCWdtu5iCw4FU7OJ7G6nsZs+Zbu0LZ6nacA/iMH8a6nwPIR4oVM48y1kA9yGQ/wAs0Vm1Tcoly2ujodD8F6Lo4VobUTTj/ltP87Z9R2H4CptT8jTXMmADKAB6kj/9dbrrL22/lWfqlgb+38qYDAIYFeCDXkRm1K7MGrmWmYozcqm04y+/5dw7YHavHdM8aJrXjDWYZ5QkEx2W244G1eP5gH6Zr2C7mEcL2V4/lztGQrsPlbsDn8q8+8PfDfQvDdidT1vN5cpmQGThVPUYX1+ua7aNTlkpIdKbpTUkW7zw+useHru3kO9WiO8MB8jc4K+mCPxo0/wnp2h29y2nK0NvIwQyNy7bUxnJ7ZBOB6mk0fVrZpGntzJBbBmXYfnzwvGO2c8D6jHSp9c1ZADJdeaIx+7aFDtMT5ORu6MQR0BFdj5vaXtqdrnJ1Oa2pwPxL1iO00NdNRwbqc5cA8qMgn/0ED8T6V7D4dvH1Twvp1zJGWjmtkaQA/MSVGRXFeKPhzo/ibTBqmku1veMgJZeVfAHVfp6YNdv4ciGn6Fp2kwSJJew2qRsY/mUMqgE5+tctarzSuzjr1XVndl2xljvMQx4dSeDjHAwcEHofb8a5Xx/dK+s21lagyfZVwI1P35pMAL9QMf9910N5dDQw8GnwyXepzcpEiGTaSANzEdBx3/l0zNN0RvDtrceINecSXqKWih4YiRz3PQuxOOOBk9qxpzXNzP5LuwgranJTWMemapewrtMkISKaQf8tJAu5z/305H/AAGoLfQbzxXM+n2TJHsXz5ZJM7V5wq8dz/Q1FNJKdsfzT3Uz5YKMtJIxycD1JNev+BtCbQ9GCXAX7dcN5twQc4Y9Fz6AYH1ye9dder7KCV9TaT5Y26nkd14A8Q6dFsW0FyiD78Dhs/hwf0rnri0urErHe280EmPuyIVP619OkVVvLS3vIjFdwRTxHqkiBh+Rrkjjqi+LUlVH1PlvUGDCNC20E5J64/zmrniE/wCjadGoKxxoyxoT0X5eT7k5z/8AWr1Txb8MoLs/atBQRzJ8zWxb5ZMdlJ6H26fSvJPEsvnagsce5DEFiw4wQercfUkfhWlbExnRk+uxyYx2pSffQzGjBAzjIPWtXwvN5erBc8SqQf5/0rPkQpjPOeOKm0pJU1azIjYbpAuSPWvNwkuWtGx42Dk41o+p03jB1CWcbKG3Bev0aucv4kMUTAANnjHpWp44mD30UKOVKJgkdR/nmsCzhEZ8tpXctz8w4zW+Yu9VW6I3zOS9qvJAqBW3MMj0xRbYVmz17VZZNw2oMkVRKSLMdy9OCRzivPWp5795E88gKncM8Yqr9jaN8rgKfrTgplcrnAHJNTSCcsWLbl+tNNhG0dCBpnWaGAMREW5960RNsBMRAkTof6VTZfLKyMEY7TgMMgcY/P8ArTLVyZAqDLFqb1FJJ6ovXQ8x1L8HGenSqMKBrjA+7mtKSPy14O4nrxxVcW4iAfoewqY2WwlKyJysbMnpnkDirsqxrblVQAHnFYzyMpyO1W7a4E3Az7huxpN31I5XuMkPzjaoA6YHenzbreTy1JOOh9aJm8mTY8ZJbo3apraVEO9uX9+cUNtK4Sa7FGed3GDgj6U+3faoOfmI/KmOAztjuSfpUanaSOTTK3VkWpCPLZ2OcdKpyXO5SNgB9c1M+50A529arvEQmSc9ulWOEV1NK1ligjJkUuCMKR60W4d7ne3+rzyAOlU7dsW5U8lTkCpbq5bykitshR97H3iaz5dbiS6DZ7cG8V0HyFskVekl4HY1RHmoiu/GTxnrTzKThnGQOuPSmwbvZE8c+YyCATnuKhlJ8oqAABz+FCJudvJV2BORxmp/JP2ZpjgqOMepzijmS3E9CGNVFuC0nzE8KOcCpJ1jtzgqSSMj0NV9wVeOAB2p0khlCkkkAcZqrXESrc+bEqGLY/1qF2OeahlQyDYuNx6E9jU9uuAsMxG8cHBoY2rK5BdTSC2EaY45zV6K8EalQnToc1TvVESOq5bHfHT61DA+yM+epYk5FFlYtpNGpHd+c+3Yc4zUE6s4Y4zx0FRRXCcMsW0r8uQfX/8AVUsUxd88be2KT01IacTJa3cECVCFb3qxFZmVWEb7cDv3q/qBQQBcAyN09qjtpfIiJNu7yj7oA6/jVJtq41O6CJXcbMBSowcnpVe5Ro5TFnquSfrSi7mWR2lQIzdVwRSNKJpDMevTFAL3WRJbAYJ5pGxC23PvVpp4FXG4g+hFUwQ8pJAyelME23qWYrlQuC2fYVI1qsyhlba/Ur2IquAGUheSDzTZ4WkhIDEY5xmkHU0IroDI2jJJyB2qCaMktK0rE+p/lVNJPLQcdfepvO8xV3DAxxzxQtNg5bbFmKZpo/3nQH86o3A2ytjt0qaBx8yKQTnoKS4R0lYYy6nFC7BFWY1oy6CSUcjsOKsRkkYIwO2KkQI8eGOCRyDTYwEOHPHZsUmNybWhZhs1jKtJKpU8hVOfzNOkkVG8sDBJyB7VQgllV54xuZN24EdBU8cjyAiTAH61NmtxS13KrosExab5WP8AeNK93ERsiO+Q8DA4FWkt4/KEcYyRyc85qExBPm2hR6AVSY1aSC0twr7pG4PX1q+yo5CxjAHQ1DBNlDgAEdeKrszhyxJBzmk3d3Ju3e5ZmDxsN4GD0IqISlT8vU8U8SfaIHMjAFf1+nvTIsojF1P+9ii4bIheURyHJJJ5wBUiSNIhVzhDg7fWnPCT84X8Sf8AJqGB0kkZVPT170r3K3VySLEFwHOAhGCT2q9JKcBlI9iKpyPHNYEKAT94Z9jVeQbtrRMVUg5C8cj2pbglfctFdynaOanhjZHQyEEH5cHtVKwug0eNrKy9c/41ZlffCwJwMjJo23CV07D5ignKwn2BPIzSg3GBlkC9DxVa1jkMYO3tzg1LvbHzZA7D+tCE73sQSDc/lyEEA8EjpUs8ghgMK/MSdvHf3puwtKGFMEJLku2at6l3iOeRQqgEgZ7cVUu7i4Eoa3kZfXnrVydFVBjv2pI0RE3fx/TrT6BFrcZbX1xHbtJcoDgdehxUkTySruDZR+cGoZpt0RQKG9c9K0bVIiiqjJuAHyjtUMmVlrYryEG6ZlUnaBu2qePrV3fJHCSi5OM5P8I9arlwszkKoOeTjk09b+PzBCrAyNz/APWqWDba2KcU9lGryXBad3TKog4BPqf8KbZbxCpYH5jxV+9AZQJFVgeRkVD5pKkLjcBgVSaYc7aM2b/j7du/H8qlE2wb5BwOPrUyxK6jI7dazZo/LkZc5OTzTVmO9y6ZUntWR32Ijb+Bzg9RUs91AhRLHKxqo57kkc1mhcilb90FJ6E4p2DfYtNK7YO9uPfpUv2yZYnXfneu0nviqkbgkZIA9TUmUeQqhOOmT3odibMT7xpxcqm1cD1I6mmSRlXUx5I7imyMFOH4NFh6k1htF2jMAVXJP5U66AuW4IU5IyOOKhtZIwrO2Seg4pDKPNZlzg/nUW1uUtyRYQu4DnmibnGc8cZPpVpNnlq+eKgkgkulbymVFB5LEgmmClfckWULGu3oRUMsm+KRF4PHPrUMhaG3DyDAHHHenQIJoN6Py3OCMU7CUUtWJppDl2YYKHGD61Zl2+cWQ7C+MgdzUKRmNsDaPXHeoWkIly3UHpTvdg1d3Rcnu5VVY+CmO4pNyIAyqXA5wKsRQLJbq0hzkZCik+zhlYNwnTHrUq1wukh6FXjy/wDFyD6VbsvKEW5UAYcEnrWW5KgAHAHAptrcMJDgkjPSk9SOW5aulUk4AU5zuHBqvFMySMrHnHFXLjdEglCCRe/tVexEUUrSNy3YHtRfQbemwjzyj5TkEdmFMgbnJ4Oe1S3biWZpPXAqtGrgnAJ5pK71GttC4iIcn86qT3JBZNo470uoRzrZq6nEbcNjqKa217WPC42gAGtOgopdSxboXjTyiTnrjvVu4cZwoqlpsixFg+cHpgZp2oGRkDxgiMdR3NQ07lW11EuLcSzpIuBkjcKtW4d53BzwO9U0Di3WXPVtoz9Kl81xhmOR0P0oemgpNvQsGTZujAxz0xVe5kYw4Yj5e/t6U21jd0+QFwDgt7068jKbFkxg9qaaFs7CNtiiO/LFQSQvb2pba/VoU2xKV9cZqMjzFKZC5GMntTIYlijCL2/WmCtbUvtIs6MUGGUZJPANVHPrTYz+85+7jn6VLCYZwyl+QOx6UmrBsTW15sAR49yrxkVXZ1ivpJUGRn5QfeodNZDHIrMMxk/jUd66SyghSABg84z+VCViuVc1kaaXBmiZgoGDj1qncQs5QbSRu+b6VDZz+VE6jgFiRmr9uxYDeR70noS7xKF3FbM6LHGVZfvEcA1JFBF9nd2AyrcDNLclprjdAh2KMZx196geO8ALcmMc9BVIpO6SuSXMrqMYAJHBzVSJNxOScg9adJIJCC/BUYAFSQbUAI+bPWhj+EFtwPy60xW2ZwcgHFXlIuEPk/KFGSzcBRWdEy4Y5Hy9aCU29zf1tcBayoTiVT71t66P3Y+tYcf3x9a+gR3noOlndbIfarw4qjop3Wi/Sr+0+tYM0DvU0R+aotpqWEY+tIRN2oHWim7xuI7UwJDQMVGWycCpBxTEApdxpCaQUAGOKTHOc04e9IaAAcHIp6nPaoxUiHIxTGhRULghuAcVOTSdKTAhIx1oBP4U91wCaj7UhEhFIOBUZYj3pUJKnnmnYRKASKdiqySsvHWplkDdOvpTAUg9aSnHpTA3O2gB9FGKKoAppHrTqKAGbaUDFBOBmo1ky3tUtASZwaazZNG7NJtyc56UgE3gUMQ6U1l7ClC7RQALECMmgAE45p24gVFvIbIoGTEYNIBzSA5FG7tQgAmojnNSMKY1AXFAyKMcD1pUPFKB1pFDcUlKwz0oXHekA3fjrmpByppjAY7U9fun0oA5rxAuZFz6Vj2nFynI61s+JGDbNprDtjidPrVdDPqdxpzYgIqwp4qlY5aMAccdatdFxmkigZueOlRk5NIzY4FHaqGKVIpUGTSZyKUHDA0ATopWnUA0E4BpCDqamY4X8KgHPSkuy5ULGSCeOKqGrE9jkvEa/wDEyZv9msY/erZ8RKY54wTkleaxz0zXbF6I5XuV5OpqKX/WRfSppOpqCX78P0NKexUTM1FN0DEdVOaxyD6H8q6iKBnYttJXPFTi2PdK4qr97Q6YaLU5D5v7p/KnAN6H8q6/7L/sUv2U/wBz9Kz1Lujj8N/dP5U4K391vyrrDbN2T9KUWzd0P5U7MV0cmFf+635UbX7q35V14tW/un8qcLZ/7po94Lo4/a/91vypwV/7rflXXfZn7rS/ZW7A0/eC6OS2v/db8qTbJ/db8q68W791NPFsfT9KNRXRxyrID91vyqTbJ/cb8q6/7KT/AA/pR9jb+7RqNNHIAOP4G/KghyfuN+VdabJv7pprWbj+A0XkgujlCjn+BvypfJfqEb8q6b7OfQ/lUiQH+6fyou2LQ5XZIP4G/KnLHIf4G/Kuwjtlbjbz9Kl+wkj5VGfpT94Lo45UkH8DflTtsn9xvyrrhYS90/IU8WMneM/lQkwujkRHIf4G/KrFtZzS8iNsfSurjs2z9z8xVyHT5Xxticn0Aq1puS3ocqmmSE/Phatx6cgHJJ+ldZHo08g5gYfXimto8qH7hFaK5DOeisox91QT71YW2I4C4rcj0x84ZMVZFiqD5yKpRbJckc6LQnqtSpZN26e9b6LbpnPOKry3CANsUDFaqHczcjIk0mCfiaPY3QMhwRWVq1nHZzCIMT8u5W6EV0Czs0pH0NYviUO97Ftwf3Q4/E15+Po01S5ktSGjL28rMjsssbBxt5+YdDXSeJymo6dY6hFymdrjup9D+PFcvFv8wqVKt71rafd+RHcQXnz2c4xJjqh7MP0/KuTCVVrSlsztwlVLmpSekjMk8pW+Zdy9GAr0j4WeDbbWJm1TUIt2n252xxt0kcc8+w/X864URwBlhQb5SdqheTIe2PrX0roWmR6NoFjp0WP3UYDkfxN1Y/iSa56cWpPmVrG2Dw/LJylutC4AMAKoVFGFUDAAHYVx/jfRnN5aa7Zhmms2RpkQcuituyPcfMPoxrsscUVvCbg7o9O9jzD4k6d9l1G21u2Gbe6CxzEdA+Pkb8Rx+C+tZeiXLQeINJuI2AHniM56EOCmPzYV6pq9rZXGkXFrfBFsmjKuOgVcdR6Y7fSvI9P028Q4EissUmYpipBYK2VYr2PAOM13Ua8XScJm9KEqkXFHrszXynMYiYemOf6VGL2dP9dCq+5JA/PkVyqeKdShvI/PWKWEn50VcED1B9fr/wDXrWs/FtnNcLFdxNbBztV2OVz2BPb+VcXyCeEqwV7aGpOba8jAuEKEcq57e+R0rmvHHhmXVdMjBu/LhhfzJG25Yr3AxgAYJPQ9B6V2D2sTEnbgnrtOM/lQYIltGhYfutpUgntRGo4NOBzp2dzzqw8C2GjOl8kk9zPARIocjGRzjAHfGPxpdb8FWmvzvqcdzJbTXP7whQNuD0JHrjGa6ywnD28KOx84IM7gQWI6nms+JZXtLq1VykcAMW71AGAPbgAn611+2mpe0vqHPO97lfwN4eu9L0by5LhJFdy8bjPKHpweh6n8a6S1jtLJD5Cb2PLMo6/j0qeUxPZJ5zCBGUcEgY9uadDBA6K6kSqRkNncD9O1csqjm25A9Xcx9X8QmwjylncTMeQIYWkz+IAA/OuA1q98ReKLmOOPS7nyo2LRRCMqoOMbmZsDOCe/c9a9f+VBk4A96jNzAP8Alqn4HNXTqqGsY6lRly6nIeC/BY0idNQ1KRZ9R2kKq8pDnrjPJbHGfriu1qBruFVyWOP900Q3UUzbY2yevSs6kpzfNIG23dk9NK5p1FZiGcqwI7V458ddANrPDr1lGoS4+SYY6SAZz+IH/jp9a9lIzWN420r+2vB2pWYXdIIzJGO5ZfmA/HBH40NXVhTgpxcX1PlxpDLh+R3HtWro9wTfxTzsAkAMh7dBx+uKzGXaSv8AdOKbvcIQD8pOcVnQlGnPml0PBhJU6ik1sO1Gdry8kmfOWPH0qvnYQfy9qUDc3Xmpxb7lYlgvHBPrUzqOpJyluzKrN1JOcupCjTFy6MUJ/iP+FJZys5IcEMh596mmLCNQDyepH8hUUHR1PU4OazM3ZqxLJKqZZVznqKjWcPH3BHGDSRIxmXcMKf4u1KzNHL+6KsB+VArKxDJvYDCsyg5IAzVm0h8uUs3bgVoGYNGpOFbHIBqqWXaQ4yD+lF7kqppaxM5ldtsHKgdT602dmh/1vOfQ0QTqBgA8dhVaXZNKSr9TnDdaI+Ykm9x3mqrbsbj1HtU1sVXEnBZzk/SmGHcpyOnNN2HG5O3alpuVJaaE9xJ5i7TyO1VtoHc1I/IGD1pUtw54Y5oiyeZESsNwA70pcKST0FOCfMcduhqvNkPtfhT3q0NalwSDYcYJNIkMs0RMaFwv3tvas8SlWHt2rVtrkwqxXlWHNKV18INW1KaJkEnPXAI7GtBU2RJ0LkY6U60gSYsXVsOePb3pkpMdyYyScEgEjrRe4pu7K07PuVQCxLcj096lVCASRxUqhBJul6YK59MioI52Kt5gPTAfHBNCFq1oV7YsqzRKzBd5OQTz7fSmWttNGpQSkRk5K54pPOVGUHdnuT3PrV6adRBGEHQjn+dDumaNsg2Mj4bmhywHygEk9zip5zA8blXcuBkEA0ssayWm6MhsDORTuRfuULS6ZNRVZxmMnHA6e9Xrq1tmneaLt82QcYqpFw+fWpXII56UNa3Kb10IzJI4wPmU9eKZc4QqHdSzf3eatKE8tQilWHU561BeRqEjcAZBpphdXsCbmtvLCrkEnPrS2ynZuU8NTrBTIGbsKtwIgtojkBQopPqKUraFeMlHySS3qauLNAm3zZFDN0yazldLmRihIUHAKt1ApWsI2+ZCQ+c88g0rCcU9xuoxRrdplyQx4ye9VtreY4TGAM5zUs1tNfSqHwvl5LGia2aJlMb4U8e4zVIr1ZXdCGG7OCeTSSRlXbrgHANXSY2Iiz04zjqaFXzCwzkEmi9hc1kVbZ3hdmQByeSGPFXBNEOGdVkxkrn+VVJLfBbrionjWYRblxtGM+tCtcGlIiAMnU5XPAHapLUAll2kbT3pbSE/aJUbIwMg1Zgz5+HHA4J9Kb7FuXQa6BGEhOCO9PjlUnJcEnvmpbkKEwcEVBGMqfY1PUhO61JbhiCFAIB5z60sILYXrmnkiVlT1PFNVcyYVwoXvt60mLVFjynhysfp81VRuQtu9e1WfPIjCyZOP4h3qp5okkHyExg85OM0K/UqKLkEuIwRwafLKjQy5xuPIBqLyDInmQnnGSpP9aqZY84I9qOoopXHRqeCxwTwB3qWSNmI3MSPSlt7C6nEhMbKoHDHjb7+tWl2C3Rmbngc+tDQ5uzKab0VfMBVO3oPpV6F02Es4PsOakCqQefwFVXj2sdowenFLqTbmQ+2KrJJgDB5AxVG8iCTLJB8qkjKj1q5MG8pWUYwMZqqWZsBgDk44NNOzKjbcmtrZYQ+0kluxPT6UxuHHXd14q15TNjDc0ltcwRxTGXDbWKk49KUpWVyU76jN6yQkCMxyZ59M0plgEMkYdfMAwRnqfb1pvnBwzqNoPODUPkAEHHPWhhdInhk8tmEfA6DPI/Ckndiik+uKZbqfLAbqM0XADwr833TkqBRaw07sdCxZsLTRJ6nmmoqheOlRlGYKY3AB5IIprUFYmZtw+lQma4tSrCPeCScN/SpNj7VVdoOfvHp+NSRGR1IlMZAPylM8/nSY7pIbK7TyebKoRSB8oPT2p8CKcstSlMIQaYC6vlTjj8DRYm99hquZZisq8R8A/3qi1CKOC5BOAG6sexqxHmeULJhWzxt71NfRxqrmUgqo5pcyvYpOzIlgVlDpMWLcfe3UqQ7STyT60+yMYtUZF2g5wD9apzT3iM7rtQDgL1BosRdt2Q+3nTe8b/KVYgHtjNUJmPmuzAY3EDH1q5a224NLK4YyfNtUcDNR3MBdIVjGFG4k4+lVew1a7KiTxJKQ7bQFJ5HH0q7aXEaxGQbZSeqEdBWdKqx7C4BBPIPpV2WdLiUOsEcWFCgrngD9P0obNOVNENw6tOzRoERugwOOKaYyFyxp8cixSj5S3UY6dql8yNlCyfIoycqoJPt2p7E3sQQTOHLI3zAdaUDex3c56k0rzbz90KvHAppbb0oQNseygDjpUWT0xzSku7Kq5JPYVNFFvHvRohx8xJ7a4itDLGwYDDMgPamrfSiFR5I685OatRXEgDIuQQMYqkyHcOp9Kn1GmtmWGKeUY3GVNVI5zbyESKRGejYqST7q4JJPUelPiZyNjEFf7pFMSVkLh3IaNWYHkEDrS3kRMisVILDpWhBNthCNjgY4qKST95uB6VN9SVOz2EgV9uFJB9M8CpXR4l3SOvuBUUUwL/KpJPYUy7ljkbDhkYDHHNNPUWrZG8vmLkjaOmamiCAlwQTgBaWKEGNRjgiojAEzjGT3oRcrWsi3LLuUjsR0qmxC9ualzmMZ606KFHIHJNSiOZERPT86k80IpJ5wOlJNGikln4HQetV2eNu4AbgCrKSuiy87SxiI4KP1GKfFayTROsCghOoziswyMjjHUHpV+5u2tLsm0DSwvGpYdeev50mn9kOVofYrtSQn7wOMYokR5AyowDY4JqrbaghuGM+6KM8kYyc1djnjkf90OD0J6kUMJXV2BiIjCgnjtShPkJPINOkOwZPOeKQwlovMRyGP8G3hvx9aV0iFeWpnQRfZ51KuxDHJAPBq7OjTyqd21QOBjr71XkmSNgCyhgQGB64q3cSxyQkscOMBdvXrRe5cm73K4UqxB7UsUifa4o3BZWODtPIqcPFL94EehNUZF2yEYwR1p7oUddzSuEjjEgjG0kHA6ms9IIbdNyFvNbqc/nxTlk2qSx4HJNRyzRFcmRT9Dmmhq+xEzrFKcY3P6CnSRl4wQcZNTWkYcLLIBuPT2FNuyRPtHQUyk7uyIYkZpzCOcDOauGPCYPQVHp8iicow+aQ8t9BwKmvbmOErEpVpWP3T6VMkS5O9h8MqpjewVPenvLbXdu4QnK+2CDVWK2iKjKEn3NEsJtgWhJCE8g9qSFyq+hUVovPYEjcFFNiBZ9p+6OpqBbV1ffIST2/xq1CqqcyMSCvQcVRbstUSXXFqkcYQKTlio/LJqpsBXFW4/LAJwQc4IJyDU5BaE7QFB44FS30JckbGtjMJ9jWAvDiuk1wAQN61zP8VfQo7z0Hw+d1omPStU8Vh+GWzaKK3M1i9y0KPenA4OaaKCcUASGQgYxUJfGKUglc1EASeaaQiwgJANSkkn2qBM/hUoOFoAczbR0pUbcOKYTkUvTpQBIeBmmkg4pO1JnjIpXC47NPQ81AGy1TxjjNNDW4pODTd3PSlMYJ3DOacEApg1qLwV46VE64A4xUqjFRzHJApCIyPSmOuASPyp9RsxPFMSI8nsKfGxDA9xSoM1NtHTihjHqQ6gmk24ORSRqFzg9aeaYg7UUdqQ0xATR1ppNMMvbFAyQik2jtSrzg0vTNTe4DCv50wlhUgPrTW4oAByOetI2WGOlKDTj93iiwESjAxTJFx8wFSil7UrjK6sTnjFPBOOafsz9KYeO1O4xwPHNNzlqUAkVHnDc0IRMODSsRikQ5FB54NIY3I7GkHBo2457U5Bk80mAx42I4xTGBUc1ZYcVE+COaQzm9f+6uKxLcfvlOehrf19fkX0zWBFxIPrV2Ie529gw2D6VMo3VU085T8KuAYFShoZIMHFMINOkyT1pOTVIAFOwcUCl7UAPWTAApysGqHrT4gd2e1ICRs4GKmx8oJ61ESAQDUucRiqhuJ7HJeKlJu0PYD+tYDdK3/E+fPT0NYD8Gu2GxzS3IH6k96hl6w/jUz1BL1i+ppT2KR0dpcWqwRK2MhRn5e+KsC6sv73/jprm4mbB5qeEk4zXC3qdKWh0Uc9kT9/8A8dNW4jZscKyE+4rnENThjjigDpUjh7BKkxAgydgrnVYjHJqQMe9AjcL22eSlHmWvqPwWsUNinAuT8hA+tAG2stmOv/oNNe4slPyKD9VrGZmzz1qJJG5z0FAHRW1zaHIaNDj1Snm4szn9wv8A3wKx7cfJnPWmiQiRsnilcaRq/a7McGLH/ARTF1HTjnMeB0zs61nKQpJ6/WqVwPmGBgU7i5TpBd2PXy8j/cqeOewZR+7H4rXPR4wB2qR5vLUbaG2CN/zdPHVE/wC+Kgna2cjylUDH92sVZietX0YbRjpSbCxfgmtFRd20N3+WrMU9puz5gx/umsd0BBI602NsjHei4HQNPbcYmA/A1Ik1uV5mWsCM+tSrRdjsbKXVshx5qn8KtqY51/dShvbNc2AM5xzT1JU8HBouFjckidB3xVWWXEnU7R1qO1vJQGjdyVYYGTUUnCSY7Ka1psmS0KkuobmYJVB7lnYgnpVWInz3HbFJ0kb610qTZz2JVY5OTUJPytWDdeIPsfiEWU6gQOq4k6bSfX2rYeUkfIPxpuSW5TpsfH/rx9KztfbF3Fjr5Y/matfvCc4NIysxBYZPqa5sRH20OROwSpcysYEsjee24YI4qQsHt2jY43jGaZ4XvHv5dREh3hJdyZGcK2cD6cV0Ai/2B+Vef9Qa3l+A3huV2Y74UaNJqHjLTo7gb4oJDMfZUGfyzgfjX0fIAHIHQV5X8HLTd4ivrnAAgtdmMd3Yc/kp/OvVCckn1NROLi+Vu57VBNU1cQ1l6prNrYP5bbpZyM+WnJH19Kt6ncNaafdXCJ5jRRNIE/vEAnFefaYTue4nDsWJdpCvBJ5z/OlFXO2hSU7ylsjQ13UpNShhglsWhUzKS+7cCoyeeBjnb61rtp0MOnl+DIF3Y/pWbqGo2y+H5LqwSLUHj5lhjkG8r32+46479K5B/E98w1a4tC4s5PszWs8kZxGuzEjlf9nbnHrjrmuulQcldEzqqKUY6anX3GltBB5kwAZhk+x9K5m6i+2Sy29vG07YwyIu4jPrXUQ6lY3Gmwza1PHY2u0eTFNcDe64+85z1Ppk1zXiC8sjDMdOMaRAEo0ZHHvkVnKLiztwlWc/X8DufDLaiul2IvEcnywr+Z94Y4yc854/Wtaa5gRjHIwLEcqAW/PFebf8Le09NRWFrKaSyACtdIwyT3IQjp1759q7u3ex1W3F9p12jxP8xkicEHA75zg8expVKFSnaU42TPMnq7maXijgaOfckaMRFIchhg8Hn279+c+9C01S3NzeRMUMksoMi5wOI1U/QHH61bufMNvcPdz4t9x8vaAWZe3GKxtN0Lektww2yRuWjiYBsAgH8+f8is5c32RxUbPmOrkPm5kdgGIzliNxHooP+frU8S3LRKkaeWgGAN2Bj69apL5cUSLPe2UQKggeo7dSK09OktPJEVpPHIq5PyuD1OT0+tLmS2JsMSwYtullyfYf1NTCxhHUE/iaHvIFJUOGYdQnzEflSLeqf4HH1FPmmwJkgiT7sag/SpMVXW8hJwxK+7AgfnVgEEZHNQ79Ri0UUUhhUtvjeQRkEVFT4jiRaBM+UvEtiNP12/tAGxBO8Qz1+ViP6VkMWZsV7P41tWt/GeqqOElMc6++5AD+qmsfy2960WEUve5tzx8TS/eN/wBanmAJTazDj09qsySxPAQrA+3cV6Nsf1NLtf1NP6kv5vwOV0WeYmYFVXGcCmxq7ksFyfQdK9Q2t6mja/vT+pf3vwJ9jbY8wuJm+zspjA6fUVDE5KZA6cGvVsP7/nSgSep/Oj6krW5ivZHl8UxOFI3E8VLcQugHKkHpg16aFk9T+dKEk9T+dT9RV7qX4E+w6nnkPlQ6cvGZiCSPfNZgdYyzk5I4Ar1gJJ/eP508Ryf3jSWAS15gVDzPNftCPbB1A3EYIqsLgRnBjJJ6c16qI3/vt+dPEb9pG/Oq+pL+YfsDyUu0jZC4HpQ9wIgU3FWI7DJr10Qv3c/nThA394/nQsEv5hewPG5p5f8AlmTgDnA5qOaXJDMDjABzwSa9p+zt6n86UW7dyfzp/U/MpUbHj6WYZWbacD36VPDCxjA52rx0xXrYtj6n86UWx9aX1P8AvfgS6DfU8ibzOgkcKOwNMQN5oY5J7k17ELc+tHkEev50vqf978A+r+Z5Qcy4AX61LCfLiYYz6g16l5Le/wCdHkv6H86Pqa/m/AFhrdTyKaCKZHXaVbqDjpVKW2mtWBYNJH2K849civavKk9D+dKIpPf86awn94pUGup45ErEAgHB9qlaV7ZQzxu0ZPIXIP4V6+IpP8mnCGX/ACaPqi7k/V9dzxtoC+TAjEdcEEY9qllDwKCImZiMDg17AIZff86cIpPej6ov5ilQ13PGws7gO0T46cKakezlmtuY33FhtO0nFexCN++aURt70vqi7h9X63PHEgubdZEWB/mPDbSeKzb+2vTGsaQz+UOoCGvdgh96XY3vT+qq9+YFQ63Pn+xsb8Hasc4UnOAhrbhjvVZVa2dh3JjOa9nCN70bG96HhU+o5UOZ6s8emt51cFbaUE+iHmqzWc7MokguG3nBwh9K9r2H0NLsPpS+qruT9W8zxaXSpY45Gjt7gkZ2/IahtbW7ibLWlwABx+6b/Cvb9h96XaaSwi/mD6t3Z4pLZ3RiLLaXHTP+rP8AhUMdjfA5On3OPaJv8K9wwfSjn0NP6ou4LDJdTxxNOuyv/HncD38pv8Kz5dOvtzstnddccRN/hXugz6GnjNP6qu4LDJdTwU6XqLIcWd3nt+6b/CmLZapA4xYXbL3Hktz+le/0ULDLuV7BdTwi2sNQM6n7Fd7M55hYECrE+mXvmlo7K6Cn/pm3+Fe3YFLtHrS+qq97g8On1PEDpt8FGbO4Oe3lN/hTjpl4BhbO4x/1yb/Cvbdq+9LsX3o+qruHsPM8PSy1EHy0s7kBvWFv8Km/si++61rOT3Iib/Cva9o96Nv1o+qruHsOx4nPp+oKQEtrwptx9xvyohsLrcPMs7jH/XI/4V7Zj2o2r3Wk8Kn9oPq/meNTWV2PuWk4HtGaqm11FM/6HdEdv3bc/pXt/lr6Gjyh2P6ULCruHsFY8VigvQATZ3IB7GJv8KibTr4Mr/ZJwDk4EbcfpXt/lN2xR5T0fVV3F9XXc8Xitb1QSbS4/wC/ZqmNIuUuJJfs9x5Tc7fLbk/lXumxh1NGw+op/VV3BYZLZnhMljqLgNDZ3GfQxNyKtC0vXhVjY3IbGCPKP+Fe27Go2N6Cj6qu4PDJngy6ZqErgyWlyFB6GNgB+lXn0+6Q/La3BHtGa9r2N6Unlt6UfVV3H7DzPEH0+72/u7K756jyWx/KootK1FWBFpc+We3lN/hXuflt6UeW3pR9VXcPq67niUtlfBQsdjdFj3MTYH6UkWm6ikSq1jdZHpE3+Fe3eW3oKPLPtR9Vj3F9WR4utjflMfY7oDvmJv8ACnR6ffMSGs7kAf8ATJv8K9l8s+1IUNL6qu4fVl3PIv7GumXIs7kn0MbYP6VkNouqNcFBY3ghB+UeSwH1PFe5EN6UfN6U1hUuo40OXqeH2FrqyyCBtNu/LzhS0LDA9zitI6TqDZBsrgg+kbH+levc+lH50PCxfUTw6bumeNLpeoRLsi068Cj/AKYNj+VK9hqARV/s+8OFJ/1Dcn8q9k49KTC+ho+qx7h9XXc8Jl0bU5nG/Tr3Ge0Df4UkWj6osjqmmagEHTMDkfhxXu21fQ0bE96f1WPctUlax4fHoWqs2Tp10PrC3+FK+hakzgfYL3A6/uG5/Svbtie9N8taf1WPcn2HmeKLoepgf8gy9P8A2wb/AApG0TVO2mXv/fh/8K9s8sUhiFH1WPcX1ddzxNNJ1iFwyaXe5PfyG4/SrFtpmprxJpl99Rbvj+VexGL2pDF7UfVIdxugmeONpWqiZ2Gm3h3Y58h/8K1dO0S7jtLia4sZvNCny1MbEk49K9MMJ9KTyj6Ung4vqTLDJ9Tx+50bUTLvTT7vB6gQN+fSoLfSNWDuTp14MDvA3J/KvZjD7U0wn0p/VI9yvYqx48umaqrknT70n/rg3+FTPpOpFQTYXQPfELH+lesmFvSmmFvSk8HB9RPDrc8y07TLyCOUy6fds7YC/uW6flVKfSdTZ2f+z7vPXHkN/hXrBhb0ppib0pLAwve4ew1vc8ztrPUfs2JNOvFden7lv8Kgew1MgFtPus+ghb/CvUvKNJ5VV9Tj3D2CPKhpmonH+g3Q+sTf4UT2WpQx/u7G6Zm44iY/0r1TyxR5a+lH1KN9w9gjySbT9QZF/wBBvPlHTym/wpr6RfGFX+x3AfA4ETZr1zy09KTyk9Kf1SPRj9l0PM59JncAraTjaMH5Dk06LS7ryxm1mGOmUOa9K8lKPIWhYKPcToX6nmDaRc7y/wBjm3dM+WadFp14j5+yz/8Afs16Z9nWkNuvtR9Sj3E6HmeczWd245tZh/2zNTrbXSwAC2m6YI2Gu9MC+1NNuvqKPqMe4ewWx5tLozyqpFjIsi5wSh5z6+tH9n374ElvIWUcMIyMj0r0c2w9aYbX3FP6jHuP2XS558mnXfQ28o/4CaVdPuNzK9rNn1CGu+NsfUUw2zeop/UodyfYeZ59caZd+TKVglbCnACHJqlb6RecF7OYexU8V6YbZvUU027eoprBw7spUrHC/YbxBgW0hI6YWnvp91MgLwssirjhetdsbc+opPIPqKSwMO7J9icF/Zt0M7YJQfXFZc2h6g0gLQSknqQMmvUPIPtSeQfamsFBdWUqdtjz6y06/h+Yxz59xmtEQXTQN5kLlsHHy11xg+lIYPYU/qNPuyXSvucSLG5dF327gj2p0dg7M6yWr4AG0/4V2Rg9qaYPah4Cm+rF7FHF3enzhkENu2Opx606K2ugiobeT3NdgYD6UhgPpQsvp92L2KtYy9cXNu9cqfvV1er5aOQe1cqfvGutbHWdr4WObUVv1zXhRv3OK6Ycms5blIBT8A81Gfl70qscVKGxXzg+lMXmnAlgQaBgUxEsa4FKRxTEc5xUh6HNAiM56CpewqIcHipB0oYCN0oQYHFLSgADihbDRDzn3qcNjmmEd6QmmJkjSt0UCmKWzlmoooC5IHwuB+dMJzzR9KRjikAtNKgU7tQRmi4xi9RUtNAAPvT6YAtPplKOlAhHkCnA60gkY5zTHHNKo2rx1oAgeaRmKRqeDycVMFxyadkjqcZpaAE3kDFJvIPHQ0hFBwB05pASmmHaTjNKp4pjAA8dc0xjymBx2pCwC0jSDPymmkdaLiFDCnGoOhpSxPWiwyYEYppOelEfzAg0pUKeBSAax4qNxyKkNMc9Kdh7CpkU85NQ+Zjg1MDxSENOaQZU5zSk000MYrSHHFROTu6040hGR0qRmNrnMHPY1zqffH1rota/1H41zw4arM3udbprYUZ9K0AeKzdN+aNT7VpDpUopDGHOaRRT26U0dT6VQ2GKcF96FxnmlLcUhAF5qU8Cmr90d6VgGBB6UAQlsnIqwv8AqhUG3bwKkY/uquO4PY57xSBtjIHO6ucfljXSeIBujT2aucfrXZDY5ZbleTg1BJ/yz/3qsSDvVaTov+9SnsUiaLgH8anhODVWM4zn1qdCBXnvdnUti9HzUy/Lx61Uif1qfeDimmJos7qUNxUKsO1DSg9KdxFkFsg8YqTzADwaqBztxSg0wLnmKRhsmo0TDHIO3tUaHnNThwRik1YCxDJzinYG7OKqo2DUnme9SVqTMoxkVVufu/jUvm8U07WoECN8opX5UUpCg8Z+lDkFDtABxVXFYBzjirsXAqjE479asxsAc0hotA4pwVScgc1CsgpVlwfapKsTEFeakQ5GajSYHtTwwxmmhD8UgGByacKGGRigB8TDcrdgalu5EiRlYgM4IA9aigA8xR2JqtdQM15I8x5B+WtaZMtjOVdsx+lKbYyDeJMZ7Yom4kz7VVe/kiYKFBUVpUbS0JpR5mcd41so4dctzcE+VNDtDdMMCf8AEVueFZDKpsrmYmVB+6Zv419PqP8APesHxRNc6zqLxR4Mdoo2oB1JGT/n2qza6fBd2sctuXiP3laNyCp/+tXo0sM61BJ6PdM9enhvaU+W3oduLE/3jTbq1WC1mlknEaIhJc9F461Q8Oa3I+LTUsfaVyqyDgSY/kad4vm+0QW1kuMTPvkHqi4P8yv5V58aFR1FTejOdYZ86g0ct4FlxfRQy5T7RGUU4+8VyRz9N1egCx4OHNcXf6Vd+HJrCO/iMNzGEuo0zy0ZBYfoCpHqCK7w3CFAVGVIzkGtcbHlmmtmjXEUeWSZ3HwktVhsdYuRyz3Cw5z/AHEB/m5rtq8/+GWsTyoNMigTyER7meYnJ3O/ygY4+6R+R9K74nHWvGqxalqb8vLoc74l1qS2uVsbQlJCoaSXj5Qew9/f6fhLoxt1gD8GY/eduWP1JrG8d2Isi+sRuSHaOKSALlmYkKCuOSeRx6Dj0OPa6jiMFHyrDII6GiGmp6FOhGrSXs9+pp+IPC+jatP52qz3N3Jn5QZCAmeygEAf/Wq7pPhjT9Ne3nM8soiQgRO26MZ6cHnI9Sc1zj6pu1SGEZbYjSsew/hA/HLflVqbVCRgGt/byasZ/UJN2Rt+JfsWoWzQ3EccsRGCrLkEV47q3hgrefYdHeRJLhgsYVzyCfmB+gyfoD6V1Gt+IILBCbmX94fuxqcsfwqnpOrS2P2nVpolM/lHyELfKFyM5I7nge388pTcWru2unmdSo+xptbsy/EnhePRrQJK4EqqDgsMN9PerfwmsNbTxNFLa29wulSArdOykROmDjrwTnGMc/hmszxBr+namVvbOGW2veM5kYlSDzyT6jtXW/Bm41e91G/vL3UrmWxhix5U0pcMxPBAJ4A2nn/69ehR9tHDVHUf3/ocGIldLY7O38oW0k9ywKrLKwZucJ5jbR+AwKpG9mj+2TpZF1kJbKSkPgIABtxjt696zpbtv7I0Vp/khlRZJSegcqCAfxP54ro7PUrUWqJblJbhuFjB6n39B715lacuZQWhlGKUeZq5neH7KKTTbd2JcyICMdW4GWP+Na0Gk26TCaRRJIuduei/h/j+lWLO2S1jIXBZjliBjJ9vQegqK5u2MrW9ptMqjLu33Yx7+p9qIUYU1zS3JnOUnpsWneOFRuZUHQD1+lN8xypcQusY53yEIP15/SsrQZbqO9vAw+1KQNtxIANrZIK8dR0OB0555rXaPzGDXDGVh03DgfQdB/P3rSE3NXjsTJcrszPe/lMgENrJOmeXiYYHv82AfwNWLW/EUgAyM9UPH6f1HFXKqalFC9nK02FCKW39CuB1zWlrqzEmbUU8cqgowPGcdxUgNcfbXMljY21zfMVl2oshUd3KqeP97Z+Ga66P7orllHldi+lx9KOCDSUtSBwPxIt0j8TWFy52i4tGjz7owP8AJ/0rn/LhPSQV2PxTtTLoNlfIoJs7gbzjojjaf1K154fbrXTTl7py14XaZpiCMjIdT+NH2de7Csks2eCRRvOOSa15jl5Eahij9ajZVHSqG4+tG4nvS5g5C2TxwBmmeYc4CAmqxJoQur5DECjmD2aLHmMCcoBTklBODgfhTBM2Rk5+tNeT5gdq1XMieQvIu4ZDKamWJiOorPjuAhz5Y/CrBv8A+6n5mjmQchcEZHenLHVE37kcKBSpfuM5UGjmQchamwmPlB/OoTKqEZUDJ9ajN15hG7j9aytQu9sqc8BsU7poHGx00LRscAjNSlUHasQSN5ZdWA461CbqQ/8ALQ/nUKZXIjex7Cm7gPSsITO3DOT+NLuPqafOHIbZkGOgpPOQdSPzrHBPcml4pcwchrfaI/76/nSfaE/vJ+dY5GDShRijmHyI2knjI5Kn6GnrLHnkYFYY44oyfejmFyHRIYmPcVKUiK/K+D71zIdvU0pkfH3j+dPmXYOQ6LyJiMrsYexqLdNkgJyOuKwxI4/jP50hkcZ+Y/nRzLsLkN2R5o1ywUD3pn2vH3njB+tYaytn5ixFRucuTTurX6i5XexvG/QdXT8Kb/aaf3l/I1hZ5pc1PMWoI2jqi9iP++TQNTB6FfyNYuOKM+lTzD5Ebf8AaXun5Gl/tIf3k/I1ibjS5PenzB7NGyNTB/iT/vk0p1NQcbkz/umsQZOfSlIBo5hciNj+0wejR/kaP7S56x/kaxwAtKMA0cwciNf+08HrH+RpRqY7sn/fJrEZ+tNfkUcw+RG8NRBPLR4+h/xp/wDaMeM71/AVzajHWpckDA6UXDkRu/2pCOrj/vmkOqxdn/8AHaweN3NITz7UXDkRvHVVHRh/3zUb6yykbQp/CsY9KMj60uYfIjZ/tiUjgJ/3zTDrUw6bPyrKOcelNouLkRsLrM57xj/gNSpqsxPzPCKwug+tAPajmHyI6Mal/emQD2XNDaoAvEgJ91rnd22gSCjmYuRG8NWdj8rp/wB809dVYHDSRj/gNc6CKbKW24UEk0+YORHTrqcxICywnPTinveXAUs5tyB6AGuUihCrl2Lue+en0qVGKY2k4HQZoU/IXs0bz30vTbH9QMU2G8kM215CM9KzftKbAWJB7g1A0vmyKU6dK2fLa6MmmnY6OOSdjgE5z6UrzSAkBwfwrInvZk+RHxgYJHeq4u5xyXyPpWXMjRQfU3vtD/3+fpTGuZQOGH5VhteS9jini9kxg8mlzIrkNT7VPn7w/Kj7XN/eH5VQW745FH2nJ6U7oXKXTeTjuPyo+2T5HzgfhVAXB7jimtPk0XQchp/a5iMhx+VMF7Nnkj8qz1uCgwBn60x53PcCi4chri5lPcflThcN3YVhGRz/ABGk3EnqaXN5D9mjfNwR/GtMkvlX+Nc/SsXfxim7s9KTkHIjY/tFO8ig/wC7T0vUb/lqv/fNYLH1pAT2o5h+zR0P2lT0lX8qje9UdJlz9KxFYjoaUe4o5w9mjZ/tBQOZMn2Wj+0owOXI/wCA1jimtjHNPmF7NG4uoIx/1w/Kn/a0I4lUn6Vz+PTApCMN1Jo5g9mjofPBXIlX9KQSyEjDqR+Fc8zHoOKQM2epNVz+QvZo6RnZRy6n6EVE10i8NIM/SsPecck/nUWW3ZHSp5h+zRuteoP+Wn6VG2oJ/fP5VkFyRSjnrRzMfs0bS3KMpPnD8qi+3Lnkt+QrMBApc0+Zi9mjT+1of4z+VOM8Z6SD8qys+nWm980c4uRGsZo8ffBNMMyHowrN3UpOKOcPZouPKezAVFJNJxtkH0qAc0hGaOdj9micNcOpKsPyFJ5kyj5ifyqNF2DGc+9PDsBgE1SqeRPsySOcN98sPercaBsEMcVno7jPOfrUy3Uigj5fyo50Hsy+Il9c04RL6Vn/AGqX+8PyoFxLn7xo5x+zNB4lCkgc1SdyqnnFBupCfmORVPUJwIyFyOOaqE76Eyp2NS1aJ4VLjJPU1ZMdvt+6v51iaTOJLRSSR9aR5CWOCTzzWMakupp7ONjYMdvznaPxqNltuxX86yQ4680/ORxV+0ZPs0XyLb/Z/Ok/0XH3R+tUxSinzsfIixutP7v86Qm0/u/zqsw54FKAMUudhyItp9kPVAfrmnhbPIzGn0yao0U/aMXs0accWnk/NGmP941M1vpZXiMKfUMaxqQ01UB00ap0+xIJWaL8TUIsbY9WiA92qhmkbgUe0YvZI5nVUO18+hrj34c12+qpy3pXFzLhz9a2Rgzp/CTZUg+tddGuQSa4zwkcOwrtYeVzWctylsRt1pCcCpHXnGajIIGetShiI5GenNOz60wDmpETJGaaEPVT2BxUm3IpSwUAHijI9aBDAMcUuTQxpM0wFpCx70tNzmgB24FaaDmgLmlHFAC0vakJFLRYQCmsKkpuKBgDTqYc4pR05pAB4PvRk0lFMBwbigHNMJwKVDkZFADlFOoXlTTc80AKRQeKcvJwRQ5HSkBGTzSE9hQcGlUelADQSDSGpG4ppGRmmgIyO9DORingZ601xkECqGNzmkzigU11bNAEisAetSFsjNVSpqReF4qWA5jzweKaeaWimA3APAp4JAwaYaASKTQx9FBPHtSjBFIBp6UwuBwDUh4Bqt70hmdrCHyCx6k1zn8VdRq//Hn+NctIx3jFUjN7nUaSf3SH2rXUcVj6MQ8Cn2rYHSpKEk4U1ErAnrUr/cNQIOaYElOAyOabT1ORQBLGBsxQ3Q7eTSDpzTk6mkBVkDhskU6QkJ+FWiMjBqGUBUINXB3YS2MDWPmtyfQ1zsvWul1fH2Vtp4rmpOTXZE5ZbkEvSqs33V/3qtT9Kqzfc/4EKJ7FRDdgkH1qRXA701hnJpqj6150lqzpi9CykmO9WEmXHJqko9zS49CaVmVdM0BMvqKPNTB5qhkgdTSL14JouxGgtyqkAnipvOX1rJdWLDBp6Bl6mnqGhprcDoT0qUXCetZOGzkk1MM+pp6hc0lnT1p4nT1rLBOaXJpWYXNM3CBTg5NC3K+tZoznqaOeuTRZhdGkbpR3o+1J61mN75pB9TS1Q9DR+0qGxmrIuFx94VjhCTmpVBJ4zRqF0awuE9akFwg/iFZ8NrNKRsRjWhFpvlKr3bEA9FXvT5WHMTxTIx4NW42B+VuhqhdSxW9udiKrdsdantHZ40JpWaHe5okY6U0nPFNXdnINSdapMQqcMpp1/n7U2elIudwA7mq91cvNettGEHGa1pky2M26yZAPQVmyj94RWwIvOu2jHUrkVQvYTDdFGHOAauoOhuc5YRqmo6mzfwuCfpjNe2xfDaz1PwPpraYqWOs/ZUlEyD5ZXK5IkHcEnr1H6V43qVqsUsswkaJLhQjsBkAjgZ9iK+qvATLceE9FlU5DWcXP/ABXpOvajBx6H0NKSVNHz3beBtVuNsSlPtc0mGR/3fkSjqM5PcYpdL0S/m8e2Gj6zbFJy6Rsp5V4wS7nI9VGK928faVPa3emavYOEjN1DHeR4HzAuAr+x6KfUEelM8R2X2a5s9et4le5sCfMGOXhPDj6gEkfj60o4j2iU+uqDD3kuabu7uxlfEPwpZ67qGjLeqQsolhLqQHH3WwpI9A34ZrxvVC+maXJCP3txCxtVx/HIG2D9RX0xq0EGoR6HeQNvVJmmjYdwYnX/wBmrwPxDZgeN9YAXMek/atXZexcDdGD/wADcn/gNcVSfNBN9GYzjzLm8zT+CmsW73OraVKnl36FZAW+88a/Jg/7p/8AQvavRdaQXVqbMsy+cPmZSQVUdwfXOB/+qvnD4Tz3UfxIsZbSKWVMOsoTpsKkZb2zg898V9Hkkks33j1/wrirU71LmcndnO6tcf2nrugWr4KxQNqMi/7WAifqzn8Paq+s6Ak12k9rI1t5hw4UAqWPQkHpnpkd8dc1zPw4vrm98VeI/tUxmFvKbaEt1RFkfCj2616QyLJGyMMqRg0lDlVhRqSpvmg7M47WtHg0nwxfXsskgngRpy6EZchcBTkEY6D/ACa8r0678Q66oitpyCQSSqqnA969o8QRmfRb7TdRYrDcwvEt3j5VyCAX9CPXofbpXitk2s+H7tbWRBbS7M79yvlSccdeDg8n0oa003OrD15ttOT1EvtBl82OUbobtQFmWY5Gf7wP+etZd7JPZuY3KSY6mM5Fd5c6vaQaKjO7T3QdHlEgPzc/Nz0AxXL+IVsNQmkljto4Q+MLHxjj2rSjiaiSg0ml3RrySV3ex1Hw10Cz1/Q53vo45wlyQqnIMfAzyD0PBxXoGrW8OiaYl1ZJ5MNlC6PHGODERzx6ggNnrw3rWf4Elkk8LW1+YIoRbk2spiQIskQwRJgcZUsQf+BGukvjm3c4Bxzg9CO/6UTqyrX5jzpJqRzV9ctaeFYWTAIjjjLEZEYJALY9hk/hWn4VsoILUTwRqkZG2LA/hzy31Y9+4A9axoLmE79FYliq7uef3HY57n+H6109tNHb2KMdqIF4HQAf4AfyrOdNSkpPoVze7yoZr2ovZ2uy2wbuXIjB5C+rH2GR+JFY3he0u7mxhE84eF1DySxsQZHP3h7c9wfyPRkFnqGq63cPdYhtcDJVvmVOyezYOT6bvpjr7eOOKFI4VVY1GFC9AKwcPaSvLZbD5uWNluOjRY41SNQqKMAAYAFOoorczCqV+PtDLar90kNJ/u9h+JH5A1JNOxZorYB5RwSfup9f8Ov86dDEIlIyWYnLMerH1oGYXjhZE8OzzW5Ae32zDP8AsEN/NRXZWriWBJF+6yhh9DXM+JEWbRruBzhZI2U/TBJ/QVqeD5Xn8K6RLLnzHtIixPUnYOfx61jWWzKT0NigUUVgMi1GyTVNIvtPk+7cRNHn0JHB/A4NeG27OYl81Ssq/K6kYIYcEfmK96iba4NeReMrL+zvF2oxKoWK4Iu4/wDgf3v/AB4N+daUn0M6qvEx+tN+tOfIHApgroONjulInXqAKQ5PamkEDrQIkYgHHWnA56GoVB7mrKKMCiwhADTgvHNPA4x3oI60ARkccUijPWnikNAABS4xSdDRmgEB6GsjUBl4h/tZrZPIrLvhtePv81NCkXI2JiAPSkzlcAcZqONxsFOEo6CkNEijNWQvGajUKIwRy2KI2Lpk9c0DSJQB2pO5pgOBzUkfPJBxQMUgYoAzTsjHFGakBhGKQ/pSyfMMZwaTGOM5oABS02jNUAuKTnFGcUjNxQAdulJjNCnJpcUARkYpR0pzDANMoAMmnoeuRSBSevSlCY6GpsAvBNO6CkpmTmgB9HGKTOBxTdxoAcTgZNN689qZISRjtSqcdTVALgE0hzTXb5vSk3UAO5pVJNRtJijcR0pWAkLAUjPuXpikHIycCkxTAAM9s04Ajv8AlScnpS8gc1IxT0pKQnigUAHejFLSE8UANc0lFFUAA08NmmYpRSYD6CcUgNKaLAMkOaksxyX7LzULDJNS2vEclXf3TNq7Js55zSGkpwzioLGkCikNKvX2osA/IIpaKKYBTPWn0hHFSMQnNNpRxSUAFFFJk4oAXtTRx0o3dQKbSGLjPWl6LimMSBUWTkdadgJsEHg0rswx2pgzkZOKccHjGR70CED5NKSDj5jmkIH4UqovXPNACjHpSMScUE4NQby02FPy4osBLz1NKpzSbeCSaQED61QBI3YdaRScc0pGTSgCgBMn1pNxFLjmgLk80APB4petJ0FOWgBoBpxpQOaa6tn2oABg9qRjSgGgrxk1IApVV60qsTUZHPtU0K9fWgBQAe1PCkc0/HSlxmqAjPWmkc09hzSUAJxS4FJilqQCqGo8xv8AStAdKpahjyXPtVR0YpbCWXyW6qPQCpiSScDjFVUmEcY3lRnpSrcqzYUg/SpSGWkGeoqdQAOaihcFAONx70kJJDE9c1QE4IxSHG6mdPenoO5xQAp+lAHrRuzRn1oARgBSUNhuo4pPpQAtFISBQTQIWmmjNITzxQMxNTO7NcVdDbM31rvNRXBauI1AYuXHvXTFnGzW8Kv/AKQwNd1Afkrz/wAMn/SzXdRsQBipluNbExIzmjtgUKM80VmUA6YNPXjimn7nPaolbn0ppCJn5HHakHWlB4o6UxCkZpMYpRTWIU0wFYEqaYgx16Uu8t7UmKLALuweKUMGNM7ZpYh82T0oAlCjPNOwKX19KjoEHen00UGgY6kNKKQ80gEJFJSkYpBzTAZJzxRH0xT3UYyaSNevNAEi0u3IzQq89akJ4oAjzULScnvUkmAKiK5PFCAIzkmh3EQ3HpSqNuabKglTbnGT1qgK0l5IR8oCin2lwZMiQjIpLiykjjZgQ2OwqtYY8xgeDRZWA0zntSYoVgOtBJLVIyPByRTsEig9aU8UMAkHy8VGoxmng5JzSU0AYxRRRTAbSDrSgGnKOKAQmGPTpSgYHFKOtFZsYwk9KQdDStwaMZFIZmavGPsznPTFcs3366zVh/oz1yb/AHqpGb3Oj0IkRjmt0DArA0U/ItbynKil1GhT0NRYqU9KjppDCnU2nUAOX7oqWDkkGoRT4jiQUAtyYA1BfAFMe1TynHQ4NV5TujO454pw3CWxg6kP9DkHvXO966PVflt3A6Y/rXNtXdHY5ZbjJV4qnPxGfqKuuflqnNzG31H86UthxNOx0uW7tvMQrgnHNWV0C4I6rUelX88FqI4yu0HPIq+upXLH/WY+griktTojsQp4cuT3WpP+EauMfw1Zj1O5UgeYxq4uo3OPv/pSsMyT4audvVaE8NXPqK2kvZyDl+ntTUvJ+T5hosBlf8Izck9RTx4Yuj3WtYXlxn/WnFKLu4/56tQBmDwxOeCy1InhmTI3SLiteK6uMZErVJ9vuB/Hn6gUAZDeHkjHzuT9KVPDW/7sn5itpb+bj7v/AHyKU6lc9PMA/wCAigDI/wCEXPHzgUo8Lt/fFbP9o3GPvDP+6Kjk1S5To4z/ALopoLGNN4YfojAsKkg8KSMMtKB7YrTTVrjHzbCfdauQ6pIR8yofoKGhWMkeF40x5kxP0FOGm29uP3EYZh3at+O4S54xtf8ASo2tgX4GTQOxmW0RbO8BQOuKxNY1IeZ5VuMKvet3X7n7HbFE4duK4eQsef51ajpcV9QnkMmS5ya3rPiFMegrmmbrXQ2DEwp9KzkXHQ0UPSpgeKrBhj3pRKQ3I4qbDLkJ/eL9aoyEi6IHTNW7dvnU+9RPg3DcdzWtPqTIqWj7dcg9DxVbW3Empuw9BSs23VYT3qDUzi7J9QK1n8LCj8SKeqXCW9i29BI0nyKh/iJr1f4KeMBYabHpGtExW8J2w3RB2LnnYzdB14NeM3qpc6iBMcQ26A5zj5jz/ID8698+A72154PliRQxS6kEu7ndnBBP4YH4V0xpqOH5pdT36UUqd31PT/EiRXHhi8cFZI1hMylTkHb8wI/KiO0DIQygqeCD3rG8QeH5bTRruXQ5WtQYm862TmKRMfNheitjuMV1dumUUjoea4Obljo+pzxlyLRnEeF7eWw1e60d2zbW26WAMcna5Xgew/mxrz+wW017WvHrwEn7XctYbz2RY9hP0yWI9eK9N8WBrDWY7m3cR3E1nLDGxHAYdCfoSD+FcdpNjbaVYR2GlRBYIxzIe57k+pNE5cy9S3O6uupX8MeHNN8MWAttOiwzY8yZuXlPqT/ToK4/xn8VtJ0uG5ttKZrzUApVWUfu0b3J649BXo2MDGSfc1wknhvwv4c1O51TU7C1FvLJ5yXEqlhC/UrjkDJ5UgdePTMOVtXqZbnHfBt7my1PUItRWRby4iF3tb7xGQ3I9SGzj3r2eJ1dVZSCpGQR3rwHT/EoPj3+2Wc+TNcMSemI24GfouPyr2S0lks7lguZrGb95GV5MZPJA9R3x1H06VJPqDRukAjBGQa4Hxp4DGoz/b9HZYbkIEaBjhGAJIx/dPJ9j+td3FIkiBkYMp6EGnk1mKMnF3R4L/wjuqG7jtdRtZYrd3CSyEjaqnqSwPHGa6C3+HNw+o4N7EdPByJBy7D0x0z7/pXqshHcA1iXdsbUmWxYwjqVUZX/AL5/wxVI1dacizZQR6LCI7GP/Q8Ykt+ob1YZ/i9fXv61HbTRlGgEm+MD92x/iTt17jBB78e9VU1RsFbiNT6shyPy6j8axNZvhaILiHLL5gAUfebJAwPU9OO5ApclndGYt04tr0O/BQmJj/ssR/JsfQFquvdtO1rbI2FILO56Ig5z9SSoA789s1g6vepeKcwXRLqUkH2aQA9s5xVbwzJNcRygSK8ryYkYnAVVGFz6dS2P9qtGroD0OwImVYoAUt05POS31Pck1rjpXOW2q2trCILcmeRfvbOmfc9vxpx1C4uGC7vLB/gi+8fq3b8PzrOwG5LcRxttJLSHkIoyT+H9aiMc9x/rm8mL+4h+Y/Vu34fnTLGIQoeAGbk4/qepPuatg0rEiRokUYSNQqjoAMCkJpWYAVlS6gLm6NrZHdt/10w+6nsD3Y/p1PYFoEZ/jK6EXh7VJgcbYHiUg92GD+uPyNdlpUC2umWlvGAEihSNcdMBQK888VxLqF7puirkQOxmnCnpGmMD8WKiuu8EXTXHh21SUkzW261kycnKHbn8QAfxrGutEaLY6CiiiuYZR1HVrLTmVbycRswyBtJOPXgVx/xOktLrTNK1u1njkjjm+yO6HIxJ0z9GAH/Aq2PHFrvs4LlRzE21v91v/rgfnXBazCbzw5q2npkNdRgoRxiVSCjfga7aWHU6fPF6myoqdPmW5VU8fNio3ChuMZqrpV2L7T7a6AwJYwxHoe4/A5FWW+9SPJYme1BGe1OCk05VweaBESqep4FWRwKTjb0oFAh65pT0pq07NADCKbnmpCKjI60wFzmkPFJ24pDSsA48is7U45HMSxEBi3BNXs4NVbv5pIRkg7s8UwY5tP2xh7iZy5HRDgUkVoqN8u9s/wB81qugMQwc47mq54pILEcYxIw7AY4qSJcJTIfnLflU0ZG3APNAw289KcD2oB9aCR2oC4gUg9eKVucUlFKwBTSKdQRxTAY3NN5Apc0ZwOlABmmtSdetPB96AEQ80/IFR7+fanZBNAxSMikCil7U08UAPzQM0wNTuCKBDsVG2QelOyF5PakZgVzQMaeR1pT0FNX1PSnb0HU0ANcYHNR05m3fSm0CuNK5PHWjkcU7HOaR844oAYcEEU/OBwMe9N2kdeKeBzzQALyeaeQKQUtAxuMUvbmloYAjFADeO1FGCOKUDigBAe1J3oIxQB7UCuIRmkxTjSUDuApRQBSigBR1p1ItPzQBE+FUnFNs23pITSXOQhNGnj9y341X2SPtFkU9BxzTVGaeDzUljWXPIoHAp4+tB70AJRSZxTGkxQA7NKOc00HNIxOQFx70AOpp60uaa8gXpzQMWm96Z5ozShgRQIXFIaRjkcUin16UrAOPIqMdeOtTbc0hj4460xkWCTTxxwaCCBxTfvYoAk25AIpADmgNgYxSlsc8VIDS2DimY596k2hhnHNM6fWqEM3EDBpQO9OcADJ60KNwoC4UUvtSUBcUUUlKOtArjsEingYHamin0DQU7PFM60uCFxQA3Oe2KUUg96eQOuaVhjdmSKkQbeKFPPFLmiwrjgefSn9qiFPU8UwBveo24qU8io2FACA80Z44pMUHpxRYBc9qqaioa3IJxnjNWcelVr4Hy1VhwxFAEsNjbw2wIQStjq3NNW3UEFY40PfaMGtBNv2cADHGKrmkkBEB++4zgDAqSJflz71HBkls+tSoeMYxTAdigUA4ozTC4cA0hOTQaKSQBQeKKRiAKYCEZpCMUDkUNmkAmeeKbg5p1NLYHFAFXUkrhNUXF3IPevRNST5VNcDribb2T8DXRE5GS+G8fbgD0xXeIOAO1ef6Cdt8legwgFAaUtxolHpQ5xQDSMuTuJ4HaoZQNIAnPWolYbgDUjBSuMVDtpoCdMduakJUjgc1XGRTw3FMRKKST7vNIjCnMNwxmgRFkClBBpdg70u0elFxjCeKch4prg9KIm52460CJhzRilx6UtIBo96Xg0ZAoyDTAUUUhO0ZNNDhulFgH0goBzR3oAG+7REMDml4xRuwOMYoQClQTzR0GaYSSetJkjrQFxQMnJpMgHikbmm0D3A5zSHIZcdO9L3petUBPCMr171HPbxKWl24f1qEOyNkGnNIznB6elADR8w4p6j1NNHB4qQCpCwmOc01j60/FRPyKAClNMUYNPqgGNnsOKUdKep5NOC569Km4yAHaeTUg5GRTmjVhxSqABQIaQaafapX+7URqQTGtS4IWmnk1IfumkUZ+qDNtJ9K5F/vGuv1IZt5PpXISffNUjN7m9orZjXFb6Hiuf0T/Vj61vpS6jHnpUANTkZFQDrVIY7NLmkpyoW6UgHIcjFNLFW6YxTlBU0pOcUAI8hk6imMMpnNP28mh8lAo61UdwZjaoM20mfSuYPSuq1Mf6PICOcVyrV2Q2OaW5G/3aqyD92/4fzq03Sq0v3Wpy2BF6yH7r/PpVxVIwTVSx5h/Grq9K45bnRHYmiAzVpeKqx9asrUjZIp3DjPpUyjjFRrUi9aAHgYpwXmm4PXNSCgZIhI6U9yDUBOHHpUooAeKQ8GgU4c0ARbj60khL4xT2Td7UwpjikAiITnJFT267AeaijX5xVgIB0p3C5NE+1uuK1YJd8eQxzWOo4zVu2YqrY9KEIxvFL7pYwT7muakPFbviNt8sZ9BisBxmtuhJA/Qmt3TzmKPHpWEwIJ9K27J9tuh6cVhItFsMVc4PepomOfmqqrAtUqsSeD0osUi9C/zjHrULSZlOBzmmWjnzQDSL/rT9a0gTIqTHGowH3qPVh/pI+lPuf+P+2/3v6imav/AMfC/StJ/CxUn7yOWW2N1qF/uIdg+FViQB8owa9i+CSXscL3Gk2twj58udm/1Tkdjk4OPbkZ968sudOaW6W5tZfKmH3l5CyemcV1HgrxnrfhSeZLexSWzlbfJC7FgW6blI5BOB+Q4rshWhOioLfzPahKFSCi3Zo+p7fUzFZBtSh8rIw7JmRB+mQPqMVJod9bXEfkQzJI0PyHDZJA6N+Ix+ORXm/hf4pWF9au+shtNkDYEKxSPkeu8D9MCtRPiH4YuLaWJZXh8sHy1EDCQnHVAB8v1ODXmzpWurESpXukty9443T63DFI6CGKD5QD8xLH5s/98r/k1isVVcDAArBuryS6v9QvYGl1CzlnJSaMYfAUDBVsenb6YAAqhL4n0K1H+myXVuR2ubeRP/Zajl5VZj5eVcrOnDq2dpz9K84+N+tQ2Xhb+zcBrm+dQq/3VVgxb9APxq5qPxN0KCF/7P8AtN/OB8sUMDDJ+pAwK8Y8SXGu+KNbe8urG6MknyxxrCxWNB0A4/yacVqSZFvMCqpnDDpXrnw08WxXNn/ZV5L+9h+VDnnHYD3H+ehrgLTwrrB4TSrxFxkvJCyj6kkV1nhjw6E+Hd5O8AGoXYe8jJX5lIH7sZ+g/wDHjWkncFqenrdAOSWKv/z0j/i+o7/zqX+0p4xyqTL/AHk4P4jr+Wa5a0v5bmCCdI/Mt54kmRlOGwwDDr14Pt0pkmqzQS7ZLS4ki/vxxkkfUY/lmo5QsdM2uRk7SoVv7rNtP5EZqpf67FaxeZOY406Asc5PoB3Nc1q2uCONYbeMtcSc7ZkKhV/vEd/TFZmmQxxS+a58yb+8Rjbnso6AfSt6WHlUV1sXGm3qdEsd3rLb4kSwts586YHef91M8fifwrRt9HhtmjnJuLqWNw6yStglhzwq4/XNQ6bcgld3OKXWdbuHMNtpWBLK/lefjOD/ABbR7AEk+2OvSKsHDQmSsdSLxDEzjkDPTvXFX3hKzuZHuI5JrWaTLHLF4XYkk7lz6k9+9Qww6s93d6dDqGPs6QSLN5fztuL4B5xn5Bzj8K19E1w3lj5d6ojvQDvXGA+DgnHqDwR2PsRWaWuhK8jBUy6NOtvqYWKLpHNHzE3tn+E+x/DNdBZX4iHyBGz371narcJJG0bAMhGCp5BFcvHINOuA2JZrLGPKDnMf+6M8j2P4eldLw8nHmRryO1z0Y6ysa5cIo9S2Klj1WaUfu4wF/vsML+Z6/hmuRj1jS7eNJI5ok3/d2r8zZ9O5qwdSRuZZ47dT/fcbz+HauZxM7HSPL9pPlySmZ+uxflRfr3P9aivr+00XTJpjgRRjJIH3m9B79Biudn1VII8W8U0gPVtpC/Uk9fwzWZ4wu5ZNZ0vSXGBa2v2yde3mO2EB9wFY/jSasTJ8qub/AIYja5tpNYuvmvLwZwOfKjBOEH8z6mt7whMINd1Ozz8k6peR+5+4/wDJfzrnPBFwPst5YnAMMnmoP9h8n/0IPU893/ZWtWN23CQS4Y54MMnyt/3yxU/TFTVjzRdjSD5kenClpinIp2a4BlXVLUX1hPbE7fMUgN6HsfwOK8uuRLaXJt7uMwzqcFW6H3U9x7160TXmXjPUTea1LGrZhtv3ajtu/iP1zx+Fd+BlLmceh0YeTu0c1HatYXE9syhULefHjoUf5v57h9RU23NNvZfNSzm2n92zWzE+hyyj8xJ+f5LG2Tg0VI8s2jzcTDlqMVOCeaUjJ60uMH2oJFSc4n8NC5ozS0AOA5pwGaanJ96lBwuMUgIyajkOBmntUbZJAHSmIA2RwKDzikDY+9SMcDimA4VXvwPtEBUcZxUqOO5FNm+eSEDGA2aAZY80hQBR060pT0FN74zipGMgBGfrUq49KIhgGnds0DCikzS0CCm5oooAXNDHikoJoAjGc+1KTilJFJ1oAaT3zSEc8Cn/AFpRQMi2nOO9PVeMmnY5ppyD7UrBcU59aaMmgnikz6UwHY55opuacMUAL1FMPWpRjHNNx6mlYA7VGYQTnJp27nAFJIxA9DQgGyAJgDrSVGTzzyaeKoQtFJSdTRYB3Dcd6kIPeo14571ITmkAlFFITigLi01nweRSk8018MKAuOABwaXoKiXinZNFgHjnvRTMgUb6AHGkxTQc5pRRYBfYCjGDzTlGKTvntRYY4AYPPNHQVGJkLbQDn/dOKRt7KdvyntmiwXG3bfuaWwBMJI96qzpKsQ8x9x9hir1iP3CD1FXLSBC+InU8CnHFRpxkU7cAMmsyx1B46U0MCOKCRTAQimsgJ607PFJnaetAxAMcUE4NG4Z5pcigBCecUm3J7UrNgcDmkQ9cnmgLg4XnHH1quDznvT5T8xzUXOeaEhNkpbikznmmKafRYByt69KlHNRrGepNP3AHigaBhxVdlKtkH8Kmc5HHU0zGBzzSsAq/NTGVg1KTTt4IpgOV8ACjIqOigQrAE80N0AWkPApMmgBUGCc084qMAls5qbFDAbgZp23FA60p5oAKdSCloGgoByaMUhX0oBjiPalxQORS5xTEAFJjnmiikMcDT1GTUYqUH0oEITg4pjY2mntTGBOM0AMXd3xSmmsCucU1mGOtMLkg6VDfAyCEgYwwFNEyoCTnApd6zPFtPGc0BcnJIAFKelSEDHNRHrSQxkK8H61KKag+WndqEAUUhpaYgoopBQMWmtzS5pCaBCAYHWkPp2oLDODSmkA3HNJs45NPpCQOtFh3FvfmhBrgvEIxen3Ar0C5A+zHFcF4iX/SQfauiJyMqaO2L2P616HB/qhXm+mttvI/rXo1ocwr9KJ7jRYDUjNnrSr1xTXFQykJj8qOwpcEe9JkYpAKOvNGwfWkBJNSKMkUxMWNcUpp1BGRQIbQGHrUfzDr0pB1oAkb72R0pUHzDFIMAYp8ZGaYEuBTXFPpjEZ4psRHQKUg+lIuT2pADgleKh5B4qfnPSkKAnJppgR7zjFSISRz1pCvpSDjtRuMfQBx0pM0uRSAKO1IWpQcigBmaSlY5pM0CQUUZpM1RQ1qO+aG60HpQAueetODetRgetOoAfvHrTKQDFLQAUdRRSL0xQMM0obJ4oPrSLGc7v0qQHqTSnpTVPODSt6UAJy3GacQAKEHy0NzUsRCetGfWlK801xgAikUVr/mB/pXIS/fNdjecwt9K46f/WGqRD3NvQx+6H1rfGRWDoP+rx710DcEfSl1GhCfl4pop2M8U0gjrVAFTQKSCT0qLpU0LYXB6UhjnUYzUdSMQRTDgUCF7UgGWBzQelPX7tOO4uhk6vzDJ67TXIkV2WpL+5c+oNce45NdlPYwnuQOcDmq8g+VvpU8gzxUEn3W+lVLYSLlgcRmryGs6yAMZz14rQjPSuOW50R2JlJyM1aDjABqoCcHFSx54zQNlxCD0NSrVZDzVgVIkKxPQGpo+gzUYAzUo7UDQ7GSDUqLnpUIb0qWM8g0MY8/LkUAU7GV5FBBC5pAmNY4FIcMKbK3y4J570Rnge9NMB64B4p4OeDUZ4br1pwqgJuFUd6tQ/db6VVHK1Zg5z9KQjm9e/1y/SsVyBzW34iH75PpWI4yMVqiOpBK2VPatexO63QHnisdxgcitjTmHkL64rCbNVsWAuG4qaFedxpsfcnrU44FF76DRJboBMDSKP3tLGSDlRkjpVZWn3ghV681cBMgu+L61/3/AOoqvrb7blBx09anvv8Aj9tz/tf4Vn+JNPuru8je2jLKEwfmA5zW0lzJozg7NMIXGd24Y+tLbaoJ7hILCJrmZ2CLtHDMeAB6n6VxOtST20620pMYJIfn07VveEZL+3nivrGQQCAnZOcccYOM/jzW+Ewyq6s9rBUVUfvHtGhfDPUr2a3XWdQWAyMGe2tuSkf8RLdj2HXk/WvSZLTwv4T06dbOytVeGJpWJTzCAo5LMc+o46nIA61xPwitX16E6pc3F26FissryMGnb+6Dn7oGM+/HrV/x9fjUdSttHskCWFvMFnKADf5YEjqP9lT5WfU8dqxxEeWTj2N5WbstEvkVNDvlks9pVxICWlQj5kdiSQR9SccVoechGN2PY8Vj69pct9ps4tJTBqaxn7NcodpDdQCfTIGR6V5LpXxb1mwLW+s2MN20ZKMc+VICODngjP4CuV6swk7u57kpUfdwPpQW45Nebaf8X9BnwLyC9tD3JjDqPxU5/StBviP4PnID6mefWGUD/wBBqbEmt4zux/ZH2KB/39862w29lb7x/BQ1UZtu6CxhG1AAWA7IOg/H+QNZMOt6drmrSahp8m7TdOiaMSupUGRuWPPOAoH51e0UySpJeTAiSc7gp6qvYflj8c1tCOlyorS5k+E5CuiS25DNNpFxLYyADlo1bKMB3wpH5GuhRlcfKQe1c1o8i2PxS1GxY7Y9YtEnTj/lrHkfyVj+Nel2FlaagPJvLeF5oxwXQEkfX26fhnvWU58iJXY898Sab5227t3jS4QbWDttEi+mexHY1h2dxu5wVIOCp4INe42ug6bavvis4Ff+8IwD+dcx498IrfbtV01o4ruNMSxsQqzAdOezdgT14B9a3wuPUJck/h/I2p1OXR7HJ6VFJfymNXMcC/61lOCR/dB7Z9fTp7bOkwrcM2oIqiA/6NZoBgCMHlh/vEDHso9awUsNYTRXtntntIfK3zMzDzH4yQAM4yeOTkZrtLdFgS0t0wEgjCgfQAClUm6snIyk+Z3Mey3nxT4lGCFiSzRD64Vyf1ak1ew2azNCjeWLwfabeTHEc6ja4+jDacd/mq/pZEmrag55Ekaf+Oyzr/7LTvE9o99ZwfZ5PKuIZhJE/YPggA+xJAPsazXdC2OKuLpm3iQFJUYo6f3WHUVlTzFn2RqZJT0UfzPoPc1qahY6ne626R6dNHcTKCwI/d7hwW39CMY9+Oleo+DfD1ho+l/uStzcTcz3DDlz6Y7AdMf1ruqY5UaS5dZM6PapR03OI0GyNjpqQvIJGJLnb91SecL7VeIHpXaXHhvS5mZvssaO3Vk+Qn8Rg1Su9F0/T4fMMAlOcKsjs+49h8xNeX9ZTe2pgctYIl/qcUIYGGKQNKe2Rztz+p/D1rh7W9XW9c1vWo1Pl3d0UiPrFGAin9Cfxrr/AB5qI0LwdqFyMC4ugbeMgYwCCXOO3yg/TivLfDtxqVlo1pDEI9gTdz1+b5j+prV62uc2IlZHfaJc/Y9ctHJxHMDbvzxzyp/MY/4FXSa5ZpfWcsLcNg7T6cV5a93qMvJ2q6kMhB6MDkH8CBXp+nagmpaZbXsfAlXJHoehH4EEVcVoaYad1bsdV4K1Fr/w9bNMc3MOYJvXevH6jB/Gt3dXlkevv4W1d2+zmayvsOyq2CjrwSO3IxwfSvQtK1W01SyW6s5Q8R69ip7gjsa4alKUNbaHQ49S9JKkaM8jKiKMlmOAK8jmtptR1m7TTl+1b7iQh4zlMFiclugHNUvGPiibXLySKFyunRtiNB/Hj+I+ue1Tw3+pR/CrWJNJuZLe7sJfNjePrs4Zh+rV3U6M8PT9p1f4GyTpR5jqPFegrZ+EjJFhpLSD96w4yQwcNj/eBH0b2rkI3EkaSL91gGFZfgL4l3uuwXfhzxFKjzXtvJDa3YAQ+YVO1WxxycYI7/WsOyvLi4jdbK6JjibYQeCD16fjWMYyvabPPxEuaPMdoGpK5MtqJ/5eD/30aQ/2gf8Al4P/AH0arlXc4+Z9jr6K40/bs8zn/vo00C9z/rz/AN9Gjlj3C77HZ5FPDe9cWFvf+fg/99GnBb4dLk/99Gjlj3C77HYseRTWYKMmuSVr8H/j5JH+8aHN66kNIhHvmjlXcLvsdM8yN3GPWoJJ0A/1g/OuW+y3pPEsf5n/AAo+yXn9+LP1P+FFl3DU37m6jVNqyLvPYGm2t4VePzDwWwK52TT7l2BZ03D0J/wqWW1unubdxIgji7ZOTTXLbcTudsHJ70jyIrYLCsi41KX7OFhjUORgsxrM8y5ZjllzUJLqyrs6mK6hPAcZzipTIh4DA49DXH7phkZU0ySKRvuuVPsaajHuLmZ2O9QfvD86Xep6EfnXEG2uDj97x6ZNKLecdJcfnT5V3DmfY7fd6Um6uLEdyOBOwH1NDfbFA/0h/wAzRyruHM+x2eSSPSjNcb5l6oGLhvzNOW4vl/5b5+pNKy7hd9jr2II61Hv2jrXMLd3A++3PsTTWu5O+T+NLlXcd2dSZkHGR+dJ9oX+8K5TzpTyB+tOWWTuKLLuO7OmMuW6gD60qSqOrj865pppQPlA/E1Xc3UnVlA9s0cse4XfY7AOjD5XQ/jTWfB6iuWR2RAOPwpwuJOgz+dFo9wV+x04Yk8c1IOnNc1Hd3Ef3SR+NMuLm9mODKVX0FKy7g79jqVIP8QH40jsFU5YD8a5dZJBgZJx3oklkZuc07LuGp0YlQEfOv50k08YXO9fzrnCz56ZoYs3aj3e4am358f8Az0X86X7XCg5lU/Q1glGPUA0gDLyFFP3e4veN9byFv4qlE0e3O4Yrmt7f3agZZixIkI+lHu9w97sdQHEj53DH1qcsD/EK5NWuV6TH8RT/AD7oD/WD/vmh27j1OrDjHWkLZ71yy3lyOpVvwqX7bLjoKnQZ0eacB6Cua+2XIwUYL+FH228bjzB+VGgHRuQp5OD703zB/eFcy7XTn5pyPwqKRJiRmUn2ximuXuLXsdWHUnhgfxoaSNB8zD865ExOjY3mkZHxksT+FHuLqO0ux1q3MI6yL+dMlvYx9xlY+ma5QB843daesTE8sfyovDuK0ux0sF+XkxJ5aJ6lhkU+W6t93ytvx/tcH8K5sQN/e/Snrbt3c/lT93uHvHRC7LcIox7Uee/UViLEwH+sP5UM9wh2rO2PpmloGpb1PVFgKow3MecelaWn3kcVjFcTkKpXPNcnPaNPIXlmYt6kVLNHJLDHG8jFI12qMVUpRaSJUZXubra1bbmw3HtTV1y27lse4rnhZEDO4/lTTbZ4LN+AqPdLszpo9dsmYAFsn8KsPqtvkAMMeua5CO2/hUnnvilew2n/AFjU/dDU6ttStjjazN64pH1OLqqv+NcxFaMGyJGH0q1HE6nO9j9aPdDU3f7UjI+41NOpKcYRsVlBnHQD8qduf2/Kl7o7M1RfA4wh5pfth6hCD9ayd70CSQdKLoLMvS3TlidoxQl446qKoNI560gd6LxQWbNMXjZ+6KQXjD+EVm+ZIKaZ5AOAPyo5ojUWav29ycbeKnS6X+7WKJ5MdBn6U03coPyhfyoTiKzN1rpB61Gb1PQ1jG6mI6L+VRmaZgQcKPYUaBqbpu0+hp0NzE+QWIrmmjkfrLL+BxQLQkDM03/fVLQNTqPPj3fe4o8+LPDiuUlsRjLTTH/gVRnTVIB3y/8AfVP3RanX+fGRxIn5inCSMn/WR/8AfQrjxpsY6vJ/31SNpyAjDyf99U/dDU7UFF5Lp+dNFzGejg1yC2hQjDygH/aqby3TgSSgezUvdHZnWJKh/iX86Xzoh1ljH/AhXKAPjG9se9LFEXJ3MxpaBZnTm6gU4M0f/fVC3luTjzo/++hXOG2XHO786RrFD/e/OnoGp0xuoB1ni/76pPttt/z8Rf8AfVcyLCP/AG/zoNlHjjd+dP3RanS/b7Yf8t4/++qQ6ha9fPT865r7JH0G786cLKL0b86V4jszov7StB/y3T86T+1LP/nstYAsYvRvzo+wReh/Oq90Wpv/ANq2n/PZacuq2n/PZa5/7BF6H86PsEfofzo90NTozqVq2AJ0/OkfUIApIcH6Vz/2GPIGGz9aGsY+uG/M0vdDU021m3PVvwqKTVoT0BrLOmQ56N/30aX+zYQOjf8AfRougsya71iLiMAjPU0+1v0hu4Iy3zSHOPQVT/s6IsPlJ+pNK1iguFlCnevQ5NVzK1hNO52bOI0LScKKoPqEQZtvTtWNcST3ChZZXKjsDj+VRfZ+3P51nFJblNs201NAvzrx7Uh1m0H3mYH0xWL5G31/OmmBX61WgtTaOtWgOAzH6ClGsWh/jYfhWC1mg5Uc9+aQ2q+n60XiFmdENVsz/wAtsfhR/alof+Ww/Kuc+zL6H86YbdR2P50e6Gp1C39r/wA9lp32637SA/SuTNvnsakS3IwQSPxo0CzOme8hbo9RG/iTPJNYgWQD71Iyue/FToM2jqMfqaQ3yMOpH0rF2MBnk03c/bNO6HY7Sb/j3YVwniRcTKa7yQDyWFcN4lH7xa3icjMa1OJ0PuK9EsDmBfpXm8JxKp969F0o5tkPtTmNGgg496D1pACCD2pWrJjQYpBGCe9LT145oC40Rc9TTgMUpJoWmIU+1JSnpS0ARNzwajDBTg1JIuOR3qFyM4poZIDmlHBqNMdBTuc4NAiwpG2j3FRR9acGB6HmgRJketMHDHmmFc9Sc0DcCM0ASmkNLTaACkIzR3NHQ0AJSGpF5ODTWXBNAWG4o6UtI3SgBuc0UlANUUBpcUCl2k0AMbrRzSuMHpRQAUU7+Gm0kAUUUDrTAXHFJT+MUijjNSAKBing4phODTqAEcggcc0mKQ0UWGOU8Y70hpQMc0p6VLERnp70x+RinydaZ70FIrXX+rIPpXIT/wCsNdhdj5D9K4+cYlb61USJbmzoJ+Q/Wukbt9K5nQOjfWumbov0o6jQdOajY5NPY4WmUAgqRPu1GafHylAmOJxRt3Ubc09OBSHYaE4qVR8hFNPFPj5Q01uBl6l/qmHsa449Wrsb4ZVh7GuOY/M31rsp7HNPchfqarSD5W+hqcnLEVE/O76GqewImsfunnsKvJxWfZH92avxHKiuSW50R2LCip4wahSrEeccUiiSMc1bZMAYqtGCWqyWIAqSNgHWpB0qEsMcc1KOlBQ7aUXJHFKjj8KmHMdMCA9qVxIshwyde1JnIA9KYowMChmA6mgqxE675DTTEw+4351JCVZ2p2BmgRBJ5hYA9cdamik+Ubuveo5T8wFNKqfrQK5YS5TJBq1bTpu64rOSNQO9T26L5gz1oBMyfEkgFwmOmKxSeuOta/iMDz0z6Viu23oM1uTYZMePetLTT+4U1kvuIO4Vq6Z/qFzXPPU1jsayjBGKkFQk5UEU7dtXNCQ0x5kKOMdqkIJfKjg81VT94xIq80qw2atjcwOMCrj2JbMq/P8ApcH+9Wk3esu+ObmE/wC1WoeSa64bs55bI898S2Yurq5UcSCQspPrVLTL66u1tNIytvEZBC2BySW5z+fStnWGWO+uXchUViST6VzullNR1ea6jaSJYipXacEnsc9ulRh8Q6Mn2PXw1ZwXkfRuu+PtN8A+GU0/S1WS9iiCQwjkR9gz/jz6k1a+Hg+3pJdSsswht0tWcHIeZv3k7fizL+VfP+r7fLhRwZDcXCKxY5J5yST36V9NeA9NGleEdOt9m2RohK4IwQW+bH4AgfhWGKxKnFpK12dntedNpWOV1fxhp+iarb6ZfyGObzDFIX42qANrn2bI5+voa84+MPhULMfEmkhZLK4wbkR8hXP8f0bjPv8AWvbfEPhLR9cuvtOpWMVxN5LQbmHIUkHj3HY9smuP8I2LaNfap4Wv5VureNBPbCUAl4HJBBHfBGD9a56dW/qZtdUfNxpAQqs7dFGa9K+Inw2n0qWW/wBCRp9PPzNAOZIR3x3ZffqO/rXN+E9GW4mt7u9G20RzISe4jwxP0zgfifSuhPm2Fud5oWmmx0TTdGxiWQfabz8TnB+p4+imuyU7FCjoKxdFR38y8nUrLOd20/wj+FfwH6k1qM1b26GtraHn3xK1KSx8R6HeWYIuLQli/YknKqf++Dn2Ne16VeR32n2mrWOWWRBMoHUqRyv19vUCvEfiIiy2m853vfRqhx0AXafwyW/OvRPgzFqNn4am0/VrWa2lt5yYklXaTG3zdD/tbqwrxSdjKekj0m61C2t7aOaSTKyY8tV5aQkZAUdzWdumumEt0Aig5jhByF92Pdv0HbPWqVjZpHqN2XLOwIaPcc7Y2/hHoNwbgf4VdvLmO2jBfLMx2oi/edvQCuWNNR1ZNzO19glqiZwZZVUfgdx/RTVDzRnPeqviBZotUtXvJB9oELOYlPyxhiAoHqflbJ7/AJVSkuwkbNn7oJrvox5ocxpGOhfs9sM6MoIMtqkvP+1LM3/s1T3gF1CsW9kBkQ7lPK4cHI/Kq2rIbC9tITkBNOt4+evymQVUa7IRip+YA4+tTThz07oFG6Opsmcs9vcgLdRffA6MOzD2P6dO1W8TQuZbVgJP4lb7sn19D7j9elWr6xS+ijmifyp1G6KUDkZ7H1B7iqEFywm+zXaiK6Aztz8rj1U9x7dR+WeKM1NWkQzUsdShumMRzFcqMtC/3seo7Ee4qhekXl07dYosovuf4j/T86q6zAj2TuMiZf8AVMDghzwMEcg5OMippsWGlsUy/kREjJ5Ygd/c0RpqMriueEfGHWv7X1iXTbd/9Hs2FsMdDIxG8/hwv1U1YWNI1VFA2AYAHasGfwrremW1vfa9bPEZ7+LDllcOzNuJJBOOh69yK6NwOwGTWstTmrPUgz82AMCtzwPcSQSXtjKwMbuZofY4BYe3UY+jVlAEcY+tTWZkjvg0ABm274xjlnTLbfxQyj8a0pPW3cKErSNvxnby3WgztbAm5t8TxgdW28lfxGR+Nc7o2v3NhaXP2JyYb2AoRnH3hww9xmu1jmSWNXjYNG6hlI6EEZFcLqlnZadBHaWySR3MU0hY7sq0R+ZOvT7xHH92uqFr8kldM9OD6PYqbq9N+Gdglz4X1FLtN1teSNHt/vJt2n9cj8K8pcrIrKSfQ4OD+ldboHjvUNKSG3mSK5s4wFCBAjKvsRx+YrXGU5zp8sEaVLyVkedeL/BGteENQkuDDI9hDIGivYugGflyR91un49K6LRreIW9je25UxXltsmAGNs8TFTn3KNEfetv48eIor7w1osNjIWgvZGnJ6cIMbSPXLH8RXA+HdVntNMtYmB8h7tCGI4AIKNg9skoT/uivOSlKF3ujzJxSbR2rADtTGFSE5pD7VnY5bkTJ6UCMDipl56inBaLBciCDGRQU46VLt+b2pcZBFFguRCOl8sYzUoGPpT9gxQBX24OMZpVjAHNSHg07bkUAV2QE8UgjqdhikA56UAQsgxTFUbjVkimlOTQBXKDNLsGalI5FNfcAxx8oosFyMAEZApwQMOacq/IKeFoAiMeBxTWXjpVgrgZpjKSfrQBBtHpSBARUjDGKMHsKBld0GfakWME9KnK5JzQq+lKwhqxjHApdoFPAOcYpSpNAyIqPSjaPSpAhGM08ID2oGVfLVj0p4jAHTFWAnoKdsz1oArhOelKQB/DmpwnFJs4xRYCIoNoIFNCipQDt6UBOKLARbaUKKl2UbaBkPl855pNvPSp9vHNKF4oArFMnpTSmOgq0UqN060WFci2CkaLI6YqVVz1pyrzRYVyuIQKXyhjpUxQ5pBwcGnYCMRj04p2wAHgVJtwc04rQBCAD2poUBicVKUIbgU7bxzSsO5WkBJGAKi2N6VbK80oWpcSrlQJtYHFWERcZxTyKcqqVwDTSsK9yLYN2TTgBmpCvPvTgtMRGRxTJhhwalcY6/SluIiVUj1IoaC5XK5oCcGpRGaeI+KVh3IlTIqEx9SKvKvBpmzrQ0CKsUXzDNPZKnjTvTmWmMrrHgU4riplXg5o2+1AiPbRtqQLmjFAXZDijFTbaTZSsNSIiATRgYqTZzS7KVguRYFMCqT71YKVGyY5HSiwXGbRnmk8sZziptpIHpShc9qEhXIQgPal2e1T7aNtUIgEYpCMHpU22gpkdcUWAhK7gOKYQc5xirGzA5OaaF3t7UWAriM9+lOWE4qx5eDzShaLAV9pLKKeV7gVLj5qUjFFguQ7faiFODUoUU6NeKLDuMY7VyecU5PmXIp+3mgrjpQAzHPPSgL16U4CgLzx1oC40JjtzS49elShcDmjAPFFhDAvPFKo5qTZ6Uu3mgBoXmgr+BqVAB1pr+1AxgGKCM1Ko4pGGO1AEW0Z6UFeKeFNKVoAr7cN0oI9qm28/hTGHIoER7fakXO3mnvHkMQTuxShCFAosFxqjA9aCoxjFSbcGhhxxRYCFhTCKnK96jdeeKB3GAcVERzU+M9M0bDjtRYREiYqQClWMnvg0ojI6mgCM0mKm2etAQ54oGQlT2FCx8VYKUbcUAdG/wBxvpXE+J16H3ruQM5HqK43xWmB+NdEdzkZy0X3hXoejc2kePSvPF4YV6B4ebNnH9KcwRq4JBGacOmDR0p2B3rNjGGnjpSFaAexqRjDMgOAyn8akXpVU2SjlXP4irMaCOMAHOO9UA40o6Uxg3Y0w8H3oAczDoTUEhBPFSsOM4qFhk0IBo9qlVmbr0poHHFPRwpwRTsO5IuR2pAu1s08HNITQSAGTQeG5py8CmyLnkUIQpzkUtIDmjOQaAE5JpTwMmgcUuaABTnFJJQDjvQcmgYgpHxTgKGAIoEQnGOtOA4pXUFfekziqHcUHJp4zTRSZNSK4Mc5po54p1NBGaBjj0ptKabiqQxaKKKACnKeKbS4qQAjvTlcE46Unagn0oAQ9TRRTk6igY/+EU09KVjzSZzSJGE+tVyxDHHSrDrmoioNSWiO5GYj9K426H75vrXayfcrjr8YuH+pq0yJF7Qm2uQe9dUfur9K5PRCfMNdXu+VaXUENc/LTV605xxSL+tWUSIAOtSxAbajALDipUGExUiY7FNPFOzSN0pCGMeKfEfkamdKeD8jU0UZt9/FXHsAHfNdhqHtXHXP33HvXZTOWZWb7zGolGXP0NSvTIx+8FUwQ7TwChzV+Pjp0qjp3Q1fWuSW5vHYnSrEZqslWI6RbLMTbTU+QelVh04qYHCg0ECoOfpUoqNOpqRelSyidG+XFKDUa1Io5pBsSbvSmgZPNKcZHpS5A6UguNwFzjio5TkZXINNaTLkCoPPbzdmw7fU1QmyUe/Wl3rkU3rQFGcUCJxU1v8A6wVBng1PbfeGOtKwIwvEZ5z6HFc+Hw4B710PiAHY5x/FWAVGQa3toJMkYZU1paauLdazTyuK09L4gArFmiNKMfKAaWUYXApqMAKa7kn2pBcRBjoMVO3+oT3aokwTz0qWVD8q+lVHcl7GffcTxf71bAHc1k6gMTx/71arfcwPWuuG7MHsjznxrFPM00durMWmG4D0/wD14pmhWH2G12tgysdz4/lWvq5xqU4x/FUEbAdRXDJu7R6MJe6kamg6QNa8QaTaMCQ1yuQP7vIJ/AEn8K+npQFfC8AdB6V4z8E9NN1r8+osv7qziIUn++/A/Td+leyMckmuSq9bHbBWihK4/wAXeHp59VtNd0g/8TK0UxmInC3EROSh9D3B9a7CkNZptO6LOWgmivYdyEqynDKeGjb0I7GvLtS2X/iS5jgjWO1iYJtVQoKqxPQf3pNxP+7716v4yez0zSrrV3jC3UEeEdSVLMeFDY+8Mnoa8q0GBordXkz5r/O2fU9B+X65r0cK+d83YqnHqbaYRAo7U2STCk9hTC1U9Sl22NyfRDn6Y5rsSLKlva/2j4g0K2Kbv9MFywx0CHfyP616tcOsOp23AHnBo8+pHI/k1eYeEkuCg1UzPafbEMduAAGEWRtOSOC3XHpiuhk0W68601WK7uJrm2kLqs0rMpBBU8dOhPbjr7VyVnzSujnm7u50HiW8ubA209lCJZZGMBDZwoILbjgEkDaeB/eq/wCHLOJj9snulvbwjaZMYCeqqv8ACP19Sax9cvY7vTICnV5oVKnqpMyKR9etS3U39lw3Fy5KvDGXSQcFwBwp/lWDg5qyEjlvFWpC48RXzK3yo/lD/gPB/XP51T09zeX1tbAbvOlSMj2LAH9K5trtnYtIxZ2OWJ7n1rpvhxF9t8V23ORAjzEeuBtH6sK92pSVHDvyR2uPLA2PiNc+T4lVc/8ALrH/AOhPXNrfe9XvixNs8VgZx/o0f82rjxcH1owdJPDpjpwvFH0Posvn6NYy/wB+BG/8dFR61bWdxZt9u2qi8h920qfUHqD7isvwZfq/hDTHwWfyygXPJ2kr+XFJqZkd1LHzJ2OEH8KfQf16/wAq+elSfO49mcb0djGsru6fXYLBpzdWYBm8ySPY424wD/e5IOcDp3rZ1y5jgt4VlZVWWZEyxwMZyf0BrHkMdh4iso+rPaTOW9cSQ5/n+lJqVkPEV5F54/4l8DblRh99h0Y/0H49cY2t0IZqeMdPbW/Bt7aWiiS4TbNCo53MjhwB7nBH414/DLHJGJdw2kZGa7nWtJt9MWaSwi8mUqfKMZIO48D9TXMeOdHbTr6HU7RS+nXhxPznypj/ABH2bn6H61VjGrG6uUVlSQZU/nQ8ptylwgJaBxLhRkkA5I/EZH41TVowOWX86EnXBBkUjpjNC0dznTs7nXWmLd5rZTmNG8yLnP7t8kfgDuA9lFc545UwyWN4o+Rn8iU+mclT+fH41pafMJNJsrkNlrRjay4OcpkAZ/8AHD7DNTa1ZjU9KurMna0iEK391ux/A13Luj1Yu6uit4Q8M2/iDRr07/Iu4p8JKBkEFR8rDuP5VzOu2Fxol+9pfBRIoB3IdykHpz2+hwaseCfEN5pSedE43O/7+2J4yPlIPoeDzVPXdTkWC6vp23ztliT3Y1dOVSM3K/uvU1W3N0MzxXNbaloei2VnN52owNO7wqPuoxyOfX5c496yLLe+nyWO84IynPCt1BH41k2EsqanbzgkyearZzyTmu7v9GtxK11FIYcZZlAyPepjT5k2v6uckU6l5I19Ku/7Q06C5UbS6/Mv91hwR+BzVwLnHPNc34XuxBeXFm5/dz/6RCffgOP5H8TXT7lHQj868+UeV2OGSs7AFwKNpJoDITjzEH1NOaWJBlpY/wDvqgQiqRTse1RtdQD/AJbR/wDfVNW5iY4WVPzpWJJQD34oUkn2pGliC5aaPA5+8KT7VbAD98uPalZjTHBecmngYFRi7tj/AMtBTZbuJQdrBqdmFx7c+lKMVEk0boDvUU7zYwf9Yv507BceR6U3byc0vnREYEi5oDLn7w/OkBHIvIpQuRT3xt6g0i0gGlegpzLg49KfjkZpSvvTAhIJFNI7d6lOAOSB+NRMy55ZfzpgNKGmhOc5p5dP760wyRjneKLBcdsoAxzSiSM/xYoMkeeWFFguKATSlOKQSxD+MUpmj/viiw7iAc8in4GKb50X98U5XjbpIv50rMLgFo20pljH8a0nnRf3xRYdw20m0mjz4h/y0FKLiEc7xSsFwK03bRJdQk/fqM3cGfv07BckxRtqI3kH98U030APL0rBdE+KCOMVA1/aKOZR+FRNqtqv8eT9KFFhdFwDpSFOetUf7Xt+zCj+1Yj05p8r7C5kXdnPFI6HrVQavGP4DSnVosfdanyMLouIuabIo7dRVVdVg/unP1pP7SgLZII/GjlYuZFnPFOHTniqZv4CwOGAoe+t2I4Y4o5WFy2Sc4xQQSKrHUYscKxNNOoL2Q0uVjuWNpD9KfjiqwvlPVSKa+oRr97A+tFmO6LRTNL5YVc5NZ39rwgn5h+VQvrSfwqSfpRyticrGu42jPU01c96xJNbc4xGPxNQHWLnPAQD6VSg2JyR0MhJkQe4qxKf3AGOd1c9ZaiZZkSTO5iBWtNKyoFJ6nPNKUbWQRldlpV4pwTNZ/2rA+/TftvPBNJRZXMjT2YzSbazlvWPc09b0rn5qHBhzIvolLtHeqSXhP8AHT/tfPJFHKwuWtoFGKr/AG1MdBQL2P0o5WF0TlaYwB61Eb5RkBR+dRterx0p8rC6LSodx5+XHApxUVSF/g9sUG+HqKXKw5kXNtBWqQvwOTzSHUhn7g/OjlYcxe28U3ZntVJtS54UUn9on0o5WF0X/LGOaNoHFUP7RPtSf2ifQUcrC6NDFGOKzv7SPoPypG1IjsDRysLo0CKaRxWf/agzyvFNm1ZAnyjB9c0WYF95EU7SeaiNwQuI1Gc9TWX/AGvEScrk+pNKupxE5x+GaLAa6zZHzDHvUgZcZBrFfVUxjyz+dC6qoAxGfzosFzcypHUUkhCqSTWK2qBh/qj+dNGqqBjyz+dFgNiL5gW5wfWpoh1zWVa6rAx2vEwbqDmrP9oxD+E4pNAjQxmm7c1Q/tSMdVOKT+2IB2b8qLMdzQCYPSngAdqzP7Zg7hqQ61AP4GNFmF0aoXcKXYPSso6/bqpPlHP1qufEaY4i/WnYVze4HejA6k1z48QITzGcVJ/wkcA4+zufxpWYXRubSxzTtvPSsNPEAYcRAfXNSprLt/CtFmO5sY4pje9Zzag7qRgD3ojviq4ZQT60+UVzQU+tOIyKzm1DHIjFH9qdigxRYLmgAM0xxmqf9pRg5Kn86R9VtyP4/wABSsO5dA4pccj0qgNUt89X/wC+TTv7VtgRy/8A3zTsxXLrDJNJt4qk+r23o/1xTG1eDHypIfwosFy6fpSMBg+tURqkRP3G/EGl/tJegX9DTsFy4oFOxVEX2TwABUn24YxhaVguWSKcq8VQbUNvYH6CkGpj+7TsFzQK0AVR/tHPRR+RpRf+qihody9jNGKqHUFA4Tn8ajOoj+6fwBpWC52CH5hXJ+L8ZYfjXVp94VzHitQSx9q2jucrOMJwa7rwy2bNPpXAy8NXaeFHJtQD0pz2BHTDrT2BOMYxUcZ+apc1DGhrnA5pq8j2pXBJ9qVRgUgEGV69KcMHpR9aAMdKBi57UhGaWg0CGY4waifg1MTSd+lNAV8kU4AnnFOIHJxTlYgY7VQXHj7v4URjnJpqsB1p5I61IDzTDQGyaQ80CsH0oBx1oppTJzmgCQEUdabgKuKAeKLgAxmnZ5phoU9BQUiTtSUZprE9qBDXPNJ1oYk9ab9KoB4x60BsnFM7UIMsM0CsSqOaNo3dKUYzSjrzUgRlTu46Ud6mYcVGQKBjGxSU7GTQUIqhjaKWigA7UUUUAFKh+YZpBSr1FSA5z6VGh5NS49aY2B2pMBGPWmGnOcKTURYUigk+5XIalxcv9a65smOuS1QYun+tNESJdGJMpArrB9xa5LRji4rrv4Fo6ghSC3TFKY+ODzTRxTx0pjEQkZp4J6ZpF9Kf0+lIAxRRRQwF60YwppKUn5DTW4GffiuPuxi4k+tdlf8A+rrjrw4upQf7xrspnPPcrSDrUcZ/eipn5qBf9YKpiQ+w6mr68GqVh1ary1yz3N4bEq1YiGRUMfWp4uKkokQk8HtUhPAApi9acRmgRIp6VMlV19qsR4xUsCVfenBgTwRUMmTgLSGBiBzikMsFgvWoZZyRtQUbduAxzSKADnFOwmxpG0D1NSeduh2MuT2NNlGcGmlcVRKJEGR7U4DB9qjQcZp5GRigZLjNTWpAdc1XjBAIJzU9uMsRnnBqVuBk67h4XI7mucI4rptUjK2Ls+OvFc0a6FsQNyVX61raWT5FZDHtWrpXMA+tYzNY7GklKwpi1IOlQAsIy4FaswVXPAzWUvyMGHUGtmZFJDA8MM1UQ6HOaocTL/v1qqMisjV/9d/wOteM8iuqG5g9kYeoaI1zeyyiYKGOcYqKTw95UZke5AVRk/LXQv8Afrb8K6P/AG7rkcEi5srXbNcnsf7qfiRz7A1NXkhFyZvQUpyUUdr8ONF/sLwlbRyKVubo/aJQRyMgYH4DH45rpac7bmJpteK3d3PZCkNLSGkB5r8Wb3zrvS9JBGxmNzKPUDIUfQ/NXPQnan15qPxdef2h8Qr4qQyW0YgX2PGf13UhbHGa9nCwtTRvFWiicvxVSG1OtXf2H/l2XD3Tf7OeE+p/lSStLI8Vvar5l3O2yJPU+p9gOSfQV0UekDRzBp9m5lvJlG+Rv4nYnLEegC5+gx2qq0+X3UZVJW0RoRaXFq8FyXIjtoEZIGxwsgB+f/gPT659K2LSQSWkLKMKyKwH1GaWeFLa0t9Ot87AvznvtHr7sfz5pUG2XafuSElfZu4/HqPx9K4731MGZmr6S9wiS2bYkilSZosf60KwOB6Nxx+XpjI+IeqRt4XhWEhvtUqj3AX5j+oA/Gu2ROK8h+J08H/CTPFE+0RRgyLu+USNyxA7ZXZn3H1rqwkOerFP1+40oq80jmN59a9O+CsCtJqlyzAsAkajuByW/wDZa8YvNat4X2Id79ABzXuXwxtJoPCFpdiJ4LuWR5tkgKnrtwQexCj9D2ruzLE050XTg9TorVYuNkYnxI8E+I/FPjjfp6QwaYsCL9pmlwCwzkBRlj19MVwF9Z3+hai2m65GIbtRuU7gVkXOAynuDg+9fTlrOlzbpNHnaw6HqD3B9weKwNT0/T9elL6hZW11AgKRCaMPxnlhkdz09hnvXkYPG1KMu67GMKrgc98LZRJ4ZYDrHMyfyP8A7NXTlQpaRsdOp7CquhaFp+gW01vpUJhgkk80oXLAHAHGScDgcUy6A1O7exUn7LDg3br3zyIgfU9T6L9RVVJqc3NdTOUrtsoHT11fUYNTlLC3hjeKBB/y2DFSWP8As/IMev066oGwYFXCM9gO2AMAD0FVbs+WowVDscKW6DjJJ9gAT+FSRco6hF9p7cw/d/3iP6D/ANC9qzk8ie3msb5A9pONjqe3vU0s13cBY9LCRQL0nnUsW9woIzk5OSR7A1VmEj2i3ksaxL8yyHdwGXIY+w4JB9Kq1ty3BxV2eWa1oI03UmgFw0ls+TbzDGJFBwR/vA8Efj0IqmNOUf8ALV69YOmaZr+jJZTSJDdsX+zyMNskb5OCAeSp7j8fevOp7ee0u57S8Ty7qBtki+/Yj1BHIPpUNs46tPldy14S2QXVxYysWhvIzwTj5gOR+Kk/981sRSMoKyHdJEfLc+pHf+R/GuaEjwSRzxDMkLCQAd8dR+IyPxroL91W/t7qIhre8jC7h03AZU/iuf8AvkV2UJcysdeGneNjyrxlA+neKb0wMY/NIuEKnn5uv/jwNVb3V2v9KWGUYmDgsQOGGD/9auu8c6fHc32nTSEqG3W7MPpuX+TfnXDapZJZXiwpMWJAJJGNuadnG/YU1KF7bMueG7IXmpRlnRUhYOQTy2OQAK7y5AkgkQ9GUg/lXls8UtrcFJMrIp6g/qK6fw3q9zOJIbljKFGQx61tSqJe6yqFRR9xocLabymhUE3MB82Bhxux1XPuMj8q3LOOO7top4ZpDHIuRz+n1qqshRww7U6xlFnqJi6Wt2S8Z7LJ/Ev49R75rnxEGlzIyxNFW5kXPsC/89ZfzpG09G6yzf8AfQ/wq8wxQOlcfMzisjOOlx/89Zv++h/hTf7NjA4ln/76H+FabYoC8UXYWRl/2TFj/Wzf99D/AAqRbFUHE034kf4Vo4AGKjJGcUXYWRXSDb/E5+tSbSOhNS7aAKd2FkRAH1NOMWRyTTwMGn0czCyIDEB3b86ay4Gct+dTvyDioST0IpczCyIfKZj/AKyT/vqmmN1PMsn/AH1U54XJ6CmI28HjGDT5mFkNKt3ll/76ppQn/lpJ/wB9VKVoxRzMLIh8rPV5P++qZ5WG4d8f71Wcc0AYzS5mOyGeX0+eT/vql24H3m/Ol6jilx0ouwsJuYfxGm7mbgsacVOc0oXnPei7CxF5fP3m/OghlGQzfnU2MnikZfWi7CxGjEj7xqQEnuaYBtPsalCAjIouw0ECE/xH86Y8fBwWz/vGplBzg0pWlzMZWSPI+ctn/eNOMCEd/wDvo1MI80uz2ouw0K32aM9Qf++jTTaRf3P1NW9tBWi7DQp/ZIf7n6mj7JD/AHP1NW9tLt4ouwsin9kh/wCef6mkNpDj7n61bIx1pQo9aOZhZFH7ND/czUqW0Q6IKn24NOPBp8zCyK5gj7qKb9njB+4KsHmkxRdhZEJt4j1QGk+yw/8APMVZVeBQV4pXYWRWFvFj7gpfs8f9wVYC8UhPXFF2BFHBHu+6OtZn2hzM6qxABIHFbMI3PiuZvLl0uXMZCNvIOVyK5sVKSS5WcmKbSVi7JcskeXlx6k1U8zzoy6scE8HNREeYuXIc9ziljREjfau0k9c1ye0n3ZxOcrbi24IfErkg9KmRMbgTnB45qq0bOD1wDTYk8rftY5Kn8KPaT7i5pPqOu5xEy7eR0OKfBKkmMOM+hNVhCHUA5x61c0iCFEkeVSZf4D2xj+dDqyS3ZTlZbkhYwMHG8EdCOOaU3U8nLSOT7tVaRnM2yXdlv1qWMDz44u7sFH4nFClJ9Rcz6M0Lrck7rkjBxjNQl2/vH86nvTvu5mHILk/rVc166PSTE3v/AH2/OmPJID99vzp2Kjcc0DuTWbu93CpdsFxnntmttwCeBWNpaF76L2Oa3MZz61D3NI7EBTDbsk+1OAGeRUmADyKFxmlqUNKr/dFJsBHQflU22mgHdwOKYEDpgHGKQLxkjmrDAZ54pu32oAiCj0FGwegqULS7aQEOwegpUQY6CpdtKF+XNADCgx0H5UwoPQVJz+FLgYoAh2D0H5Uvlj0H5VMi+1KVwOlAFcIvoPypRGvcD8qmCcUFeaAIPKTsq/lS+Wo6Kv5VKq807bQMh2D+6Pyo2D0FTbaNhxxQIh2+1G0Z6VMEpoQ56UWC4gjX05p4XNKAR1pR1yKAG7R6Uu0elSouRSlOelMCKlApzLSDoKAEIwOlNIJFSHJ+lOAGOlKwyPbwOKQipGqJTlqdhBijbUm2jbQAxV5p+BRilxQBG/HFRuMnGaldMiowlIEN2L0IzTAoBp0iMxwpxjn607FMCMjPajAp+KMelDGRMoI4FOVQmc1IVwKTBz04pCG8UhHFSBaNnHNAyErnpTivFSBcUYP4UwItvGaYoIbHarO3I4qNlz9RQITFPUA06Pkc0uznIoC4xl9KjVAhOO9WeCOKRQCelKw7nar1Fc54lUsJK6NeorA8QrlZPpXRHc5WefufnNdp4SObbB61x7oA/wCNdX4Sb5GHvVT2BHVpT8cUxR3pwzWbLG78tinA0zaN2RTqQDxS801c9qdtNIQhIzSFhkUMmOaTAxVCGs+egp0XIIJprISeMU+KPbyTQAjg88VH2qwagb71FwEODTlORzSUtAXHgUE00UH71AhwNL2pKa5+U0ALnPBpVHvUO70qVDTAc+MZqPJFPfJHFR9OtJIaJFbP1oLYNR59KU5/GnYQo5zTSMU6jGaYxB1oYmgHB96fjNSA0cHNOBJ60ho5INAbji/HvTQc000J1oAkFOHNMqRGycUARleabip3A455ppXjjrQMiPFJSnJNAHrwKoA7UsfU0hx2pV461ICyHsDRSEAZph9jSEKw7HpUBU1K1NpFIikBCd65TVuLp8+tddN9w/SuR1g4umqkSx+iYN1g12HSMVxOkOVvF+tdqDmMGk9wQlSoCRUYGTxU68CgGGNtBzilAzSNTGJn86KACW9qUrQAUoGUajAp0Z4NCAztQPy49K47UQftkgHrXXXxyzVy9+oF5IfWuymc8tyhnHB61H/GKe6/vKj/AIhVsSJLL77fU1oLVCyx5rfU1fXrXJPc2hsTp1qxHVdKnSpKJScYpc1GzAEDvTWZhkYxnvQBMkgY4HarKc4x0qpEuFFWU4ABpWAljyJuOlSTSbQaRTgcUwnJpWARCWbJ6U7vSp1pxTv3p7EvuLjIpoXninrxTgOaZKdiHGBxSjpUki8ZFMAqSrjlqe2/1oqEVJCcSLR1GU/EJxYr6Fq5Zhzmup8RnNins1cuxwK6CbEEn3q1dGz5B571k4JJJ61r6N/qDn1rCa1NU9DSAxUijimCpVzjnpSJGykIBuYDJAH1Na8OWgg+mK47xDe+XqGlwKcb5gx/Dj+v6V19gd0EYPUUR3KaOf1oYnP+/WtDyay9dH79/wDfrViIAJPA611R3MWtEI6yPKkcEZlnkYJHGOrMegr2Dwvoy6Do6WpYSXMh824lA+85/oOAPpXNfDfQwf8AifXiHLArZow6L0Mn1PQe31rujya83FV/aS5Vsj1cNR9lHXdhRRRXKdIVX1G6Sx066u5jiOCNnb6AZ/pViuA+MGrG30OHS4GxNeOGkx1WMMB+rY/I1UI8zSQHmXh93udRv7qYlpHbe59+T/Wu+8I6Fa6lplxdX8QkErmOE5IZFUkEg9QS2fwUVw/heCSX7VFAoaeacRRr7kAc+3GT7CvY7G3i03TbezUlo4UCbiOW9Sfr1r1Jy5YKKHKd4o5Dwzpq6J4pmt9TYyTzrtsrkj5XjHLJjs/c+oHFdHJJZxarLqFy6IY1+zozH7x6kAdzxj14aqmrWA1eL7HFMqujrPFNtyYWUggj37fnVzQbGWFTNeOk1xyquqkADPJAOcZ6n1/AVg7t3Zk3cj0+/gu5C0jGO4mY7YpVKNtHQAMAenJ9yav3ELNCwjIEnDIT0DDkfh2PsTUeqtumsLfbu8ycM3+yEUtn/voKPxq4eRQSyK2mE8KyAFSeCp6qRwQfoay73wtoN9dyXN7pFlPPIcvJJECzfU1eP+j3gbH7u4OG9nA4P4gY+oHrVugRyvhXRdL8PapdafbafbQyE+dBOIxvkjP8JbrlTkfQZrr+1Y/iC2MlrHdQnbcWr71b0U8H8OhPsCO9aNjci6tY5lG3cPmU9VI4I/A1LKKt1PLazvaw7gL84Rl/5Zt/Gfb5eR7g+taCKqIqIoVVGAB0A9KRlDFSQCVOR7dv607NJJILmbr9+1hYs0KeZdSHy4I/7znpUum2Y0/T4bUOZHXLyynrLIeWY/U/pis+0I1DxAbluYbRCYx7k4B/Ehj/AMAWtS5njtreSedwkUalmY9gKpCZXtp52gMsgjYb2G1flK4YjHJwTx7ViK76xrl00gdbeyb7OsJ43MQrlm9RyuB7Z9KLLTJb2aS4uLm7gjd2eK2ilKLGGOTux95iTk5yBnA9S2K0m8OapLeXEzTaXdbRPI4+aFwAodscFSAATxjAPqate7ubwh7N3kdLBa/L0rn7kRyaxNpUmG8x1uSucELgZ/DKgH13GpfiH4n/AOEY8Pi7iUyMXVQqtjdn37f/AFqz/Ad5F4lvW8RYKq9qsOG6qwdtw/lT5Xy8zJdTmlqb93YR3UJjlQMp9e3vXFeM9Knvdjf63U4AfKlI5uIuvlse7Dkg9+nvXayeJdIOqjTI7mFrzGfLDjd+VZ3iKOa5vEgsojK6KWkCsFIBBA5PfPI+ntSaa0kOVSNSLTPFL+RiUKEqrKG9DmrOm3k02my2+SXiIaME8ZByCPxyPocVLr9rcQXVwL0FZ0chgwwTnnd9DVfT5IbOS1lkkXcr5kA7KSP5YB/CtsPNR0ZnBqDXmWvEC/2j4fklt/mkRVuIuOcr82P0x+NeZ6yxkvmm/hkAZT6rjivV98SXlzDE6vEx81Mcja3JH55/DFcRcadEsk1hcJkwNmJuhMZ5Uj+X4V0zjf5mlWDmlYLi0i1GziMuVk2Ahx1HFM0qw+wCUs4dnI5AxwKtqAiBR0AwKC1Xyq9yuRX5uo8tRtS4ha3kJUNyjjqjDkEe4NRFqjL4oeqsxtq1jf0q8a7tSJgBdQt5cyj+8O49iORVzFc5DceReW14DhXIgn9Cp+6T9Gx+BrqQtebUhySseXVhySsRbaUDFS7aMVFjMiYZPFR+Ud4PUVZyOlOCjAoC5Bt9qMVYKg0zbQBFtpB1xT271AVJbNFiiXFMKjdmgHA681IVyM0AQsmRjtSOhHPAzUxB7UjLnrQBX70VKUpNlADVAA4poGetT7eKQoKdgIsKOAKdt5p23mnBaVgI9uaNlS4o20ARFfQUAHuKmwe1OUYHzUAVWQjqKcgKjBHFWSm4dRioivYk0ABXjpTATjBFTkcAUnlnGR1oAiXA5PSnEDORUqR5XPf0oKD3pARYoCknpgetToNppwQKvtTAqlSKQ8dqsECmlR2NAFfGetK3HQc1IVyKTbxRYCHBoPvU2KCvB4osBXBOTxUgBz0pQvPvU23rSAiUUpUY5p5GKeUyp+lOwEBwBxTME1OEFK0eV4FAEariubuypllDKGG4/wA66YKwrkrhH+3XA3AKZG/nXNil7qOLGLREh8tIl+nT1qqrkuc8YPSjaY2yzA9vwqwyxleQfzrz9jhvYcjrj5j+Heo1UNOzngAYxSbwqkYGexFMDFTk9Dx9KEK3YW5Bh3NF0IzimWt6hj2uu0g0/duOO1EkCM6LgDgnA/Cq06ldLMSWUYDKwJByO9XdNt1n1O0mRiw8xCVPbByaoeWS+0Vs6GFF9H5a7dkTsfchGNVBe8kOK95DGGWJqMipyOaYy17R6RAaY4qZhzTWGRUsZc0BM32ewFajDkkVT8Ox/vZGrSVcsc1m1qaR2INvOe1OHHUDHap1QKdxHFP2A9RxTsUQBc4odCSRk9O1TYA4FKzqg+bv6UAQNGMYI/OmBNvA6VPuDfT3oIAFFhXINvtijB9Kd34qQL+FKwyDZ6fpSgHGO1TbR9KNmaBXISmaQIfWp9hzS7efSgdyILilIqTb6U5QCORTC5DTSuBU4Xml2A0hkA4FOK0/yQOvNTCPigCqFyKXHoKnIwOabtGMCgRFtoK1OFGOlG0elAFfbQq1OU4pFTHWmAxcgjFTY9KTHpTdzZ4oASQZIpu2pMU4LQBFtpQtS4pCMDNAyMxn60giwTTwe9SA5GQKBEJTFJipyMrTCOOKAImwKYr5FPdScDFNaMKOM0MY4DNNxSx5zk1Js54oAiAHeomHJwKslMVG2KAIMU5BUmBSj6UWERMMmjkCpsU0imAwDilxUgXil20WC5HijH5VJt9aNvOKVgIxGOxNDx8deamCgdBSgeoGaAKuAPrUgA25qQpzxxSlcACgCuV59qVVI6VY2DGMZzQoVRt4yaAOqU8isbXgMSfStgdax9cGSRWq3MGcDN/rDXR+Em+ZhXOXIImb61u+E5B57CrlsSjtl6UtNTkCpMVk0WnYYBilp+BSgYoC4KKdmk7UZpiBuRTKcWqNjjFAh4pwpucrxSqeKAHd6ZIvcU40hyaAIG47GlAJ6Urk9KfHwoBoGKq0khpc8+1I5GKBDAeKHGVpwGRSNnHtVDIwuKmXpTaVcg0Ax1ISD2obpimAkA0CEkXkYFKo+UGnqdy0uKBkakMcU/HFIFw3HSpFwRUsRGBlhxUh4FI3HSk6g0ANwWNOK4FCDBpTQMaD7UnQdKdgEcUYxQAlKAc0uKDQAcmnZpFYZoyM0ANZfSmgZqQ00Lzx0oATb70bfzp1OA4oAiI55prcdKew703GRSBMRlzio3ypqVu1Ry9qRSIpOVNcrrIxcNXVkcZrmtcjH2j04qkKRW0UH7YvpXZqP3K1x2mHZcpj1rsk5hFJ7iQik54qXcQvFMUYOaC2MmmA8PS7qiDjFDOAOtBRJvAoL1HnNFDEx5ehX+U0w9KQnEbUIRRumJY1z2o8XDGuguByTXP6lxcPXZAwmZz8nNQsKnI+XNQyVbJQ6z/1n4mtJetZlkf3v41pLXJU3No7E8fWp1PvUCCp0AFSWN584k9KlHTFIV5yKavWgCyMBeanjIccVT3EjHarVuAEz3oAcMjimg809/u8VGM0XETrk5xThn1ojHy5p2akTFFKfakqQjAznNBCVxp6U1RT1G4dKDGwGe1NGiGqCTT4wRIv1pVGOe9SxjLrn1oHYztfQmwJ/wBquUNdl4h4smH+1XGtxWqIY1sCtPRuYmx61mGtTRhhGHvUVC4bGmq8VOvMdRJyMVLG3yc1mUjhPEUnn+K7ZFbiOWKP8Qdx/wDQsfhXpOlIUtssQea8oijln8XiJiMC6Ykj/ZZiT+OP1r1bTXzC4x0NEHqaVElZGPrv+scj+9W74e0w63rFnp2D5T/vLgjtEuM/nwv41xPjy+MUkNlC2JriQA46hc/1/oa9u+F+mm10iTUp1xPegbM/wxD7v58t+I9KderyJpblYajdqT6HZMFUKkahY0AVVAwAB2FJRmivMPSCiiigCO4lSCGSWZwkcalmY9AByTXgfibV21q+utRfhHkRYlP8MYYYH8yfc13Hxs8QjTdJi0q3f/SbobpQOqx54H4n9AfWvNPDoj1HQ7uDOLhE4z1ABPP8q7sCoubT3sEJRbcOti/4TvJrTUYms4hPdG6ZY4u5yhBI5A4BJ54rvIPEU1zbiRBcuDkApaOVJBI64x1B71w2gQyW8PnRDbqerfuoRn/UxNwzf8Cx+CgnvXrunWkNnp8VuigRRIAA3oB3966KqslIlq0U2c3a32t+bPM9mHgEYJiDjzFG75jgZBJHQZ/hrqrJontont3V4WUFGU5BHbBqG2JjtJbnA8yX5lB/JV/l+JNZ8mlXdqZ006cC1uB+8jPDRtjDMhHdu49Tn1rC5BXt7r7Z4mW6Yf6MEe2tj6sCCx+jbTj2QHvXQ1lX9gYtGVbVAs1sBJGo4GV5A+nAH0rRtp0ubaKeI5jkUOp9iM0ITC4hE8Lxk7dw4YfwnqD+BwfwotpDLECw2uCVdfRhwR+dSZqsSIbzP8E/B/3wP6qP/HfemIsOqyIyOAyMCrA9weorK0tns5DHK2VL+U5PZwOG/wCBDH6VrVTnhR7lo5MiO5TaSOMOvII9yM/98UmNGhVXUZGESxRHEszbFI7DufwGfxxRp07ywFJ8faIW8uTHcjv+IIP41WeRjc3t1t3LbIY4x/ebGWx/46PwNIYujxCO2d1GBI5wPRV+UD6cZ/GqPiNvPurCwIykjG4k9CsZXA/76ZD/AMBNbFvEIIIoVORGgQH1wMVh6rFPJq8N5aeW8UULwyeY+0EllI2nByRg5/8ArVcbJ6lUmlNOWxt6bEDjNYfxG8XWvhbTVNxam5Ex8ry/72Rk/hioLDXNQvHaPS7KKXYSrS7yYwR/tEDP4ZqbxH4aPiDSnXxK9mkKjfujDAxkD7wYn69qpW5veKrScndHk3ivxBZeIPAX2ewcg2kiYhkP7yNM8D3AzgH0x3qrpfim48O+AIbDT2xe3LyOW/55ruxn68H+dUBpfh638TW9pa6rJcWLTBJJNuAF/wB7vzjnHvVjxJo1ofEYsPDU0MqFFbDzLjeSflDMcHtxz1rR1EpqnbzIUdLs0fg74X1LU9c/t6VH8mEsY5ZScSSEEE57gZP4/jXsL6Ve2StLFqMj3BYyOGjQJIfQ8ZA7DB49+/icmkeOFkRLu8uLO3GFUvc7IkA9lOAPavafDxe20OCK6vorqQIuZFcHJA5PHr1oqK+txwXvWseYeKJ21XU2vLpMJOoVUPWPHG3PqP55rm7iExHGeR0x3Fd1fWSsLglCYHnkKt6neSf1zXKa3A0HlpkHdllJ6471k4uMrx2EtG4mbZT+RMp6Kmc+ynr+Rwfzp/ieLYsOoRjmD5Jcd4z1/I4P50afbC4dj5gSQAhVz1+vtVy32PC9rIM7V2sj9SvQj8On0IPevQpyU48vVGsJqa5Opgs3p07VGz1GY3tJns5SS0XMbH+OPsfqOhphane4cw8tmmFqaTTC1FyblqHbMktvJ9yVSprqNCuWutNiaX/XpmOX/eXgn8ev41xiyFGDDqK39BuBFqRTP7q7XcP+uij+q/8AoNc9eN1fsc9eN1fsdJimtwM08Kc+1Lx0xXGcZCEY9qkWMjkmpFOOAKU9KYEYXFIV54qZfemkc4oAgZAOtN2gDFTSJnFKY8rmgCqsRLcj6VMqEcGpRgfQU1mDDikUMIA7io3HBwaAmSc9KZISp4pkiYNLilHSnUwGAc0p4pfpSbSRSAZ3qQYNNCgU9B6CmAuKMUp4xijBNIQ1RzUmzNMGQeKkDEUDFCGk2nNG9j0xTlfs1IBhGTxTsU4lc+nvSgDrmgojIO4EHA+lK5XnFIzfNtAJzTQj80Eic01ly2c5p4+XqKXHp0pgM20mKmIyOKZigBmKRhxxUmKMUFEQU5qQLxSgUo6GglsYFx0FOA4pwINJnnilYBoTP1p4Ugc1IBgc96Qigoj2+lOIAFLjtTiuRgimBE/3QK4rVDs1C4X/AGyfzruXVdhHQ44riNVP/EznVlBw3GR7CufF/wANPzOPFbIrA5HJzn86kDMoxj5cd+tJC0aSc4GOmakdlPfJrzmee2QqrSk7cADuam2nhRyTwTS424ZfxoZ9kas3A3dTQg3GS2+1l2nCd6kEgdgCcCoriU+Xjk59KiiQzZKSbWXgjHIpO7RT8y1KF3gLg4HUVp+HxtmuZGx8lu/4ZwP61lQIqAKz/N6nvWxpWFtb9z1xHH+ZJ/8AZa1w6vUiiqWs0hnbmmSe1SMMCoz0r2j0CI0U4jikNAzb8OxExuQO5q8FAFVtCYx2rFecg9atozY+6M1j1NY7CEDGDTWIUBRxSyFm4UgGm7QSCT0FBQ3BJpGABwQfxpzDH3abk9/1pgJj/wDXSMpI609RTthxnFADMelOx6UKQSQetOUHvzQSNxTlFO2ccUqrzyaQDSKQLzQWw+KdzmgAVMml2gfWlVttDfez0FBQmAaOg4pGcKMjFAcEUDFAbrS4NAYdzRkGgApu3mnnjrQeB0oCwhGBShc0q5zS+wpAIFwaMUA596GwKAIj94jODS8VG4JYk1KozVCAAUYpwXnrSikMaBk4FDISRT8UAHPBpXARY1FOIoI29aM0wDbimY61IWGOopBjHJFAiAZYkdKTZu4PAqZSu7g0MwLcEUDsNEa46UyR9h6A052IYYIxUbEN1xQhCM59AKj4JJFOlYY6j86iQqP4hVASAUUm9fUfnSeYn94fnQA4mmde1Hmxjqw/OjzY+zr+dAD0z+FPFRLJGT98fnT96NwGX86AHZpBjPNIHTpuH50F4z/ED+NAEy7aU7R3FQeYn99fzpQ8f99T+NIVybaDyDSFCOvSoxIi9HApfOXrvWkMeB7Uh9cdKBMhGA4/CmMUDbmf8KYHU1l6vksfpWqOSKzdVGWP0rRGB59fri5kHvWl4W4uyPUVR1RcXT/Wrfhttt8Kt7Erc76NSAMcipQc0yHlBUgFZlC0UZ5FHegBe1NYZxg07FLQIi701weMVKRTSOcmgYkQPSpBwaYPl6c04yADmhiHGmFsA00yFlIXrTI0Y5yeaABWJPNI781KFUDFMCqTgU7gKu4ikPXGKl7UUgGr0oY460P8o4o3gjkUDGjpS/WlyAuO9RsTmqAkLDFMAHPNMA59KcOTQIlHAwKOaT6GgGgBaAcd6Q8qaiA3VIEzHNLwRUQOMg08c0DHjAoPNJg+lLjnmmgIwCBx0p3ann7pxTaTASkalI9KaaAEXPenYNJmnK3FAD1HHNOPC01TxTiMigBinJORTyOKaBilycUAJgUhFKuec0GhgREc1E64qc01xngCpGiuWxxiue1zmUH2roivODWDrq4kX6U0KRm2JxcJz3rs7b5oB9K42yx9oT612dqQYBihgg74oNLtP4UY4pjGNioZZFiIyM56UTOxcoMAetNCZXkkmmgJY5Q4yOPrQsm4gVWwQ2eRxTkB3rjrTsBdxSSnEZpaZN/q6SEU7jkH6Vz+pjM5+ldBP0rl9Yu4kmYk5I4wK6YGEtSq5wvNZ89wobYDlicVBeXrSHA+UegpllZzTyK4G2MHO4/0olPoiox7l23kKXEYIOGYKD68VtCqIWNGjUDLZzk1dQ5rCafUuNuhYSp0qvHVhOgpFEqjNNKbT9acpqTaWU4xn0oAjjXLAetXSQFAXoKqxL8wB4OasHoRikwsKTx0pFHpTQSDTw1MEKC+3npTlY96bu7dqcuKS8xNXDGW61aBAGAtQ4AGe9OjJI5oYJWJc0ZOKbQDk0yhwp0Z5FNFOTqKSGVfEYxbN/vZrkpBnkYrsPEa/wCidfQ1yB4Na9DNkW3nmtLSD8jfWqDVf0nGG+tYzNImslSKuDxUadalU4yScAdSakaOC0RfM8b3JP8ABJO3/j+P616JDcxWlpLLO6xxJyzHoK8+8F4n127nI5aMuP8AgTZra8c3f2bw465w0kigfh83/sv60RdtTWSvJIzvCdk/jf4mou1xbKS75/gjXA/A4/U19UxoscaxoAqKAAB0Arx39nLw5NY6Jc67dFQdQASFNvIjUnLE+57ewPevY81x1Jc0rnoQVopIWiiisygqrq2pW2jaXcajfNtghGcd2bso9yatou5sfma8P+LXiX+3ZZLazkP9mWTbUKniV84LfTsPx9adm02uhnVqKnFyZwfibU7rxNr899Pu86d8IgB47BR+GBXo2rfDttMtll026kLeSqTIxwH4G7kDgHn1xmuH8D24uvFmkRADAuUc8dlO4/yr6Gu5ERgZGCg8c1eE1Tn1OLCSdRyqy3PMvAttLe+I7i5u49j2yABNvClsgbfYKpAx2Ir0G/O+OO3HWdtp/wB3q36DH4iue1uyl0q7XV9KClFz5sXbaeuD/dJ/I/N6g6drqFteTC+EqraJArB3O0KGG5s+nGyu6pUdR3Z3zm5u7NSf55oYu2d5Hsv/ANcj8qs1iw6zaG6mZvtIHCqxtZdu0DOc7cdSa0bS8trxSbW4imA67HBx9fSsiCxtDKQehrF0T/R3u7BjzbyFkGf4HyR+u4fhW2Kx9RX7PrdncjO2YNbv6eqk/iMf8CpoDRqG5jMsTKuA/BUn+8OR+tPzTHPGRVEj4JRNCki/ddQwqK9O2EyDrERIMdeOSB9RkfjVXRj5dv5H/PMKwz3DAHP57h+FXnbGDjOKLDK+oTLYSi+OTCybJce2Sp/mP+BD0oWIw2FtC+PNeRWcjoWzvb88Gn2CJcaasMq71jJiO7uUbGf/AB3NLfN/pNqvpvf8ht/9mqBlhelcxdPPPex6GrKkMEKvcyxnDOhyFQf3SdrZ9hx146VTxXNXM5h8VysygQTxR23mDtKu5wp+qvx/u+9aRSuVSSc0mdNpkMcMaRwoqRoMKqjAA+leU/Ha/wBWuZrXTLKG4azYF5PKUncQcBTj8/xHpXqllKFIJPSpbmzs7iQTTJl/r1pwkoSbkOrGXNoeHfDnwLPZNBrmtw7AZAlrbuOS3J3sPYA4Hr9Kyfih4Pu9Gv3vLZGaykYs4Uf6pjz+R/z2r2nxNdk3+nxW4XyrZ1lkA6Ku4A/+O766O6tbe9hMdwgPGDVKrrd7E2Z5/wDBnxJNrvh77FqgE01sTEkr8l1ABGfU4P6Vp+I/DVqonudOsrf7QVO6MjaHPqGHKn3H45rZ0rQLXSbgyWuyNMlgiIFGTwScVLfTAbiTgDrROzl7ppSg5aMyPsNpf6DCtlEYoiu5VPVTnkH3znPvXD+KfC9xc6bJ5Sk3MGZYsdTgfMv4j9RXd+FyzaW0hBCvPKyj23kfqQT+NaUiBlPY9QfQ0oycHoZtWZ4bp62N3oqXNvFs1GwJkmQMT58R/iA/vITyP7vPY1INMvdXD3ejW7zTW2C+znIOcAjr2P61T8eWE/hrxQ01gxhhnzPAR0XJ+ZPQ4ORj0IrqfhJfQi9naAFVnTBQEkKeu0/7pU4OejjPNb1fdaqQ2YpR95TRxniHTp3iRpLeW2vYvnSOVCp9157Hpn6VzgkWSMSJnB7HqD6Gvp3U7G01OH7PfwpMpyRu6j3B6ivAviB4Vm8M6tJNCzSabcNkOeqt7/59/XAq/M9UaSlzanOFqaWqMtTS1auRDY8tVu0mcQ7o+ZoGEqD1I5x+IyPxrOLVLZzeXcKc9eKh66Mh66HosF9FPDHIhBR1DA57EVJ56div51yWjiQpLbowAib5Rj+E8j+o/CtFLS5llSOMlnchVVVySa4Xo7HG4tOxutcxAclB260w3Uan7y/nWzfeGhpPg28d2D3sgj8yT+6N6/KPb+f5Vwxs5D/y1/Sm1y2HOm4Wubxvo1PVcfWm/wBoR9yh/GsVrBz/AMtj+VN/s9v+ex/KhMixt/2ihPLIB9aa2pwqMb1rG/s9gP8AXH8qiawJOPOP5UNoEmbn9qQbT8y1GdTt+zCsf+zj/wA9j+VL/Zp/56n8qVx2NN9XhX0IqBtWiLcYqk2mZGPMP5VH/ZB6+cfyp8yFY0l1aM91zS/2qnYrWYNLIP8ArWz9Kf8A2WP+erUuYdi+dVX/AGaP7UH95Pzqg2mZH+sakGlesrUcwWND+0x/eSnLqgA5ZKoDSh/z1enf2Uv/AD0ajmCxeGrIDyVNOXVU9VrO/skZ/wBY9H9mAH/WPRzBY0Rqi9yuaX+01PdfyrPOmjHEjUHT8Lne1HMhWNIamDnlfyoOqKO61liy772pos8k/O1HMh8rNb+0xjqPypyampxlgPwrI+yEdWaren6YJVZ5GfaThQD2oUkJpo0DqURGA+D9KjN+p/jpn2C2H8Z/OlWwtugYn8aYhDfKf46QX6D+OhrC3zwT+dJ9gtxyWx+NCYx39oJ/fNL9vj/vGg6ZagD94QaadNtv+ep/WncQ8XsZ/iNPS6Qn75AqJbC2H8Z/WnC0twcBmoGTfaFzgMfyp/nrt++fyqEQQD/lofyNKY4QP9YfypAP89R/Ec/SnCbP/wCqoQkOfvt+VSxrEWwGJouArXITk54qzbStMC23Cep71VhtFup8KGEa9TnrWk6hMRJ0WpuNDMClxS7aOKYyGXpXG6uo/tWbnpg4/AV20g4NcfrkONYIA5kC9u+MD+VY4r+F8zjxavExgC8p/WpFI7HgHpUiqDuVeD1NSzQBbVG8vBkPEnbjrXm3WxwrUWNcDmortI5CVPRe49akVy0ZQnJ6bhUTjbtULjPJpIXW4lvC2OWJUdN1TrvTI2KAe6imqdi5IJoM+5gMEegxTuLVsSTK5bBrT0jeNHcv1kuCT9FUY/8AQjWa8hkG0DAHY9TW7FGY9OtY8c7Cx/FiR+mK6sHG87nRh/iIsZWo2qw3CenFVj94CvUOwQ4Apn3sHtT3HQUgXmkM29NytrxxwKuL2qKzjAt8H2qwoJFZI1EwD1NNYEghevvT2XFA6c8UFGVNeSRSbJUx7inrdblqW/jWQZxn8KqxmLywzRjPTgUPQFqTrP7kfjSi4I5JP51CWjHSOkLL/cFK40ib7Rnuactx/tGoF2f3KcNn9ykpA0TicHufzoMwA6mmL5eOUpQIyuTHVJk2EM6k8E/nT1mB/wD10wJGTxGRT1VM/cobBDvOHGf50ecpH/16kCxYyY/1qMiMn7nFIZG8wwf8aaJ1A54/GpgiZ/1dPMUbxsFQA4qkwIPOjIzuH50G4Qdx+dVBCoYg0NbKT3FTcdiw10OxH50hu+MZH51GtupbGBUhtVxwKLsCBr5w33hj60n25x0K/nUxtlxyoppt0bjaKNQIft7buqgfWnG+Pfbj60G3UHO2nGBcfdFF2Aw3xb0/OlF+wPBH50GAAAbacIBj7tF2OyA356krQL/HcUhhX0oEI54pXYWQv9p49Kb/AGtjnav1zUyQqB0pjxLjoKNQIzrBxwqmojqz54FThUU9qcuznGDRqLQotqkhPCj8qYdTlJ5X9DWiSM8IT+FKoLDiNvyp3YWRmNqk4HCgfhUf9qXGc/8AstakiSD/AJYtj1xTAGA5ib8qWozMOpXLf/s01r65YdT/AN81rAqPvKR+FOGwjtRdhZHPPe3OcMWP/AaFvJ88Bv8Avmuh2p6CmFFJ4Ap3YrGL9rnPZv8Avmj7TPj7p/75rcCgDoKNoPUCpux2RhC7m/uH/vk077VP/wA8z/3ya3BGvoKcEX0FO7Awhc3B6Rt/3yaT7Vc5+43/AHzW/sHoKNg9BRqGhhLd3H91v++ad9puP7rf981tMgAyQKNgI6U9RaGMLifHKt/3zSi6mz90/lWu8S7TwKiMQwOKLsLIzDdTk9D+VOFzMezflWgsXqKGhyQqjk0rsdkU7ee6kGY1cgcZ21P5l6equfwrW2pawIijLY6VH5shHRfyqkSV5fFtyT+7VFHuKgPilmyJyGJHBArTk8Faf5G+Oe8Yjr8y/wCFVT4OsShIlu/zX/Ctrow1Odn1FJ5WaQ7Tmr2i3UaXSuGBHtUl54YtYm/1lx+LD/Cl03SLSCZWMk+fTcMfyq76COkTxNAnylWyPapB4nt/RvyqC08M2cymRpLnJ/2l/wAKnPhS0z8ss+P94f4VndDsxy+JrXvu/KnjxLaE9WH1FRf8Ipa/89J/++h/hTx4Sse8tz/30v8AhSugsyYeIbY9GFH9vQHpUY8JWP8Az1uf++l/wp48LWSnImuT/wACX/Ci6FZkg12EjgEn0FKNVDcheKY/h21C4WScH/eH+FC+HbaMg+dck+7j/CnoFmOOroo5FV5tdh6AEmkn0OGQFWecD1DD/Cqx8KWznPm3Q/4GP8KLoLMlOuAcKmfxqNtdl6qAKkTwpaKMma5/77H+FSxeGbLcN0lxj/fH+FF4hZmfLrlzg4YD8BUI1e7/AOen6Ct4eG7It96cj/eH+FP/AOEcsscGb/vof4U7xFZmPBrFwo+f5quf25txuWrLeG7J+C047cP/APWqKbw5aIQQZiPd6V4sdmM/t6M/eWnjxBaHj5s/SmNoNoR0k/76pq+H7fJ+WT/vqjQdmTtrtkOTLg+lRSeI7BesvP0qGXwzaSNkpLn/AH6jPhOzP/LOX/vs0XQEreJrAf8ALRj9FoHijTwOXf8A75qD/hFbIH/Vyf8AfZpR4VsP+ecv/fZougJj4qsegL/lTx4hhcDy1JqFfC9h18uTP++amTwpYEAhJufRzRdBYDrx/hjGPrR/b57xj86kHhSxH8E3/fw0q+GrRT8qSf8AfZouhWZSuNc+YER5FTwa+qRjCZ/GrP8Awj9qQR5cmP8AeNIvhmzYZZH/AO+zRdDs0Qv4jUHlMfjUX/CTRjqAPxq3/wAItYnqkn/fZqJ/COnE/wCqk/7+GldBZjB4ptwMEH8xTT4rtscI+fwqT/hDtNyMxv8A9/DTj4O0wHIjfH/XQ07xCzK7eKoB/A5/KoZPF1uoz5cn6f41e/4Q/TcZ8p/+/jVE3g/Tuf3DH/to3+NF0Gpmv4zj52xN7Zqt/wAJhOWJES4+tbH/AAh+nHpbt/38b/GnDwnpw4Ns3/fxv8aLxDUyl8YTY/1Sn8af/wAJlN/zwT860/8AhFtOX/l2b/v43+NKfDOmn/l2P/fxv8aLxCzMv/hMpe8K/nUieMCcAxAfjV7/AIRfTCcNbn/v43+NPHhXSf8An1P/AH8f/Gi8QdyqnisEdE/OpV8ToR90H6GpF8K6R2tD/wB/H/xqSPwvpe8bbQ/9/H/xouhWZEviaEjkH86G8S269Vb8K0V8NaSox9m/8iP/AI1BL4b0/nbb5/4G3+NK6HqUG8U2o58t8/hVO61GPUVEkQIA4Oa0H8N6eTzan/vtv8aa2k2llGRFDsDc43E/zNK6BmE03lYI+92p+k6zcvf7ZJ3EY4welaKWVs8mZIx/30a1Y9KspYl3RDjodx/xobQkiwmqWpGPPTI681Ib6ALkyoB/vCs+PwvppyWhGD/tv/jUjeGtLAA+zr/323+NCsVqTyXlu3zCVPzFV21W1Q481c/WlHhnTP8Angn/AH23+NI/hjS8ZECZ/wCujf41V0LUiOsWoz+8X86RNcs1H3xmm/8ACN6eG4gXP+8x/rVu18LaeSWNuoHqWYf1p3Qalc6/aqOXFVLrxLCG2rgL6k1uf8IzpjN/x7R/Xef8arzeFrAtzaIQP9o/40KwNM5+78SQyoEtiQx6kisM29xfy4gQse7HoPxruV8MaYG+a1jX/gR/xqvrBW2RIrZVjRRgbRitou+iMpK2pzcOkW9mN9ywllHbsPwpzTryFHHrSTksSWJOarnirULEt3JB/wAfH0xV9aoD/j4HuBVtULcbjisahpDYtxfMwA5NWWR1AJxtNVIQqKQgOTU6EnjPFQWTIRipFJzxUceOnepQOaAJEc555qUHmoY+OKkPTigAIyTmigA08EL1oAb1FOXnAFIxz7VPagbsmpEKqELhqcB+FKcbie1NDbjVDHjFBA60U1jxxQO44dakU81XHJ61IpIoC43xCD9jU/7IrkZK6/XjnT0PtXISjINaR1Rm3qRmr+knO70zWdz2rS0rOXHvWU0aI1Uqh4nlkh0C9eJtrbQufYkA/oTVxGGTms3xTLt8O3/yu37oklVztGQMn2yQPxqHsVDex51oesz6VqTXUf7yPlHQ9xn9K6DVLn/hM9e0jSdKZiLhwhJGNpY/MSPYAH865q00+SS0mv0cCJJFRwR6jr+ZH513/wCz19jPxBY3IjEotJPswb+/lc7ffbv/AAzWUnaJ2RinK59J6XZQabptrY2i7Le2iWKNfRVGB/KrVNpQa5DrFpRSZrN8Sa1D4e0lryZRJO52W8P/AD0c/wBO5PpTSbdkDdjC+JGvtYWq6PYPi8ulzO69Yojxj6t0+mfavGdVjAsbpFGAHGB+Nb7STXFxNc3khlupm3yOe5/w9qwNckSKwv3kXcqsDjOP4hXouhyUZLq0zx8TW9q2lsdT8FdKjk1C91OVcm2URRf7zZyfqAMf8CNeoXDlsgqGB7ZxXh/h7xNfeFdJwHXyp5d7whRvZzgYUkE9sYrr4/H0GzNxHcRkf7CsCfwNFPCVKcEmj0qOHnTpqLR1U8crypCFYQzNsfkcDGT/ACqGx0ax0y/SO384wLhxAW3IHPAbnnIx9O+Misua/wBYmubeSGCCNEmx5cjfM52k4JXIHH1rodGujextO6GKYM0csZIJUg9PywR7GpYzV2gnNZtvIx8S3cQA8tbWI5/2i0mf0ArR6Vk+HD9pa91DJK3Uu6Mk5+QAKpHsQA3/AAKpYG1VDXoGn0uYRg+agEiY/vKcj9RV+gjIwaQjPtZRLAj7g2R1Hf0P4jmpGPFU7JfIR4D/AMsnMYHoOq/+OkVZzWiGZiyG21awHRLiFoD/ALyfMv6F615Dla57Xt40y3u1B8y2nScAd+SNv47sVty3Ea23nM4EZAOfXPSgA0psXF3GTnLLKB6AjH80Y/jTdQ41O2bPSGQY+rR/4U7SreUSy3MwKeYoVY+4UZOT789O1P1K0kmeOa3cCWMEbG+64Pb2PHWo6gOVvlrn7G3h1SPVUuVLRTXTDrggphQwPYjaCD9K1ILtHEiMDHNGPnjfhl/+t7jisrwyHWwt3fq5kL/UsP6irGOa+m0fMepiSSBfuXaLkOPRwOjfoe3XA4vxX8SL6DTr3+z9IvE8nhp5kKKoPQjPU969PJyMGuZ8QaJb6q8FpIgaGd2MidNygYP86bd9y5VZNWGeC4ZLvwul/q7bTcWy7y56Js5JPock59CK6XQdTGoaXb3Ak3yY2SnbtO9eDweRnrj0IqrPYXl7YxWlwUjjQgOUP+sA6Hpx2OPWobvQrm2m8/QbhLWVwqypIm+OTHAJXIOQO4I981Oj3IjLXU2rm6CISzAAdzXPsk+uShIi0en/AMcwOC49E/x7dueli30K4uJfN1u9+14+7BHH5cS/Vckt/wACJ+lboUKuFGAO1O9tjV1rK0StDDFbQRw26LHFGoVEUYAA6CgmpHqImgzOT8daJba3FbQ3QKqshdJV6q2Mbfo3H/fIrJ0vSdO0ibfZ2s9jIVCvJDNvyPdXBH5HNdpqcfmQEcZPTPr2rxT4j+INUtLttKfCwN+8WVeHkib+A46YO4epxVxTl7omenjX47Sazkv5Vks5UPk3sQzHJnBAIH3W/TjPqA3xlbWXiPwbqHlsJVRSykddyjPH1B4PvXOaHpaWeg/YcztazZcpJgOoP3SPR1GOe+MH2yPBusw6ZqsnhrX72WJFJWCRn2pKjcqCe2cnHTqB2qGrCu0zyu1k37oySWToT1I9afu55rs/iN4EfQL2K60li1pJnbvPKt/d/Ef54rhywdd4BB6MD1BrojK6uRqtzrr/AMCaxFbJc2KLf2zqHUwfewRkfL1P4ZrlJ45beUpPG8UinlXUgg/Q17p8KNTXU/C8MZbM1mfIcew+6fy4/A12V9pVhqkPl6lZ290mMDzUDEfQ9R+FEpWLcU9UfOekXqR6lalmx56mJh+q/rkfjXtXgfw+YIF1K8QedKuYFP8AAh/i+p/l9TXn3xI8BweHri11XTxI2kecgmiJJaE5zwf7p/Q/Wvd8qwDJjaeRjpisJO8uYzjD3rswPGsDN4SvvLGWwhA/4GteVRWVy+MqF+teyeKmCeF7w9eFH/j4rzSOVugPHvUPUxru8jOGlzMOWx9BTho75yZT+VaDOScZNBOOhP50WMSl/ZAx80jVC2jjPEjYrRJPYmjLHpRYLma2kEdJT+Iph0ycdHB/CtF2YDqc0JI4/iNIDJezuEH3M/Q1Xfehw6MPwroDI+MnBqPzFP314/OiwGCrKT1qQAdq1JLK2n+6oDe3BqrLpMqcwSZ9m4osFyrjFOWmSLNAcTRlfftSxuG9KVh3JAKXFA5p4FVYLjMUpTcvHBqQLmnKBnmiwrkOztSsnHFSnk8KaTJA5GKLBcqsoAwaAgqdkzzikZQoyaloaIDHvYIPxq/KPKhWJeDjmiwi2q07np0+tTxhGJLDezUJA2UBGB16VPDECrHNTSWoZ+GIHpipWTaoROFxzxyaYip5QGcUBVflQCBVsIAvPNDLxhQAPQUwKzJ7VGY+eRVtwKbigRW2UbBVgj2oI4pjKxUVE4+YCrRT5hTZI1DggUmURiPAzSEeXEW7ngVYI+Tiq8DefqCQ9Vj5OPWhkm1YQ+RZgt97GT9aZzkmp5mO0J+dQnipS6lCUYGaUUlADHrkvFeYtRhYZ5jBH1BNdexwKoalYxajb+SxC3ABeI/TGR9OlZYl/uWc2IV4nM+ILEi+juoSVhuUEnHqeT/n3qC+hla3glG54h8g/wBk+n+fQ1v3EbS+HUEgImt8gj02nBH5VnaDIssstrP/AKqUBT7HsfwOPzryVLT0OJpuVu5lQMMrnjPGKtTIHtpJEIzEy549aivrVodSNrIrCToPRvTFX9Ltg9lfxgYJjB9eQc1TaRmld6mazq6cDB7imHG/BBJbAGOv4UyQPG+3BqzaQpLc2qBvmaVSR9CKpsIrULqJ1uJkQcI5UAfWujulEbCNekaiMf8AAQB/SsWFHPi2RDkxGYuRn0+Y/wAq05WLP15Jya7sDF2cmdVGNriMAUGarFdp561PIccUxgK9A3RCwOfapLdd0yj3pKnsVzMfYVL2KRtQDMY+tWAtQwcRDI71YU56VmjYG4HAoGT1p+M0oUKKBlWVdwIxisplCzFOzcitx+R2zWXqMRXDqOVOae8Sb2ZX247U7ZxmpMbgpHQjNSomVNRYu5WVakVOKniXPpT0UKfWqSE2QCPigcAACrEnYKCSajUYXoc5oEhyD2qRcD0zUaE5wakVMOMdKBkhTI6Uzyx3HNWBxTGPPHWkBDs5pfuEN2pxzg7cZ96g+yBzmWeUt/s8CmBDdRhZd64waQbSOtSy2q+UzCSRnA6E8VXtiTwetFhXJkjA+aphtI5oXHTApHwpyKB3EcDv0qJlBORU2N460BcUxXIQuaQrUjDBpMjNJjISMGnEZFNmkVetSQwTTrmJCFx1NIZERTN2DwCauWumzTOSyswHUVoDT8D5lCAepoAxQkz/AHYyF9aVLSST727+VbBXadqkYpNuMfN0OeKEBUh0+FcGVTuq4kFug4UH8KawLEk9aGyABiqES/ux0j4+tHmIOkdM6Likx1oAcXU/w03cnTFNHNI4wPehgG6Fjyn6U14LZ+qjP0pAvrS55xQBVk06FvuMy/Q5qrLp9xHzGQ49Ohq+ykEkHFCTEHBYEe9GgamMzPEcSoy/UU4OGxg1vb0cbXQFfzqtcabbyjMJ2N6ClYLmatP+lJLa3Ftyy7l9VpkcoNCQXJgKXbSA1IMVQXEVc8UhXBp4xzQET1NLQBpAIqBgc1ZZMdKQqKBJkGMDJ6VNZRjBlcfKKRImmlCL071blJXZGn3VPUdzU2uVcieJ3Bkb8jUSKzOFRTyfSryKRyTk0oHX1qhHQWh2qCuKkvVRYvMAw3oO9U0PHFSykyWpHXFamBxviOdvOUrkDFZWnyMbxNxzk81peI15U+9ZFidt1Gfer6CPSbBlECjHargYEdKoWJzApHpVsdKxGyTcvpSGVfSmMflPrUbnC0WHcsrKD0ApTIewFVIT82KsUrAO3saNx9BR0FNqhAXBP3aT5T1yPxppXnOaMUgHHb/tfnQCoPSmGigCwHX0Ipd6981XFLTsBMZVB6ZprOGHI4qOkNKwDy47KBRvbsTUYPPNLnFMY/c3940bj6mmA80rGgRD5hDEbjSmQ9mNNcDk+vekXBB9qAJEkOepqcSEDrVNDk+lTikwJDI3Ymmlm/vGlOMDBpCMUhgCegJpQ5HGKRW25NN3Z9qYEnmHvUm9e4NViakHIzRYB5Zc9DSb+eOBUYbkg9acBQIc0jevFMLMe5pxXIpgPOKAHqSO5qRZCB1NQryad0NAyUysfSlDnHb8qhoBOADQIeSrNkgflQQg7UynDpRYCQBABjAHvUYUgnDjFBNANOwrgUycmQ/gKaUKnO8mn0YzQ0O4hcc8GsLxCf3alTjmtpsAHFYevYMA570kgexi2TM1yuWJrqrIEY7j0rkIG2TqR6111jMuzPWlIEXTKijnjHaoJJ1Zhg/lUEuWcnt6UijH1qkgLXmLjg0i/vDx0qDbuYetWkQL0YN9DRsMco2nI4qQyvjBNM60qkZxikCF80imzSbiNpzUc7bSQKrs21Bg8iqQPYl71ha8eVrdjbegNYevDhfrXRT3MZ7HOy1C3WrEg61WY81qQhw5uF+gq9nbjFUP+Wg/3auRnaOcmueoawLKH1zU6NjNVkbPtU8YziszQsQ4zkdasLUEZ7VMtAh4pcgjvTQfSnrQBIhoON3NN4709fvcUCCNdze1T8KCEzzSFDGBkYzSClYY8dKhJIbFSikcDGaYDkbcPenbSelV1bDA1aXtikwRGVINPRScZpx603cQRigBNcH+gLj0rkH711+s/NZgD+7XJOOTW0SHuQd60NKblxVAjmrumcO9ZTLiae1uSOldD4Q0OLxHp3iOwuwqLNarAr4yULEkH8Cin8KwUPAr0X4Zx7NKv52UjfOAG/vKqj+paszairzPnPVbO+0Pw+lneQ7JLi7kUgHJBi+RlP8AwIDFdD4l8G6t8Pf7C8Q2Tu+1Y3lY/wDLGfGShxj5D09+Qeoz6R4h8KT618UtBuJVU6VDG90/B/1iMuR6ckxn/vqvSNZ0221nSrrT7+NZLa4Qo6kfkR7g8g+ornqSs7HbGG4zwxrNv4g0Gy1SzP7q5jDbc5Kt0ZT7g5H4VqZrxb4OnVPCPii+8Ia6pRJ1NxZtnKOy/eKHuGXn229M5r2mNS7ACsGrM2TugmnhtbWa6u5BHbQqXdj2ArxvxBq03iDVWvpwUhX5LaI/8s0/xPU/l2ra8fa+NWvv7Lsnzp9q371h0mkHb6L+p+grmZSsa5YgAdzXpYShb35Hn4qv/wAu4/MYDya5fV3NzqxslP7qN/OmPbOflB/EFv8AgIrcur+C2s7i5Z1ZIkLnack47Vy+nebKZmmxvkffOw6FzyVHsBgfQe9ehCHPNInL6Dq1bvoQyxyX+uwTS5W3iUvHEf4R0Un3Jyfwq3qmTYzbThtpxUsAy0kvdzx9B0/qfxqvq83k2UjYyccD1r0uRQg79T6bkUIvzPd7BBcai8yqBBEilMHqzqpPHsAv/fRqlpIuVudQ1KDdLbtcFHhUcsqALvX1YEEY7j3Aza0pZNI8K25vTvuILZWlIH3nC8gfjxWjoNubbSoI3OXxlz6sep/OvmXoeQU9Xu0utOWCzl3Ndkx7kPKr/GfUEDj2JFa1lCLe1jjUABR0Haj7Lb/aGnEKCZsZfHJxU1TckKKKKAMuf5NTlTgLJGsg92BIP6baR3DKQDgn5fp61neNL3+y5tIvmH7k3P2WY/3UkHB/BlSppJVF2pDdVwwHY8YNXHYY/UlLadcLGBuEZ2D3AyP1ApNC0+RlhuLtw8ca4towOFXsx9Wx+X83l+fWregH/iUW6Ak+UDDk/wCwSv8ASiQGhRRRUCM/V9Mi1GLlminUEJKhwy57e49qyNGX/iXsh4ZZp1U/SVxXTmuX047IZV9Lif8A9GvVx3Gi+JcxqcYY4GPQ1DGd/iG0UfdjgkJ/Erj+Rpuf9ID5yAh4/wBrgA/kTS6Z8+vyN/cth+rH/CnLYDfoopkhwuR2qCRxpjUoYMMimsaYyKQ1CxqRzULGqRZXvv8AUE+leXfFfS1vdLS8jXM1mfMbHUxscN+Rwfzr1G6+aBx7VzWpRpJCTKoeLBWRT0ZCMMD+HP4VcdNQsWXntr7T47uMEo8YkRl5JUjIri/HXg2bWdPvLuOMi7tEVo/+mijcWX69CPyp3g3UH02XUvDN6ZHlsiXtWAyXhJHH4bgfxI7V2yaxMk/l3CeZHgbiRh1OSCD64x04PWp2did0eNaD4tkm8PXeg6/LJJFsJtbhjl43HIVj3UnAz2z6dOVisHNlJeQhpIkbbcBQSI+eHJ9D0rofiRpkWneI5JLXb9muv3sZXpyeR7EHIxVn4WahBZeJPsl4I2stRQ20qyD5ct0/Anj8a1S0uiLdGZ3gLxI3hbxCsspLWM37udR/d7MPcf419J2U8N3bRXFrIksEihkdDkMD3r538V+A9SsfEjabpltNdwzZktGUZynox7FehJ9j3r074ceE9d8Paay3erIhf5ls9nmxxnvk5HP+6cfWs5NMItrQ6zXoYb7T7nTr+Mm3uYyhcc4z3/A4NZ2iy6jpWk6XYXhiuZDF5STR54KADDZ6nGeePu1c1C7vYjFFPZ28hlcJH5cxyT3OCvGACTz0FZuTdpFZLOyzQl59qPtZo2LqNrYzxz+lQWSeMtRiTTY9MhcSTFg0xByF74+ua4wAZrY1fQprK0+2W0j3FmP9ZvAEkR/2scEe46fTmsYfepHHVvzagoCkmlPNH1opmQjGk3hevNDnaM1GTnvigBzMCcmnDGOKgOc+tPU7Rk0AOx15qNxj7o5pS+eAKbzRYLjELDqtTRy4P3iPrSDnimkYPTikBK9wrjbIgZTVeXTIJwWt28tvQdKedo7U5Dj5lODQBlzW89qf3ikr/eHIojkDdDW2lwSMSAMKr3OmJKPMtyFb0HQ0DuU1NPCt1qHLwPsmUqf51ZRgRxRuFwjDMcCnyRkD5hzToztORT5G3mnpYlt3KxHFMiiM8wAHyjrT5Cfur1NXkjFvbhf4261LKIpkUrsX7qjj3p0a7QKRjhScUsRZgCARQA8fepsiUpzSgHHPNACYpG29O9SFajI5oAiIpMVPTWx3FMRHTac2OcU00wEpoXLZNPpGHp1pDGz/ALqCSUnARcj60nh21xH58n3nO7mq+phnlt7QHlvmcVsxgRQhF4AGKT1KCWUGTjtUZJz0oVMHOadTJEQ5FL9KQDA4paAGsMg1j6ldfZJ7W4GcJJtb/dI5/lWtIcHg1jaoiPCwmJCbhlsZ289airHmpyXkZVdYs176MT2sgXB3qR9ciuJSGWzkeSQACNvLdgfu54rqtGlkFsbe4wJoDsb3HY/TFYPiZZ47iSIORbT/ADYGME8Z/kK8OG9jinbSRevwNU0uHULZVN3Byw91PIqa1tmi1S7fk286Ky5HTOciszw9dm1vvKb/AFdxhs+j/wD18H9K6aXG3jt0pS93QpWepy+qWTPp1rcw8soMb49icGovDkYl1CNmGDFliP0rd0mPzdJuYZD92WRc/j/9eq2jQGF7hn4YMFx6YGf6inzaNEOOqY42hh1m9uW+6I8r9W4/kGqLHOa09TlBtodvO/5yfUdB/Ws4jIr2sHG1JXOmCsiNhk1GwwcVIxwKizliK6jQStPSoN25vU1mjrXS6VDtt0JHJGaiWw47k5RVCqR0FKq1I+DIRjpxQAB1NQtjcOKDgg0px2pOaAIWWoJ4t8ZBq4RTCmacdCZbGRZ5MTxt95D+lW0TCetMlj8q+B6LIMVMAVQ5pW1sO+gkYAXpRt5yKRDxRyTimLcbKrcY/OjYAoBNSbDjmkCEjNA7D4Y1IqTG0cColyDgZqV+lAxrNke9MI5608MOlI1JAQKxUEdacjsTzyKTgE+9KvAxVEjhVGZPJmBH3W5FXh70kkYkjKN9QaAIoiGxipWUHrVSMmNijdan5OMmkUKPl460bsdaYxxmqzXBL7FXcx6AUATyOApJNQwRzXT4iGF/vGrltYoQJLph/u9hVtpwo2wABaQrjbfT4IMNL87+pqw1yFBEajFUizMcsc04Gi1guOeU4yzYFKjArkEnNNC7uMcU8DAoSHccO2aGABzQOaCPWmA0nvS5zTTSjpTAKQ9KDnNI3Q0AMYjHBphb3pSMDg0zOTSAejHPtTicelR8cjkGmc5pk3Hs2eCKYEXkgc0uBRnHNAXGjKng4pSGJyTzQxBPApCSetAXJ4pmUYf5lplxY29zlozsk9qYpOMU9QevSgozZoZrVsSDKf3h0qSMhu9bCyK67ZgCOlUbvTmTMlqcr3WkK5GACPeprdFz82KqRS54PDDsasK1NPqJ6qw6YDcQvSq79gOpqV2wKfZoNxlk6DpQ2CJI4xbxAD77dTTTjIpzsXck1GyhmHtSSKJQRihW29qcoToAc0BOcmmB0CLF/Ehx7GnssQt5NrE8dCKZio5SVjYDuKswOK8RjgH3rDtziZT71u+IQTH9Grn4mxIPrWhKPSdLObZPpV4cLms7R3H2VPcVaeYqAAM1iWPL+1KSCvNU5bhwBwufWpoJGeMFxzTEPUYOatLyBVYCpkbGAaQyXHFIRQG4o60xDD1opW60maAG0U7ANNPBoAdQKTrSjrQIQ8UtGQTilIoAYaSnHrimkgHFAwHHWhxuFKOlKASaAIXGV6U0KfarO3FQuuD7UAOQADjr606o1OPrUgIJoAVetK3NFB60gEPSmgcU8LTTxQAxXUMQSM08ufSqUscpclV49asW+ZAQTgjg5qrATZ3c46VLTAgUYzSjIqQHVXmBBDCrFI1Fx2I48kZ6Uu4nAqQDP0pu0BsimAHpQOlGOc0NSEFAPam5py9aYDqMYopc4FAhKUH5SKSjIoGNNYOtj9yfrW8ax9dXNufrQgZzEf8ArR9a6jShlea5cLhxXR6RJyFNJgi+D87D0NDsAabKcSHFRk5NUO1yeIZbNSxqqZ2jGaiiOIwR3NPD4GTSbHYmzzTlIBBqEv3FKWpCsx9xGT8y8+1UblHwPlOKuxuxyAelEzMUpp6ja0KVoSu4N9azde+6p960C5ST7tZutEtHkjGDXRT3MZ7GDL3qrIMGrTnmq033jWxmgH+sX/d/xq6OBg1SX70f0q9XPUNYEiVYjODVdKmSszQtL1pxYjio0pxoAkUmpVbtUKGpPegRLmpLZhv56+tRLUtuB5o4pXEyY7j8x5FJnFSydCKhxQgTJC27mmSHtSrxQVBpjGqpPapY3ONppp44pwUdaTAfnuaVcNUeS3AGBUiDGAKQhdUH+jD/AHa49uprsdU5sm/3K49upraJDIWHOat6Z/rHqme5q1pZzLIM1E9i4mvGdx2ivUfCcIsPDGnAnmdXJOMZ3Mzr+leVb1jV27hc17Lc2gt9Gis7fg2yqiDPQp0/kPwrI68OtWx6SeXNGffH4Hj+oP4VolgoyxAA7mucvLpHt4ZFfarjr3AIx/WotOQ6jCk90zvkBtrk8EjPTtWM6fM7nanY2NSg06+e2NzJD59tKJoH3gNGw7g+hGQR3BIrE+IPiuPSrOPTdOuE/tG8U/Ojf6pO5GO56D862Le3iVwsSIhPfFch491O1ndtHs4YXC4N1PtGQeoRT69Mn8PXFU6F5LqZ1aqjFs5KyQRxIoGABW74Yt/tfiSwQrlI389vYIMg/wDfW0fjWLF0FdT8P492vTzZ+5asmP8AedD/AOyV6VR2gzyKC56quaPi3wnYarDMVtU8w/NhcKSfY9j09q8mv9Hk0e3MUIZoN5jEmCGVieQ4PRuc+/GK9+mYDcx6Cuf13SrfVUZomjFwV2Nn7sq/3XHp6HqD07g89CvKjK6PdpVHTd0eOAAAADAHAqbw1Yf214v061I3QRSCeX02pzz9WwKbqsLafPLC+4MvQP8AeB6FTjjIPp14I4Ndb8G7Jdmo6tJj58Qox7KOT+fyn8a9fE4iMqHNHqd9eqnSvHqdt4hmVpLGyyMzy72H+ynzfz2j8a3oV2RIvoMV59ca9a3Xiq9Uyx+RaxRmOYsNpKtuZQemTwPwrvLa+tbpA9tcwyqe6OG/lXgyPMZYopCeRQ7bUJNSIAwJI9KWq1u+XPvVmmwOW+KNmb3wFrCIGMkUPnptHOUIf+leIaJ4l1nSNRtl1OGZPtaiVfOJy6k43fpX0uwDKQwyDwRXifx8hEOueG51QBW81CR7FMCnFtMaZ6TDJ5ltHJn7ygkelXvD0u6K7j7RzkD8VVv5sayrKQNZwuhypQEEfStDQVWO7u1XgOEkx78g/wAh+dXPYRt5pKKKzEFclYk7bgHr9quP/Rz11ua5KIbZLg9/tE2Pb941XDcZLsJYsXIbOQM8Dtz61NoMivrd+g+9Hbw59stJ/hVfNQ+CyX1zxE55AlhjH4Jn+bGqktAOvpsgyjD2pc0hrMCnDNtbB6Gp3NZsvyyMvoatRSb4ge44NVYsVmznFQuar/aArHP3SalLBhkHINOwIZJyjfSuekmjRsO6rnjBOK19Ullit1+zhPMeRU+fOME89PbNVIt1xdR2k8EEEEgOwwvu37SA3BA7lR37+nL5rDuU9D8Pwy+JodZY/Pb2xt9vqd2VJ9cDP5j0pktu76/q0AwojKSpngFXBJ/Hdurr7a3itYikK4BO4knJJxjP6CuM1t0/4TIlyFjewjJOOh8x8GluxHLfEDTPtptYpFDbg4wCMocZyP8Avn+deWNGLa+aJJt7xNw68c/5/WvoXxNpTanpYS3YrdRqHjf0kXoR+Zrwa6ls3kvfPtnj1CSTiOJTgP3wOwJ7ds8dK3pu6sTJXVjv7DxPqOspbXT3I+12bZRQoVc4xzj1wQfxxXV+KPiPp2i6XbXFva3VxPcR7ljK7URgSCGc8ZBBHGf1rxjSb6TT7tZiGA+7MhGDj1x6/wCFenaIunakkmkaqiyadqRGxwQDHLjCuD2z0+uOxNYzjZmHM1Kz6m98NrzUvEFhJrusbN8zNHbRouFjjB5x35I5J/u1yHxX1Cfw54i0O/spNsywsrR9mXdnB/OmxxeLPhldSRrC+q6BuJBXJCj1x1Q/p9a5vxlrP/Cf+J9KTR7aQzNGIfKcdDkk8+gHOaSWppfQ9q0bxDaX3h29unBSRbdmlib733cgY75yMeuRXBp8qqPQAVu+N9Mg02905oiF+02wjYLwGaLaM+/BXj/ZrBzzUnPWld2JBzRjFNFKDigxGuccVG2D0pZQWPtTcFR6ikAAY60ZzxnijJxSUwDbg5yKWkpD0oEGcdKQnNFFMQYpyrUbBsgrUsZ9aTGiRVAHrT0coeKap5NDA54NIZO4iuk2TqM+tZlzZyWhLJl4v1FW1PbNWIZgTsfkeppAZcUoYZFPdwFpdRsTCTPbDKdWUdqp2xa4cAdB1pgXbNcyeY46dBVh2LtubrSY2qAOAKB1pAI3IpyscAKaCBTlAHamMeMHk9aDg0w0gIPcUASADHBqNhzmlNNPNDAQNzTZCMe5pxGBTG+Yc0ICPOc0mR60/aMUFQeophYbUkKgyDd90cn6VXbO7GelMv7gRafKF/1knyD6d6TATS0W9vLi7k3YzhcHHFX3tYi2VMiH1DUmmwfZrCJP4iMmpj0NSgIVV41K7i69jjn8akjU45qSGbGeBTZmZFLojOvcL1FMQEYppPpUCXbysY4YJDIOu4YAojt7lGJmmHzc4XnFMZKAAOSTj1rO1GMSxui4+cYFXltkXHzSMOuGbrUV0uZEJH5UWvoTNXVitpEnn2eWGLiH90/qQOn+frRqlqLy0ePgOOUPoagiY2+qpIoykw8t8eo6H+lX5ztf2PNfPzTUjhtpZnBl5UG1wUkRiM9x/nFdpY3QubYEkbsYP5VheIIAsolUACTg/WtHTI3jgilIILoFfnoy/L0/D9KqeqTIgrNot6KrJHfo4IHnEj8f8ioTuSCUbRv+Y4Xuea0IGxA5xyTk1XjOyaWZuREN4z/e7frz+FKnBzmorqaJdCC8+WRYcg+Uix5HqBg/rmqzN2FML8kmkJ6Zr6JKysjdDJGwcU1OQTStgk4pD8qe9UUSRLukVRzkgV11vGAuOgFczpcZlv4QPXP5V123ZC3HQVlN9CoIqKc596coz1poFOFBsLnFApM/nSg496AFLYoTBJ5prHNNBwcigTK+qRE24kHVDmmu26NWH8QzWg6CWB1/vCsi3yICp6o2KBEig0pz2FKvSlplCAkDmn7wF96TimsRSAeDxQTkUKQVpeMCgkQLk0uKdikzzjtQBE6/NQAKewzg03jPvTuAYpT04pdtBGOlICvcx7l3D7wqGOYbeeCKuM4H3sVnTW5muAI2wh6mh6q4LQQyNNJsiH1PpWhbwR26Zx8x6nuaZAqW67VALU4sWOSaCh7uX69B0FJgDp1puaVTz60yRR6k4pVzu9RQ3zcClUYpFEisV6U4HPJFRGlzQA8tzxSFjTATnmlJ5oACaUGmMaBRcCQGo5SFFKxwPSoXmjH3mFMADE9eKXjFRNcR8AMv50LIrdGB/GgB3OetKTTcijNMkUnimk5oY8U3NAC0hbBwaM0uAeooESpg08HNQg46VIhpDF3YOMVLFKUPHT0quZBuIoDYpWAmu7RLlPMiwsnr/jWWsrIxSUbWHXNaUMhQ8Hg9RRqFml5FvjOJR09/agChHmaTA+761d4ChR0FV7UCOPYRhu9TmgBRSEHI5pQOKWmAo4HXml3mmMcCmtkYIpgdEz4BOKiWUOzbvSpMhuO1RyQDkxZ6cg1Rmchr+CkhUng1zkXLjPHNdNrilY5QRXMrw3NaEnoWhHNon0rUwM5IzWL4cbNmn0rbPGKyK6E0aRleFX8qikX5jikOexIpOgoBAOlOCnFIhBNPzzikA5OBzSk84FNFAxmmIcwyOKb3xS5NLQIB0phHrT6DzQhjAKd0FJ3oOaBMa2T0OKkU5pAKdwB0oAjbrmmkA08mm4yc0DADFKCQaaeKOtAEgOaaeetHaikAxcA5pwALZ9KilBXkURMcHJpgWMg8ClUEHLYoQelKwpMAFGwHqKBThQBF0pFUZOO9KwwTQppgP6UE4pvfNKeaQDhg80YFIKUcmmAoNKetITik3ZpABGDQelGaQmmIQLTgB2pCcUZ5oGOzSA0lMJoAfuweaaOCaQ/WlXk0AKay9ZGbZs1pswBwazdYINq9IGcsuN/41u2QAcHpWAPv/jW9aKSox6UMEaJO/kdBSBSTgU6AF0GKkiBDcjrVFJirGVQClAyMYp9IDUjHEALTSuRxTs+lPPSiwNkUChWJJxUrY2nBzmoaRyQpxTS1FcRUBlx6Vla6MQn/AHq1bclmLH0xWZrvNqT/ALVdENzGexzEmMiq8oqxIOc1A1bGaGg4aKr46CqGPmi/GroPyr9KwqGsCZRUqVArc1OhzWRoWE6VKBnGahSpU60AOAx05FPXmmqPm56VKAMUCHgYFPRyhGOtMJBFNJ7UAy68m/kfjTM1BDJgkNUwNCEPFOpgpaBjgacpqNc08GgQ+lXrTAacOooAnvF32wXsUrjJB8xrtph8gGONtcZMMSOPQ1pHYh7lR+9WNMz5z49KhbmptO4nb6VnNGkTd02ye+vYraGJppJD9wf3c8k+g5r2HU7hYp5B1yN49z0P/sv51x/w0hnQ3d20TLZyBUEhGA5BP3e5Az16flW54glKtaLGC0ks+xV9fkY/lwDWZ3UI2jcSxs0LyPIQ22Rtq4+6Mn/P+eW6Zp+fOMk87hpWIj37QMnpgYqGZbjS7b93+8EhBllY4CsTgnr054A/Tiufm8fWkN+mm6BGbyflpbp/uJjqR/ePQdh+VBrJqKuza8aapb+GtMVLO2iOp3AIiYqD5Y7v+Hb1P41wGmjbaJkknBJJ6k56mneJZprq4kuLuUyzuoy5x0HQcdBSWP8Ax6J9P611Uo8rPLxFb2m2xPEvyZrt/h7a7LK7v2HMz+Uh/wBlMg/+PFh/wEVxAYRwFm6KCTXpmlS2dpo9laR3lvKYolVmRwQWxyeD65p4h6JFYKN5OXYv5z1rOvbZkbzYByOeKkfUbIcNeW4P/XUD+tV7q4tBEZJLhRH/AHi/H51yI9Q5LxL4WfxY0tzbzLatH+6+5ku2Bk9eMdPw9hWj4Q0VbLTobTURGxRmIiUkx5zwT6nAGM9AKt+G9StZdNuYrWZXIuJgMNuxukYj+YP0NbWnQIkKNj5++exqnN8vL0Hd2sXFUKMAAD2rP1m2t2tGke3haTKqrsgJBLAcH8a0c1m624Isrclh51zGSR2CHeSfb5QPxqGSaUr7ZBUeoPtjUDuaivX2ykVFqMm9IGHcE0JbDFtpP3y1pVixNh1PvWzninJCYteNeP71/E3xAsPDU1mUXT5/PeUHIeMoG/DqB9a9kzXAa5pvk/E631FR8txpjxnj+JJF5/Jx+VJboEa6KkUaxxqFRRgAdhU+lyFdWiH8LxOv45Uj+RquTSROI76zkz9yUA/8CBX/ANmrWS0BHVZopM0lZALmuXlG24uR/wBNXP5kn+tdPXLzkNeXYHaUiqhuBzHijxGmj+X8ylmP3Se1XvhDqH9qQ65dg533Y5/4AK4WbwndeM/GmqWZuvJtLEgNIvJywyABXqHw+8JR+ENPu7SG6e4WabzdzqAR8oGP0pzl0Qzq6aTSk0wmoBGfqS7XEg6Hg0yxk3CRfoauXSCWJk9RxWTprkXLKe6mrWxRVkkwSDRZ3u2RkIdow23cqkgMei+5PoPb1FKtjNfXksUTmKJWPmS45UZ6L/tH9Ovsda5tIINMEEK+VFDiRMHGCp3ZJ78jnPXJz1pyYXIhY/aVVr8EAMGWFGIxg8FmHU+w4+tZmvy/Z9b0byxjcJkCgdAArfl8oH41vrIsiRsvR1DD6Vy+uTRHxVaLLIq+RZyOoJ5LO6AADvwp/KoA6mRwsbN2AzXDX6mbxM7p8yw2ESSexLuR+laWt+JrKyC2fmnz2Vd37tmwvc4A61QiSfUM/wBkzrZWz5ZpJIMyynucN0/H8sVSBF/TZpIYgCN8SHAx1X29x1+n8uc8T6fBbajHf2yxm3vhvWRQPv4yef8AaHzfnV+K6vNDl26uiy2rMFF3FwFycAup6deoyK3tRso9W0qeydgpYbo3H8DDkN+daRlyvmRUZcrujxnxVp24fboF+YDEoA6jsfwqv4av1ZDp0zFdwzA2f0H06iumiLPG8dwgWVGaKVDzhgcEVwniGxbTrsiPITPmRN6c+vqP89a6KkFKN0GJpKS54ntvgzxk2uQTWN7C41iyG2UIvyyjpuz0GeOvr+WvY6VY2uoy6hDZ28V7Mu2SWNADjrjP8z3/ACA8z+FWspN4kkJKiS6sys6gdWjYYP4hz+WK1/G3xFs9Fk+x6di8ut2JCj4WNc8/Nz83t27+h4rHPF6XZY+KrXtz/Zd3ZW8ktvpzuZZFGQC2OPyBGegJrGEiEKwYFSMg+1bOgfFbw4Y4kuFuLL+EpJGXXH1XNVPHOjwQXUGo6NJE+k3w3J5RBRH6kDHQEcj8fSkzKrG+qKP2qFTguKjkv4FH3s1mi1J+8aa9svvSMC4+poOmKjOppnJx+dVTarux2o+xoc5HFK4WLqanAepAP1qZLuF+jiseTT48fLkfSqxsXTlJCKdxHThgehBoNc5G11CRhicVft9SPAmT8RTuKxp0VClzG/3TVmIBhnOaLhYaKVTkkDt1qRgDwDSIgQk9zRcB6qRzmo5C27gHinlsfSlLcZFAyJWBJHenBwD61HtJbcDgd6AOeuaBF23uAPlb7vvUNzaCAtNAPkblgO1Q43GrVtK4PlEgoRg5NIohVgy805cd6hmga3kJByh/SnIwI4NAiY4xRTM0qtigYuMH2ph+U8c05jxxUY5oAkByue9J3zSduOtNyc89aBEueKTb1pm7Bp27NAxrcGg4GKVjxUTNj0oAZIACSKpmP7VqdvbjlV+dv8/lVzcoYFuQOSKf4ejE13e3ZGFztX2/zxSbBF6U/OcdBxTBSt1PqaTvSAaF2k+lTI5X7pFQuD65HpTgQMVQEzSFhjv3qIrk9acp/Cg9eKEgEwKguBkA1Mxx2qOTlaadmD2MaaUi8kTgEAMPoRj+YNWfM82EN3p09mszNKv+vC7Rz1Gc1TgYruU9fQ14uKhy1ZHFNWYy8gW7jEb4xuB5+v8AhV24xHCAo+Xd09KqMxB5GKsKwliIbuP1rnZCCUn7F8vXcD/48KXUiIrOGP8Ajl/eN9Og/rUlsiPGDI2IUG9yPT0+tZl5cG5uGlbjPQeg7CvRwFLV1GaQXUhNIfelJyeKGGePzr1TYiY84FOIyBmhUy2T2FKeTgUAbXhuHdM8pH3RtFbly+ECjuar6Pb+Raqv8XU/WpLnmTA5xWL1ZrHRDFcAfNSqeeKZxQCQ3HSmWSMQeaQetIW7mjOOlAATgGmKwpCCSaYV9KLgXLdgcis1kxfTIP4xkVagbawxk/Sq16CLuJidi9Ce9JskYjc8djTw3QVF8qfKvQGlB/OqAkJweRTS3FBJPWjjg0ALHn8KkHSm7sUoHOT0pFDwQT70YyaaDyaUHnNAEm0AYPWm8ClDevWmsQOtAATTGpJGxypqu7tIwRM+5oJCUGV8L0HenpiJNq9e5qVVCxgJ96mgbRzQBEo+binUpwTxQSuelMQA0jE9qQ9acn60AOUjIIPNP75pi45yMmlye/SpGOzRmq89zHEOTz7VQn1EnhP0oHY1WdV+8wFRPfQRAjcCaxT5sx+YkCl+z4HPNK5SRam1PccRqcVE1zcP0yKSONQ+MVPnHbAoAqu1yRy5/OoGWYnBY1onBpjKNw9qBGc0M+SA9RMl4nIfP0rXwKRgCOaEguZC3t5F95SQKuQaucgSripGRTUTwKTyKauBpw3MUwG1hUmfesTydhymalhnZThiadxWNlVLc0rLjoOaht5t6ckZFTBs07isESkD5vWpM9qjzSHr3oKFZVAPHNRqx2kc5pXYnNIzHAoJFBqWCdo3B6j0qEDIp4x0oGia92yKJ4BlujAVAkm4CpoZipCHBjPWoLtDG2+PlT1oGSb6XdzUCvkU7OaYrE+fSo2ftSA4FNPrQFjqeM8ClGRu+lIBSjrQYnI68MrJ9K5P+LFdhrkeVl+lce+VYmtUI7fww3+iqK6EYPWuT8KyEwAZrpMk4Oah7ldCcEbvahsdqiBp/YUhADjpxUi9Mk5NQ7we9SpmgZIBnrQQM0mcLUYYk9aBImpuTSKeuaO9ADuaUcU3NFABTgOM0i9afQIaaac0402gA/WlXrScCkDfNQA4rmjFONGaEAyilwTSGgYzkkgjIqIoc9eKnwc8HFAQ5yTkUASRA7eac5GKaTjBHSm9qFqA9aN3PFIvBppGGzQ0A2VsnilX7vNRydc5608A0Ax45+lOpg4p2fegQuaBSAc0p4oAGYBST0qGOQu4GAAaZKxJK9qIxhgaLDLBPpRmgAk0hqhgelFIaWpEIc0wsAafjNMcY9BSYxpbnmnIaruTnpxSoTilcZOzDnIqhqmDbP8ASrRbiqV+SYHHtTFbQ5s/erotLG5owe9c2x+aul0U7jHjsKJCRt5SGMKiDce5qDcS2SaluR8wNQjrTGL1oAAoooAKXPFIeRQOBSAYRSEZBpSRnAopgKvywsRWRrR/0bH+1Wo5xCT6msjVzm1Y+4remZT2Oel6moJRVqXGCaqyc1uZIY3AiPuatKflGfSqr/6uP/eNWRxj6Vz1TamTKKnSqyGp0NZo0LSHipB7VAlSimIlQ04n5vaohUi0mMkB5pwxj3pi06gTHqATkipgagB4qVBxk9aAJBSjBpvY0iAjr0oESilptFAD1NOH3hTBUi9RQMtSHO0Z6LXHXgxPIPeuycKCMjtXFX0gWZuCzO+1VUZZiTwAO5rREWbdkVnPbHtXf+C/BEj7L/XlaKA4KWh4aT/f9B/s9fXHQ3/h94YhtbePVNQRJbt/mhXqsQ9R6n/a/L1PbSycM8jAADJJ6AVjKVzupUOXWW4SSJHCBhYoI1wqqMKoHQAVUjXzbgXEgwQpWNT1UHqT7nAqFpxL++kB8lf9Wndj2P1PYU+FmC/Ocuxyf8B9OlKx1WKfjJfM8Jayv/TnKf8Axw14v4EjCJPOFyWfZ+Cj/HNew+MZQvhXV+Rk2knGeeRj+teZeBoFGkwHHMgaT8yT/WmuxzYj4S7r3K9P4c0aec2sdLr4xwP7lR2DKlijOQFUEknsK6obnly2KfiO/NvbR2sDH7VcnauOqr3Pt1A/H2qrbTy6ftSynki2jBKHAJ+nSsa2uG1DU5b6XoQDGD/Cv8A/LLfU1fDZ6134WlGacpK59HlmFUKd5LVmpd+LdWsrGabz0lMaEgPGvJ/DFc/qGu6hq3h4XF3cSSTTDYqKdqhi2BgDioPE8mzRLj/awP1z/SqWgOJbCwjOCIVaQ/UsQP03Up0qaqcqXT9TonCCqcqXT9Tv/hj4ekkhldZCkttGAkvODKTu59QMDI7g165plyt1aLKFMb/dkjJ5RxwQfoawvA1j9h8NWoYYkmHnPx/e6fpgfhXHT+LpdG8WapdAtLYGTbLEO4UAbl/2uPxHHoR504utN8i2/JHK1zyfL/SR61XmninxxDpHxL0vT5whsTE1vcO38DSbTn8MLn2Jrr08SabNoEur2tzHNaRxlyVPOccKR2J6Yr5i8Y3cup6r5853TTOzsfcmso03KLfYyfwtn1JeMwOHOWX5SfX0P5f1pjPvs09UYj865z4fSSa/4Ps54b+VbqFPs0wmHnDcv8XUNkjn72Bmukh0i9RHD39u4YdPsxX9d5qL20YyJGywHvXQVzwt72CeMS2hk+YcwOGBHU9cHoPT6ZrYhvbeV9iybZcZ8twUcD/dPNJtdAZYzWP4ij/49JwBlHKE+isP8QtXzJk5pmoJ9p0+ZVGWA3Ae4OR+oo2A5TV9Qh0yza5uWKxKeSK5/SrXX/EVp/bGnTRQ2/m5hhkyDKisO/bOMf8A1q09e0S+8U2o063VrWyZ1aW7kHUDsi9SenPT612uiabFo+kWmn27O0NtGsSs5+YgDvVyl0QF4cj0opqtuUEd6WsxC5rkJtB1W91S7Ml4tlp7Ssy+SA0sgOO5GFHXpk/SutzTN/70r/s5oGUdF0ax0aF47CBYzId0j9WkPqx6k+5rRpjSIv3nUfU1Vk1K3UHy3Mpxn5ASMepI4A4PJ44oAuE1DPNHDG0kzqiDksxwBS7LvcQyW8f1kZj+W3+tCWkKuJJFWacf8tXUZH+7/dH0/HNFwuZseoW95p0l5EzsgXKoVK564OCMnP5VWsdNvY7gMI1ghzwZTzgjnCj3zwcVJ4icwajpEuSUuJzaSLnqGUsD9QUH5n1q/pgmggFncMXaEkROf4485UfUDj8M00UWYo0gj8uIELksSerE9SfesnxFJ53h3VhEfm+zyqCPXYa0NQlENnI7MFAHUnGK5m6lkudKlgeWOytrhtjXEz7SEOBhB6nnk4696AL8t8YYdHEUbyvIp3InULsyCfbOBTrOwCzzXt4iG6lPPfYo6KPp/Mmq9wkUGwwODCFG1g2cAcdaW21eG7TYpaRc7TKgyn59KaQFyGCJEZvLVTId7ZH+e2KimtI25TKN2IqZgJBuRgRTDuTqDirGVZYxcW8kF0qvkbWBGQwrF0W5k0m/XSrty0J5s5WP3lHWM+47eoroXIbkdax9csUvrVo3JU/eV16ow6MPcUIDE8aWX2PWY72MYgvhtf0Eqjj81/8AQa5XXrEX9g6YzIvzJ/h/n2ruoXfxFoN5pV3tTVLcAg9AWHKOPY/pkiuQt5DLGpKlX6MpHKt0I/OuvDyunFm9JqUXBnmHm3NlJI1pK8UpQxlkOCynqPxrPGCAR0rqPEll5F/IVHyt84+h6/rn9a5uZPLk4+63I+tRUhZ3OGpDldhqI0jqiKWdjgAdSa968ch7HwBpttE2JrWSGPeB1AjYc+ozivJPASWzeLdO+2MFjEm5c9C4Hyj88V6X8WNQMHhmOJcb5rhR9AAT/QfnWDWoorQw7G4F1apMvGeGU9VI6irHWqHw21u3ttRWzvobaS0vGA3SxKxjl4AOSM4OAMfT3r2QaZZoMmwtMHv9mT/CuOtV9lLlaMvY36nlJ+9xRXrcNlYxMGay0/jn57aM/wAxXmvia0hsdZnjtWU2z/vI8HO0Ht+ByKVKuqjsTOm4q5nHGKgJzTiSaTANbmQ0rnmmMgNTdKMUhlYK0bZU5q7a3YQ4fPNQkVE4Un3p3E0bKTK3Q1JnIrCjkZO5IrUtLpWXDcNRuBZ4prc456UhYNxTVba3tTAdggGiNSTSb9xz2pwNAhzfL64ppcMoznn1pGYk4FIq5b5qQyzG4aLy36diapuht365Q9DUoBBzk49KkJEqFG79DTAiDe9PBx1qmHZHKntU4bIFAyVmpuaYabuxQImLYphbnNRlvem7qAJd1LuxUO7mkLGgCbzM0xjUe6kLZpDQk0gWGVjzheKv6CRFo5Hdzmsi8crauAcFiBWjYfLZotSw2Lec0uajUjHBoZgFzTsFyQc0h5x60yKQPmnnpkUwHZoJ44qMHjOeaaXPpQBIzYHPNMcE9KP4eabIxGPWgBJBhdwOCKq3EaygyAYlA5x3qdjuGKrMWVzjlT0NcOPp3Uai9DmqrUpu+6PHdT+lLbv82PXpTLtdrb16N1qzZBbaB72XG1eFHq1cNOm6j5UZJXYmoN9mtUtQcufnkx+i/hWYOmT1ps8zSuzsSWY5NR5Jr3oRUIqKN0rFhcZ9akxkVWBIqRGI571Y7D2GBiptOhM12gxlV5NQOc1vaLamOIMw+Z+f8KluwRRpq3lwk9+1QZPrU98VVliH8I5+tVgazRukPpM03NBNMY/INHWockU8MKAFPfim7gDjjNBOelMZfegVh6MQ1V9S5VG7g1MCcimX4zDn6UmJIps3zmpFx1qjM5EmO9Swy9iaLjaNLT4Rd31vb7tnmyLHuAzjJxnFbmn6Hp9+B5Oqur/3ZLcKf/Q6yPD0vl6vDKF3GNXkx/uoT/SprLmJ65q9SUZWizalBNXZ0P8Awhf/AE/MR/1w/wDsqni8HWgH768uT/uxL/jVbRdZmtLKXfK7BGwATke1NbxbdnOVQj6YrleIn3N1QXYnv/BsZiB0u8dpQOYrlQm4/wCywOPwOB71y2oWV1p0/lXsEkLkZG4cMPUHoR7iuoTxQxj5BD+5zVS61+4vYGtrlhJbHJ8sgEZ9a1p4lp2epE6Gl1ocxuppY1X3+9I0mBya7zkHTSHIVepq2iLBEAeXPJ9qqWq/N5j846VKZdzEmjcCXcAPSmM4NRs45BpqvxnFMCRuMcU0jnNNaTIBNIHBGSaAJcjtRn0qMMDTZJkiQszYAoETM4UZY8Cs261EISquHPoKzL3UZLqQx233e5pba2EYy3zMe9JlIfmWdst8oNWIYQvakU4qRWqRkg4oYjHWonfbz2pMhhkUwJVf5ulSFwBiqoYhuacXBoAn3AU0tzUIal3CgCTdzSM2eBUW6jdQKw7BHSg03fSF6B2HFaYyg9qUPmkY5oAZlozlTVmC65G6qbGlx8oI60rhY3AQVBBHNNZjjrWVFcmMAGriTArkVaYmWQwIOaODVYNnpTvMxRcZZDYGOKiJBOQORUfmZpwYY5oAfyOetTRv8u1+hqsZQBSeZnkUXAWX9zJj+E8inI4wcU2fD25OeV5qok3HFK4F7dTc81AsoK5NJ5mTTuB2g3AZNKDzSg0hHze1UYHN619+VRkcVxcrgEiu716PDnnAIrg5RiRvrWi2EdJ4Vk+XHbNdUD+Vcn4VxlvXNdWvSoe4yXij6E00mgGmA5AAeamGeoNQZqWM1LAfnIpOmPWlzzRmgBRnNLTc0ZoAdRmkooAcpGakzkVDmlBNADjyeKPXNJz2ozSENoAyaUU0Ha2PWmBLgYopuaXOKoBSPejbmkzR+tSAYpx5FIDRSARhxQORRmjNMAU5pcjpTc4NKaAGuopRkUGkzQA+img0ZoAdmkkbjA4NJmmseTQMjZSWyT1pVXDDBpTzSA8igCekHJ5NA5FNPBqgJCtN6HmnBvlzTCealAPY+lNI3Ag9aSg0WGV3BFN+lWHCsvPWoSMcUhhmql4Mxv8ASrGc5qvdfcb6UgZy8h+aug0F8Olc9L981uaIwG31psg6NyGbmm7aa3WlU0DEopTSUxiigjIxSZoFICJhsalTlhSyR7znNJEPnAII96YEdwwEeB2NZWpjdaOc+laF6CvQ96o34/0WT0xW8OhjM55x8pqu1WSPlINQMMV0GaIpP9Un+9U4PygmoZP9Uv8AvVKOUWueqbUyZDU8dVU9qsx1ijRlgDjrT06UxKkUcVQiReBTgTioQccVIppDJlNOBqNalTB60mSL3BqRXHemikZgO1MCbO5eKcKjQ5UU8GkgH0tNBpwpgPXHQ0oIDYpBgUDlwaBl2Qjco9QKy/DsujWWsTya2srKpzHiMMMnIOT1xg9AMHnPpWncOohjc9cYrk9Qx9olY8c5zVpcyCM3B3R6o3jLw+kJkbUY0QcYZGB+gGMn8Koaf4n0/wATXktvYT5htyGZHBRpP9rB52g/r+FeFaneCZvPOfKTiJfX/a/Ht7fWsez1C7sb9L20meG5Q5V0PT2+ntU+zsejCTaTkfUobed38Kkhfr0J/mPz9qkDV4FefEnW5JLWS1ZLZosmVV+ZJScdVPTp+p5r03wb4yTxBpj3E1o9vJGdjkfMjNjPy9+46jv1otY1Ukx/xBvmi8PasFYAbIrdef4nbLD/AL5C/nXLeC2xpGnjBGYE/wDQRTvincvB4a0+CRWFxdzSXjqeoIXAB9wGA/CpNLX7NDbxqPuKq/kKlo5MT0RJr3AOeu3/ABrmdau/+JXBYITuuAWlx1EQPP8A30cL+JrpfEDDyyzHAEZJP51549w0lu92QfMnwsIP8K5wn6lmrojqc2Hpe0nr0L2mn/Ry56uxargaqtuuxI44wWwAqgDJPYVKWKNtdWRvRgQf1r16co00oN6n01NqCUbmT4vkxpqp6tn9D/jU3w809r6Wztjk/aZgD7IOv6Ams/xe+YYR7MP5V6N8F9MBu5blh8trCI1/3m6n8gfzrixE7VJS7L8zlqy/eyl2R6tqFwljplxNwqQxFgPoK8ElczLJvOS+dx9SetesfEu9+yeF5UBw07rGPp1P8q8dWSlgY2vIeHVrsxtDuXj0ySLzGVAxVxnAIBzzWUs32zVQ/wDAOn0FQ3E7xNdQKcK0hz+dLo4zcO3YLWPtOZxguhyOfNaHY9Q+EfiUaJ4gNjdPts74hcnor9j/AJ9favf/ADFDbSwz6Zr5W0TwxqfinUEtdKXaUIaSdjhIh6k/nx3r6CsvD97pmhWts2qXF7cQKA08qgs2O2PT6kn3rmxCSm7De9jp2YCeAepP/oJptxbw3Mfl3ESSp12uuR9axLC9kmkQH96YG+cIPmH1XqK05NQijILkeWf4gen1HasBFSTT7i0ObGRpoe8Ezksv+655P0b8x0qlpgnGoLBd2dxbrKpcSblGJOpGVYhs8nnPQ+1dGjK6BkIKnkEVh3V29x4s0+zhx5VvFJcTH3I2KP1b8qANMw3Sf6u5R1HaWPJ/MEfyqhZa5bXGomwZlW7wSFRt4YDvkdPxx+NWfEd4LDQr6fZvZIHcL6gDn+YpI9GtbZwdNd7WMAhUjwyc9wCDj8DQBLbviWWI9VbI+hpPtkTPIkW+V0O1gik4PpnpUTWV2tz50d1C/GNrwkZ/EN/Ss6W3NjreltNMJbq6uJEJVNgCCKRsYySeQvU/gKB3NaO6M1wIIYZBLt3fvUZFA+pHPXoM0slhHO5a6PnAjaY+iEe4/i/Hj2puqiRHsrmIn/Rp97qP41KspH/j2fqoq7uVlDIcqeQaBECWdohylpbKf9mJR/Ss68ldPEtpAwDQXVrKrj3Qrj9GarttcAo5c4Ac8+gNUNTngg1vTpZpEQBXUMxA+9jgevQUwLejPK2mxR3JZriDMEhbqxU4Df8AAgA341Os6tcNF3UZrL1LVIbFxcIG2MQJCy7FPvubAzj+VV7JpdQuTd215GkR5UIofd77s49qBkHju5S3XRCzgMNShfHcqM7v0NW7pZ9SdJZHkstPhPmZJ2SSY5ye6r7dT3wODfjsYRci5kUS3IG0SuMlR6D0/Ci8iW5KQux2Z3so/ix0B9s0yjNb7LcmKW8lnljTDossTKmexII5I9+lOvhY3iDz1iuIcZCkB1JrVZFYYKg1XeyhY5Kkn6mmBw+qaDGkb3Ojw+SIyHe1JzDPjsV6Zrp9IvrfU9Mjnt1CxkbWjxgxsOCpHtV9oFSPYgwvpXH3DHw7rTXKA/YLgjz0H8Po4+nf2qlqBsSl7SchCcdR7ir0UomiDjv1qO8Rbm3WSIhuNykHIIqtpr/LIh7c0xks/wAp3Cq0jblzVqbkEVnO21iDVIZkanHNb3cOoWA/0u36LnAlTuh+v6GsTWvJe/TULPiz1EGUDGCko++p9D3+ua6i45Brl/EMDwWNxNAhaIsskij/AJZyDpIPqMqfqDVxbi1JDT5XzHPeKojJZPcRqC8YJwff/wCvj8M1w80ayxApwrDcvtXocciXULAjKuvT2P8Ak1wSxmC4ltH6qxVSfUcfqB/L1rrmlddmOvFXT7mahZWBGVdT26g1v+IvEc+u2OnQ3Snz7UMHk7SZxg/Xjmsm7j2N5nRTw3+NRqAenNcso8rszltYltZNjFWGUbgg16t4W8SXl/Y/YLm6kMkKjB3cyJ2J9SOh/A968mArpPCty0esWO1sMxKEeqkc/wBD+FcmNpKpRb6rU1ou0lc9KaeQNy7Ee5rB1mfzLzngKuP1NbjLnmsC/thNeuSzDHGB+NeTgW3OxeNilC5U3ClyKk+wj++9L9gB/jevW5WeVdEO4Uobiphp4/vSU7+zxj70lKzDmRXLDNRvyatHTx/ekpjWGO7mhpjuiBOMg0bjHytTiyOON9NayP8At0WYXQtveAnaxq2GyeorOax3YIDhh3qzHBIqgZY/UU7sNCyWAHFHmH1qHypO4ajyn7g0AWFkHU04zDtUK27N0PP1p5tmznI/OgQvnNmlEoVs5qGWJgeTgfWmCNqAJb9x8kiYwRyarLcISCJF/OpPJdwVIOKZbaJEWyd/50Bcka5TH31/OmfaI8ffFWhodtnJ3fnT/wCxbXHRj+NIZnmdCR84py3MYP31rRTRLQ9Ub8zVuPQ7DvFz9TQUYhuYv74pjXMX98V0o0PTj1gX86cND0/tAn50XJOW+0xf3xS/aY+ziup/sPT/APn3Smvotht4t1/Oi5RyNzKsgQIc4PNa9tzAB+VLfaNHz5MBHuDSW0TxRbZAQw9aESyRFIPtTzyuKZlgcVJ2qhWI1GM4p6yN0PSmLy3WkYHOOaAJwQehpCecUyPAByacAM8UhhzzTXU46ZNOBGevApruCTs6elAiJQVKh8E96ZcgqpYdhUuwtjcDTnX5QccdDRKCqRcH1InG6Mywja9fyuwGWPoPWodZuVllWGHiCLhR6+9Xb2eOzsDb2wKySnLt3x6VgE85rLD0PYrXczjGwE0A0lKOa6LljhmpFNR1PaxGeZI16scUwLmmWpnkLsP3adfc+ldKn7mISsMDt9ar6SiE+SowqDPPc0Xc5mkxnCLwBWbdyo6DWYsSzHJNJmmg0maC7i7sGl35NRZ+bFL0pFEgfNLWzYeGL6dVku1NlCRkeap3sPUL1/PArXl8M2LBRC10uMZLOpz+G2spV4RdrlqnJnHg0M3FdFN4VlAJhulPoHXH6jNZl9pNxY26zytFJEX8vfG2QGxnB+oz+VVGrCWiYnBrczGVmXqR9KLshIACfSpCygdaYPLcguRgdiKsky3VHcEuAv501win5XyPcVsSLBjgx/8AfNTW2j3N2yiNVUHnc3yik2ktWLV7GfoUwfUtiFgfJmOcekTH+ladl/x7sauwaO2n+fOX8yRYJRhVwBmNgee/WqdmP9FNcNaalK6OqlFxjqTzOE0hwOC0w/Rayt/NXr2T/iWxJ385/wCS1mFgK44rf1OxvYmEhqR5DHA8gBO1WbA74BqsrA1Z/wCWRz02n+VVFe8iZfCzkxq0mP8Aj0lqa0u3upCHgaNRzljWs8KAZUAge9MCL7fnXsnmC+eqqEB4FJ5vfmnSQqCOw+tNEa9nNArETTfMflY/hS+cQvCmrywrj75/OkMKjox/OqEZ7y5HIIFIsoUYOav+Sp65/Omm3j/yaVguU2uQB3rCvp7i8mCBXSL1xXT/AGeM+n50fZ4gM5/WgVzn4IvKQKqn/GrC78fdNbHkwjvR5UXqaLDTMfLj+E0uXH8JrWaOEDOTUe2Hd1NFh3Znb2xgqTRlwOEOK0/LgHOaXbEeAQaLILszFSV+i5p3kzZxs/WtHy0HQj86Fj4yMY9zQkF2ZpgnH8H60eTP/c/WtJio68/SmEx+9OyFdmf5E/8AcH50eRP/AHR+daYMX+1S5i96LId2ZfkTn+EfnS/Z5z/CPzrVzEKeBG3RlH1oshXZkfZ5/wC6Pzpv2ecdh+da5Kdm/SgKDyCCKVkF2Y3kS+g/Ol8mUdh+dajeWG68/ShjGD0z+FJJD5mYzwyHqAPxogWeNipAI+takhjxwvPpim74+yj8RRZDuyvvfGMUFm9KtAxn+HH4UN5QHTn6UAVlLntTh5mOQc1MrIO5H4VL5q9M00BUOQnI5pm9/wAKusykdaiCj1oJuQB2XI6g9qpyW920v7lgFPY1qgL6ZqRXRedtFrgZgsL4gfvFp39mXveRa1hcc/dpTcDHTn60WQ7s6AMR3qcOPWq2c0orUxRT19RtDE8Yrzm6bEzfWvRNfXdbJz3rz2/QrcP35qlsI2vCz/vGArr0471xfhbIuWzXaqehFQ9xi/WnCmFqUdKkY7PNTR+9QH2qRGPcU7iJs0UwtxgdaevSgBSPWijJ70oGaAEpwFBHpSOCB8p5oAcOtPpg6c9aXd8p5pCEpM804Go2oAfSH1HWmhqXNAC7qdnNRmnKeKsB1OBHemGipAkOKUEGo6UHBoGK4xyKibnB9KlZs4pMAg0gGqT3pxpo4ozTEBpKCaTNUAp4ozmkzRmpAdSUmaRjQMbznFAAyKM0ZoAkBpTzSKOOaWgBAaWk61JGQDyKAGnHemmpZcHFRdTikMYx4xULKSc5qcrTSoxQwIWBqCc/Kc+lWTioJxlTUjOVn/1p+taulNwgrLuRiZvrWlpX3FPvVMg6TPyilyOKY3RfpQDTQy7FLb7cOuDUcxjLfu84qs3PSpKAH7ab0OKeDxTfrSGFC/eFHWhD8woArXiljiqOoLi2kH+zWlc8ZJ9az9Q5tpP93NdEN0ZS2OYeoW61M9QP6+ldDMhsgHlZ96VDwKQnMDfWgDCr9K56prT3JkNTxmqyHmpozzWKNWW0OKlRutQKeKkBGDVCHoctzUmRu4quTgYpImJl68ChiLq1KDxxUKZPWn5wpFIB2+lHOKhzng1LEcLzQFiXeQQAMCnZORUR5OQacJMHBNAmT5pwbiosjGaUODj1oBEozT1PNMBBAIpQeaBlm5GbNT71xPiaUrDKoOPMYRk+gPX9M12kzgWgB7muI8Rj9w3tKp/8eFaR2CHxo5HUnJZF7AZqjjPAq7dwSxeUJ43R2QOA4wSrcg/Qgio41+ZEQr5zkYB7AkDP5kU21uz033IEt5ZFmaNGZYRukI6KKfa3t5Z5+yXU8GeT5UhXP5V2upWsNj4bmihTh2RWPdizqCT+dcSy7pTj1qIvmM6cue7N/SJr7W9TtBqN1PdCL58zSFtqqc9/Vttd/HwRXNeDLQR2klyR80jbF/3V/wDr7v0rplHTtUN6nPVleRkeN7gtFBYqcPdZDkfwxDlj/IfjXJXbiTUoIQABCpkbHr0A/AfyrRvb77deXOpE5jY+Vb5/55qeD+Jy30xWFpzGWW4uDyXfAPsK76EdmztwlLkSvu9TtvANqL7xbp0bDKRuZm9tgLD9QK9d8ReHLLWbZkmjVZOquByDXmnwhgkl8TSTKP3cMDbj7kgAfz/KvYLh5FjzEoYjqCcVz4qXNVZtVleZ83+NfD95puoQwXQwEcsO+5exB716p8IoPK8MyTEczTsQfYAD/GtrxLDaavpc9vfQ4YKWRhyVYDqD61j+G7u60LR7fSZdKu3vgWEe0Dy5CWJyWz8vB5zWbqNxsyOa+5h/GHUA13Y2KN/q1MrD3PA/ka87D16rqnw+vtcv5b/UNRhgmlx+7ijLqg7DJIrnvEnw+uND0i41Br+KWOHGV2FSckAfzrqoV4Qiom1Oooqx45fH/TJ/99v512nw28Hah4kbfGhhsy+HuGHBA6hfU/oP0riLk5nlPqxNfU/wkkSXwPpTIysRbqpwc4IyD+tckpuMro44fE2dF4e0Wy0DTY7LT4gka8s3Uue5J7mtImio5UEgwSQPasTQzNSSBpftNsyR30akLJt7eh9R7d/bqGWuqJf6aJZ7CV51JR4VUNhh6E44PUHjg9quyWUOCzbsDnGaztPke3eZ1XdCSC6jqvuPb/PrTt2GZE9/rNrBLNbaPcw2UXzOHmTfszyVQZ5A56jpWjotpBMov9NvWaWdFy0ihwy8keh/iPGeM1vxSpKm5DkVyvhPw8iaPbmS5u1KgqAsxAGCe3SkBr39tqF0WE8drLA1vJAUVipO7GTyMdulRaWl/a6JZ214kpubdFTenzb8DAJx7VZkS709A0dwbmLoVnAyPowH8xSNrUalVFtcu5+8EUfL+JOD+FIRaiv4tqi4cRSHja/yk/QGs63nt9S1uG4jlVxbK6qncMcDJHUHgj8apeIdDgv737Q0s0V6oBimRsGL2A6Y9c9fyxasI7ogRaxHZS3Cj5blUxuGOCVPQ/Qn8KdgNPVZ4YbORriVI1x1ZsVgRapeghbCzeWJuMyN5Y+oB5/Srsuh2s1wJ5pB5mMDywFx+PX9amt4ZY7rauCUPLdqBmcY7hJTFNO6yMM4SBnROOhIHX6nvU+i20Yuy7TLczKPmkyD+Ax0HtW4YkZNrDOec+9Zl1ZmGYTqAzAEByoLKD1GeoprUCPVvKuZQrosoTpvAIU+3v71haqJbCGS9s5mgSIb5lRR8ygjcenUKDWuRTWQOjK4BVhgg9xWllYouQWKSQpKLy6l3AMsglOCD0OBx+lRTwXMLtJFM8mB1YDJH4CszwhO1nLc6HOxLWv7y2JPLwMeP++T8v5V0cjbCpP3c4NRsBn2eoM0gSfHPAbp+daJqOaCKUHegPv3qukpt5RDKSVP3HP8jTfkBZbkVj65aCe3ORkr/Ktg9KilUMuKa0A4LTr+TQJxDPufTHPB6mA+3+z7dq6MbUuUliIaKUcEHI5qjq1kuXQrlT0rBsL99El+zXO59NZsqephP/xPtV2vqijspDWbd8Nn1q6ZFkQOjBlYZBByCKp3Qyv0poCmTlcelV22gtvUOjAq6nowPUVIxw2ajkrohG5olc5TVNM/sm6R4fmsJiRGc52E87T+XH41w3iaHy9Vd1yPMCyAjsenH/fIP416zdBJ7Ke1nGYpF/I9R+orzHxXBJFPbpNkvHuXcBwwOCD+hqpq0bP5Cn8FmUkkE1tngHrx/CR1/wAa0vFEVq+l6XrNkHM06yQ3cbY2+ZGEPGPUPkH0wOxzk6bFJNdw2sCCSS5kWJFLBRuYgA5P1roPHmlWOia2dIsJpLhrJBHdTGQlZLgjL7VzgAcL0z8pyTWFWSm4pfF+hztJ27nIphs4yCDgg9RWnoj+VrGmSAEnzxEAPViP8Ky4xjy2zkHMZPrgnH8jV+0cwyxygEtE6ygDg5Uhv6VE488HHyBaanr4t7ho8pGSTxWelldvJOwSMlX2MpYZBH/667G0cZVlwVOGB9axdaY2+rXBXPlybXGBnsM/yrwqUfZO8Sqs/aLllsZYs7w/8s4/++hUi2N2eqRf9/BU4m3jKsKern1Fb/WZmP1eBFHptww+cQj/ALaCpf7HmYjDW4Hu9WI23dSBVlQmOZR+VL6xMXsIGf8A2JN2eA/RqDoc56GD/vqtLKjpID+FG8Dvml9Yn3H7CBmjQ7nH3rcH/fpDoN1/z0t/++q1BIvvThIO1Ht59w9jAxR4eu8n99bYPvSr4fu+9xb4+pra3ZpRij29TuP2UOxkjQZ8fNPDn6GkPh2dj/x8QfiprZU08N9aXt6ncPYw7GTH4an/AOfq2H/ATUq+GZM/NeW+PZW/wrS349acJDil7ep3D2MOxQHhSJxh9QQD2hJ/rT18I2w/5iZ/C3/+yq+JTTxN60e3qd/yH7CHYzx4Vtx93U2/8B//ALKl/wCEYjH3dSb/AL8f/ZVoCXNOEhzR7ep3F7GHYzh4ajH/ADEW/wC/P/16ePDUB4N/J+EQ/wAa0Q5p240e3n3H7KPYzx4btR1vrk/RFFO/4R20/wCf26H4LV/cTQKXtp9w9lHsZ58N2jf8v13+G3/Cj/hGrP8A5/Lz81/wrRFLto9tPuHs49igfDVkRg3l7/30v+FNHhbTwP8Aj7vD9WX/AArSUEHtT+fQUvbz7h7KPYzB4Y07HzXF4R7Oo/pQfC+l95b0/wDbRf8A4mtUA/3RS891FHtp9w9lHsZP/CL6Tn/W3n/fa/8AxNH/AAi+lAcTXX/fQ/wrXz/simkn+6KPbT7h7OPYyB4a0wH71yf+Bj/Cnf8ACN6bjIE5+r//AFq1N3+yKN/tR7Wfcfs49jM/4RzSCvIuVb1D5qE+GtOz8r3A+rD/AArY3/7IpQ2evFHtZ9w5I9jHHh3TcfvGuHP+8B/SgeH9LHSOc/8AbT/61bBcelRkj0pe1n3Dkj2Mz+wtM/55zj/tp/8AWpRoOmgH5ZiD/t1oE+1FHtZ9w5I9jIm8O6RIfnt5Gx6uai/4RnRf+fEn/to1bTCmkUe0n3Yckexjnw3oo/5cB+Mjf40n/CPaKv8AzD0/77b/ABrZphA7ij2k+7Dkj2MoaHow/wCYdH+LN/jViDTdLhYNFp1sGHfaT/WrR4pCQKOaXcfLHsMWCyRspY26n2XFRta2ROfsFv8A981KWppIo5n3DlXYQQaeBzp1uT9Ka9tpzf8AMPiH0JpSRimkinzPuHKuwgstNXlbCMn3YmrFu9tbOrwWVukinKuAcg+3NViaYx96V7lWRsNrE7tl1jZj3Zc5qKXVZs8JEv0QVlh/enbtw60rIZbk1GZhhthB7FRUTX0nl+WRH5eQ23YuMjPOMe5/Oq7D3zTMUCJDcAEkRxA+yAUx7gkEFUP/AAAVEwqPNUBKrpkHyIMjvsFJJNuJJhhJ7krURyOaYzY71OgIeXj7xIvbiqt1Kqo2I12EcleoqRmX+8PxpFkTpuFVBpbikr7FNp44WtS6K6FiTkZHOP8ACukS1tZIleOGMKfRRiuenijmHl78sfuknofSrfh7UfJdrO6yozgE9j6Gjl5dhXb1ZrLZQqOI1/Ks/X9KJtpr+Bf3exvNAH3Wx1+h/nW9s45qxbOsfmJNGJbeVSksR6Op6/Q+9K+tw6WR5R/CaQda1PE2ktpGpNFGxktXG+CQ/wASH19x0P0rL6Yr0k1JXRxtNaDpOWpoHNNZ+acj4OcU+oiUvjg01nGPSmNICeaY7ccVQDy9Gag3Uu7ilcRMDQDUO6lD0XCxLmlLcVWaXBAAoeTA4pjJd+QeKjbGflNR78D603d70gJc8YNIGA9qj8wU/cGXNO4Dg+DzzTi4Peq+e46UbxgUXAs8dziomPzcUxThuTSsR1ouBIHp26q++hXoFYsFsGjdUO/3pC9IZPvoLVX385pDJQKxOGpS1VwxpplOOOKAsTSE9u9MCk4A/Gk3cc0u/B4oC5Lgih8qeSCfaow5zz0pd6H72fwoGNdpGPCgCk5ByWJPcA06SUMu3tUYZcUATo3GT+VO3VV8yl8ymKxZ30b6q+ZSh+RQFi1vpC4qsz88Gk30BY7XpTselRlhn2p4bjArUxuUdayYFFcJqA23Lj3rvdW+aAc1wmqcXTU47CLfhw7byu3QAqMniuD0I4vVruojlBUy3GhWAB46UKaaaAai4yUCpULbcdqhRs1IJCBtpiHqvcin5wPWiPJTnrSZwcUAPABGe9Lnjim5oHWgB4bHXmlz3qM0ueKYDhzSMPSkzx1pQeKBCrxSMAaCaOKAG+1KRQe5FQFzuJzQgsTUobFQFsnrUgOVFUMk30u4VDmkPXrQBZ425pM0gPyCkzUiY9jnpSFsUlFILiE5pCcdaUkUgPHNMBc0tCqMUrHHSgBvamk0pPFNNUAuaDzSdqU4AHrQMMc0igh6co4pT9akB1NPWlzSE0gEDHNLuNQlST97FTIPlwefemApclcd6RTSHg0jdcg8HtSGiXgrULHPApSflqNG65oGMbO6oXY85qZz81QTA5zUgc5dj9+/1rQ0v/Vj61QvcidqvaSflx71TIN5znaB6UYOKHAwh70u7jFNDCMknBqaq6KQcmng5oGShqM0wdadmkAA05fvCmUqkbxQBHO4w+fWs+8YNA/+6a0ZlByCO9ULtMRP/umt4boymcu9Qt0NSv8AeqIjrXSZDP8Ali/1FBPT6UHiFx7g/rTW7fQVz1djWnuSIanQ96rL2q1CM96wRsyVW6c0rMe1JsXd60gBD4xxVEsaJ2VtrDOanQ+/NQtgtkjmnqMgEcUxF3fjAzzUgOc9ahjXp3qwqiiwXE29x1oLdqUnBpuwnkGkFyZD8mKFHemr0FSHkY9KAHZpOc0i8Gn0ASIeOaceopiYp/egCWf/AI90+tcZ4iSa4221tGZbiaeOONAcFmLDA/Ou1lX/AEVfrXBeKd/n2pQlWS5VsqcEbVYj+VWttApq80em63aXEk/k6jp2n3ukqg2SXMoiktx/dZuc49RivJtfn0v/AISmRtLgSCwtSkWUJbO05ZiW5PPP0plj4n1TQYbtrK4wsowyyDcu48BsHuOPy5zWNt8mQliWSTAYnn5unP1/z1qeToeq430Os8UXAFvbW6ty5MhHqFH+LA/hXLxRNksoy3RQe7dAPzxQ80zzJHKcrDEFjPtk/wD1h+Ara0G18+/jGPlh/et9f4R+eT/wEU4+7HUyjH2UNTsNPhW2s4YE+7GoUfgKz/FF28dilpAxE92fKBHVV/ib8v1IrUTha5G+uvtGpXd5nMNv/o8R7ZByx/E8f8BqacOaSRz0Yc8rMzdWmWGJkjAVIkwAO3HAqvp6+XaRL325NUtUlLIqE/NK/NX1OABXpQfveh6cX73oezfCCKK20O4uJGRZbibA55KqMD9S1d8ZoypxIv518yW2oXFll4LiSH1KuVqKbx9qsblIpVdcY3Oik/yrhrUnF8z6mdT3Xdn0VfT20U0JuZ1O6RVVTj5iTwKt3v7+5iWN8bQeQe56fyr5+8Im68Q6/p0N5K8nmNub5jwo5PPUcCvYbd/+Eb1OKO5nkk0u7IRJJm3GCQdASf4SO/YiolBx3E1Y66AOsSiQhm7kVx/xcu0g8HzRMfmuJERR9Du/9lrsQa8a+N2r+ZeW9krfLbxGRgD/ABN0/QD86mCvJAtzxOc5aQ+p/rXpnwg8Y/8ACO3C29/IRpc5w5PIhf8AvfQ9D+B9a8vY5U1r6Qc2pHo1aQipyaZlS1kfYltcQ3VvHPbSpLDIoZHRsqwPcGpK+UPCfjHVvDF3O+nXRFuHy1rJ80UnPp2PuMV9A+CvHemeKI1iQ/ZNSC5e0lPP1U/xD6c+oFYyg0abnVXB/cSY/umqOlqVeQ9sAVfbkEHvUVunlofUml0GPijWIMIxhSc49Kr6CyvpcRT7uWH/AI8asO21GPoKyvBkvm6BE3/TSVfydh/SkwZd1ydbfT3lkOEQFmPsATWZoUMr/ZzKfmVfNk5/iPb8yfyp3jeVU0fa5CpI6o5P90n5v/Hc1paPA0NmrSqVml+d1P8ADnov4DA+uaOghip512SemcmptQjDRhsZxwfpT7RQA575qWRd6lT3p3GYJtY9wYblx2B4rWQ7blPSRP1FVXTBIqxcHYsMn91hn6GhgW6D05pM0lIDNvYBG4ZRhW7elVsVrXKh4iO45FZ8eBKuematFHP+Iw1mbXWIAfMsXzIB/HC3Dj8ufwrp5mWa13oQysu5SO461FqFrG0Tqyho3BV1PQg1j+DpmSyuNKnYtNpz+SCerRHmM/8AfPH4U33A3oJPMiB79DUd3CJ4iP4hyDVe0fZM0Z7/AM6uk0rWAzbS6KHypeg4BParrHNZ2pRbJRIvRuv1qSzuNy7G6jpVWvqMbqEXmIcDkVy2pWqyIysMg12EnIrD1KLkkVcBo42yv7jQJjGQ0uns2SndPUr/AIV1kV1DeWyzW0iyROOGFYOoQB1YMODWDaXU+h3jMmXtnOZIvUf3h71o4dUO3U6+Xgmot3GDTvOjuIlmgcPG4yrDvUDnnNbUjSBDcSKgJbpXP63Fa6lZsqupkT7p/pU3ii58q22DvzXnF1rbJcFVzwea1qTS0YpzS0Y+XzbSVXiZo5o3Uow6q24YI/Gpr1bqSF7jbNIZZNjTsCw3nJJZvXqfU10ml6joV3qltqE9hLPZW+BNa5BMzgHaWycAE4J68qfWn+KvElz4hkgWS3t7SztgVt7W3TCRKcfmeBzwPYVyWk5WS+Zik+hxt3CFs9ifKV2hD75GKmtWLBGxgnrT5YpHuIWIxCAWB/vHp+XX8QfSixX5FHuR+pqlZu6HbU9r8Gu03hnTmYEFY9nPcKSoP5Cn+IoEEkEjl/mUqNpwOD/9erHhGAJ4Y0oDPzWyN+Yz/WneJUH2OMtnCOM+wIP/ANavn5/E7GZzaxxqcqzCpVAz940wCJhlWJp67R61myyZfxqVTz1quGHrT93pSCxZU1KpHcVSDe9O3etArF4MvoKUMvtVMH0pQaLhYubx6il3D1FVM06ncdi4CKcCKpqSO9TI/HINS2FifIpwaogc04UrgShh70uQajpwNO4DxjPWpMrUVKpouBICKeGGe9RZo3+1FwLAfHalDj0NQq3tT/oB+dK4Egf2pwk9qiGf7o/Olw39z9aAJd59KN59KQbu4H50m4DrgfjQK48O3oaXe3oaiMqg9R+dH2hB6fnQBLub3oy3vUJukB5ZR9TSi4X+8v50CJc5oqLzx6j86BNnoR+dBRLRUfmH2/OlEoHcUxXJME0m003zRS+atAgK0YpDIp9Kb5goAcRxTaTzB60xpUBwTQA4kU0mmtIuOD+lMMgPRv8Ax00alDjmmMeaTf6sf++TSbl9XP0WhABGaTFIW9FkI/3DTSzf885f++DTYCsKbijzG7QzH/gNGJT0trg/8ANADWFMIPfFTbJe9tcD/tmad9nZv4ZgfeMigCoy47imb9rYJqy1pOSdsUzD/d/+vUTWd0f+Xd/0ouFhpI96QDJ71KIbgf8ALB/zFL5c/wDzwf8AMUXAhZD7/nUZj9c1dEE56Qt+Y/xp32C6fpD/AORF/wAaLgUPLXH3c0jrgcAflWgNOvB/y7/+RV/xqN7G9z/qAP8Aga/40XQGdhhyOKQeZ2Jq3JY346Qx4/66L/jUJsL0nlYl/wC2o/xougER5FPJz+Gao6pbu7G7jHzL9/H86tyWlwv/AC1gH/AzUPl3ET586FlYYYA7hj34qk1sJrqbPh2+F5aeW5/fR8YPcVrKnvXFTK2lX6yW0m5OGVh6ehrtdPuY761WWPGf4h6GkTtoRX2nQ6tp72NxhJOWt5T/AMs39/8AZPQ/ge1eX3ML29xJBMjJLGxVlYdCOor1zZ71jeN9EN/p51a2QG4twFuFUcunZ/w7+30roo1OV8rMqkb6o80K/NnrQzYPIp7UwkZxXXcwG7uKTcKU4IqIgLnbRcVh+9SORTDjPB5pCB1phcU7oLEu71pN1RMfekzRcdiQvxgfnTS3FRluKYz470cyCw8yHPtTSwz1qItmjgcUuYLEo6UoftUQYDpS7xmjmCw7JBxmjPrQHBPWlyAaLhYcJOMGnbsr1qEketAbFO4WJCaA1QvJgZpqzZPNFwJy3pRuNQ+YD3pPMHrRcLE+aQmoi49aaZB60XHYsBiBSAiq/mj1FL5o9aVxWLGRjFKrDPNVvNHqKBKPWncRYLUm6q/mjnkUhlHqKLjJ2bigcmq5lGOtKsuDnNF2BPmgmoGlBNIZR60XYaFjPFG6q/mjHWjzR6ii4aFgNRmq3mj1pfOX1ouxXR3vanoeKhBwaU8mtzATUR/opNcHq2ftJyK7u7O+1f2rhtaXFwPpTjsIbpDYu0ru4T8g+lef6a2LuP613tux8peMmpmUiVqQUOwPSkDc8VmBInBwamX7wxUIXJzmpkOM0wJQTQWxTVf1NQTTKj4JpgWVYGlJqtHOg6nr7VMTQA4tTlJNRZpS2BTEPY0obioS1PXJGaAHg5NKGpmeMVGzZPHWgLFjIPeq8qbWyOho3eho3HuaEIaDTkbB+tNxkmgAA80DJc80ZoApGBoAC+OM05ZM5qIqcZpyDaB60ATA0uaiB5qTdlcGkAx2zRkmmlh2ppc0wJwQBzSFs1EjZHPWlzQgHgg0m6kBppNUA7dRuqMmjNAyZXp3Xmq4Yipo24qRDxmmsaUmmZ3fSgYmaer4NAwOnemt96hgOJyaTcB1oWmy/dyKQDnYY61Fmo91KOlIAPWmSninE0yXtigZz1//AMfDVa0gnn61X1IfvzUuktgtzVMg6Nvurn0pu7mo2f5Fx6UiseO5oQyxmgGmbuKN1IZJnmnA5qHNKGxQBITzQDyKjzQDTAfJ94896rXpzC3+6atSc1VugPLb/dP8q1hujOWxykgwTUGc/nU02efrUL8dK6jFDT80Uvtj+dRSZ4wccVKn+rm+lRSnCJ9K56q0Nae4g3Y65qSKR92CKjU1NGRnmuc2LKsVAp4cluelRoeKkRcv1GKpbEsd1IIqRaQxY+6RSp15qhFmJGA4BOal8zbwetN8zgAGmlt1ICT745oTKjBOaj3VKmMc0ALnHSlVjSNweKco4GaAF8zmpVORURUNT1GDQFyROtBb5xnrQKaVy/WgC4T/AKP+NcV4iBZZmAOY28zA745I/EZH412q8W/tmuU1FN11IPU1pHYm/K00cbqCfupTwQo3fXHP9KSJB81vIMrj5c91/wDrdPyq9NbmMmFxygwM87l6A/ljPv8AhVNIl3eRJk4G6Ns849M+o/lir8z2otSSkiFrW6DKY5EcpwuRyR6HJA7Cup8HwlJJnaRPMK/vEydx54JBAx3ArCVLlHRQElRiF3s20r6ZwD+dbWnWd7HeQSNFsCPy24EbTwR/n2rKaXcxrqNmr6m3rd4bHTZpU/1pGyMHu54H61yF3tt7SG1TJKj5mPU//r61qa9d+fflc5gshub0MpHH5A/+PVzl1PxJM+B3wK2w8bLmYsNDlXMzLvJQ2oJk/KhArVlmSFC0hwBWVaaVqWoQyXFpZXE8Sn5njjLAH8Kp3Eskkh84ncOMHtRGty3fcpVHG7tuTXl69wccrH2WqOcufypzHAJrpdG8F6hqOmm+VoooSjOgY/M+M9u3SsHJyldmdpTfc9D+DFjv1W5uiPlghCD6sf8AAGun+L0pTw3CoOCbhf5Gm/CXTP7N0OYGXzmkdG8zGMgxqwH4bqo/Gm5WLTNPjdgoaVjz7Af41pfmnc6L3epmeEPiLPp1utnqgaaBRtSQfeQenuK878YarJqN7cXEp/eXDliM9B2H8hSMwVSxPAGc1zl3OZ52c9O30rSpCNPVdQq2itOpGfumtPSHCwS5/h5rLP3fxqSGYxpIo/jXFYwlyyuc8JcruXdOj82cyN0Xn8a10Z45Y5YnaOWNg6OpwysOQQfWs7SCPLkHcEVoV00kuTU6aS90+h/hx4tXxPpGLgqmp22FuEHG70cD0P6HIrrSa+U9O1S70W7W/wBOuGguIgfmHRh3UjuD6V7N4I+JVvrtkDfxi1uUIRy3EbN/sseMn+6efrXJVp8j02B6Ox6BdvttpCT/AAmsr4fIU8KWZb/loXl/B3LD9DS6leiaykWENuIJH5Ve0vydN0Nd5CQW0fJ7BVH+ArJiZT1eNNU16wsfvR2h+2XHt1Ean6nJ+i+9dBWL4VtpU097y7BF5fubmUHqufup/wABUKPzrapElZDslI7E1PUUq/PmnocrQMr3CfPkd6ZqfFhMx6Iu/wDLn+lW2APXtUNygkgkRuQykH8qAC1k8yBG745qXNY/h+4aWxj3nLlQW+uOf1rU3UyhzfpWfINshx61fzkVTuRgg00BZYB0wehFclqZOk+I7G/6Qz/6FcenJzG34Nxn3rqUf9yhNZXiWwTUtKuLdsfvEKgnsex/A4NCAW6zHdbh9avK4ZAR3rn9JvW1HR7O5lGJ9vlzD0dThv1BrVtZPkKnt0qt0BLcr5kTKfwrIDFGrWZqyrxdshI6VURouxzB096qXo3Kagil2mpJn3JmtIxKSOX1C6gjuDC8iiTrg1m3cSXEeVIPoa4vxrqrDxBLsDMQdox7VJ4c8Q4nEczNsbghuo966qbV7MqMlex0GnXj6XOUfP2R2+df+eZ/vD29a6UkHkHIPesO/t1kTzEwykc+4p2h3LI32KU/dGYmPcen4Vr7Lkl5F8vKzO8aAiFT2wa43SbKKS3aWVAzOSeRmu+8Y25l03cv8Jwfxqn8HraC71mOS8QtFaLuUY4aUnCDPtkt/wAANaqn71zSEVz6mP4U0mzTXit68sdtJGfuMADjk9R+P4VsaZa6Nbxy396xvobaQqsW7bHcErJswBzjITOegzkV7Pq9kNbvII9UggvLYxtFmVQJIjtPIfqQehBz1rxu78H3NobsxKqQRzfuYWfcyITjlsY4J/I1lWopw5r2RNajyrmT0Zy2pTkma4kI3nn0HsoHYdgKk0PS5b68tbC3P72VhGG9O7N+ABP4V6DpngK8WSWC4gLzXETR+cUJSEMpGR+Pfr9KveBfCl1o+qyXOookdwoMaR7g2FPVsj14/Ae9eVPFQUZKPTY5pSSV0djb2ywRRxRDCIoVR6AcCqniG183TLoMrFREXO04Py/N1/CtjbzTbtQbZ0PRhtYex4ryGjG55skFqgBRLjn1lH/xNTJ5I6iX8XH+FZ0QeJBE8qF04PWpMnrvX8Kzsa3NVDaH7/mj6EVKpsf7035CshWP94VMpOPvA0Aae6z/AITL+lG+37b/AMRWeGp4b0o0Au74e278qXzI/f8AKqYY0uTTsK5dDxHrup2YuxNU1Jp+TRYVyxuQH736UpmX3P4VXz60uaLDuWPPX0ajzU/2vzNVDuPalG4UhlsOmO/5mnZT/a/Oqg3E9alBI/8A10wJw0f91j+NSK0WOIyP+BGqwfHb9acsn1/OkLUsl1A+7+ppA6f3P/HqhLE0n4mgZZEkf9z9acSpGMEfjVZTg08MaAJ1CjuxH1qV5osYEQH4mqu40lMkseZGe360wvHn7v61EMUpI9KRQ5/IbrHn8aYY7cj/AFQ/Oj8KMn0oAFgt8/6lasqYh/yzU1WJY9OKcrHvQFiyZI/+eSflSeYn/PNRURf1xSblPWgCYyqeNi0m9f7oqLco6ZpuRQKxKZFx0FR+YueUWm0bR60hgzrngAUqy4pNg9aNuO9Meg7zx7Z+lKLhiMADPrimeWM9qUIKBaDjcSetAuZR/FSFBTGyDwKQaFhL2YfxfnzT2vpiB82PoMVS5owfegLIufbp24aRm+tBunI5x+VUR8p4NO3n2piaLBuGHYUp1CZRgNge1Vt/NMZt3GMU/QXqTPfTMcmR/wA6jNzIf4jn61XJphbnvSKSLDTynqxqN5pP7xqMt9aQtRzByj/OfuTR5z/3mH41CTzRmlzC5SXzWP8AG350F2/vN+dQk80bzT5g5STe46MfzprO/XJ/Omb6TfRcLCsWI5NREnvT9/tTW55FAxhxSDHUZzSmmnIoAcx80bH/AAOK1fCt/DY3LQXIxHN8of8AuntWQGPrzT3TzVz0PemiGrnojR+nNS20rQvkcgjDL2YelYfhfUTc25t5zmeLgH+8K3gq/eqrE3PMvGHhxtPvhPaJusbglkx/Ae6H+nt+Nc99il/55n8q9wktYbuF4ZmxDJwf9k9mrhNUsZ9Pu5La4RRIh6jow7EexrtpVE1Z7nLODvdHEGzl/un8qYbOfsh/KurO70H5Uxmb+6v5VtzIz5ZHLGzn7xn8qabKbvGfyrqS7f3VqJmc/wAK/lRzLsHKzmPscv8AzzP/AHzUb2kuf9WfyrpW3egH4Uz5vWjmXYOV9zm/scv/ADzNNNlIf4P0ro2L9jTSrDqTT5l2Dlfc577DL2Q/lSiwl/ufpW6xbNIS1NNdhOL7mINOlP8ABSjSpz0QGtjew709Z5FPGCKfMg5GYw0m47oPzFL/AGVcf3R+dbTXT/7P5Uw3jgcBST7Uc6DkZkf2XP3wPxpy6fOo6qR6Gr8l055wMjtSC8UjDIQfUGnzoXIzOk08Bct8n05FJFpEkwzE6n86v3UqOFVCcdzV2OeO0iVMZfGTim5JC5WY39g3P+z+dIdAufVfzrZ/tJ+yjFNOpSHoq0c6D2bMU6Dc+q/nSf2FdeqfnWq99Ox6gfhUbXUwP+sNHOg9mzO/sG6/2Pzo/sC6/wBj86vm5mI5kb86b58h6u350c6H7N9yi2g3QHRT+NA0G6PZfzq6ZXJ+8aPOcdGNLnD2fmUDoNyeoX86P7AuPVPzq958n980C5lHSRvzo5w9mUhoE46sg/Gj+wpP761f+2z4wZGI9+aZ9ukyQSM0+cPZlUaFLn/WKKX+wZO8i/lVj7bLn71ILqbJIkNLnDkK40E/89P0pBoRPSUVb+0TEf6xvzpBPKh++c0c6DkZWHh9z/y2Wl/4R2QDPmpVk3MpIBc03zn5y7fnS9oP2aN7NOU4pmaXPFWQJOQLeT0xXF60wMq8812cnzQuPauI12MiVeaIiK1kcXCH3rvbNwIF55xXnVrlZVwe9d5YN/o60pFF3JY9KfjioVYg8VIXAODUASq2akU81Vzk8VKDxwaQE5OOTSEqRyAfrTScgAUdBTAFRQwIAFTEVWLndjFSh8CmIftpMZPNHmcdKaWLHigCQ4HpTgwxiq5JDYNODUMCU00rnkUmcjijJxQAmDmmk041GTg0wHgZHWnKvqeKYKdmgCVSCaccYxUaU/HPNIBDzwKcFx1oyFprPnpQApYdqaTmmE0ZpALmkGKcMUwmm9AHfSjNKpGKaxwxppgOzTCaM5pcACqAaTRmjGTR3oGKOTUqcCoRjNSKeKkB+c01mxxRmmvzSAdHx1p2KiU8Ypy5HFAChtppScimtnrxilJ4pMaKsvytgU9TkZpZRuqNflODQIcTiopX4Bp7c8VWmBAwaEBlanzLmk0z77Uaj98UaZ/rDTZJ0Bxsjz6UowKjc/In0oVsjmhDJgwx1pwIPSoM0qtg0wJ81G0m000ucVC27OTzRYZOJalBzyKpjJ6VNHlRgmgSLbn5aq3JzE30P8qsOcoPpVab7h+hrWHQmRy0vXFVpBzmp5Tgn61XmPFdJggibKSj/ZqGc8J9Kfbn/W/7hqOc/Kn0rGrsaQ3GBqlR6rg1IhrmNi4rcVOjVUQ/KKmU0xFlXINSqQ31qqpqeM1SAnU04HFRg1IozTGx3HWnBgelRg05evFIkmU1ISO1Qg1IPu02gH5xTlPy5qPPI96kHFIB4bgGmocv1oJwtJCcvQBfVSIMZ71z2pLtupRXRqP3H41z+sjF5J7gVcdiXuYd5Es67TkMDlWHVTWaLFri7t0kVk2sSzIcAjBHH1JHHt+es4GT60kGDcJn1qW3Y3hVlBNLqRnRpOUFxlGBGWX5h+IOP0rX1C9Wx0+WcrudRhE/vMeAPzqVAODWB4lut+oW9sOfKUzEDpuPyrn8Nx/KpvfcalKrJKTMG/mZHhst5aTJlnb+8/U/rWVq033Ygfdq0l0y7HiRrNkzcvtCgdBkA8n2HWus8R+DLKz8J3d1EjSX0SiRpmY88jPHQDGa35vcsegotwdjsPhMUbwTYlMZBcNj13n/AOtU3jDwNpviKN5VUWt/j5Z0H3j/ALQ7/wA65n4E6gJLPUdNc/NG4nQE9jwf1A/OvWAlRfQ3hacEmfKviHRr3Q9Rey1GIxyryD/C49Qe4r2nwLLDqHhOxaLACQ+U49Cowf8AH8axPjxYXcj6deRxySWkSOj7EJEZJByx7A8flXmOn6hqem27SWUt1bwTgoWUEI+eD7ZrJvU5b+ym0j6N+G4P/CIWLnneuc+oHyj9AKxPitosmu2/kwk+Za20lyg/vMGXj8Rmup8IwfZfDGmRDtAh/MZ/rT0jFz4gvVPRLSNf++mf/CqvYtJPRnyn50ojMe9th7ZpxtZ/s32gwy/Z923zdh259M9M12PgHRbe4+Io06/jWRIJJcxsMhmTOARXuOvaHDquiXWmyIqxyoVXA+4exH0OKq99yIUudXbPlc/c/GgVPfW8lpcS2067ZYnZGHoQcGpH067j06K/eBxZySGNJSOCw6il3MbDtMl8u62no/Fbdc/bW9xOzm2hllMY3t5alto9TjpWnFfRm28xzhxwV9TXTSmkrM6KM7KzE1WYJB5YPzN/Kup8A+NLfR9PGk3CW9rDI5eS6lhacMT/AHkBBxjA4z06VwE8zTSs7nk/pUeaxqPndzOVS8rn034W0S01KSG+0rxDBLAhy9vYKI4m74aMltv6Hmuxv7bzYLfTmIKzvmX3jU5YfQnap9mr47sry5sbhbiyuJradfuyROVYfiK+p/hVPq1/4WtdQ1+fz7uZfkYqARHnK5x1J65+lc7i0VGXMdrSGjNJSKGuM4pE4NPPSmDrQMU0x+hp5qN6aGjmdAl2PPEW3GO4kRvbLFgPyYV0Ga5Oybyte1eIE/M0c/5rt/8AaddMkm5Fb1GaYywGqO6G6MkU0NTgwZSKAIFb/RM+hpEcOhRu4prnZayj0NU45uetNIDBsf8AQPEOoWBwI7nF5Fx/F91x9eAfxrajfawNYvjHMC2eqxfes5Qz8ZzG3ysP5H8K01cMoZTlSMg1aGaBbiql0Ay0qSZXHpUcj8U0hlBvlY07f8uKSYgZJ7VlQ6zZ3K3AjmXfECWBPIxXXSjdmkUefaZbQXni3UrmUB4YXfGehOa173w7a6g3+ixFJ2GVCjOfpij4UwxXN7HvXeq+ZdzEjI2pzz6/SurS6nS489JXWTOdwY5r0I8lKCUle50c8KcEpK9zgdM1STTLv7BqWRHnaGb+H/61a94q20yOHVWVgyEnv6V3msajoGr2USav4ca5vON9zBKsZ4+vOPauS8UaZ4bMEX2K0vWupMiOC4uMrH06FcEqB69PckUc8WrCcoWdmS34W70pyvRlzirfwOtLQ6Nrc07IkkN5EY94zubbIqge/wAzH8Paq9jZxWumRW0GfLVcAnqc8k/nW58PvDT2/hawvVOxLi+uJ5GfjJjJREHr0c/nVytYuC1TO1NU3tRN58Nw4eGRS0bEYaN+y5HVW+76jPX0sk1maze+RD5cZ/et+OBXPKWjXRlSejTOg8GXlzqkly98ytI0kkasBgFQFYf+hEfUGs7VU8rXID03pj+lUPhtqzTHUlD/ALqEo8Q/2fmDMPqSv4YPrWz4mjKtp1wwwN5Q/UjP+NfJ1EoVZRjseVNWGybQ3HSo5lzE2PShxkZFSQjcMN09KT2Mzx/WE8jXr+LdnEpYD0DfMP51EnXmt/x3aG31sSISFeIE47kEj+QFc8HXuGNZNG0XdFyMZqdSBVSIrjgmp8Ejg1LGTbvenKfQ1AFx605Rj/69ICwrHNPDHHaqwY+lOEpH8NFwsWRmnDPY1AJwetPWVadxWJgSOtKGqMSAjpTkG8/KhJ9qLhYfkUBuaQoR1jYfWl25/g/WkmMej4PUUu/nqKjCH+7+tPEf+z+tO7FoODe9Ln3FNMTDov604Kf7v60hjww9RS7vcUixk/wj86eIh3x+dMNBu73FOD+4/KnCNB1I/Ol/dj+7+dAk0NDH+9Tsn1p6tH6r+dO3x+q0ahdERz60hB9TUwaM91/OlLw9ylFmFyud3Y0gEp6HNWd8I6FKUTxr/GooHcrrFKT1xSmGQdWAqU3MWf8AWLUc99BFGzNIBinuK5G+E+8/P0piSxswVXLMTgKBkk1o6TBHLFHqOoxhrduYIDwZ/c46J/PoO5GmL1yCsSQwRnqkEaxg/UKBn8aLNic7GUdOvhEJG0++2Hofs7/4e9Z32yFZWjlBVlOCDwQfQiuqilO4ZJzWgZ5pU2SsJo8Y8uYCRD9VbIp8ouc46F4pD8jZqZo/ati+0Kzu3MsH+gXJ53QL+7b6p0H/AAHH0NZN8l1pahtQjzBnAuIvmQn69j7HBpco+YYFpQvtVf8AtGzIBE64NBvrU9JxSsO5aCego246iqv2iA9J6QzwDG6U5oGWsj2pMZ9Kg82Dr5h/KjzoScKWP4UASOncgfnSYHoPzpN6dg/5UhAPQSf980AKQv8AdH500qP7o/OkKHP3ZP8Avk0vkseiv/3yaQCY/wBn9ajYH2pZV8sfOJQP9w0xWVzhRNn/AHDQAu36UjLnuBUvkyH7qSf98Gg2sxH3JP8Avk0wINn+0KaQB1IqY2rj7ySf98mmm3btHJ+VKw7kJx60hwe9TC1c9EcfUUv2KU/wt+VFhFUgU01b+wTf883o+wT5/wBW1Kw7lTA70hAxV9NOuGz8u36086ZcAfw/pTsFzLNNJb+EfrWq2mz45Cn8RUX9ny/88/8Ax4UWEZxLj+AmmFpD0idvoK0/7Pnz9wAeu4U5bGf++q/V6dgMWSSaNhugcfXinR3E5kUrEMD1Na81hcy43TxnHq2aWLS2/jvLdPzP9KAI4XktZYrmHg9cA/mK7yxlS9skuITlWHI9D6VzVjofmb1a+gdCpwE67u3WneHL06ZqZtbrKwStscf3W7GqTM5I6RdytgnFRaxZrqVmqYH2mIfum7svdD/MfiO9aF5bGI7hhkPRh0NVhgjA4Iq72d0Q1c4Z7eoGirqddtMsbqMfeP70Dsf730P8/rWFIorrjJSV0YNWdjOaKomTHar0gxVd6sRTKZNROuD0q0fYVEeSSaYisV4zikIzVhgKhcY6UDIHTnNRtxUjyL0qNmFADDzTGIFDP1xxULNluaBCs2TTc0x3OcCk38c0ASHkVGcelN3ZPTinZzQAIASB71LO2ZCRVZm2sAOuakZstTb2BB9OKC3Yj8aTNNlYbDQA7PcHNMZ8dRUMco2hQpzT++aYDs8UmaRjTC1AEmaaX9jTN9JupisxxY00vgU1nBqIvk0rjJTITTSec1A74NKHyKLgS7jTlfH0qDfSb6LgWRLjpTFck8moVbNPyB0pXAnV+acDz1qAGlzQM6nNFNzSbq3OclUgq4PpXGa6vz/jXXKeG9SK5LWzgHPXNCAx4+JB9a7fS2zbD6VwwYZFdnpEm63X6UpDNVRxuob5qjVuaeGqAHIcMQakVuKrFvmpRIwzxQBeU0uarRSlutSFqBDwPWg5JqPfSF6YEueMUZI6VEGpd1AEm71pwNQbqUPzQwLANGah30u7PSgCUtimOwCk9aZvqMS4PFMB8MwYkAEY9alU5NVt/JI71Ir0AWo2561IzjFUy9AfPekwLBbNNJqLdRupASZozUe6jdQBJmgHkVHupynPNAEwxTWHOaZupS/NNaDAGlzTM5OTRmncQ4cmnYFRFqA3HNFxkuMHNKGqLdQG5pAT5pOoqItSFuaAHZwafuqFjkZpFbHU0AWM5pCcfSo94oZuOaVhgW5pGwTUbHFG6gBxIFQzcrQW5prNwaEIytR+8Kj0/wD1p69Kl1Icg1FYcTfhVPYk3GOUUUgpT/q1pFwKSAcTRuxgGmsc4poPUmmMkz6UZqLfS7qoZMDTs1XDUu+gZoN8qLz1XNV5D8pHsaldwYYz7YqqW6/SrhsZyOZl+831qrN6VZmPLH3qu4yvNdJghkA5f3Q1WuriNdinJIHakuLrytyR4LkYz6VnDJPJNc9WSeiNoLqaK3dsI8FZN3c4pou4s8K/5CqQXJ4q5DbhRucfhWSRbZYW4QLkq4HuKswyCRAyg496y7iRRn0FXNLffaA/7RqpRshJ3Lqmp0NQRgk1OgFShk6mplPy5NQqeKUnjFUIeH56VOCB25qmG5AqUbvQ0ILkwNSLn1qNfepABimwsP4NOBpo4FKRng1IxSc8VIgFRqOcCpU60CZeQf6N9DXPa2SL1voK6KM/uPxrntb/AOPo/SrjsSzHk65psOPtCc96WU4wKZGf3qeuamRSNtGA+lYfhi3Os67PeuMwh94z/dHCD9M/nV69EklsttESJrl1gQjqCxwT+AyfwrpPC1jHb2LyRqFWaRmQDsgOFH0wP1qFpqdmFhd8zGo8KavbRPt82eSTYMcnaoz+lSfEK5TTvBV+z43TqIEB7luP5ZP4V5vqviSSPxrbytxDYXbrkd0LYb9Ks/FzxDHqmpwafZyrJaWq7iyHIZyP6Dj86q7bOuVVWZjfDvXk8P8Aim2urhitq4MU5AzhD3/A4P4V9M2rw3MEc9vIksMihkdDkMD0INfH9dJ4W8Z614ayunXObc8mCYbkz6gdvwoafQyp1eXRn1BJbrKMMPbmvJviRp+m+HZbeXRZfsWp3Uyo1vbuPLkUnktH0/HA61yes/FbxFqNsYInt7JWGGa3Qhz+JJx+Fc54WWTUPFumid2lkkuFLM5LE89yaST6lSqp7H0/ZxiG0giHREVfyFeP/FqfWotcln0mW9ht441Sd7Z2XHGRu2npyefevZK8S8da5q9l48u4tH8yUMih4AhdW4xkgdPrVO3Ubt1OG8I60dE8U2OqzBpRFLul5yzA5DfjgmvqS31XTrjSk1KK7g+wum8TFgFx7k9K+cdVsba8dMwLBKiKrlMZL/xZ7Hnj8KyNU0+1tNPjaLWoZ5T832YI2R+IyM/XFFWlKKUnsCUqSv0L3ji407U/HF5NYS/6BPcDMoGBzgMw9s5Neq/GO0tdL+HdjaWaokSXEaRgDsFY8flXgoKtDuLYkDYC47eua6DxB4v1XxBp9lY6hJGbe0ACBFwWIGNzHucVC1s0Zqe/mez/AAw8NppHhe3nZB9qvVE0rd8HlV/AH9TWZ4t+GNlqsr3OmuLG5bJZQuY3P07fh+VcL4M+JWqeHYo7S4Vb/T04WKQ4dB6K3p7HP4V6vpfxM8K6hErS3jWch6x3EZBH4jI/Wr5mtGjaNSEo8rOW+Fvh6xhtdUt9Ss4ZdQguDFMJUDgLj5cZ7Hmuvn8I6DMpV9HssH+7EFP5iuRh8X6Pa/FeeeC8jOl3lukUsw+4JAODn9M+9d7L4u8LxZ3a3p//AAGYN/Kn7S3QuE4pWPKvEfw5s7HXbeT7S9rok7bXkxuML9lJPQHsT071694OvJdNmj0TUHL/AC/6HcH/AJbIB90/7YHX1HI745Hxr4+8Nf8ACO31vaXUd/cTxNGkSISMkYySRjA614/b+Ndbt9IXTUuyYY3WSF2GZISpyNrdRUy95GcpQjsfX9FeW/DH4p22urFpuvPHbar91JT8sc//AMS3t0Pb0r1KshJ3Cmd6caSgaENRNUjGomNMo4uc+X4xI7T2jD8UfP8AJjXQWr5gX24rDulz4p0+THGycE/Xb/hWtD8m9e2eKpAWWkxUJudjAio5nqjLJVJDsat9Mpsyyn7xFZIfDZqvJOcbSeOuKydU12309MyMGb0BqlEaRu3ipd2c0EnKSKVP4isfwvcO2m/Zpz+/tGMD++Oh/LFUbHxLa3ZwhIPepUkW31xZkP7m8TDH/bXp+mfyFU4NahY6ESYNNkeoGamM+RQkMg1SfyrKeQclUJH5V4dfTsHllyQz5zg+tez6xKsel3bOQFWJjk/SvDysl9ew28O3fI4QbmCjJOOSeAPc120Sm9D2D4J6FM/grxHrjA4Vfs0PPUZVpP02/rVyugtfEVn4Y8D23hfSQskUcTRXV6/CySNnf5YIywJJAPHGMZ61ybyTTj92rQR/33HzH6A9Px/KrlOT3CpraPYL288pvKhTzbgjIXOAvux7D9T2qGxsW3NPct5kr/efGM+wHZR6Vas7NACQuEBySeSx9z3+tb+l6UbsCWbKW/bHBce3t71ClroOEddDAMWpahcLa6NGoYMPNuJR+7iHp7t7CvSbaSVNKsbGV0dbZMAqm0M3dsepyfzqKGOOCJY4UVEXooGKWSRUQsxAUDJNaubasdUVYbd3CW0LSOenQeprhtZkutQtb97ZgTAA83qRwSg/4Dnn8O+QnibXWkufIgJ80jI44jX+8fc9h/hRoEqWs8cQ5hkG07jnOe5z1Of51hVlpZGFWd9ET+FNai0nxIbqR0e1lLxSMPulW6H6ZArurm8XV/Bcd/G+4Lckgn2dl/r+VeUNaCzu7yxI+WJspnuh5X/D8K9G8CkXPgLU7Zv+WEpYD2IDfzBr5qpDkkcb2saCNlAfarNscsPSs2zk8yIEVegJHSi5BynxFt7d3hlfeSCQuwgdfXj2rhSqqTtR/qWH+Fel+NbAy6DcT/xRFWz+OD+hNeXZyf8AWg1Ldy6exahdCw3AqPrVsSW/eR/yrKAGeHFSKvuKhlmqj2ueZ5P++anR7D+KSY/QCslEHHzCpQoB+9+lSBp+ZZfwtMfwFHmWZ6+afyrPG0fxfpTxj+8PyoAt5ts/KHqRHt/Rv0qkCo6/yp25aYGmskQHBYfTFOWQL92WUfSs1StKG9BQBplw33pJD+NN3RZ5Mn51RWT2z+NO3A/w4ouKxeV4x/FJ+dSCSEjncfxrOBH90VIGGP8AVj86Asy6PI/2/wDvqlzAP7351SDj+4opfNGPurRoFmW2e3Gflc/jUfmW3/PMn8TVbfk9KeOaBj2lh7Qk/iaFeMjP2bI9cmo2FNyR3OKLASGRSflt/wBaRptv/LBaZzjrTWOPrRYBTcHOREgpDMT1ij/KmEk880wk+lSBIZR3jj/Kg3KqP9VEf+A1DuOPu0hJ7qKNALEd0M5EMA/4AKm0xo73xBbR3dvA9pErTyx+WAHVRnb9CcD8app9K17NBZaRcXTAedeuIIyRysacsR7FiB/wGri2iZpMuyXsl5cvNMwLN2AwAOwA7AdAKnWYAYrFifgAcVchb1OaszNe3kGea1YXQgYNc/E3vV2CYqRzQI2xxyKlicjO0jDDDKRlWHoQeCKpwTB196nUnPynn0oYGJq2jNHM93ptvEwOWe22jn/c/wDify7CqNvOkqApHGMcEFBkH0NdarHuKz9T0mO8cz2zLBed2x8sn+9jv79fr2mTbKhZGNkf3E/75FPDKP4Iz9VFU2Mkc7QTAxzr95G6j/Ee4qMlwcfMfpUG1kaQlA5CoP8AgIpxuX7MPyrMVmPZqeqyE8KaBWRdN1KOj0gupv75/CqpVh94AfjSrTCyLa3Uw/jOKkF5Kf8AloapiloCxcFy/d/1o+0E/wAdUsUCgLFsy9y1NMpPeq/ejoaAsWBIT1JoL+9RDkUEUgsSFv8AappkwOpqMiggEUXCw7zTn71OEo/vVARjvTSKdwsWfNPrSNKcdTVcj3pMmi4rEzSH1NRO59abuPrSHpTGIZTUTSk05hUZouA1pabvzTXBzUbbqYEhfHqPpTpmW5jBORKg5YnO4f8A1qr896FLKwI7U79yWrnVaF4hZohBOwYHqD2PtWvLzh06HmvPZEKXKzRcRv2H8LV3fhy4W5tdjnJHY0IyejHyDeh3DKkYYeormr+0a2m2kEoeVb1FdrLbYIKEbTVLUdN+0W5jYYPVD/dP+FVTnyu3QU43VziXTnmq8kfvWtNpzqxVgwI4Iqs9g47GuwwuZTKBnJxUD7Vyd4rVksWqu9ifSmK5nebEPvOpqvJLH/fFaL2NQSWJqhXMxniBPzjmoi8ZPDjFaL2R9KgexPpRZBcpMyngEVGdndgKtPYH0qF7D1FFguVy8S/xVE0sXvVhrIDtULWmP4aOUOYjM8YHQ1G12BnC/nUjW2O1Qtb0+UOYjW43yruG0Z5qw9xHkkkY9qga3JqM259KfKLmLBu4x0zTJLuNlwen1quYD6UxoSO1HKLmLP22IcdvrTGv4/T9arGH2pph9RTsHMWDfx+lNN/Ge1VzB7Uww+1FhcxZ+3x+hoa8Trg1UaHjpTVicelPlHzlv7bGT3/Kka6i7ZqsUB4cYNIYD/DzRyrqHMyw1zER1b8qb9qjA6n8qrGNgeRRs9RRyIXOyx9qjPRv0o+0xkcsfyqqYx6Um0DtT5EHOy4t3ED1P5Upvou278qo7RRso5EHOy4L9M9DStfr2Bqj5dGz2o9mg52ehSuOxFRByT61CWpcsmGqySw7cjtxXJ691P1rpi+5N3euY1znefekhGKDzXW6G+bdfpXIAGup0E/uF5okNG3uINPD81EW4qSMgryBmoAkz3pQc1C5IPGMVGZe1MC1vC9aa1wO3NUmf1NKpyaLCLQmLU9STVbO2nJKB1oAtjijdUYcY60hIoAl3UoOfaoN35U5GoAmyBUqDIqoXyfanxTYOOoosBM6Ec561CVb0p8swx1qITcU0A7PAJpwNR+aD24oMgI4FAEoagOAar76N470rAW91G6qyvz1p+6lYRNuo3VDuo3UwJS1OD8VAWoDcUDJ99KGqpu55p6yZNAE+4jqaN1Qs3HFNVs0DJ2b0pA/rUe6jdQBKHo31FuzSFsUCJw9BaoN9G6mBPv4pu8VEWzTGPNIZZLcUjOCBUGcd6QtQIe0q5xnJpwfiqpwDkU4PSYyZnpM5GKgL0glweKBkOoL8oJqtYn9+MVavmDRjFU7XidafQg3WbES1Fu9+abPzEvODVWPcHyT/wDXoQy6JVPGeaCT2qFeDkAU8NTAdnHWjdx1qORqbuqh7k26gNUatSZwetAy6WzAvtTAf3THvTYzmCkHEDGqhsZyOcl++frVC8udo2J9/ufSp76ba7IhG7+VZ2wA8nJrSdS2iIjHqyELk5PJp6RljgCpo49xwoNaEMHkpuYc1ilc0bsVordYwGfk1HO+TgdKllky+KoX0wRCq/ePWtbWRF7lO6l3ttXoK2NDINiR6OR/Kufzya3NCOLN/wDrof5ColsWjXVgKeH54qsHzxTkzmpRTLivUincarqQO9SIadxWLUW1RwBn1qQudpzzUAOKSRyBgd6QiZGyKk3elU0Mm7Pb3qyvNMZMpOBmng5psWfTintw2AKVxXHr1zUicmol5qxCuWGKAJmk2RAe9YWtHMwYdxWzcbThVOWHWsrWF+SM+taR2JZhy9aijyZkx61NICaZEv71frUzKiOvdRFlrFkQnmGKOSXGcYYqVU/q35Vd1rx3p1hpAttGkM90IxGjBSFTAxk561zmrQX9zrV2lnp9zdOURVaJCVUY7ntyTS6Z8MPFF+u77Lb26es0y/yXJqFHmWx6FFT5Eoo4l2Z2ZnJLE5JPc0yvT4Pgvrz486+02Id8O7Ef+O1qW3wRmOPtOvIvtFbZ/UsK0UJ9i1QqPoeOYPpSfVgK9qm+E+j2mq2Nq97e3DSBpJcsqgIv4Z5JA6+tdpovgrw5pu022lWxdTkPMPNbPrls4/CrVKb8i44Sb30PnHTNG1LVW26bp91dc4zFESo+p6CvRPBfw91vS9Z07VdVihtYYplxEX3SEngcDIHr1r3SNVRQqKFUdABgCqWsOB9iQ/x3AH5Izf0qnRsrtm31WMIuTY7NeQapftDrGukHErz7Y+P94Z/DBr12vCddnx4qn3Y2ujNk9v3kn+FZc3JqZR3MmTzbVlE+GRjgSrwM+47V03hr4Z2firQ7i7tr6S0vknMYQrvjI2gjI6jJ3c57dK52+voZIJIUBbepXPTFeqfBG5dtI1FTg+U6Pgded2f0AFTUr88FGW6LqLmjZ9DxvxR4I13w0zNqVixtgeLqH54j+Pb8cVzeSB8uM+tfbIAdSrAMpGCD0Irk9S+GnhG/d5pdFhSQnJMDvF+QUgfpWXM0czp9j5i0yzt70lJr+C0mzhfPVghH+8M4/EVvN4A1YxiS3azuUIypim4YexIArpvGnw5tNI1SVLQzpbygyWxLhgR6cjOQeOvoe9ZWlaVqGmhZdJ1WWJWwxiaPKn6jOP0zW8Itq9rlxovqjj5dIv4mZXtnyCQdpDc/gavaZ4R17U4GmsdLuZIVYqZCAqgjrySBXXNFcCOaW78szEs58sED8Aa6z4f6TNqF5HaXMs7aZar5k8Rkby2YnhcZxyc/gDV1aXLG6f3lvDpK5z+gfBPWbsRy6xd29hEwBMa5llHsRwoP4mt7xx8P4PDfhfzfDEAa4/1NxcTvmVlYgZU9Ac8cAcN7V7QenSuT8eTbo9OtAR+9uQzD1VAXP6hK5o3bRMYK9kfNk/hTUYLuS3byPMjO1sOSM/lXo/grxP4p8OQpb3klvqdiowsMsrCRB6K+P0OfbFJFC0xefacys0nT1Of61ILV/SnK1zilUlGT5dj0fTviLodwAt+8umS/3bpcL+DjK/rmugs9b0u+ANlqNncA/wDPKZW/ka8bNoxQjHUY6UNp1hdRI01nbuSo5MYz+dVTpe0vZnTQm6l7nt5cHoRUcjhVJJAArxfTNN8vWbWCwu7yxWTOfImOOn91sr+ldgY9fsxxJa6pEOzgwS4+oypP4LSnBwdmbPQvzDOpWknoXH5qf8KvF65qw8QW17qwsHinttQh+d4JFBwMEZ3KSvf1reLU0ULK/FZ8781Zlbis67lSGJ5ZWCRoMsxPAFXFDRFelvsspXqFryO/a71fUZIbTLHdt3HoK3NU8TXviG6fS9BXy4f+Ws7ddv8AStjRdHh0uMBDvkxgtirvF6IblFLU52y8I30LBzqCo3oFJ/rVhtbudInh0/WYgqbsw3IPytzx/wDX9q66qGqQW99EbKaBLlm58tuij+8T2+vX0pXaWhmpvodLbTie2SRTkMM59aUtVDRLT7Bp0Vsm4xRKEUt7Uq3cl3K0OlQfa5FOGkzthQ/7T+vsMn6UXSV2W5KKuzA8fXbm0i022DPcXR+4nLEDt+f8jWfovhSXR7VL6SNbrUM/Mh+7Ep6kepH/AOr1ru9O8OGC4ku7lhPfyjDzEYwP7qjsv+TWjPpz/Zpf9w/yrP6w09DknXbfunIadeafIqXCyzXE7ruDm3fIB/urjhee34k1sRRm4IFvbzSsf4pEaJF+pYZP4A1H4IbGi6d/16p/6CK6SR8BT6MK71G6u2elCmmrnO3kM1jrWjG4mElvLKY5I1UBAcfL7nn1OOOgrt81x/jUEaOLhPv20yTDHscf1rq4JBNBHIp+V1DD8aqyTsjaKS0RJmuQ8V695QEEGGdjhFz94jqx/wBkf4eoq34l1tLS3lVSSF4O3qxPAUe56VwsYmubhpZyDPJ1A6IOyj2H6nmplKxnUn0RJaxNI53MXdjukkPVj61pk7cY4x0xTYYxEgUfifWlbkGsWzFFjXv3sVjqi+n2ef6E8H8G/wDQq7H4USGW21q1fmIojge5JB/TH5VyGm7LqC50+c/u50IHscdvfv8AhXU/CKZLSLUkusfapf8AR8ehjK5/MyIa8nHU7PmMZKxqaVEfs+AeVJH5Gti3iA5JGawbWdrfUr2Jvu+aSB9a1I7kE8cGuK5lqLrdt9q0u8t/+ekTKPqQcfrXhnlsr4LEV7vLPuQflXi2r20kGpXUSgKscjKAU7A8YouVDQqKgHJY1PGR2Oar5ZeHkAqRGUfxikzUtKealzxVVWX++KeJEyBuyamwiTefanLIaZgH1o4HrQMm3kjpTgeKjQgdqkBFICQGnhj6UwGnhqBDgfanZPpTA3tTg1ADxmnru9aYD6UoJ9KEMk2E0oSmjJp2DQIcEA5BpRTNppcEdiaYAx5puaDx/CabnjpQAu/FNJpTz2pQuexpARlqaSfWpWU+hqJgT2NIEMYnsRTSx9aCDn7ppu05+7QhkikkHDDOOKvB5Do+mCU5bZIT/wB/XrPG4DIXFaNyGWzsA3/PI/q7H+taR1ZnJiQNk1fi4rNhOGFX0biqZJdRqsxtzVGNqv2FtNdt+6GEHVjwBSuBZik2kYODWhb3AYYbr61Pa6fawAGZjK3p0FXBe2sRKqsSkdlHNTzofIyJcsOhPvig8HripTqKONqqfyxTJCWXKxk5+lUncm1ilqumxapEoZik8f8Aq5l5K+x9R7VgLHcwMYbxNky9x0YeoPcVtyhoXMiB09eKjl1COdRHdxiRB910OGWnyPoUpGO546nNNDZHeprtWgIbKNE33ZB39j6H2qv9piHDOgP1qLGidx496NuelRi6hHWRaFu4c/6wUgJSpFKGFMFzCf4x+VOM1uf+WgzRYB2RQKZ5sP8AfFOEsf8AfWlYB4+lHem+an99aDNF/fFFgJBQRUXnwj+L9KPtEPZj+VMCQAUED0FR/aIvU/lSG5h9GNFgHFR6CmHAP3RTDfQA4+f8qQXMTf3v++aaTJuh+R/dFNP0ppuIh/e/Ko3u4B1Yiiw7okb6Uwn0qP7VCf4j+VMF1AxIVmJ9MUhj3J9aYTgdzQZIz2f8qQSr0VWpoBrHPbFNxmn7Wf7sLk0nk3A6W7/pRdAQuOaax2rmpHiuc/6hx9SP8az7q3umYHBAHYMP8aOZBYtWdwHkaJhlG4J9Perdjfy6TqPz5MZOGH9axkWWP/lmc+7D/Gr0Ec1/bSiUKrxrlQWBZh+FHMTKN0emJeJNAkkZyjjOaGuwECsK4bwnqpiY2Vwcrn5STXVSOpBHpSZCRo29tFfo5Qr5yDJTuR6ioZNN9qzkleKRZImKyIcgiun027iv7cN0lX76100al/dZlVhbVGBJpn+zVaTTP9murljWqsqLXRcxOTl0z/ZqtJpuP4a6uRFqpKi07gctJp5/u1Wk08/3a6eRVqrIi1QHNSWP+zVd7I+ldJJGvcVUljXtigk557M/3agez/2RW+8Yqu8a56U1cDBkss9qrvY+gFdBIi1XdFpiMJrTHYVC9r6Y/Ott0HNQPGtCZJivbMOw/OoXtz6L+dbTIvtULRrVBcxjbn/Z/Oo2gb/Z/OteSMdhULIKdhXMswOPSmNCe+2tF0FRMnFOwXM8x+4phj9xV8r7UwqPanYLlBo/UimFGXlWq+UFMZR6UrCuVPMOPmUH6Ugwx6YqwUU9qjMXOVOKfIPmIzFnp/KmGMf5FWA5XhgfrT1YN6U7dxXKLRgev5UgUf5FX3UEVERRyiuViPr+VNOfQ/lVrHtRxT5QuaR1m0U8sx/4CaQ63bH+N8f7prGOnXJHMZ/Km/2bcD/lk35VNmO6Nr+3LYKQC3/fNZWo3kNxu2FufUVD9guO0TflSfYLn/nk35Uahcp8e9a2m6lBbRhXLZ9hVddNuD/yzanf2ZcdojQ02F0aw1619X/75o/t+1HeT/vmsg6XOf8AlnR/ZM/dR+dLlHc1j4gtT3k/75pp1y2z/wAtP++ay/7Jm7KPzp39kT46L+dHKwujSGtWnfzP++af/b1mowBL/wB81mDRZz1MY+rU06TIDjdHn/eosK6NU+ILTH3Zf++f/r0w69a/3Zv++R/jWeNHnPTafoaX+x7j/nmPzoswujRHiC2xwk3/AHyP8aX/AISG2/uTf98j/Gs3+yLn/nmPzFB0i47qB+NFgujT/wCEitv+ec35D/GgeIrYDiOb8h/jWYNIm77fzo/sqQdWQfjRYLmp/wAJFbf885vyH+NJ/wAJDbdo5vyH+NZh0mTGdy/nSDSZj02/nTDQ0j4htz/yzl/If40N4ggxxHL+Q/xrN/siftt/OlGkXB/hH50rBdGj/wAJHb/88pvyH+NH/CSQf88pvyH+NUBos+Oi/nSf2Lcf3R+dFmF0X/8AhIoT/wAsZf0/xpD4jh/54yfpVE6PP/dH50g0ef8Aur+dOwXRoL4jjB/1Mn5inDxHGf8AlhJ+YrOGkT/3V/OlGkXJ4wv/AH1SsF0X/wDhJogf9RJ+Yo/4SaP/AJ4SfmKo/wBh3Hon/fVB0K477P8AvqiwXRf/AOEkjPSB/wAxQfEkY/5YP+Yqj/YlwOmz/vqg6NP/ALH50+ULl0+JEx/x7v8AmKb/AMJMgP8Ax7yf99Cqq6PcHj5fzqVNFkH39n/fVHKF0Tf8JQne2k/76FH/AAlCf8+zf991Wk0aYngRgfWmf2JMe6fnRYLlv/hJxn/j1b/vv/61B8T/APTq3/ff/wBaqw0OYDJK/nTTo056tH+dKwXLY8T56Wp/77/+tQfEuP8Al1P/AH8/+tVePRX/AL0efrTzokh6PH/31TsFxx8UEf8ALof+/n/1qcPEpb/l0I/7af8A1qiXQmz8zr+dS/2FjrIoosF0O/4SUj/l1/8AIn/1qQ+J/wDp1/8AIn/1qY2iIDzL+hpDoidpSf8AgNFguO/4SYnpan/vv/61J/wkb/8APp/4/wD/AFqaNHQH77f9809dKizzI3/fNKwXIz4jY/8ALtj/AIH/APWpR4hY/wDLAf8AfX/1qlk0m1I+WVs+4qMaNCT/AMfAH1FFguMOvSnpbr/33/8AWpDr8nQwL/31/wDWqX+x4geJwfwpDoqZ/wBcPyo5Q5iKTXXdQogH50iavKrhhCvHvU40iFes6/lTxpkH/Pdfyp2AbL4hndNv2eMf8CNQDXJ8/wCpT8zVk6Xbn/l4X8qadOs1+9c/kKLIVyP/AISCcf8ALBP++jR/wkE//PBPzNO+x2O7Alc/hVoaRb4B/eHNG47lT+35v+eKfmaBrc56Qp+Zq4NLth1jc/jUiabbZ/1bD8adguUV1q4/55J+tL/bM5/5ZJ+taQ02D+GLI+tKbSFBzCoo5QuUo9duVXAhjP505tauniZBEi7u4B4q6scY6Iv5VMqEdEA/ChKwmc2LaSRsgEk1YTT36v8ALXQovqKS4kgiT94AW9BT0E7mZFbxwpuC5Pqao3c5zjv2q/JOkpwp5xwKy7kZYn0rVLsTcruwVGkaseeQu5Y9TV2/k4VM8DrWcaTHFCA1t6Ec2sgyBhz/ACFYeeKmtbyS2UiPGCc8ipeqKOnGB1YVIhX++K5v+1Jz/d/KnLqdwB1X8qjlQXZ1KMgHLipVeIHJf9K5EapcY+8Pyp39qXIH3h+VVYNTrhNGD9/9Kc80AQMz/pXHNqdyf4h+VNOo3DLgtkUWQHXnUrYcbXOKry69ErhIYc+pJrmPtkh+9yKYLlQSQnJosB2trrcLoA6lD69auR30Dty4+uK8/W9kHQKKeL+cHh8UrAeiC9tUb7xb6Cn/AG6LBERIJ9a87Go3OOJKQ6jdf89TRZC1PRFmAbJqreXUE8XlgkMOhNcbDrV2owz7h9KtxagJuhCt6GtFYVi86lGwaYhxKv1p0EoYbZSAD0PpSOMSKD61E9iol37dqOl3a32mKk6bds9q3HmqOQVPZhk/nXe+F/ENrq9t9o0+UhlOJYX4eM+jL2riU7GuWluJoNVu9W02c29zFJ5aMv3ZAuAQw7gkH8hTozknZanoYTESg+XofRlrdLOvo46ipya4PwL4jGvab57BYr2Btk8SnIB7EexHI/Edq6+7vY7bT5ruQ4SJC7fgOldqaauj14yUldGLC/2rX9Ruc5SLbap+A3N+rD8q2YOlYeixNDYxiUfvpCZZP95juP5Zx+FbUJ+WmthotKaoarg3FivcSM/5Iw/9mq4DVDUHzqNon/TORvyKD+tRU+FmdX4GSZr5+8ZsDq0DjrJbhv8AyI/+Ne+SttidvRSa8K8bIRFo8gx80DA+uflP9TXHNe4ziic6DXrnwLeSG+vbduFmg8zB7YZQP515LbyeVIH2KxHZulei/CPVWbxjDG6LiZGTjt8pP9BXKkmaPZnuFuQAUH8PT6dv8Pwq0nWs+ZJWdhC4jmQ/KWGQw9CPTp+INRx6p5LBNQge3b++PnjP0YdPxAquhkM13TIdStXsrnhSd8Mn/PN/X6c4P1ryO906axuLhGXDwudy+3f9cn6EV7W9xFPEChSVDyGVhmuH8XWc19qDJYQPLceQPOxgAAkhScnr8rflW1CfK7M2pytozh7Szmv5I0hjLyzSAKo9Bz+Wetet+EtFTSdNSEEM+fMlkA/1kh6n6AYA9gK53whYizvJkuEMV1FEqojEZ2sTlhg9yv6e9dk1/DbIBcSQwqOgZ+T+FFepzOy2CpK+xamcRoWPPt6n0rzvx3csNZKDBNpZEjH/AD0lb/7EfnXdQs13MszKVhXmNT1P+0f6D/I8z8RE3HiPU1OG8y8SM+wjjU/zqaWjv2Mb8t32M+CJkRVHAAwBU6o1XEtvaplt/wDZNRc8uxnqjVTh+WML3X5fy4roVg/2T+VYV2vlXk6dMPn8xn+tdOFfvNHXhNJNED3NzaX1pcWduJ5FYgr/AHQR1x3x6Vt2ZTXGZbrWmnYcvaRg2+36p9//AL6JFZ+m86naj1Yj/wAdNdFd6Na36qLu3SQryrHhlPqGHIP0pYiVpmtSrySs0T2On2lhGEtII4lHZVA/lVotVPwr4Ts77Tb4zX2rrdWt1JFlb6T7uAy8EkfdYfkauf8ACFxnAOt60V9PPQfqEzWXOjZSurmPr+v6dosBe/uFRiPljHLt9BXEWo1j4j3621lFJZaMjZlnYcY/9mb2H416XZfDvw5b3hu5bJry4PJe8kaXJ+h4/SutjRY0CRqqoBgKowBUuo3sFzzbWNAsPDsum2mmQCOHyZNznl5GBXLMe55rLmvoY5vIUtNcf88YVLv+IHQe5wK7Xxx4f1LXZLEaZeQWYjEiyyyKWYK237oHf5T3FJpPgi0s7cR3F3dTDHKxN5Ck9z8vzHPuxqoztGxLV2cf9k1KdN85h0y3PVpGDSY/9BU/99VoaVaxkCLRbKe/ZmH7xBiNie5lbhvwJPtXa2nh/R4tSttunWnmb/8AWOgdzwT95snsPzrodOhIn8x0KIjHapGMnPX6f59Kidfl0KWmx52nh26ufEFzp+tzxSJDDHKbW2JCZbPDtwXxgeg56V1tvpSQxrHFGqRqMKqjAA9hXLLqgj+M9w5cG2vX+xE543CNNv45XFeuw2A9BWcnLRs5K9+bU5VNOPoaZqlmLbSr24dTtihdz9ApNdxFYL6Csvx3CLTwNr86qCUsJiB/wA0kzJI8W8JoYNOsYiclLZAfyFblw2IHb+6N35c1k6UBHKqLwqxgCtKb54nX+8pFe5DY9yk/dF1KL7Xp9xB18yMqPrjiqvh/U/8AikbaTOZUXyfxXj+Qqezl820hf1QH9K4m9uZLFtW05GKlpt0OOo8zAyPoOfwok7alTdtRl7cHUL8lfmggYpH/ALb9Gb8OVH/AvUVet4REvP3z1NQ6dbJDEu1QqqNqD0FXDXO3c5hM0hNFITSAYJGgnWROqnIrc024Wx8VWt8pAtbmMu5borIN+fxCD/vmsGYfLn0qVAb3S57UHE0fzxH0P+cj8ayr0/aQaImj0bXIzB4glyMB0Vh+o/pRC+CM1Dq18uo2Gi6lH925gyc9Q3BIPuDkfhT7ZWlKqiszscBQMk14G25lYuySDymx16iuD8T6c0+qSzCaFFcBtrsQemP6V6vaeGJmhD6pdW2mRsPlFzIA544+XPH44PtXE+N/CuoO0T6bLZajtQh/sdwsjfguQx79BRcXXQ4BtNXd893a/wDfw/4UosYlP/HxAfo//wBaqd5bT20zRXMEsUq/eSQFWH1BqBQM/d/Wi3maI1xbRD/lpD/33QtrGx+aWDHsxqhGB7D8akC/7S/nRYDSW3iwAZ4+PVj/AIVKLeD/AJ7x/r/hWSFx3BqWMA9WApWA0/Ig/wCe6fkf8KXyYB/y2X8jVABQOv60oPtQBobIR/y1T8jTdqdpF/I1VAzTwuaQWLIVezL+VPCA/wASflVdQQKcuaLhYsiIf89EH4U4IqjmVfyquKUAmi4WLKhD/wAtlH/Aac3lqP8AXg/RKq7TRimFixvT/nt/45SmSLH+uP8A3xVUimkYpJ2FYstJGf8Alq/4KKb5sK9WkP4Cq5phFVzMXKTPcQno0o/EVH5sX9+c/wDAqYVFGPapbKSH+egHBlP1ammYHtJj/epuwfSkKj+9+lACl1J6yD/gVOVo+4f/AL7NQHaP4qBg9DQhk7CNkbZ5gYDj5zViadp7Cxkb+GMpgezEfyxVWFeetT2UROmzoefKnJ69FYDH6g1rT3MqmwqHFWEY8AVUQ9qvWe1Tvbr2FJ6bhutDVsbUHDTnC+g71qvqUdugjjGSOiLx+dc7JeNu2xnnufSpbRSzAAFmJ+pJrO3NvsVpH1Nf7VNcn96+F/urwK0rK0lcKETCnoTwKt6JplvaoLnUwSR92MdAff8Awq+91Ayl1DEZ4UdfzqJVVHSJSpynqyIacsChrieNfYHNM+32EPHnMcf3VqteSvO3A2rjG0VnSW/OcU4ym9wlTitjUfU7F2xvce5WqssFjdklAMn+JDg/lWa8GD0qIoVPBwfarU7bk8nYbfxTaa+5lE9ox53DI+hHY+9Y19K1uyyW5jeF+hKLlT6HjrXQpcTH5WPmLjGG54rK1DT0QPJAP3TD95D6e6/4VTkpaCSsZP8AaU/YoP8AgIprX87cE/oKp3AMMhTBPcEdCPWmLIT/AAmosaF77bMOjH8qPt05P3v0FVRIfQ07efSkFi4t/cA53n8hTzqE5GC2fwFUCWPQUg30aiL/ANumx98/lR9skP8AG1VI0Y9WAqTZj+IUBYsC7fuSfrThdt/dWqqqM/M2PpQRg8HNPUC014/91R+FNN1IfSq+09zShT2NIdiYXMmOTQLqT+9UO0+tGz3p6hZEv2uUfxUySeSQYbBH0FN2gUYApBZCbmA4OKaS3UE59acSKaTQA0vJ/wA9Gx9agZ5M8M1Tk1ExpgMLy9nP50nmzDpI350N+FROT2IoCw8yyjqwP1qMuzZDhSvtwaYWf1FMO/P3qdgsK0LDmJ8j0zginQrcJIHQsGHIO6oGL+opoaQfxUWGbUwcqtzH8sgPOPWut0TUxfWw3HEqjBHrXA2l08T4c7o24IzWlaTtY3iTRnKHk47ijyM5K2p3hweRW/4e0uIo91darbWLfwRScs/ueeB+f+PI3l2BpzXEDDkAg1SttfhdQZ45Q3cqQf50r8ruDXNoemy2cj4+y3VjdZ5xFcLkfg2DWZepdWoJuLeWJc4yyED865q1u7K5wI72NW/uyKVP+FWVv3snxFqAiP8Asy7f8K1jiX6mTolmS89xVSW79x+dWJNRlmX/AEqG3uAR96SIbj/wIYb9apzRWE33rSSE/wDTCY4/Jt3862jiI9UZuiyGS7/2h+dVpLv/AGh+dEulRvnyL/a3/TeIqPzUsf0rMutJ1RMmGKO5XHBhlUk/RSQ36Vqq0H1IdKSLclzn+IfnVaS4H94Vz9/cXdi4W8tZ7dj0EsZQn86pNqvqDWiaI5TpmuVP8QqJpgejCuZfVBULar9aq6FynTNJ/tCoXcf3hXO/2qT60xtT9qXMg5DeeRf74qFpF/vVhtqQ9DTft6n1qlJByGwzLn71RM6/3qy21CPHNV21EE8HinzC5DXZl/vH8qjYxnqx/Ksk3uf4qYbkn+KjmDkNY+V/fP5UmYTwXP5VkmY+tMMvvRzhyGpIsP8ADIfyqEon/PQ/lWd9oA/ipv2xR1anzhyI0Si/3/0qJkXP3v0qib9Qe9MfUBjgGjnHyIvlV/vH8qQqv94/lWZ9v46VG18x7U+cXIjV2p/e/SmOkWOHIb6VmC8J604Tbu9HtGHs0Xd+3qwNKksTdQfwNZzOScZ4p4cIvHWm3pcXKjWjiikHylx+tOazQDPmEfVay49QaBeOaY+qSv8ASkqjH7NHRLcAcb/1pwuYx9581zJlb1NG5z3NVczsdP8AaEYfKRR569iK5xXdepp5mIGQafMKxviYZ+9UgniP3mFc357eppVlJ70cwcp0BubcZzigXVt3rnmkqPed1LmHY6hbm2JGOKR2hk+6y1zJkZe/NIJnHRjTuFjpDCSDgg1Glud3NYq3ko/ip4vpSfvUroDe3RquM00srfdbgVifanPeozdPnrTuFjeVgP4qlWVCPmIrm/tLnvR57EfeNLmCx0peFhgvimosStkuDXOeax/iNL5jD+I0+Ydjpi8X94UkbwxtnIIrmvNb+9UZmb1NFybHTPcQ7uoqNrmLs1c55jHoTSmQgdaOYfKb5njPRqYXVv4hWEsxz1p/mHpmi4zZUgHO4YoLgfxCsMztnAbimmZvWlcZ0IdSv3hUTYJ4IxWEJWzyakEsmOGouBsRn5xyBVn7REP4q50zSZ5JpRISetK4WOhN1F/eqcXkTxjnla5kPz1p/mle55o5hWN03kfY0n2pSeCKwGY560ByD1ouFjcNwM8Gnxz7u9YXmn1pUuGU9aOYdjoLubCKpNVTID/FWVNcu55bpUXnNj7xp3CxtCQetKJcd6xPPcD7xpPPf+8aLhY3hckEdMVMt0O9c357/wB40C4f+8aGybHS/aUNP+1IBXMi4b1NKZm/vGjmYWOk+0oRTTIh/iFc4Z2/vGk89v7xpOTCx0BaLuRTHMXXeK59p2/vGk85sdTSuCRviaJT94ZoaQMflIrnTKxI5p4nYdGNPmY7G2QWNOZD0rGW7kA60NeyZ+9SuM1mQiqsyMxwoNVRfuF9aQag4GAMGjcDTs7UIQ87ADsK0vMR/uyAVyr3MjnljSCZxzuNUnZaCsdZuUD74P40hPowrlhcv/eNL9ql/vU7iOtSTH8Q/OrPykAnHNcWLuUfx1Kt/KBgsaOYGjrWMEWWOCaqPeFyccCsWPUM43GrSSo/Q80uYLF1Lh+xqlfM7SHNTwDc3tVe9I3HnmqggZVikxMpzUN5J5fmE/hSnhxiqOqy7pyo6A1pFktFGdt3J71AaklPSoqQIaTSHPYE/Sg1Ys/uv9RUTdkUlcgBOPuN+VOG4j7jflV5KmUVjzsrlRmAP/cb8qftfA/dt+Vai4qXPFNSYWRjbZP+ebflQEk/55tWyxwM1H5hGOKOZhZGWEk/55tSeVJ/zzatln2jmnRncuaOZhZGL5Up/wCWbU7yZv8Anm1bidaf0FJyYWRhrBOR/qmoNvOf+WTVvqcClyO9HMwsjAFtP/zyNPFtcdojW+vSpVGelO7CyMSJb1ONjEehNaNn9odgrxFR6k1fVQKsxhcZ70XbDREF9c/YrCaY8lEJA9T2H54rj9Tn+w6fbwZ3SEZPufX88mui8RMWFrAB8ryeY3+6vP8AMrVPxH4Vl/s2XUmuCZY41bySvRQORn25rSjeN2dVGL5XJGd4D16fQNdhvp9/9n3LeRO2OCPX6rkH6Z9a9u12f7Q1lYRnck7iWTB48tOfyJ2ivJPEdvDZfDzTIHUebIyuvqCQWJ/XFdT8LZru70UXN6zP5Q+y27N/zzXn8eTj/gNdFCTvyndh5uPuM9BibLVoRHC1l25+atBGxiutnYi2prPuzu1WH/Yhf9WX/wCJq2pqnKQ2pt6rCv6sf8Kyq/CZ1vgYzUn8vTrp/wC7E5/Q14/45tibHTtiFmSTyxjtlD/8TXrHiBiuh35/6YP/ACrzzxkgSBOo8qdCMe/y/wDs1YWvCRyx2ZwC2s//ADxf8q6f4drJaeM9IMoKiWdYxg8/MQv9aqXNwkGAcs7fdReS1P8ADc8sHirTLi6dUVJlcAH5UAYHOe54rkVO97Ddr8vU+kZzskVyMfwt/wDXPtzTZZCzmKMJvADMX6AHPbv0PFT6omyeZgMoFDFPVhyfwPH61mI3lzyfNkFRyf4sZGfy2n8amL5kZh/Yli139qlj33G3aG+6APTaOD+OarM8GnamGUpFFJHsY8KCysCB+Rf8qvNOQp28t2ryb4j6r9t1BLCMnyLXlif43I5P0AwB+NbU6Tm7FJXPTbIwX9zcXB2yRzkohwCCqErj3Gdx/Gp00ayhuHntIo4ZnOXIXKufcf4YrgPhlq3+jPpcjfPCxmg91J+Zfz5/E16L59KdNxfKDRatHMkvlOAsoAyAcjB6EH04P5V5FLdL/wAJHqMvIBubhx/wKUj/ANkr17RU8y+kmP3QAv5ZP9f0rwWxuWmR5pTl5GLEn3JJ/Uk/jUX5UzGq7RaOrW+HqanS8U9S351zkcw9asx3AHeszksdAs6HufzrF1Yj7eSM4ZFP48j+gp6XA9arX775YiP7pB/T/wCvWuGlaojahpNBaP5d7bOecSqPzOP612scietcC77F39NpDZ+nNdMt2PWtcZpJMvELVM6vwI+dY8QxA/IRbyge5VlP/oArcrlfh/Op8VagmeZLJG+u1yD/AOhCuqbhiPQ1zdDSnsFFGaM0GgUZoprttRmxnAzimiSuAHvATwY1Mn4luD/45+tbF1Jvbyl5A+97+1YkO5hdFMN8/lIfZQF/Q7jT9VuTZaRe3IyTFE7k554Ukn69amUbtMZ47rU7me5v4GPmi6e8icf75YEfhX0roGqw6ppNnfQ/cuIlkA9Mjp+HSvnu9sdmhWMgX5khVZB9R/jW/wDCLxIbGaXQbmT93zLaZ9P4l/r+B9a6sRSagmuhnXge+xzLXP8AxMuWTwFrAh275Ili59GdVP6E1HHqQHeua+Jt/wCd4Rlh3433EH44kVsfpXFDWSRzxWqOC09v9IkPooq9vrK01/mmP0FXd/vXvR2PYpfChdKbFki5+6Sv5HFc54k0+SXxBa3MMRlzCwKqRuyCBkZ64BP51t6a+FnX0mb9Tn+tJftsmtJh/BKAfowx/PFEo3iU1dWMqGWOQFYzyvBQjDL7EHkfjTjWzqFjbXwH2iP51+7IpKuv0Yc1iT2d9aHMRF9AOxwko/8AZW/8drGVNoxlBoWmmore7hnZkRisq/ejcbXX6g81MazJGnkEGoLaY210r9gcH6VOaq3S4Ib1poGdZ4b1CzUT6XqKTvEsv2y2WJguQ3Drkg4G7ngH7x6V0x1+dEMWnIljERj9z98j3c8n868s+2mB7W4wS1s2W906MPy/kK72eWC0iEkrDnkAHJNeJjKPJO/cwkrEzSSzOWkZmY9STk0rlYgPMkVP9481gXOsyvkQKIx696y55XlbLszH3PWuWwjro9Vtru6gsZcXUTuEAkQMgJOOAa881oJb6zfwIAEiuJEUAdAGIre0bP8Aatn/ANdk/wDQhXO+JSD4k1Ujvdyn/wAfNCGkQiYelOWYHtVYMMdKejD0pllxJAalDAVVRl9KnR1NICdXFSq44quGGamRvpRYROring1EHFPD+xqQJQTTxmo0cjtUyuT2FACjNOFJuz2FLup2AXHvRwO4o4PWjAoATI9aRsetOIGKbkelIBvHrTTx3p+R7U0kUAMJA700uB0p+R3pD5eOaBkRamE+9TERkcZpm1ewosMrNg96VQvc1aS2kk+5E7f7qk1Kum3Wcm1n/wC/ZqkDehUTGeM1pac58u8iA++qsfwOP/ZqF027xu+x3GPXym/wqS1ikhuFDwyKG+RtykYBq46MxnqiB12DA6mmiRuFB5PAqa+UxOcj2qK0XcxY/QVm/eZa90uWsXOO9dto1hFYWourofvG+4vc/wCfWsPw9aCW4M0o/cQjc3v6Ct15HuZi79+g7AelRN8z5UVCNveZPLLLduC5wo6KOgq7DAAoz0ptnAWZVVSzMcADkk16N4e8OR2SRz3YD3fDBTysf+J9/wAvWrp0b7EVK1jlLDw5fXyq8cAjiPIklO0HjP1P1xRq/hS8sbJriWSBlDAER5OM9+QK9RqrqFst3ZTW74w64+h7H866fYxS0MPaO54dcWcoztAas6QqrlXBRumGFdNqMTRM6MCGUkEHsazLgRXUQWcckcMOoNYSRqmZgXYcnrTborImQORUWXt5fs05yCcK3p7UyRijFTwRXM7qVzpjZxszC1i3Plh17Nn8+v8ASsktIB3rqLpBJCwH4isaPT7mbLQqpXOMlsVunzamXw6FAbzzmnhXPetWPQbxx80lsvsXP9BUiaBcg/621/77b/4mloO6MhUkz1FTCM46itQaJc5x51sP+BN/8TUyaDMQCb2yX2Jk/wDiKVwuY4Q+opCDW4NAlz/yELAfjL/8RSPoMuf+P6xPuDJ/8RTuK5h4NKAfetn+wJR/y+2f4eZ/8TU0fh8YO/UbcfRHP9KNB3MHafWlCGug/sCIf8xAN/uwn+pFPTQICfm1BwP+vf8A+yp2QuY53Z9aMfWumHh2AnjUn/8AAf8A+ypy+G7c/e1KQfS2B/8AZ6LC5kcowbsKYd/p+tdcfDNr/wBBKX/wGH/xdMbwzbAf8f8AIf8At3H/AMXSsPnRyJ39xTSWB7EfWuvj8K28hP8Ap8n/AH4/+yqX/hFLKJcyXk5P+zEB/wCzUWYudHDu0meoAqNmbv1ruf7B05TzNdH/AICtN/sTTg3zNdFfbb/hRYfMjhCJCfk5o8qU9VxXdtomkjlDe5/4B/hUR0jTyeRdke0ij/2WmHMcHJazZzUfkTg5J4r0H+ydKH/LK+/7/p/8RUb6NpZ/5Z3h/wC26/8AxFIOc4Axuf48UwwuTy5Nd2dE0vPMd3j/AK7D/wCJpy6JpQIIguGHo03+CimPnOFjhIPJzWpbSo0BiZMMDkNk8+1daNM0hRj+z3P1uGpr6fpByP7NTB/vTyH/ANmpfITaZz8N60dlNascqRlfaoF+6MVvalZWrWpFrYqkuRhxI5IH4nFY0tvLGPmRh+FTLUcdGR8ildi4AYk4poJ70hBqEimy7aX1xartilZV9M8VoR63N/y0RG9wMVhcilVjnmh6C3Oqt9Wt5CBMrJ7jkVrQwxXIH2a5hcnopbaf1rhVPpVm3meNgVOCKnmkh8sWdlcC6swYpgRG/WNwHR/qDkGuG8e6LaxafFrOmxC3R5vIubdT8qOQWVkHZTtbjsRxwcDsrC8k1DRryOVwXgTeoPXjuKyfHvyeEpIUj3GSaI9MkNhjn8sj8a6MNV5pab9TOtT5VdnkzPUZep2t5v8Ank//AHyajNtN/wA8pP8Avk16ljhuR7zSF6k+zTf88n/75prWs3/PJ/yqbMq6IWeoWlPQGrDWs5/5ZP8AlUZsrj/nk1UosltEDOajLVZNlcf88mppsrj/AJ5NT5WK6KxJo3EdzVj7DcnpE1J9guf+eR/MUcrDmRXLn1NNLH1qz/Z91/zyP5ij+z7r/nl+oo5X2DmRS3EdaQtVttPucf6r9RUf2C5/55/qKfK+wcy7lfdTGJzVv+z7j+5+ooOm3B/gH5ihRfYXMinmjNXBpdx3C/nR/Zlx6L+dPkl2DmXcpZ9KchOatjS7j0X86cumXA7L+dHJLsHOu5Bnim5Jq6NPnx/D+dH9nTY/h/OqlF2J5lczJCS2PSkHFaLaXMTnKfmaT+yp/wC9H+Z/wqeSXYrnj3GIRnNO3c1ApxTy3arMiQvTdxqPOBQT3oGP3Zp6tjrVbdTkbsaBWJnbmlDBfrSEDYTnmod2KAsSu2abmo91G6gZKDTt2KjXpRmmhEm/3pm6m5o/GkMfu+WlDVCTQrZouBPupwfFQbqC1AEhfJpC1RbqC1AWJlbFIXyah3UBqLhYmzRuqINQTRcB+aTNN30q80AOB5pSaToOKbzQBISaFPNMzRuoAn3betIzZFQ59aczcUgJA2Vx6UZ96h3YoL0xkxcYpMjrUO6jdSAkduaTdUZNJmncCXNGaj3U3JLUAT54pC2DTWPSmEnPNFxEu+l3VCTRmlcCbdSZqPdSZp3CxKTTS3FMLUhakOw4tTs5HWod1KDQBPkAdahZvmNNZyDTCc0gQ/fxShqiBpc0IZKGp26oM07PNMViYNSlqh3UB/Wi4rEwanZzUIalBxzRcCTNTQOwdRuwM1XDAdOafuoA6C1vIgQvem3YBO9eRWIjkdDV+OQvFkmrjLoS0Nc4yc81k3RzOc+taDsvAByc1mzn94T71ohFZuTTD0pzdaY1ACGrFsPkf6j+tV8VbsVLCTA4GOaiew4vUmjqUNTAhFOVTWBbJUPGalByMg1Ei+tPAIBxTAUnPHemd+lJhs1IGOQNppiJFUFRkZqTAGB0pi5prbt3Q4pWC5YVcd6XNQqT3zUmTjjrTESCggkcUi5704daGAA4xTlZ94Ibj0pDg9KcqmnYCyjA96nU1TRcHNTb9oyeAKLDLOkWiahqd3JMoaGBUiA9T94j9VP4VZ8dTfZ/C16QcM4VB+LDP6ZrO0/WrXRtJspr1mQXjyXDbVJJyfl4+nH4fSqeo6gPGs0Gn6ak0VpE/m3EzgDA6DHv1/yK1SdlFHox0goLcrWNvN431GAyI1vo9kNnB+ZjgcZ9TgZ9BXqFrHHbwxw26LHFGoVUUYCgdqzdOtYNPs4rW0QRwxjCj+p96vI9d1KmoLzOulBQXmaloc1fVqzLNvlq6rVZ0Itq1Z8Uu/XL1f7kUQ/VzVtWrF0eQy61q79tyKPw3CsquxlXfulrxIf+JJdA/wAShfzIH9a4vxbCJrK+AyGVBICPVfm/pXX+JW/4lLL/AHpY1/8AH1rndTAM43cq64IqacbxZzxXuM88jVVywyzN1YnJNSIAZY27qa6XR9OtZLCIvArSJmJic8lSVJ6+1VvFkdtp2liSGFElZwARxxXn6xZ59OT9p5n0RdsJora5QgrPEsuQeDkDpXOXUhtlhjA4Mnl9OgUEg/iuwf8A16v+G5JLrwXoDQpvMdoiEKQMgKAP5Gob+0nMcqThI2lw8YHOCPlGfxKH8KzhJKyZ2Ir2iG7nK/8ALGM/vD6n+7/U/wD164T4t6YIdStNRjXCXMflSYH8adCfqpUf8BNelabbfZbOOIkF8Zdh3Y8k/nWd4v0Vtf0R7OIotwJEkiZ+gIODn/gJb9K6KdTlqKXQpPW5zPwv0QDRrq/mG2S7PlQtjlUU8sPqw/8AHK6Brh0ikyB5yZTb/t9APxOMfWtu1gitLWG2txthhQRoPYDAqoLH/ibSXRK+UyqQnfzOhY/8BCik6vNJyfULmzY7Y4Z8DAVM4H0NfN9tIRCgHpX0bEcWl4e4iP8AI15Do1nbPplozW8TMYlJJQZPFZtXOWu7I5pJSO9Si45rrhaWxGBbQj/gAp4tLcf8sYh/wEVPIc3Ocokx9aXztzoM55rrltoe0Uf/AHyKZe2sZspwkSBthIwB1HIq6cXGSZUKlpJnMuNyMvqMVNDdlo1OeoBqDNdRoRWTS4PlGRlenoSP6V14uN0mdWK0SZN8N5yfGan/AJ6WUqf+PIf6V6JNxK/1NcXoAC+NdJCjA8m4zjjPyrXaXH+vf61xNWHRd4oZRSZpaRsGaa7BcFjgA7ifYc/0pTVXUDm2kTqHAiPtvYLn8s1RIlkRBp8bzYQlfMkz2J5P6k1U8b7rfwRqkxGJJkWFB6B3UH9Dn8K1RxXOfE6cw+ELKFGGJbpUI/2VDn/2Val3ckhow4GSaxjUgFGjAx7YridUin03UFkgYie3cSRMO4rqdGm36dFnqMr+Rqt4gtPtVr5iD97HyPcdxXsyipRsbVI88Lo7TQdc/tTTILuLJDr8wHO1u4rM8eXTyWWnRMhIa63ZI4GI3/8ArVyvw21n+zdZbTpmAtbw5TPRZP8A6/T8q6X4jykXGkwlgAfNlx64Cr/7Oa8pU+WqkeclaaMrTmxEx9WNWt9Z+nt/oy+5J/WrO+vYjsevD4UNsXxeXqf7asPxUVJqIMllMB94LuX6jkfqKpwNt1acdmiVv1Iq8WoSuXcsxTCWGNx0ZQaazVR0t9tp5X/PJmj/AAB4/TFTs1ITIL+ztr1Qt1CkmPuk8MvuCOR+FZUlje2vNlcC4j/55XJ5/BwM/mD9a13aoi3vUyipbmUkmYy6lEkixXqSWcpOAJhhWPsw+U/nmrcqbkIq1Msc0bRyoskbDBVhkEfSso6bLac6VNsT/n3mJaP/AICeq/qPasXTa2IaIm6YPIq9pU7S2gidiWgPl8nsOn6YrJe8CziK6ie1mbor/dY/7LdD/P2q3ZMYNRCn7k64/Ecj9M1xY2nz079UZy2NQnsKQdalEeau6db27yj7WzBPQcZrxnorsyWr0IdIUnUbdjkIsiknHQZ610F7p+iTXtxKdJWQySM24zyc5PXGatx/2ZFGBEGX2DUjXNqg43/99D/Cs3NGqizLbR9HP3dJhUf9dZT/AOzUiaHpYJP9noQexkk4/wDHq0hfW+ejfmP8Kf8Ab7QDnNLnQcsjPXRdLBz/AGbEfbzZf/iqmXSNKH/MJg/7+zf/ABdWjqtivaU/lSHWbMDiOTPuRR7SIckiL+ydK/6A9uPpLN/8XThpWmDppUH/AH8l/wDi6eutW2f9Ux/GnjW7XODCR/wKl7SIezmOjtNPQYGjWZ9yZD/7NTzBa5G3S7NfohP8zTP7Zt9w/dnH1ND65aoMiIk/U0+eIuSRN5MBGP7Psx/2wWlFrB/z5Wn/AH5X/Cq3/CSW4HFvz9TTT4ljPS3A/GnzxFySLi2cA5+x234wr/hUyQxKOLKy/wDAaM/0rPHiaID/AI9gf+BU0+KVHS1T8WNHtIh7ORriKPH/AB5WX/gLH/8AE0hSMH/jzsf/AAFj/wDiaxz4pBOGtIiPqaVfE0AbnT0I/wB80c8RezkbaTPGP3cNqv8Au28Y/pSyXt2y7S6qP9lFX+QrFm8UwtHthskjPrnNV08QZOWUD/gIo5o9gVNm0Z7n/ntJ+dIbm7xjzpMfWqa+Jo1XC26HHdh1pr+J2H3beH/vmlzrsV7ORb+03Y6Tyj6MRTvt1+Ol1cD/ALaGsw+JpT0iiH/AaY3iKY9ET8qXOuwezZqtqGosMNd3JH/XRqb9rvz/AMvNx/32ayT4guMcY/AUqa7cd2NPmXYORmk0t6xy005+rE1EwnP3mc/UmoU8QTKOBk+uaim1+8lbIfaPQCjn8g5GWPLkPrTTAx6g1SOr3jcec1J/aNyR/rn/ADo5w5WW3tdww6ZHuKzbjT2icNEuVJxtA6GpxfXH/PV/zpVuJCeXb86fMPlN0tHZWENlDjf9+Zh3b0/CprL5iKxIWJPJrasDxzUwjYc5XPQ/AGnCaWW+lXKxfJHnpu7n8Bj8676sbwjAbfw5YqTksnmf99Et/WtntXowVkcMndhRRRVCPMfG8At9XnwMLJhx+PX9c1w9xJtY4NehfE5VS5tXB+ZoyCPof/r15feS4Y1yyWrNoj75vtFsDn50GQe9Q3Monto7hRg52OPemWrebMkXZ2C/nUdsQbC+i/uOrD+X9a5amkjqp6xIHlwKl0iWNJpEmYKjfMpPrVGQ1GSapaEvU6rfa/8APVacDbf89F/OuS3MO9NMr+tO4uU7EJA3R1P4ilWAH+H5fY5rjFmkznJqxHeTJ91yPxoUrboOTsdgbeAD5t2fpUJFqDjzBn0/yK5ptSuGGDKSPc1C12w5zScuwcvc69IIW6Ov509baIn76Y/3q4oX0gzljihr1+oY0c77D5DtzaxjpLH+dL5EK9Zo/wDvquCfUJyfvtUZvZieZG/OmpvsLkPQkW33cTxn8amxbAZaaMD6ivNBdSZPzH86GupDwWP50+d9hezPRXurFTxMrfTmpklsyud1eYrdOvRjTmvp8ffb86XOw9mj0sX9mvAIps9/pxGWkXPsa8yFzIf4m/OgTOzYyaTqMapo76XU9OHSUn8KgbVdPz/rP0ri9x9aZk+tLnkP2cTtv7U03HLt+VMOq6aP4nP4VxJY56mjJ9aOdgoI7kalpRHMkqn6ZqtJqlhuxG7/AIrXHZPqaAxFHNIfJE7QXluwyoDD1zQbq1B+bKj2Nces7AYBIprTMepJoc2wUEjsE1DTznLyZ+lNe/03v5jH2Nch5hxTTIafOxqCOvOqaeBhQ4FRtqNi3RW/GuSLnFCycUueQckTphe2yzK6QQOM8iSMMD+dR+J7CG01d0tlVYHjilRQSdu+NWI59yfwxWAJDwR610HiF5TexyTKV8yCJkz3UKFB/Snzc2pEo8r0MYpTSntVjIIowD3osTciQYqZRzxTkSpAuCOKlxKUjW8Ogu14gP3rd+PWl8YOf7J5/iuE4+itUWlsIt8gOCw2D3zxVnxogXR4skZe54H0U5/9CFVgo2rBiZXpHDEAnpTCoqcp703GO+a+gseO2Q7R3FNaMdqmINMNOwrldoyPeoyvqKt0hAPagLlQqO1MYAVYeLuv5VH3wwGaYEOBmkK1YKA9KaVx60xXICKTFTbQwpojAOaYXIimab5dWGUdulJxQBWMQ9KQwHtVzbShadhXKJjYdaTy/SrsqAgUzZnHy5oAq7PWjYathV6UjRe35UAVdpox7VY2UeXQBXwPSgDFTmP2ppXHWqEccGGaAwFQ7sUbq5LnQTbs0ZJ4qJW5p+elADjxQDik3Z70ZpiAsexozTSabuqUNjs05DzUWakjqgJSaaDQaM0CFzjrRmmMeMUgNFwHUA4NNyB1oyKQx26k3VGTRmgB5NLUeaUNTAeKKbmkzSESZpCaaDRnNAxRzUinFR9KTdnpTAlzSM1MDYHNNB5OTQBL2pM03dSgikwH5pCabmkzQApNGaaTS5xQA403NG7im5yaBofmkzSZozQAuaAeRTTzSryaBEpNMJprNk03NAWJBRmmZozQMcTSE+lNJ4pAaQh2aXNMY0gNMB3U04mmbqM0AKxpuaCeaSkMKkUZHNNBA60m80APwBSE0FuKjJ5pgOoB9KaDRmkA4NzT91Qk80A0AWAeKcGquGp6tQKxaTHGatxv+6IFUoXycHpVmIja2apMTKqnbP8AjUcvVqVuJSe1NkPzN9a1iQys/WmGnHrSAFmAAJJ6Ci4D4YmlcRp1PU+grahhWKMIg4H602ytRBHzgyNyx/pVoLWbdxrQjC+1OCCpAOKUD2pANCik2+1TAe1KFJPApjasRbKXbU/lmnCI0WEVwtLsqyIqcIvpTArBM04JzVoRU4Rj0oArCMU4Rj0qyIh6U4RiiwFYRVIseOgqwIxS7cUWERKhFUtcdoNKuGU4ZhsX6scf1rVC1j+KVk+yWwjRnBnXKrjJ4OOvvigqGskjnNSjutZ1GxsLdQzJGEX0UZ6n9T+Nek6HpkGkaelrbDOOXfHLt3JrO8MWMdrA8zKPtMh+duuB2Ue1bgb0rupU+XV7nsUoJe89yYGpFaq4anK3NbG9zZtG+WriNWdathKto1BomWw4CknoKw/CLGRLuU5/ePv59yx/rVzU7jyNMuZc/djY/pVXwjH5Vo6nqoQf+Oj/ABrGrsZV/hLHiY/6DCv964j/AEOf6Vz+s8wK/wDdNbnik/ubIetwP0VjWJfDzLWQDrjNOj8LM6fwMk8FaJb6tBqnlSGDUYZhIrgkq6MowHXoRuVueoriPiNeLJHb23AkRjvUHOCOCP0rXtvEUvhl7q4gUE3VuYC5ONjDlSPU4L/jiuX8P6Pd6/qa3N/HILNW3OzcBv8AZHr7muCdNuo4rqcyhzSv1PdfhVdSyfD+wVGKYDDd3xvJ4/76xXR3ks0pgBYNyUBI55HH6ha5r4fEf2NdwqgWOC7dVA46gHH/AI9XQXTFIC4/gZX/ACIP9KycEpO+5pa2haRgygjoeadUKYUbR0Ulfy4p273oYySg0zJpCaQE4fZp2oOeiwsf/HTXmOiIRpFmR3hT/wBBFehao5j8La7IOq2cxH4RtXBacm3T7ZR2jUfoKpHJiehOIj1yKesJxT14WpEODzTscg1IxipBGOhGR6VKoH50/ApgefyIYpXjPVGKn8Diuh8LsXs5k/uy8fQgH+eaytej8nVrgY4Yhh+I5/XNX/CEn+k3SHoUVgPoTn+YrsrPmpJnoVvepXOn0KPHjTSie0Fwf0SuuuD+/f61y2j/API5aZx/y7XH/tOuouD+/f61wMVD4UMzRmkopG4tVbmOS4liihIEu4ygHoQo4z+LCrJNQW8rpfsybfkhUAsM4LEsR19lole2hJJHKJI94z7r3B9CPWuQ+MMxit9Es+Cf3kjeo2hVH/oRrubcQXMzNcwxCYDdvXjcB6/T0Oa82+J8pn1lFI+5ZtJ9NzjA/JKdG86iTWw7GL4el3Wjrn7r1q7q5vw5L886Z6gGtzd717MdjelK8Ecp4gsja3fmQkqrHfGw42t6Vrap4lj186YzLi8trZ1n443FhjH12Zq5qFut5avE3Xqp9DXGWMZjvb3cu11ZYz9QM/1rCpTXOpHNUhyyudlYti1j+lWN9UrZsW8Y/wBkVNvroR2RegwNjVkP96Ij8j/9erxes2Rh9vtj/suP5f4VbLUIq422fZfXCHo4WQfyP8qss1Z07+Xe20nZt0Z/EZH8qts1ITYrNUbNzTWao2akQ2Sb6QtURam7vegi5JPHFcRNFOiyRtwVYZBrEvoLqxjQwBri3jYMpPMkXOf+BL+o96191R3VyIIWY9e1ROCmrMTt1Na1kSaCOVDlHUMKlyN6f74/rWN4fnLaYE7xuy/hnI/QitOEllJ7B1z+tfMYiPJzR7GMF7yL9w4jwB1qsZz61DLKXYnmmDmvPjHTU7pS7ErTH1phlOetM+tIRWiRnzDzIacpz1qJeeaeDRYLkhYikDHNNJBGKVRS5R8w/ew70EkjmgYFKDmmkJsjOaVDUtMIp2JuBOKaWpSKaw4o5RXELZoBxTTxS07CuLmnp71HSg4pWGmWQwpC2ahDUbqVinImBpc1EDT15qrE3JAacvNMxT4x81FguOFPFGKdjNOwriU4UYpV60WFcWpUpoFOHFMm5ZgPzVsWb/LWHE3NaVtJxVIlnvHg24F14Z0+QDGI/L/75JX+lbRrzD4Z69HbvJpty4UO2+In+9jkfjgY/H1r03cCMg5FdkJJo5pKzHUVE8yL1IqtNqEMSM7sFRRkk9hVOSRJ5/8AFaeMXtqisDIIjuAPTnivLLx8sa6TxTqP9p6td3Wflkc7f90cD9AK5S5J3Gudu+prEk01yboPjIjBc/gOP1xUtkNljqUrfxOsQ+vX/wBlqJpP7Nss8GeUg49AOg/Pn8BRM3k2UNqp5H7yQ+rn/AYH51xy9+V1/Vjsj7kLMpvTac3NN21rYyuNxnikKVMic04rikylqVMYoNTFaQpxRYLkGKQipSlNIxRYdyFhSHpUpFRsKB3IzTDTzTDRYLiUh60tITRYBOKMU6kFFguNUc09RzmlAOaUD2pWC4uaQ1IFoKUWC5ARRip9lNKU7CuQk001KVqNhRYLgDS8VH0p2eKlodxcimE01s0zmmkO44mmMfSjBpMEUwJEbjFbviW6aS6tI2JzDaQp/wCOBv8A2asOFDJIigZLEAVs+N4fsviW4gGP3UcKceoiQVKFPoZyyGpUcd6pAkVPbKZZVQdzVXsTa5r2VrNdnECFj2ApdrbcjDD1U5q/eyjRvDu5OLm9zHEO6pj5m/Ufn7VycLPFyGIPsa6qGFdWHM3Y5q1dU5cq1Oqiyy2kKoQ/mcn1BIxUnjq+tZfstlbsXmt3kaZh90FtoCj1I28/WueXUrtRgTP7HuPxqoT6104fB+ylzNmFbE+0jypCE02lpK7jkGmmketO60YoAj20nSpKQrTAjz9Ka0asc96c0fOQKVVI6igRAVAbpzSAY71YIHeoivPB4pgRlQe1IEAqQ4BwaOKBEe0UhQVIeKTINMBoUUbaeF96dimBHtpPLJ+6M1LtpQCOhqgIMdQQR9aRlwODippgRg8HNRheOeRQAwc9qQqKk8sjpjFAPrQIj2ntTSD6VOAD0pCD6UAeb5oB7mo80pNcdzpJFbmn5qCnq3y0CJSQPrSMcVHmk3UwJCeKbmm7h2pQcdaQxcHNP3YHy1GTzTlI70A9CRTxSio93NNZ+MCgCRmGeKC2KhBoJoAeWyaTNNzim5pMZJmjNR5pc00A/NG6mZozTESbqM0zvS5pAPBpQcVFu5oLGmLqSE5NJu5qPdSg0hkjN6Um6mGkzQBKrZNG7mowcUpNAyTdRmo80ZoAfuoLZqPNGaAJQc9elIx9OlM30E0AOzRmo80ucCgCQtQh5qPNANAEjHmm5pCc00mgB+7mjcKizzS5xSuA8mlzUW6l3cUAPzSZphNIKLgS7qM8VGTSg07gPoJpgNBNFxDiaM0w8UgJNFwJM00nmkY8U0mi4DyaTNMzRmlcY/NGaj3UoNK4D91OBzUWachwaLgW4z0q1G3ytmqCNirEbfIatbiYkrAD3qKU9TSSOCetI7L5eT9K2RmyE4GSela2mWhVfOkHzMPlHoKh0uz+0MJnH7pfug/xH/CtnaR2qGxjADTwKUe9PVaAEC8UoQ1KqcVIE9qAIlSngY7VMqZ7U4JQDkyID2p4FSBKcEoEMC04JUgWlAHc0AR7aXbUmB604AUwI9tOCg1IF9BTlU+goAjCU4LUoI6HFKFDdOaVwGBapa1bPcaZMsQzMgEkf+8pyP5YrSC0uKBrR6FDQ7pbi2WSM/LIocfjWoGxXMaWxsb68s8cQybkH/TN/mH5HI/Ct6OYOuVNejCXNFSPYpzvFFsPUkbZYVTD1NA2WqzVM2bdsKKso9Z8TYAqyj8UGqZV8Ty50kxZ5mdY/wAzWhoB+W5/66D/ANBFYWvyb73T4B/fMh/AcVteHjmO5P8A00H/AKCKyqbGdbYXxKf9Htf+u/8A7I1YjNkEGtfxQf8ARrX2m/8AZGrAL+9VQ+Eim9DmPENuHt543BwpD8DnAOTj8Miuyt9iW8axf6sKNuPSuf1ZAWV8ZBGDVnw5cF9Kjib70BMJ+i9P0waaVpEw92TR3/w9b/QtWQ9RdlvzjT/CuoSze4sLh5pFPyOoRFxzg9ea5DwFJth1gj7xnQKPUlFA/Wu30uQCYxtja4/WvJxF7ysT1KyuGAb+8AfzpciqtsT9nhJ7xp/6CKl3UWAnzTS1R7qQtRYCPX32+DNcb1tpF/Ncf1rkLT5beNT2UD9K6XxdI0XgPVSvWTbF/wB9uq/1rnUTimceJexKKcKYABTgaZy3JUbmpc8ioFPU08NxQBzvi+MC6t5gPvoU/I5/9mqr4Zm8vWIh/wA9FZP0z/StXxWnmaYsg6xyAn6Hj+ZFceLv7FdWUw6C5jDH0BYA/pmuyGtFndTfNRaPT9Mk2eNNGH9+G4T/AMdU/wBK6m4P79/rXHWTH/hMPD5Hd5lP/flv8K6+6P8ApL/WuFjo/ChM0bqZmjNTY3FZjtOOuKht/wDXXTDo0px+AC/0p+75l92A/WoraKSOzWdUd4pGZztGSuWJ6elNtLcVifLB49oyC2D9CCK888esra9fYYEraon0+8a9Bt5VlYFc4yRyCP515d4yYJ4h1wLgKBGAB7xgn9Sa2w699MaMDQHIvW90P8xXQ765nQj/AKWx9EP8xW9vr0o7Dov3SxurlI38+8uZB/HcOPyO3/2WuieUIjMTwBk1zOjEsluX+8w3t9Tyf50p7pBVd7I6RXwoHpSh6r7vejdWhpcfO3762I/56Y/Q1cL1mTP80R9HH9auF6S3KTI9RYi2LjrGQ/5Hn9M1b3gqCO9U5SHjZD0YEGmWMpezjLfeA2n6jik9xNltnz0qMmmF6jZqRDZIWpA1Qk0ZpE3JJJRGhZjgCsS7uGuJMk/KOgp99ceY2xT8o/Wo9J0yTW7sx4ZdPjOJpRxvP9xT/M1nVqxpR5pGUpX0Ro+F5JJY7h1jP2YkeXIT9885wPTpzXSWhzFKMdWX+tRwQKiLDCgVU+VUUdAOgra0zSw9pdiWaKO4BQrGWG7HzZyO3avma9R1W5PqVHRowz1NOq7Jplx5mE8o5/2xTW065U4fylH++K5rG7kVRTSpNaKWEZIQ3K7z2Ck1dTw5eOm9HjK+p4p8rI5kYSg46U7Fa50WdD889qPrKKX+yWxzd2n4P/8AWoHcxwDTwK2E0jPW8tfzP+FTx6MD/wAvlv8Ar/hVJCbMMKfSniM+ldAmij/n6h/AH/Cpo9A3cm6iH1zTshORzQjPpS7DXTnQkXAN3GSfQGlXRIFI33AI9gaLIVzlTGfSo2U+ldkdL09Ry5NULvTLP/lncSL/AMBzRoF2cwVOaTBrb/s23z89y3/fH/16kGnWJH/HzJn3XFLQDAwfSgA+lbjWFkP+W0p+mKQWFlj/AFs/5CpuitTFANOCHPStxNOse8835Yqb+zdPAz58p+lPQNTnwp9KlRT2FbBs7AZwZz+IpUt7L+FZj/wMf4UKwtUZixnvU6Qk9K1EtICBiObHrn/61XYYLeP7sDsf9rmq0FdmGITTxDXRx28Z5Ftn/gJqU2yEf8eh/BTRoLU5gw0bAO1dEbVR/wAuzn8DTHhUDiyf/vk0aBqYGKRgD3rYLFGwLAke6GoJtzEt9iIA/wBkjFK6HZmegA71ZhfBHNIZo1PNun61Ks8RHMKD6UudD5GWFkdGWWFisi4IIODXc6N4zkniS2upTa3an5ZCv7tz6OO2fX/9R4FbiEDmMH8KlOpKIhG8KPCB90k8fQ9RSU02Dpux6ouvGdXDjZKhwy5yM+1cR4h8RXlxe3dsJysMcjRhE4DAEjn1/GuX03UpYtVkW2lZIJX37Sc4B7Uy8lZtRmJPJlb+ddDldGCjZlwK86M8akqDgjuCf6VXlVbZmYoXdRndtO1f8f5Ut3fSXWo+QCFihwEUdM5Az+tXNTlg0seX5SyTlf4uQP6VyyqqWnc6I0nHUxhHJ5wuroEP1jRv/QjUTEsxJOSaWbUJZSzNsLH/AGRTEvXXtGfqoqouwSTYoX1qRIt3QGpEu3cg/J+CirdhHcXau0UqjacEE4IqlK5LjbqQRWznkI35VJ9kc5zG35VsRQ3gUB7qPHu9WIrSYDi8jH/bSna4tjnfsnoppwsSeiMfwrqo9Pmcc3kX/fyrMejk9byH/vrNPlYuY406c3/PNvyqJ9Nk7RP+VdxJpIUf8fUZqjPYhOlwn60ctg5rnHSWEoH+qf8AKqzWEx6RP+RrrJ7ZACTdL+VZ0kK5OLlSB7VJS1MA6dc/88JP++TTG025/wCeL/lW1cKYJmjDbtvBPvUazunRiDUqSZTi11MgaZdHpBIf+Amnf2Td94HH1GK1zeyEjMhqNptx6kmjm8gt5mZ/Zc46pj8amj0a6YZWIkevarquCameZhESCTtHA7U+byC3mUF0i4HWP9amTR5j/AP++hWtpVvPqFur20N3PJkqyQxGQjGOeB05FbEGi6lgZ0zVv/AVh/SrUW9kQ5LucsuiTHoq/wDfQpw0ab/nmPzFdtB4e1FyMabqOD/ej2/zq9H4U1Buthef99IP61XI+xPOu554NDuD0jH/AH0KY+h3A6oo+rCvS/8AhEtQK4FjdfjJGP61BJ4O1THGnXB/7bR//FUezl2Hzx7nmb6NP/0zH/AxUL6PKOrRD/gYr0S48G6uM40u4P0nT/4qua17TZdGiWXUrOeGNm2A+arc4z2J9Klwl2Gpx7nNnSXzjzYf++qX+yDjm4hH4n/CrtlcWdxKfJSUHByWJxwCaid+TWE58rtY2hDmV7lb+xwR/wAfcH5n/Cnjw+zLuE8eD6VIJBilWYL0P4UlVVtUP2TvoyrJojIcGZfwFINEJ589PyNWxOSdxJ+lPNx8pweaj20l0NPZJ9R2haZZ2upW89/JJJDG4ZkjXrj8ab4v+yax4jvr3T5wIpXBVJRtIwAPp2qMXLFD61iGQ+Y5PdjThUlJ2aFUpRir3Hy2U8QyyceoOa1fD9krXG+clYlGXPfHoPc9KrWN0yuqFjtJrqr6GOC7aOJeBErE+pP+TVc6c1B9SOR8rmmYPjaTz/EMgDZhiiiSFR0RSgbH5sT+NYYXjFaOsljq12JOWWQpn6cf0qicjpX0VJWgl5HhVHeTZHtoINSDkUEVoQQ5weRS4p+KTigQ3FBAp3B6UYpgMwfSjHrT6TPrQA0ikpxHpTSKYDGXNN2Y7VLg0UAQMnoM/Wm4z14NWCwpOG9M0AV2WmBCD1qwVI6rn6Uu0GgRCBzTsU8rjtQBgc0wGgUBWzwKkUDNSkhVyKdwK86fuhu61XQ4HqKnlbeCBUSAgYzQAoIxmmOmRlc1KM9+lO4HQUXAqc9jTizAcjI9qsPCGG5Tg1CAaoDy+nE00sg700uvrXFc2H5pRUe9PWnhl9aLjFJNNzSkr603I9RSuA7NKG4waZkeooyPWi4x+cdKTcab+IpRgdSKAH5zSUZB7imkgdxTuMdmgmm7h6imu6jvRcB+6jNRh19aXevrSAeDRmmb19aNy+tO4D80oqPevrSh1/vUXAkJpM1GXX1pN6+tFwJc0ZqLcv8Aepd6/wB4UXAkzRmo96+opN6+tAiUmkzUe9fWk8wUDJwaQnmoTKOwpPNPcUrgT5ozUXmj0pPNFFwJt1JuqLzRR5goAlzTs1DvFJ5gouBLmgngVF5gFHmDPIouBLmlBqHzR6UeZzRcCYNgGm5pm/IpN6+tADweaGao/MUDrSeYtAEoPFIW5qPzV9KQyr6GgZKDSg1EJV9KXzVoAlzQDxUfmrQJU9aBEuaQnuaYZVPSkMinrmgBwfml3UzcuOATSZ/2TRcTQ8mkJpvznop/Kjy5f7j/AJUhi0ZpPKlP8D/lTlimx/q3/KmA3NLQYZu8b/lSCGU/wP8AlRYB2DUigAdajEMv9xvyoMEx/wCWb/kaLASgj1qR5MIApquLaf8A55P+VPkt7gKAIZCfZTVR3EyIsSav6dZNfSKvIjU5dvQf41Vt7O6mlWMQSAk4yykAV2Wn2iWdusUfOOSfU+taECrAiRqiDaqjAA7UCJuxzVvbTlXNFguUjH2I5pViPYVeCA8YoMXPHFFhXKyoQOlSKDUjxletM2Z7mgB6rS4AoSPjuakWOgCMHnGDTiDjg1KsYpSoAoAiAFOC+1SBPrTwMDpQBBt9qcAal255xTgntRcCNVOakAPpT1WnhaAItvtUiIey084XrTg7Nwqk1Nx2IyMfeGKTci05oJZDyQoqRLRQBuO407MV0YOtaZLdyJe6c+y9iXZhvuSrnO1v6H3qlp2oec7xsjQXcXEsD/eU/wBR712KpwABWdrWgxaoiOHNveRf6q4T7y+x9R7VrTqOn6G9Ku4aPYrRTBx7+lW7Zua5uC4uLe9FjqUYhvsZXbnZMPVD3+nWt+2boa7oyUldHo05qWqNZG4FTI9UkeplaqOhMzb1y+vAnpHD+pNdF4bOYbn/AK6f+yiuXZt2q3bnsEUflXSeGD/o9z/11/8AZRWdT4PmZ1XoHipsW1t/11z/AOOmudLVveLT+5tf98/yrnC1Oj8JEXZEd8N9u3qOaz9Hn8jUJIjwlwu4f769fzGP++a0WOQQehrCug8L74xmSFt6j1x2/EZH41Uu5EnZpnsHwpVZJtXdo1JR4wjkcg7TnB+mPzro5FNvOVXgxt8v8x/SuZ+FD40ye5wQtxcnBPddqgfrXY6tDwJ17fK307H/AD/SvFqSXtn2Ze5lWjh7O3YcAxr/ACqXdVWz+WzgHov9TUua1BEu6kLVETSrlmCr1JwKAKXjqTZ4asLUDJu7uMEf7K5c/wDoIrEWTAq543uFn1/TrOPlbG3aV/QNJgKPrhSfxrPDA0kefiHeViVXy+e1S55quOvFSqadjnJQ3SndeBxUO7ml3c0AR6rF52mXKdTsJA9SOR+orzPXsNps6BsSbdy885Feol8jpmvMdY0C81W7mgsZUje3RuH/AIzuwBn8DzW9OfLCSZ14eajF3PRNDvPtWteF7xMFZWLcf7cLf413l6cXT/h/KvMtAtZNIj8LQ3Db3t7iKJ2U8ZYFePYFhXpeo/LdH3Ga5zWh8OgzNJkVHuozRY3JVPzj86u2sxg0GzxxK8KfgSBk1mbsHPoG/wDQTT0nMsEGD8qxqq/l/n9KznHmaQbEsOBKqjrgnFeR+NJSNb1nPVp1X8kWvXILWWYm4gALxnaFJxuHfB/L8q8X8byN/wAJJqKOpRvPJKnGR8oHb6V0YeS57ImWiuVNF4eVvYCtXfWZpfy25b+8aub69KOw6btEg1uYrpdwATmQeWMf7R2/1qppwAkJA4UYFJrcuTaxDu5c/RR/iRS2BwjH1NTvImTvJGhuo3VDuo3VZfMOnbCKfRl/nVstWdcv+5J9CD+tW92RQtyk9CQtUFo22SeP0fcPx5pS1Qbtt6p7Ou38v/10pBculqYWprNUZakS2SFqqXlxhSiH5j19qdPLsjJ7npWbbw3GqatbaVp5X7ZcHl25ES93P0HapnNQi5S2M2+iIVWS/uzZ2pKgYM8o/wCWa+g/2jXcaPINNtYbW3Rfs0f3UPb1596pwaRBo5ls7clxG7BpG6yNnBY+5qzEMMK+cxOJlWlfp0BKxf1C4eO6Zbc+WGAYlevI9ayUkKXWRnleea0NQO67c9tq/wDoIrMwftGB/drlveF2arSdkXo5WbJzT/NfGATUEQLKcjGKmQHeB2rK5pYs205jIYdfer0mo3Ey7WlYL6A1mgU8Dmpeo0rE+73pwPFRL71JwEJ9qaEzqfDGlrq0KxwWjS3KjLkS7RjseTXYW3gG/IBFhEoP965qv8HLcPPPIBkiJePxr2GGZcYPBFd0KSaucUqjTseaxeBL8dbW1H1nP+FW4/A91j5rezB/66t/hXowYHoRTs1fsok+0Z5+ngmYdYLDP/XR/wD4mkfwTcH7sWnj/gb/APxNeg5op+yiHOzzd/Al4RwNP/76f/4mqF94Guoo8n7Bnvjd/hXqxYDrWDrl7EispYcUnSiP2rPCtUC2d9cWTwRGVOCyjjnHT86zLkqZCIx8owB+VbGrOk/iG9Y4PzcH/gQrKulCyEL0HSuOatKx0wd1crU4MRSZxRnNSWODmlDc1HSrmgZOCMGt/wAC6dLrdx9i84wqitIH2Bj1UY5+prnc7UY+1dx8JLyztrmWS5uIoMRsoZzjJJT/AArSkk3qZVW0tDtLf4fRqg36pcE+0SD+lWl8CQDGdRu/wVB/StRPE2lrw19Acdw1TL4l0g/8v0P5118kDl5pGangy1XrfXh/FB/7LUo8I2oH/H7ff99J/wDE1ePiHSR0voj9Mmk/4STSf+fxf++W/wAKOWAXkUW8H2bdby+/77T/AOJqCTwPYOOb3UPwkT/4mtT/AISXSP8An7H/AH7f/CmN4n0kD/j7z/2zb/Ci0AvI53UPBFhApZbu/Y/7Uo/+Jry+6NxHfSQrLIYt+ME9RnFer6r4ms5QfLkY/wDATXmDkNO7N7n9axqKNtDSm5N6mNegtcSMSeTVY8d60bqPMjH3qjMuAfWuO1kdretyuz89aTzDtbntTXFRO4VGFBNxsDmO/Ug/w5rYu0K3khP985/OsO2Uy3oUHll2j8Qa6G9ILzeoY/zrp7mHUy1k/wCJjdMOxwP++v8A61Ta9OZ7veepRf5VSVWS5ug33g6g/man1D53U/7IFceiaZ1u7uigTSg5pdvvTcVqpGbRYgbDcV13w/s0vfEtjHNGkkLudyOAQcKx5H4VxqHBzmup8G60NI1S3uvKEwjP3N23OUYdcH1rWFrmVS9j3xNB0dQMaVYf+A6f4VNHpWnR/wCrsbRP92FR/SuGt/iIXOBYBR7zZ/8AZa1Lbxp5uP8ARVH/AAP/AOtXZzxOW0jrlghT7sMa/RQKeEUdFUfhXPw+IxJ/yxA/4FVka2CP9T/49/8AWo5kKzNnA9KRlBHIFYUuuOo+WFfxNZ114mukB2RQ/iD/AI0cyCzNHxE6R20jAAFVJ/Svm2OAf2gG7AE16xrOuXt1HIjeWAwI4U/415q1tJBqAVh97gH8ayqNSRpBNMdff8fDkHvVNjVy7XEz/U1TfFcqWh1N6jc0ZpCaaTTsJslU1P1hb6VSD4NTJMNuD+NCWor6HqHwWCpPfMR/AOfq3/1q9bBBr528G63e6fav9km8rzFG7Kg5+Y+orp18W6t3vSPoq/4V006iSsYTg2z2OivIl8V6met836VOvibUDz9ub8xV+1RHIz1ak4ryx/E2pY/4/wD9VqlceItROSdSlB9pcUe1QcjPWbuVYoiWI5rxj4w3KSWlqgOcykkfhUF1rt5JnfqU7fWc/wCNc3rmNQjAmuWZhypaTdg/SplVTVilTadzL0WJEt7iUddrAD/gP/16iZ+Km0//AESyuRM6bjkJg5znbz+Waz3cnjn8q86S5pM746RQ55OtNEmKbhj/AAN+VJ5Up6Rt+VHK+wc67khkPGKc8vHy1XaKVRzGw+tMyw6qQKTgylUXcts+FGDz3rMB5Yn1qxuJGF/nUbWs0Y+ZDj1pwi02KrNNISJysin3rvFcXJjk6s0MQb68/wBMVwSoxYAA13fh0RtMGunEdqjJ5jseFRQMmqUbzT7GfNaDRzWvKP7a1EAYAuJMe3zGs4q496t6lcG61K6uVPE0ryYPuSahBB+tfRR0SR4ktyEKc56UbiPvCpWBzwaTHrVkDOD0ppUH608rzkUuKAIgpH0oIOakwaTb70AMwaaRUpBFJtoERU0tUwSmPH3pgNBzQabs96NpHc0ALtB60wwr1BxUig96dtzTAr4ZT3NSg5HOM0/ZRsoAZikwPSn7D2pCCOtMQ0AZ6U/aGUg0zFOXr1oArFChIxSde1XXTeuFxuqrg5wVNADAPWnAUuKAKAEOe1RMGD81OM+lKVyMFeKYHn39lW39xv8Avo0f2Xa/3GP/AAI1p7aNtc9ja5nDSrQf8sif+BGmSaVBjKJj23GtTafSl20WHcwlsYCSDEcj/aNP/s+3x/q//Hj/AI1qzRfxDg96jCAD1pWC5mnToT0j/wDHjQNOg7p/48a1NtMEfPNFhXM/7BAOkf8A48aT7DB3j/U1pFcCmlfSiw7mf9igH/LP9TTxYQd0/U1c2U4IKLBcoGytwM+X+pphtIP+eP6mtMp7U3YKLBcoLZwEcxCnCxgP/LIVcIHbn6U4A/3fzosFyl9hg/55LSGyg/55LV4ITyT+VAjGfU+9FgTM/wCxwZwIgaeLKH/nilaISjaKLCuZ4sIM8xr+VH2O3B/1K/lWhspNg7CiwXKP2ODGfJT8qUWcJ/5Yx/8AfNXBHzzTttFguU/scH/PGP8A75FIbSAD/Ux/98iru2l2e1OwXKItIf8AnjH/AN8ClFpB/wA8o/8AvkVcC+1JtpWC5V+ywf8APGP/AL5FJ9lh/wCeMf8A3yKt7abtNOwXK/2WDvDH/wB8il+zQY/1Mf8A3yKsY9qVU9qLBcr/AGaE/wDLGP8A75FJ9mi/55J/3yKt7DS7TRYLlX7NF/zyT/vkU1rZB92NPyq5tpCuetFguUvs4/uJ+QqVbdMfMif981ZVPanrGzHgE0WC5TNvGf4E/KlFvH2jX8q0BAB980OI1TK9adguUhagjOxQPpTvJijIJRT+FTnJHWmFMmlYLkJC9kA/CmlAT0H5VZEftT1iosK5U8v2FOEfsKtNGFXJqMfMeBRYZGAo607JIwoqYRe1Lsp2ArbCetHl1a2UbKLAVtlJsq1tpuyiwFfZSFBVnZR5dIRAi5NTBKmSHA5p6oD0p2GVxHx04oVcnpVspnFGyiwiEAelBijPVOanEfPSl8s+lMCsYEYfLwackWAOKsxpk4pCjpwwzQBEY+eKVUOfapV56jFSqnFAESpk4qRUw1PC+lSAce9MRCyU+NeKfgDrU8SDZnigCER96U5XtmpcbTweKOCc4oCxXOWbkVJ5W4gJj3zU5QE7qliQMM4pAVPJKH5hijHvV27jYojDoOKh+zs4+UZ/SgCAMB1NKHTtkmneUUfDqQfQ1Kq+3NADBj0NPx/s08jHXio5J1QUAP2nPTH1pjvtYDApwM0ij5D7Z4qRLUEgyHPsKWrHdIYsuTtRcn2FSCKRiOQtWY40QYUAU/AoSE2QiAdSMn3qYKcdKcDxQDTAaF9sUoWpOMUnFMBFAHWg57U/Gaa3A460gMPxcFXS4rhgCbe5hkBI5H7xQcHtwTTpvluCR3waPGMJl8MakCNxELPj6c/0qFZRNFBMuMPGG49+a6MO9Wjuwj0aLaNU6PVFWqUPhSfauw70yhA26e6f+9Kf0xXUeFjm2uD/ANNf/ZRXIWLZg3d2Zm/Wus8Kn/Q5z/01/wDZVrOfwIzm7jPF5xFa/wC838q5ndXQ+MW/d2n1b+lcxuopfCZ3sSlqz71f3oYfxVazVrSLQX+sWNsQGDygsD/dHJ/QVVSXLFsN9D07w5brpug6XARtKhJHHoxO5v1JrpY9RjlJWWPbG3HJzx7j/DNYzBVbaowB0FNkkWKJ5HOFQFj9BXkypqW5aGRyLkIvCFdyfTcf/rU/NQiJore2DcvEiA/98jNPzVrRDQ4mremIHuCzEKqAsSew9aok1NPMbLwtrV4v+sWB9p9CFOP1NDCWiOMs7k6hPdalIDvvJTIAR91OiL+CgVZwAaisIlgsoIv7kar+QqfI9KZ5EneTYqmnDrxSYxg4qVRxQSNoA5NOHU0p7GgAAHes+HS0h1efUBNITImwRHG1emSPy71pGo3HTFA02ijrTMumTSxgeZDiZc+qEN/SvQdSYSLDMn3XXI+h5FcTIiujI4yrAgj1Fbfha4+1+EoIWOZ7Em2cemzgfmuDUs68LLdF3NLmoQ1KGpncSOTsbHXY+P8Avg0mngm0tUjGWZFCj14pN4DKD1bIH/fJrT8O2nlWFvNIQZGiXGOgGBWdSfIhW1NO1RbaFUzwoyT69ya+d/iM/keMNS3ZAeTfgnn5hn+tfQGpS+XbgZxuYL/U/oK8S+L/AIZv73xPbPYiMNdRbyXfAyuFP6bfzrOhePvE1GktTltL1RPMEJIx2rbD55FeZFprO/lgmOJYZDG2PUHBrtNGvzPAA/Ud69HD1+b3WZpj79/M1E+kcYA+pOT/ACWrVt8sI9+azVbzJZ5P78h/IfKP5VppwgHoK6I9yb63Jd1JupuaM1dx3EuDmCT6GrKP+7U+1VZOY3HsafC37pPoKS3LT0Jy1V7lsBH/ALrA/wBKcWpko3xsvqKHsHNqWC1IWqCB98KH2plxJgbR1PWhaktlbUbsQxPMwLBeEUfxN2FdV8M9O+xatZGbBvLhy8z+5U/L9BWH4c0b+3DqF3IC0FnG62y9A8+D830GMfU+1dR4Mcy6/p7/AN7Lf+OGvHzKo3otgS2LevWkltqlyrjjzGIPrzVCMfMK634gTm0Fm8ccbeaX3hlznG3H8zXK2epae9wqXKyW5yPmA3r/AI/oa8lalEl4uHb1wP5VQjB+1ZI421pa3qWmWs5ZGe6LcqsfC/if8K56bWrueXchWFBwqRpwPz5NJrSxcL3ubK7QeTzUq47Vz39pXYOfPfP0xTv7SvT/AMvU4+jkVn7PzNlJ9jo1A96dkehrmxqN9/z+3OP+urf40v268PW6uP8Av4f8aFTXcHJnRZHXNSBwVOPSuaF5dsObiY/VzQJps/6x/wDvo1Sp+ZDm+x32kahd2kMX2W4lgyuG2SFM8n0rZh1W+f71/MfrOf8AGvLYbmcXUH76XHPG8+hro4ZJDYBmdictyTnsK0u49TLlUj0O01K64zdSEf8AXU/41t2t/dEAfaHP/bT/AOvXl2lsTChJ6iugs26VfMyORHoUdxOw5lP/AH1TZJHb+MH8a5a3c461aDZFO7FyIv3LnnLr+dY14Cc5kT86S55I+tZmqx/LP/u0tW7DskihcwLHerKJY8MRkbvcVTupovNYrIm3PBLgf1qldxE1kzxc81Dj3NI+RttIh6TW4+syf40gZO91aD6zp/jXMSRkHjNRFeec1PKi7PudU00C9byz/CUGmfbbYHH2q3P0kBrlyuaAmO2KmyHZ9zqHvYNpAmjORj71S6ZfwWsOJJAcseFIPp/hXLKKlj4prTYHHudtHrdr/earCa5aj+JvyrhwxBqVXPrVpsn2aO+g1yzI5cg/Q/4VZXW7XPG4/j/9auAikPrVyGQ5607kOCO5XVrdhxu/P/61OGoRN6/n/wDWrlYGJq9ETxVC5Ubcl1EV4OT6ZP8AhVN5IizEqwyMZ61CgJp/l8Umg2K07xliSzf98f8A16oSvFuO8ybfZBn+daMsOaz7iHrU8iK5m+pUd7N5UjU3O52CjIUf1qK8tEEojR2ycdR61JDB/pkRx0bNWLpSb2MY5+QfoKiSs9ClqjJ0U7tSh2n/AJaKvP1ArYZy8g/2mGfzrH0Vo4pxLKjOqNvCq23JByOfTIFW7O6ExXtIGGV9OaroR1sVY7iQXlwgwyy8tkc5GSDn8/zqve3hhYGRGcHjAbb/AENEBJv5M+hqrrCFghHTd/SsYrXU3bJ01S372b/9/wD/AOxpGvYnPyW7oP8Arrn+lZ0aYqxGowKuyCxcF1F2hf8A7+f/AFqt2t6E+7EQc8HPTis5VqxEAD0pohpHR2N8Tjdu/Aj/AAroLC7bj5m/T/CuNtXxituymIxzWkTNo7izu2wOTWtDcsR1NchZTnjmty1lzjmtUjNo13lYjqfzqhdF+asRtkUSR5FOwjnrwvg8Vh3bODnaCQcjPausurfOeKxby268VLiikzkrh2UkhFrPlupFJwFH/ARXQXtr14rEuoMZqGi1YoPqdwnQp/37X/Cqsur3eeGQf9s1/wAKfcxEE1nzJio1NUl2JH1a9Yn94g+ka/4VXe+u2z/pDA+wH+FRMOajbNLUfKuxf0+9uWhTzJSxyQMgdM1q6tdTW7EK207U6YHUD/GsLTv9TH65P8zWlrzf6TIM5w4H5YovaSJsmmTx30+P9a/51Ml9Pn/XSf8AfRrLQkipVbFXciyNhNSuAMCeUA/7Zpr3shX/AFj/APfVZe80rSHaeaVx2NC3nd4J2Z2OCMZNYs91KbqYCR8BsfeNX7N/9CmP/TTB/KsfaftFwQw5kY/rURe5o1qvQkkuJnGGkkIHqxqBy565P41MF9WFGwetNlKxW20jLVoRr60hRakq5VCH0pfLJ9PxNWCoFJtHpQIqvHInzKFx67q1dKmmVWLSDJ6bSaqhRyCMg9av2cKpEcdM104VXmjmxbtTNG3vWRjvijkz6r/UVJe3z3EIhRRFDncyjncfeqajikYN6V6SpQT5ktTzPaSatcjaJv4Wo+5jPNKAwpD1wa1M2O3Uo5oVB3p2MUDEApCM0/NIRQAwrSc0/FGKYDRSEdulP2e9KMjigkiUY6mjAPXipT9KTGR0xQBAyDPFN2VYK+tRlSKAIyuKUH2p4GaXAFMRHn2ozmnE4pMii4CEUnSnilzTAiIB7UnljsSKnUA0/Z7UwIBx9aayZORjNTlM9KXZilYd11RUz9aADmrEsQYE8hu1V8FDzTEP5HYUYB7U3dnvS5z9aLisciEpdlWFjJ7UpUD7xrI1K22gjHbNSswB4GaYXJ6cCgqwKueClVpIwjnuPSrJlZRgHH0qpKz7suD9cUAOwMU047UwOdw4zmpRk/w0CGeXmnCAkU8BhRhm4JJoERlVXvzSYyOF/E1MI/UilCr7mgCARk9T+VKY17jNTkKO1IeegoAgOBwBQEJ5IqcRE9sU8Rkd6AuQbMUoUVPsH1pdvtQBX20bfapytKEoAr7aNlWdgo2UAVygA5oCZGanK0YoAg2U4JUoFG2gCu6+lNCH0q1sPoKPKJoArBMnpThDVgRHtThGaAIBEB2pdgqfYc0uzFOwrkAj9qQoBVkJSiMnrQMpFeeBUiQM3UYq1hV9KbuJJ2nApDduhGEjTqMmlJOflwBUix04ICcd6CSt5W/OWJoNrn+KrYTBpadguU/s5HUinC3qwVzT1XiiwXKogFOEA5yTirG2nbe2KLBcp+RFzuYn2qJogG+U8Vbx8+CKf5SdcCgLlbGBijaPSrWFApMZ6UWC5WwPQ0cVcMW9cdBTfsnvRYLlYqO9Nxmrf2ZV680NAHGF4NKwXKgXnGKkWL5qnW1bP3hTdjhttFgEKZGKFT0FWAuBQAO1MCHbSqnrVgJj60zaRyaAGKADineXgZqaFFzzjJp8hB4WgCrtx9akAJQ7sYqZYWbtgVIbYsR0C0rgUgi5qQJTp4vKbjkURtk4pgII6eqVMqZGacFpAQtH0wMinonGOlS5wMUYYmgCIp7Um2rLgkdOahbjqQD6UXAci4GalTCtg8A1BEshOcH8TUvk7jmRifYcCk2BYEqJ8rHPsOaZ8xbMagL/ALVPSNVGFAFO6Uiihd2jurSBy0g5xVRZJEI35wema2c5pjBXI3LnByMjpVCuVYYfMGZScdl/xqwkMaHKoAfXFS7R360m0/WgQijNPApUAYcGpAoHei4EXSlAp7EDrSAhR0ouAKKftpu4dcU4EHpQAoFLikyPUU4UAIeKYeTT25pF4HNAFXV4fP0m9hzjzIHXPplSK5TQLkS6DpjEjmEL+K8f0rtZGXy3L424Oc+leT6XqJ0u3ttO1FFjTaJYpgcgq43AH0Pzf561pRmoz1OrDOzZ2ytSXUmy2lbuFNUre5zgMfoaXUn/ANDYD+IgV3PRHfGVxtrlbeMd9orrvCRzYT/9dj/6CtcipwABXWeEDnT5/wDrsf8A0Famp8JF7lfxmf8AjzH+/wD+y1zOa6Pxp/rLH6Sf+y1zdFPYl7jq6L4f20k+vSzRxGXyIcADoGY4BJ7DAaubr1L4X2Zh8O3Nzj57mZiD6qo2j9d1c+LqckNOo4K7LsQWbyzMSQSGJUkfXH4Zq5qenxQRxKZpn8yQZBI4UfMeg9Bj8apRMCqkYIwCPSrd7cefMmCSIolXOedzYY5/AD/vquOSfMrGnQiJJyT1PJqM0pNIa0Ab1qPxQxj8Aant6yFU/wC+nRf61JUHi4n/AIQooP8AlrcRL/5FH+FJkz2MNDtUDsKUHmm44opHkkzHg4p8fSoRz9acjEUBYnUYFGPfmmhqYznNO4iRmIPPSo+/XNPRsjkUjgY4pDDNWvCTeV4ouYBwl1aeZjsXRgPz2t/47VJTg4NS6VIYPFeiyg4DSSQt7ho2P81H5UGlB2mjflGyZ0/ukim5qxqybL+QDocH9KrCmj1U9BIgZL5T/BHgfiev6VNYXUhsIYt7BYgYQFYgfKSvb6UyMbV44PXPvUUbrFdXEbEKrMJUHYBuo+u4NScU9yS5PcSPEqMWdQ4YZOSO3XuOayvGxD2GmXo5ktZvnP8AsNhG/Uofwq80ijGWAzwOetMurWO/sLu1YAPLGUVsZx/k4P4UnGy0FJKSsz5f8SE/8JRquRg/a5eP+Bmui0ljBpbzY+YL8ue5PA/XFYnik+Z4ou2KFGLKWBGPm2jP65rcjKtDaQoeP9Yw9l6fqR+VXhl7zZilyqzLtpEF8tByFAH5VfqvarwW9anr0BIWikooAU9DTbc/uU+lLTLY/ugPQmjZlLYmzSE0lIadxEULhFkX+6xxVeVZbqeK0tzie4ON39xf4m/AfriluGWKZ2cgLt3EntWz4WsiiSX86kTzjCg9UTsPr3NZylZWRoo8zOr8NRRaf5NtbjbEibVH05/xqr4MhFv4pjtsYFvNIgz6DOP0IqfT2xeRfXH6VY0SHy/HRbtKokHtwF/9lNeZjo+5cqa1NT4mjMOnfWT/ANlrztlBuD7EfyFekfEkf6Lp/wDvSf8Asteeqo+2uD3C/wAhXlRJZDKuAGdgV7ComfI7fhVuSIbEDcmoWhGak1TIFbmn7l9KlEIpfKWkURAg9qCfpU3lCjYKYyENTwcmlMY+lIU29800SyWA5uofx/lXTJxpgPu38hXLW5xdxD6/yrpUydN56Ddj9KUuhK0bL+lt+5jHsK3rVsY5rmtMb9zH/uity1k6c04sTRvwNkCrkZ4rLtn461fjatUQLKPmH1qrqS5inP8Asj+dWzy6/Wor5cwzHtgfzp9SXscrcxjHSsq4jFdBcpkdKyblBk0pFJmLKg9KgKD0q/MvPSqrY9KyaNYsr7fajbUpGe1LtqSrjQox0p6qPQUoWnheKQNibRSqBQQc8ClGc00FyWMjFWom6VUTGeasxYzgUEs0rduBV+FulZkPGKuwn3q0yGakRyKsryKowtVuM1VyWDrkVUmjq81QSLTEjLEeLmP60XYH9pIV6ZT+lWGBEy8ev8qjmTOooD2K5/KoktS0zntM27SrglWGDjr9RV2KxS3UXlxKN38EaEEv7n0qlYjAFWrk/LgVLu1YEtbmdbkvczEehqDVMiGA4zuZ/wBNv+NWbPKzTemP8Kr6gDmMe7f0qI7s07FOMHHIqzGOKSMEr71NGp9KZTYDrUqE5o204Cgm5ZgbmtS2kxisdM9jVuF2BFUmQzprOfGK3LO46VyNpI3GDWvazEEZatUzNo7C2mzjmr6EMK5yznHHzVr28oIHzVomQyzLGCKzrq2znitRWBHWmSoCOtAjlLy168VgX1rjPFdrdxA5rEvYAc0mi0zibu368VkXEHXiuuvIOtY9xAATkVm0apnMyRVXdQATmt2aBM8qKoX0Sm3dUADY7VBaZWscFIvfmr2urtuH7fvcYqrp8ePIXoeBVjX3P2vb2M7f1qJP3kKOzIoz8tSA1Go+UU4DFVcRJuprvhaTNRzHC0rjL1lj7ASP4pCazUwS5PXef51es2IsIh6uT+tZ8YByxJyzEn86UL2b8y5aSt5EuwdjSiLNCLz7VLx2qgGiJB1B/Ol8hD0z+dSDFKMUmBXaEDvUZQD+MVcOKBtx0H5UguVFTPR1/OtO0AMXUdaqzOBHtRBz1OOlW7BFW3Gw5FdeDXvnLi37hY2rt6U0KCeM07ODgjNPCgdK9Q8wiMbdsUzaR1FWaDigCsMDk0pwamIB+8Mik8pT04p2Ag4z1pcU9oT2OaaVZeoNIAxxTcUuR9KCw/CmABR2NOxTQy+tP7ZyMUAMIpMU849RRt9cD8aYEZFJipGWm7W2kjk0AMKA00qR3pvmtnkU5H3EDHWgkjbNNq2I80eXjsKYFYClwfSp9uKUAntQBEgFSjijYR0FOCetNCDAPSlCZ/CgD0oY4B560AivLME7VVeTfk06YAtzTlUAcCgZDtOM5FKrVNimFB24oEcyZGbvgVCzc9alWLPUk1KsQHQAVlY0uVlVj0H508RHueParAQDrTgntTsFyFEC/dFP8vPWpQuByaNpp2EVmt1HMYAb+dQ7CT6VoYPpUMsRJLKPm7+9DQXK23FGzNSIAwzzin4UdBSAr+UaUR46mrGKTaKAItoHalC1KFPYUuz1osBFikxU4UUu0U7AQ7KNtS7aTFFgI9npRipAM0u2iwEYFIwqXbxTSKLARAc07Ap209hR5Z70gGkD0pKkWM1KsQ7807AQAU5VJ7VZSMHtUqxY5OB9aLAVVj9ads9KnZok6tk1G04H3VouKw0Rn0pfJ9RR50pHAxTXdsfMaLhYcVCj1pu4Fe1NDD1Y+1N2jNAxmz5ie1PVKkVO1SbQKLARBcU4ALUgXPOKbsJNMBnXmkKHFShefanDBoAijj7mnlMCpO1BUnpQAxVzSsAgyfwp5AiUE8t2qJVJOW5NICFUOSSOtOxUpHtSBcmgBgTNPVQpzT9tKFoAM8e/pScmnbadigCEijpUuPSl2d8UAMThue9RkYkYipyNo96asYPPWgCIkmkyQRip9gHanLGCc45pAM5pyIWJPQVOEAGSOKBydoxQMYiAEnFOXCkkDk1IUGAB2pSmKBMiLOSMCp1OcZpoTg0jIcUASsBt7Gq9ygjlzjtzUxBAU9QKnaOOdQZCFHqTU3GkUoWDipglRuiRSHygzfQcVJiRh8x2+y/407isKVC/eIFN35PyoT9eKckYU5A59TTwpNMLEZQt1YgegpY4VXO1QDUu2nc9hQOwzYAOaUYHQU4LSgUAJk0AU7FKBQFxuKKfigKKAQwKTTgMU7gdKPwoBIaVU8nr7UuCOvIp4FG2gCIjPI5pRz7U7bzkUuCOtK4DcH2pQtKuD0p4xTAYF700ipGPak4oAaKWlApTQMz9elMOiXzpneIXC465IwP1ryfxmytqjxLjZGTGMdMKAo/lXo/ju5+y+HnbdsLSxgHPPDBuPwU15fFZalr1yzWVnJI4AzucDrnnnFTzJaM3pu0WJo+sy2BWKbdLa+n8SfT29q6uS+SayjkikV4iQQR/Ksm28A67NjetrB/10lz/AOgg1ov4EvtN0+5uRfxsyJvMMaHa2OTyT6Z7VpCu4rl3RpCsouzNS3lEkYOea6TwTdq1xf2mfnVlk/AgD+lcRps2FT5sgjNa3hedrXxwuT8l1b4/EE//AFvzrqlPmgmbrc6Txp/rLL6Sf+y1zRNdH41b9/Zj0Vz+orm6qGxMtwJ4r1jSi1v4e062ido0WFSdh2ksRknI9ya8oiTzp4YgTmSRU49yBXrsxAYKoACjGB2rmxC5pJM0p7EML+WrpIT+77nuvY/59KktC32aMyZ8xhvbPUZxgH6ACqt2vmyQQqQGmbyyD/dPLfoKuFtzFhkAnIHoOwrMskzTSabmkoAUmqvjIlfD2lRjpLfRg/QB2/8AZRVgmqvjI/6NoEOeWnMmPpG3+NSyKr91mcVz9aTYfWnHA704DNI8ojZMDNIDT5Pu8UwUASDkUhHekU4pQTgnrQAKpByKeTxzTVbIzz+NOFADB1z0pElEWs6I+Ol8in/gQZf61LVa9wtxpshHCX1ux/7+LQXT+NHZ63/x/fVRVEVd1s5vR/uj+tURVI9RbDwansyovrfzFDI26FgRxg/MM/ipH41XFNkLCJjGMyKA6D1ZTuH8j+dKUbqwzQ1WC3haNYYIoyPmJVQD6D+v6VQSR4pwwUtGBltoyQPX9anvbhbicyRndGwVlPsVBp+lf8f/ALeW381rOPu07j3Z89/FSzS08ZSyRAeVP+8Ur0YHnj88fhVXRlLrJKfaNfoOv6k/lXfftB6YqSaffwoFG3Y2BgcHP5nd+lcbpkHk20ERHIAz9ep/Wt8Iry5jCpoaaDagFOzSUV3EC5ozSUUALmo7c/Kw/wBo0+mRcSSD3pdRrZkpooopiKGpJK0tu0dv58atl03hc46Dntn+VaieILxFAGkHAH/Pyv8AhUBOBk1Wlk3Z5worNwu73KVRrRGjF4puo5kf+ySdrA/8fC/4V2HgTVxrPiCKV7Y206KVKFw+V4IOR7k8f415rALi+JGnoCg4ad+EH0/vfhXe/C7TI7PxEGMjyzvGd0jn3HAHQCvNxtSnyOCd2VzSe513xK/49dO92k/9lrzsH/TyM4yVA/75Fei/E0Yg0z6yf+y15qrH+1tuM5Ix/wB815UdwZZIIba3AHQmkK4POKCS0xDZZaeYgexpGqGfL6il25p32XPQfrSiEqcCkMZsB70nlY7mpfLbPSja46mgZD5Y9KTZjsKeTg8mmEntzTGNjyLyPjsa6Jjt0ckejf0rnYiTeRgjsa6K5+XQVPTIb+lRPp6iW79B2lPm3j/3RWxbNjvWDph/0aP/AHRWtA/FCYmjetpOnNaMMnFYNtJyK1IZa1TM2X0fMi/WluzmCXPt/Oq0cg8xfrS30n7iX8P51aepD2M25HB5rIuFySc1pTtnvVCccGmxoy5l5qqy81elHWqjqM9aykaJkYoGKUkDvTdw9azsMcMU8YqPIpQfegZJkYo4PamFgByRSCRcfeFMZKMVLGQMEVWEqjuKEk56igRqRyVZilrJSUjuKsJMRQmSbcMpz1q9FJWBFMauRTHua0RLNoSVHJIKoC4GOtNecf3hVWJsTs2ZVpk5/wCJg59GP8qgglVrmMbu/apGz9rmJ6jeT+RqZblLYw7MfKKluB8tFoPkFOueBSsCKViMyXP+7/UVU1EkTIB0wauaf1uD9BVHVARMpPQjiso7s17CRMcVZTd2BrPjdfWrUU6AY3UwZbO7utNLH0qH7RGf4v0o8xTzuoETqxHap0kOaoNKqYPzEewpyXKej/kaaFY2IJyK0be4ORzXPR3A7K/5VcguGyPkb8qpMlo6y0uiMc1tWl1kDmuKt7kjHyt+Va9pdtx8rVqmZtHZwXAI61Y84EVzdvdk44NX47nPrVklufDCsu6QEGrpmyOlV5gSPumgDAvIuvFYd3HyeK6m6iY5+Q1jXkD84SpaLTOZuFx2rMuuFPFdBc28hJ+QfnWNqEMiISUAqGi0yLToybq3HuKg1jm8jB/56E/zrU0mMHULYN03Ln86zdX/AOP6H3ZjWL+IqPwiAfKKToaeORSdqYCDGKhnPFS96inHy0DLlrj7HbnqNzcfiKzkPArQhG2zgA7qTz61nW0U3ljzdufY0qb9wqXxkysadu5pPJc9GWpFt3I+8n507jFD8UnnD0oWCUHny8fWgwOejRD86LiFWXPan781EbdyMGdFHsKRdL3gn7WSfTJFLQB08qrFjcOT61oaaP8AQ0/H+dZB0hN2Xlb+dbNmnl26IDnHGa7cHbmZyYv4UTGlyRQelHNekeeLmjPrSAUY9KYhaM460fzp2M0AGfSkNGPenUBYhZB6UwxKT3qcg0g56jBoArGE5+XkVHsdexxV6m5B6UAVwBjrTSPlJqwyA9RTDECPlJHtQBXErDI7UeawPepfKZR2NAGPvAigCIyA8sM/hQkq54H6VNtFMMa+lADxKF9Kd5w71FsU9qaYvRjQLcsb0bnNAwelVChXuaUORTuMt9KXFVVkJOKlExHBxRcVkSYpNm7qM1GZ2DfKAR71G7ux+9j2p3CyIblFEny0iZA5GRUnlg9STTgoA6GgVhgPFLTiPSkxTA54RnPYCnhcU7FBOKkobgCj6CnBadj2oAYF9aMU+mkZoATikNO20oFAFOcbXBU8fxUoA79KsmJT2qrLG0RLdU/lSAeiKc4NOEY9RTEXinHA6c0AOEX+0Kf9nOMhgag8xuwOKeJmxwDRcA8tgcEUhQgZIpwl47k1IjhhzxRcCmwkPT5RTkikbqTV5WGccVJsDDIouDKQioKVaMbd6TZTFqVwppfLNWAnoKf5Z9KLjKvlmnLFnrU5VR1YUwyqDhQSaLisII1HpQTGnU1FIzu2cYpFjHfk0hjzNn7gpp3N3p+MdRQDnpRYCPywD05pdvtUoQtQQF4JyaYEYBHIqELluTxUzjdxk/QU+KHgmkBF5YxmlWMnoKtKoCA4oBxk0ARBAo6c0m3HIGasHGKQjnAGTQBECdvuacFwMmpFjA5I5pj7y+Nvy+9AETc9OlKi8fWpFTcfap1UAUXAgEZzTpMRrlhk9hUxIVcnpUIXe26Tk9h6UrgQAFzuYfQVJtqVgOwpVQNQNNdSEpmgjAqw644AqPbzRcRGBTgpPapFXJqULt4HWgbaINhHbmniInk1MMdqa5boqn60XEMCKDjrih5I1HQE0wgDoOfc0woSelADQdzdOtSBcU5FApxoAi25YccVMFx0FCLzzUhXPSgCGRXkYKnAp0cAU8596sRrtpeSfepYITbnGBilZM9OtKu3dy2fpT533psQ7V78cmi47dyAD/aA/GhyNvy5Y+1Njt1Q5OWPqalK0ahYiUPsKkhQfTrSqir7n1NSbaFBzyKLDuGKAKcBTgOaLBcZinquBk08L3NGMmiwhM+1GM07FKBVBcbil204ClxQIj2mlAxTm9qQUDExRjinAUGpAQClxRil6UAHNHNKOacFFAEeKcq8804kCmk5+lADWXLfLxScrw3WpBSsFI56UAR/WjHtQVI+6ePekBJ470XGOpOtOAoIoApavpsGrabPZ3S5jkXGccqexHuK5bSNA1PQdWglDLd2x/du8Yw209yv5HjPSu2xS5NKxSk0rAo54pxG7gjg03J9aBupkHld3B/ZesXdjn5YpMx/7p5H6GrenylvFOkheqq5J+uKk+JMJh1q0ul4E0RQ/VT/AIMKg8HMt54osTkFo4GZh6cgVpCenKd9KV0jsfGZ/wBNtB/0yY/qKwK2fGj/APE6t0/6d93/AI9WJXZDYqW5d0SNpdc09VXcVmEmPZAWP8q9ZtIYLm8eOZMkj5WBIPHbIrzz4foknim3jcZ3xyKD6fIf6ZrubeVortHbAZHw3tzgj+dcVd80pRNaa0TJ761t7a82wJgrFliSSWLHHU+gDfnUINOvpvMvLgg5XzMD22jb/PNQ7qmmrRVy3uS5pM0zdSbqoQ5jVTxlzrWixf8APKCZ/wA9gq1EN8qL6sBWb4pfzPF2O0Nkq/Qs7H+QFKRjXfuMhz82O1AfAqPqSaco4qDzhSeKUDNIBnFOyRTAcqetOAApV54NGMHrQIQ9KRWozgGm9TxQBJmqOsSCOyEjdI5YnP0Eik1dArP8QxltDvRjnyyfyoKh8SO61zi8U/7A/maoA1e1lw7QSD7rpkVnVSPVWxJmlD7SGIyAckDuPSo80ZpjIbXMbTQE58pyqn1XGRj2xx+FPsrqdJXnhKeW2AAy53Ad854z/QVWvFIuINv3Z08pyD028gf985qz0HFJpNWYIyvixAur+CZJVADwsCQex6AfmwP4V5ZB/rRXrmvKH8OaiG5QRMxGM8jkH8DXkkH+tFbYWPLzIyq62LVFFFdRiFFFFAwqNeJ3HqAakqM8Tj3WkxrqSUE4HNBIAyelVpHLkAAkEgAAZLE9AB3J9KNtQCaXPrtyBwMknsAO59q6Pwx4XW9vL63122YXCWryQ2pb7rrhvnA6nAPHQe5qbwDprWviuyuNUjCyJIVjgbB8okEbj6tn8q2NRvxY/EoXBx5Yuwj56bW+Vv0JrxsXjHP3Kb0NIxtqzm4lEVzNEo2rnIHoOo/nXTeAB/xUsY/2D/MVj+IbX7BrkkQzhWZBnvtP+BFbvw7G7xQh/wCmTfzFeetUN7nQfE5f3GnD0Mn/ALLXmEfGtknt/wDEYr1T4mj5bAezn+VeXIMay/of/iaSQmJcPdRhNkbYx1x1quuozhtrQnPuK3JD0+lM346Y/Klc1SM9J7qQZ8hiPapF+0k820gFaFuQ7FpWYIPSpGkQE7NxHuaVx7GfiYD/AFMlKqTsOYWFXDMAeM/nTGmJ70XArGGXPKfmaaYH7hR+NSsSfWom3e9FyiOKNlv4ycY2t3rfvz/xIlx23f0rCtlb7apI42mt/WSqeHIQow5RmP54/pUT6eolu/QraW3+ixem0VpwtisnTD/okX+6Kvo2KAZqwydKvQy1ixSVcilq0yGa0UuZkHvUl5ITC4yByP51mQS5uI/rVq6k+R/94CtIvUhrQY4GPvD8qqTJn+IflU5IIqJ6psEZ8sBP/LT9KpyWxz/rP0rTkqrL0rNspGc9qxz+9wPpUTWO7rcOPpV5jgVETzUDTIRp0AX5rmYn2NRHTbdusk5/4FVk0oNF2Mr/ANlWu3OZSfd6VdNtc/cb/vs1YzxTlPFGoFc6dbf3W/77NKmn2ynIRv8Avs1NmnqaNRhHbQD/AJZ/+PGrEcMOfufrUAeniQ9qQrF2OKEfwCrcQgX/AJZKfqazFlNSpIatMVjVBtepgWjFrj/VCs8SnNLvPrVJisX4liadBDGN2R/OiYkXFx03HcB+IIqgGYFWViGByCO1WxOtywE5WOb/AJ6dFb6+h/T6UA0Z1uGhPlyjDD9aLk7vlXkntWrNbKQY7pDnqD3HvUSQxWzf6PvZz0ZuT+FKT00FFa6mdFaPao/msN7kHb3A96h1DCGAEDJj3cj/AGj/AIVduXSIkuRJMeidgf8Aa/wrJuI5Zm3ySFm96zSa3NL3DcMdF/Knq6f3Vz9KhSBvX86k8oKeTmgB+5T/AAr+VLkf3V/KmYFKQvpQMeCB6VIp+lQjaKduFAiyp96mRqqI3qakVvemmBoRyVZhnx3rMV/epElx3qkxWN+C5wK0ILquYjnx3q5BdH1rRMho6eOfPepRICOtYMNz71cjnyOtXchouynIrOuFzmrHm5qKTkUAjHuozzisbUIsxOGPUV0dwgOayb2IhG6VDRSZR0lVj1KFmAKqcnPtWLqg36jCe3zGt6FD5xPopP6Vj3sZN6h9ENZuOtyovSxARimGp3WoiKRQw1DOflqdh6VBcfdoAt9LCP8A2Yif0qmpG0Zq3OSumDHUwkfzFUUQhR9KiHwo1fxMnVhxUgYVCgNSAGmImDccU9XI9KiXgCnAgnpSEyVmV0KkDnvVYBlzwalCjsaXkd6YEYZv7prRt8GFD6gGoIAGkAfp0q0oCoFXoBiu3BLVs48W9ELigHnFHNJ3r0UzhH4pcU3PrTs0xCYXdnHNLn0NROik8Eg09VAxQIef1oAoxQDQAv1pDS9aQimAYzTSoznHNOFBoAbg0FaUtijNADaCBil3Y60Eg0xNWIyg/wD1VG0OfusfxqY80UDIdjqvQN9OtRF+TlGH1FW6M0WAq7lP0pCgIypqd4kbqPyqJoP7jEfWgBmCval2g896ULIvUAj2oyB14+tACYpCM9aPMGcU7rQDdxuMUDNOApdppgMxnpwaXjuKftzSFcGgWhh7aTbUo+lGKkaIue1ABxzUm30FIVz2oAYMGinhQvSlxmgCIjNKEqUKBSHFAEWKUrkYPOak20BaAKBjMThP4T0qXYBU0kW8cmq4YxuVkyfQ+tAC45o8sGpABjNRtkn2oACqqOMZpgXkmpApPanKuDzQBHH8rZIqyrc8nAqPBPajbSGiw0+0YVcn1pq3D4PCk+4qML605VA60WEHmSf3sfQU05b7zE08gHpTlUbcDrTsBD5a56UFPQVKQAaOtAEW2nKtPCk1IEOPSgCIr69aTYeuMD1qRiFHy4J9aiIZ+pJouAhz0WkCYqVVwKXbQBEODwKnjzSpFzntTnGBSAa+DwKTZxk05Rz7VJkelAEWMcnrSxr1JqTGeTS7S3TpQA3jHSo2DOeBirUcLN0FD7Yzg4LUrhYiSPC+g9TSPIq8Iu4+p6U5ipPqfWkK0wISryNlz+Ap+zbUgFBBNADAM8VJwg45NKqgDrzSGgGNJ3daAvPSnBTT4159qABExTtlShaG+VSaB2I9oA5wBTGO87V6etRyOzcmiEE9DQIV4kVcgHd9aaqEDk1Pt9Tml8vNAFYLu6mnogqRFjJxuH4Uu9Vb5QDU3HYEiPXHFKSq+59qUyPJ14HpQoANGoaDSGZfSmiJc5OSfc1NnNJinYBoAHQUU7FGKYAKDzS4pQtADQKdtpyr60/AFAEYXNPGBS5pKkBCeaUGjFISB1oHoLSj1zTc56UZoFYdn0o5PWlpMUAGKXFABpRQAAGl2mlBFLkdqAG4oxx1pT701sdqADOKNxpAKUDNAxuMnmnAHFOwO1HTrQAgBob0p2aao3NSAAOKlVBt560mMHJoDA9SaAEK4HBFNABFBHNG3igBaaaaVYdKcpBPPWi4CqTmpOB1NMYYpppgYPjjSTqmjs0IJuLc+ag9R3H5fyrkPhdaTTeJLm5VT5Ua7S2OPpXpyms34e2S2vhq3bH7yUu7H1yxx+gFOEbyudOHd9DL8ZnPiGD2tsf+PGsitLxkc+JIuekWKza74bG0tzb8ETLb+L9NkkOEHm54z/yyau+1aeLzpZoScMpfaRggjqMfr+Nec+FXC+JrAt03OPxKGu61MjzVQjkuD+AGT/LH41yVY/vOY1g9LEsBO0ljk9CfpUtQx/KgB6gU/NIsfRmmbqQmgC1p4330I/2s/lzWBfN53ifWZc5AkSIe21B/Umuk0Rd17n+6pNcjpzif7XdKci4uZZQfUFzj9MVEjmxL90uKB0p/A4qPdtoVwTyTUnCSrT8DNRoQwyOlO5z7UCFOM5FKKaeeBTsYoAbIgYYNEcYQcUpNIeaAH5waq6oDLp10g/iiZf0NTHIHHWmEbkZW6EYoGtNTo/ONzoWkXB4MlujEfVFNQA1Ho7+b4K0d85Kxqh9sZXH6UBquOx60diXNJmmZozTGNuUWSA784jdZcg4KjOGI98EVffSbtDhJIZV7MxKn8cA1SGGyjfdcFSPXI4/XFa812f7EhcnEkqhD9cfN/I1lUck1yjSRiXsbzaNqUJKFngkUFenKkCvHYD+8U17MkLXStbIcPL8oPpjn+leMQfeSuvDv3mjGoi7RRRXSYhRRRQAVHKQJIyfcVJVe/bZCGwzEMMKoySTwAB60mVHcZPMMZOduQAqjJYnoAO5Ndd8P9N8jWLK+vwPOdtsUWciEMMZ9255PboPfW+FvhyMGbUtSjV777kSE5ECkc4/2jnk/gO+a1lG8SQOThkCkfUVxYio5pwWxnUbhYtaurWXiR5FHIdZV/Q/zrO8Q2DXesandStnezeWo/Q103jWFftltdRj5ZUyCPTqP51kxjfGQe4rwU2jrsmR+MVNza2Opj/l5himYjpuxtYf99Crnw058SRH/AKZt/MVJFALzwM1vjEllcyQDH9yQb1J/HNVfhdJu8QxD/pmx/lVIlnXfE5fmsB/st/MV5eo/4mcx9Dj9BXqfxMGX0/8A3W/mK8rAJ1a4GcYbP14polm8tjbiCMuW3EZ61E8NsvRCfqadNI21f90fyqsWJPNZ2NUxzKmMKuBSbB6CgE5p2TjgUhjdij+EUxkHpTzuPbFJhsUDIWUdgahOe1WSpHNQu4B5WgZBBu+3c9kP8xWtrjZ0WMdxDg/99E1mW+GvjgY+Q/zFaeugrpKf9cx/M0mthJ6sgsBtgQeiirYaq9tjyU+gqQHmkNlpWqxHJVFTU6GmmSy7bSf6VF/vVavZMRuc87xWZbH/AEyL/eqxqchWP/toK0i9SZbImEpoZyR1qmsuafvHrViHuT61XkNPZhUTmoZRE1REmpHJ9KjPJqRjSfam7qeRTCtKwxfM9qXf7U3y/elCe9GoaBuOadmkCEUu2kMAaerYpu33pyigRIH96kWQ1CODTwaYE6uafvNVg59KcGNUmKxZDGgs3rUKse9SAqVIO7NUIu2F+1uRHcL59tn7pOGX/dP9OlR39+C7pY7o4Txub77f4D6VS2n+9TGSgVle5EVPZqZtf+8al8ulCAVNi7kYBI5pGU46mptuKMD1qQK/IowamZQD1ptIEyLmnYOKdwO9G4etAxBTwaYWo30CsSgk96eGx3qvvpQ3vTQF+NjjrirUTgfxGskSn1p6Sn1qlIVjejmA7mrkU49a5yOb3q5FPx1q1Iho6FJh60/zM96xI7j3qwk2e9VcmxelORWbeIpBJqYyEjrVe45xz1IoALOLMsh9I2/kaxbpP9LP+7XRWy8yn/YNY1zHm6f1wBUtagnoZ8qVWZa0JUqs644qGirlTH5VBdKQhPtVxlqtdD93QUi3cqq2benl1QUjGDV+/wD+QfIT2Vf5is1cnoazjpFGvVkop2R6U1R6mnbR61QXH54oBpualiCnrSECZ704nFIzAcKOKaWx14oEO81YzuY4xWgpIAzWYJcHgA/WtOu/BdTixfQfScZz3pBS4r0DjHBh3pTjtTcUgoEO25FJS7qM0AKOKXrRQKLiDHNLR9KPrQAUYzSGm5NA7CsKYCCcd6fnP1pCvQ4GaYhCppORSkkdKAc0XAQHNGKWjGaAGEUoU+tKRSc9qYAVNJt9KcM0d6AGYNBXipKKAK7wKx5HPqKb5LKOGJ+tWSKac0AVSJF/hz9DUZlZW+bI+tXQRjmmkA8EZFFrgRxSB+GP4088dCD9aYYI+ygfTimGNh91/wA6NQMvNGaTNLipAM+lLSYoIoAR22jgFiSAABySeKeYpxd/ZDbzfavM8rydvzbvTFRODuh/67Rf+hrXRTH/AIu4q5+Y6opA742GplKzKUbo51hKsIle3nWMymEMU4Ljqv1q1Ppup28TS3Gk6hFEvJdoTgCrWp8+F7Ig/wDMfm/9DFa3225j+LYhS6nMcl8IXgMpKNGUORtzjFR7RlciOV8xRGHBJBxjAyT9KsXlteWKI99Y3VrG5wryx7QfxqTRxF/bemQWNrJJfLqjDLyjy2QMcAD2ANa+rPYy6D4l/snUrrUm+2JJcLcgqIF3EZTPXnjNN1HcSgjCFrevZG8Swu2s8Z88RnZj1qK2sbrUlcWFnc3QT7zQpuC1s6NeXNtHLrepXczWkVu1lawM2BcMRjAXpgetZOkzxpNZWl/q91Y2CzCVvIBIEgIwOKOZ6j5UVbKC7urmS2trO5nuIwS0caZZcHnIqxPZ3trLDFc6fdwyzHEaPHgufatq8vILHxl4lbV2mt1uYnjQ2nLnOCCD2JHes90s9Pu/DmrwXd9Lp88u/bdMXkjKN8w680c7DkRDcabqdrEZbvS723iBwXkjwBVdY5HSV44pHjhx5jqvC56ZNauqLp99YavqemXmqSG0mV5YrpyUdWY4KjPH0q8uj3LWNpoirJFNJbyatdv5ZIZguY48/Sj2mmocnYwbSzvL1pFsLK5uvL++YU3BfrTIUlnuRbW9tPLdZIMKplwR1yO1W7i5lj8BaVLBLJA8upzs+xihJXG3NbOrXttZeLPEkN1LLapf2scS3USljE5AJPHPPSl7RhyI524gntbjyL23mtpsbtkybTj1pFV/JilMMghlJEchGFbHXFbmv6ezXPhzw1BePd3ijbJcuDkeYcheeeACaPEUVlfCe70O/wDPtdIVLV7ZoinlrnG5T3yaansNxdjFAFOx6UBcHmn4GK0MmIkY5J5NKYs9OKUEileTYme/agCNsRDA5Y1ExYn5j+AoBZ2JJp2KAECZHNO2gdKcMAUo5oAaF5pQuSKk4A460hOOnWgB3ApCNx96cFIHPWlAwpxzQBGVxTkXPWnxgHrzSvKE4RQWoBCLCWbOOKdIVQY3DPp6VDJJI/3mwPRajA5pWYyVyxHyyHHvUHktu+8TUw4FKMk0xEaxY75qTGKd0pNpPNACYpwFKqGn7cfWkAzFAWpVQmlKgHrRcLDNuWxUuMdBQmM1KMe2KRVrEecAk8Cq7yl+FX5adcFXz83y+lRRvj5UXilcGOVWP8NShVUfvGC+3egNIRjp9KAgU+p9ad2Fhdy/wqT7moZp93yhSR7VNTBGgbIUZNFgGoo24xgU4IB0FPxSgUCEC0bcU7FLiqAaBRinkUntQAmKUCnAelKOOvJqQEC0gzmnNk00A+lBpFCgmhl496cM0E5oIe40A0owKMUFTQIC1QSqWORmp9tLtoGRIpC89akFLtxTgM0ANo60pFO+lIBmKcBml/CjB7mmAhIX60m49qMUo4pAI28joKFU45pc5p+7jigBu2l28VIh4HFP+X0oAhVaXZU2cdqMj0oAh2HFESktU5NQu3zEAY9aAQrEEgD8aaVHakp2aAEAx0p1FFADaQoDzT6jdN4AyR9KAGyKccHNNXPepQMDijbkdKAERDml8OLs0KyXGMRDijcUBzU+lYOm2pAwDGp/StaW504bdnAeLLnd40a3CsSkSsTjjBH+NVyeDWh4iwddvHAG4soJ9cKBWHqF5HaxMXYDiuuL5Y3Zq9yzot75fiGw2nkTpn6Zwf0NerX0UYmiZSS/zBsnPUg/yFfPGg6tIvia0uF5CybgD34OK+iNSXZqDL/d4/L/AOsRXCqntJmtPVDQaWowaXNaWNB9ITTc0hNOwy7BP9i0jU73vDCzD6hSf8K5jS4TDp1tH0KxqD9cVs+IGMfg+WNThrqVIh+LgH9AaoA4GBWMnqcWJeyFQdc0jxKx7/hSinjFI5AX5QAKkxxTB96pM5oAQAjmlpgUbs5NSUCGEH0padUbEDvzSGGeaDg1Hu9aaZPyoA1vDLA+EpIgf+Pe6lT/AMiE/wAmp9VvB5BsdetwRlZxLjv80a//ABNTA1pHY9Sm7xH0uaZuo3VRY5s4469qRbjfbxwjgIWbHs2CP13flSFqpljHc8AkuCv4g5H/AKEaTVwOh8Ow77t52+5EMD/eP+A/nXg8J5Q17nZaotnbOphxDGhZpN3OcZyR9fevCYTlQfQ4/Wrwt/aSbIq7I0aKBRXYc4UUUUAFKCQQQcEdCKSg8DNBR6D8OPENuLg6beuI7mVt0LHgScfd/wB7+dUgrIAjjBXg/WvPZg9xIkUX+tlYJH7H1/Dr+Fd+MqoBZmIHVjkn3NcOIioy0MazvY6jVF+2eELOfOWhwjH6EqB+RWsGz6c10XhcfbfDmp2n8SOHX/gSkfzUVzsHytivFqq02jppu8Uy9of/AB86vZdrq181fUvE2f5FqqfD9BF42lTtsZh+JB/rUkEy2euabdMBsWYI5PZH+Rv0NXPDNobXxzIpB+SKRCfo68/rWZZv/EXBax9drfzFeWOSNalAHBJyfwr0/wCIb/vbNCOdhYGvMJH/AOJrMPc/yq0QaaJGNuJWbjoalZF7HNZDyzxkYjB46g1LBcXrg7LYlR3zUGlmaGxaXHvVTzbo9YgPxpwa47hAPrSHqTlail3AZ6UBnz82Pzpxf1AxQMqM57k00Hnmp3ZM8rTGZP7uKBkdkub9v9w/zFaWv/8AILA9EA/WqWn7Wv2x18s/zFXfEA/4lp+g/nQ+gvtENuP3a46YqXBpIRiMfSngc1NrhcVfWpVaoxSgEUWC5Jbt/psX1qTVX/dqO/mj+RqGy51GH6mnan91d3/PX+hqo9SX0FRxgVKH44qopHbNSgn3qrhYm3ZppbFNHvSHFJjGu3NRMeeBUjUwjmkNDMmmlqewFIVyKQDQ9LupMYpMUxjgTmnZqLOKXdSAkzSgj1qLOacFouBKCPWlDAVGF5pwUUAShhjrThIKiAANOwDQIl3g04MB3qED3pRx3qkwJd47UhNM4oz70XEOzSZpVxjmlO3uR+dFxkZJppJp7mP++PzqIvHn76/nU6ghGYim5JoZo/8Anov50wyRD/loKQxSSaTmmmWLs9N86L+/RqO5Jk0ZqIzwj/lqtAniPSRfzpWY7kmTmlzURmjH8YpPPj/vU0mFyfdSo/rVVrmIdzSfa4h/eP4UWYjQV8mrEcmKyVvYx2f8qlW8j/2/++TVIlmyk1WEnHrWKt5H/t/98mp0u1HZvyqkybG0s2R3pjy5eMerCs77eo6K5P0ojvfMu4VCsBu71aJZ0dv9yX/drLkXNzJ+FaFu/wC7k+lUCc3Ev1pkrYglTNVZErQeq0i0rAUHQ1UuVyoBrTdeKpXKZI+o/nUyWhcXqg1clLD5RnITP6VRQnHKgVo6xn7CwXGSyr/n8qyiZgOAv51n0RpHqTg57Cl4NVN1x2UUoa4P92gotFfc0JDGT8zOPxqAG5I6pShLzsU/KkBZNrETzJIB7Gmy6bC0ZdZ5MjqCcVGVugBkJ+RoxOw2sybT7GmmAQWcRwxZj+NbQHFZMUcgZMum3cOADzzWuDXoYPZnBjHqgxSFwp5OPrTqRlDLhhmu44xQwPcUpFRRwKvcn61LgigBMZpcUopaAEAp31pKOaAFBo3UmOPem7iDhlz7igQ/IoyKKO9AAoBNNPBqQKKjcYOKBhxSUvFGPSgQgpTijFLgYoAbikwad9DQeaYDDmin4ppHNACUoFHeimAHimnBpTRgUgGbfekIIqQrTTkUAM+opdoPSlxmg8dKYGHijBpwpakBmDTgPWl5p2KAI5UEkZQ5Ge47VrLr9+JFuDa6cdRVPLW/MR80DGM+mcd6zaKlxTGm1sNLz/2Vb2GY2igumulYg7i5IPP5Vry+I75ruW7istLgvZAQbpIiZBkYyCTwayc0nNLlQ+ZoW2lntYrQWvkx3FrcG4S42Zcsex9utWb/AFCa7srm1itLCyjumD3DWyENMRyM56DPYVWwaSjlQuZmhPrElzbWsFzpWlzR20flxF1bKj1GDjNVbG8ktLX7NLZadeQiTzUW4jOY29iOSPY1Cc0AU+VD5mSjULtdTn1Cdba6luARNHNFlGU9h3GKh1C7u7yWzeKG2tY7IYt4Io8xrzk5B65p2QOopC5NHKg5mT3OqS6hZz2ws7GyiuHElybZCGlYdM56fQVdsvEGs2c5eLUriVTC0QjlfKrkYBHHUVgzfK25P+BVJHJubI5FTyoOZlzT72a0tfsktvaX9v5vnqt0pOyTuwIpslzNJqf9oXQinuGmEzKwwhI6DHoOKZH83IGKVkBbJ5NNJCbYgmujqJ1ETYv/ADvtAlxwG+np2q1eajNc209ulpY2cdw4kuDbIQ0xHPOegz2quaVRmnyoOZkYp4BNI7qOnzGkE7n7oAqhCvhD8xyfSonzIwOePSnhc8tyfWl6UAMCnFKF45p4NOAyOaAI8U4U7b+dKBQAzBJqREA6nJpwXinKmR7UAM27jx+dSKgA5IA96eF2oXPAHQVSJeWQkk4FSPYmZwGwn4mmEkfdAx696UcCnCqEMxnmlVakC96Bz0oAZtpyqBT9tOVMDLUrhYjI9KUDjmpMDPFFA0N20qg9hT9pHUgU1pY06tuPoKnQrV7i7SR3p6w8ZcgfWoDM5PGQPal5YZJNG4LQmIjXo+4+lQykuNqnavtSqoHQUu007CbI0jAGOtPCgdqcF4owaBCUYpcUYoGJijFO204CgBuKUU7FLQAzGTzT6AAOaKAEwDRgD3paQEGgQv0oxTgKSkMAKXFAFLz7UANxTTTzSUAIKeBmgDFPxQA3FLilooEJikxSk4600t6DNAxGpBRgt978qeAAOKAExS4oANLtoAQjimdTgVI2cU2FSGyxoAXZzT0QYJNSKBtyetAHT2pAOC4FIRgVJTCtMQ0ZpDkUpIXvk+lNdy3AGBSHYaXZuF4FIVwealAAXjioz1oASnjBHNNxUnAHSmBHn0pcUp+lJigBMUtFNNABR3oPtSgUgFIA61YsuLOD/rmv8qqvwjH0BNXIRsgjB42qP5VtS6nVhup55rkynWL7PG2Q/pXm+u3r314UjJ2A12fjZnto7i7H+runYxt9Sc1ifDyx+2a/CzKCsSmVsjIz0H8/0oxE7pRRUno2anh3wfMNGa8mUR3LSpNErcFUU8j6kE/pXs12/npaXC/dltoZBn/aQH+lYu0hSGHDDFatkwk8M6XIDkrBHGT/ALu5f6VjBJSRWHle4zNLmkzRXQdQuaSiljG+RE/vECgBnitsLodn6u07f8BTH83qn36VP4gfzfFAX+G3tFH0Z2JP6KKjByawe551d3kIOtPGBTAeaUdaDAcPvHNOyeabTuo44pAAzilzio9jZzk012Pc0ASPJxxURc0wk0hJxxQMf96kxz1FRhn9BTl/M0AaHg8qmvanBnme2jk/75ZlP/oQqx9etZ2hSeT4ssTyPPhlh4+gcf8AoJrUuhsupV9GNaQPQoO8UMzRmkzRmtDYXNVL07Csv9xlb8M4P6GrOaiuFDptPAPyk/XikBaDhbK8djhViYk+2DXiOnOGSYA5CzOP1r2XxDLFD4b1OeFcK8OzAJxllA/Dlv0rx2GMRXt/GBjbNnGMdVFVQleaMqnY1h0FFIh+UfSlrrMwooooAKhuHwNo79aldgqkms67lZUJRd0rkIi/3mPAFGiV2I1/Ctt59/NeN/q4P3Ufux5Y/gMD8TXVZqlpVqthp8FsOSi/Mf7zdSfxOatBhXmTlzycmcsnzO51Xw/m26zJbk8XELIB2yMOP/QT+dUNUt/suqTxAYVXOPp2qroF4LLWrG5J2rHMrMf9nPP6ZrpfHVr9m1gtj74wT7g4/oK8/Eq0rnTQfu2OY1WLzbCUYydvFdL4eb7VrdvfcZubNZSf9rKhh+YrDkXfbsvqK1fh+2+1CHG60lkiA/2WKsP13VzSOhFr4htm5tPaM/zrzKUFtVl29d2f5V6T8RHxdWfP/LL/ANmNecJzq0p75NUiWPa5QhcOBxU51CMQrH5mMdlFXJrQFEK7RkZqIWZ67l/KpNLlL7WvZj+Rpp1BR/yzlP8AwGtECGH/AFnzUhnhIOIsfjQBmnUe/ky/lSf2kT0hf8quPKGHCgVAWJ6AUXHYal6G+9Gw/ClNwp/hI/CgEnqBS59hSGS6O4k1KTAPEXp71o+IRjT+fb+dVNEG7UJenEY/nVrxKALA59R/OqtsZt+8wgHyD6U49aS35jH0p5HNSiriDrT88UgGKWnYVxln8uoxH6/yo8QXBt7eNwm4mXGPwNFsP9Pj+h/lTNaYeXADz+9P8qI7sH0KcF1NJyIXQeuasK9yzY28epqNJeOCKlSQ+tAx4W5PYfnSlLj2/OlEh9acHPrRcCEx3J7gVG8V1/C61aZzjrUe4560agVTFe95E/Ko5Yr84CSoPwq+ZB3NMaRfWlcCl9nvSBuuEz7CpBDc951/KpzIMVEWOc5NK4xVSXvKp/CgpJ/z0X8qQOvpSE0XGDeYv/LQflTSJG/5bsPoKC3NKDmgYnkE/euXpRY7/wDl5k/OloouIkGlKR/x9N/31T10qMY/0l8/71Q9akjUetFwLSadHt5uJPzpr6fD/wA95P8AvqowdvAJpQ47mi5I37DHnieX86etnGPvSyk/WkEmKd5ntRcdmL9lg77z9WpDa2/dD+dHmUu7ii4DDa23/PP9aT7LbDolPzSZpXAaYYP+edM8uEf8sxTyaYxOaBiFIh/yzFNKxd0FGSaQ0hhiH+4KMwjpEKbmjBpjsO8xR0jX8aDNxgIg+gphBpCDQA4yN7flQsh7Y/KmfhSZPpQBKJG7ml3t6modx9KMk9qaEWllwOtSLOe1U+fSlVT70xWL4uDn3p8Upa+tgfU/yrOAPWpbZj/aFt143fyNUnqTJaHXW7fuZDVGJ8zS/wC9U0DkQnBHPJFULaTMsp9WNaXMV0NA1E6ik380M2RQNkLrmqdwvzD6irrVVlGZVHvUy+FjjuiHxAuLRFzhvNH8jWMFz1NbHiAFoozjP7zn8jWTsb0NZs2jsATHenBBnANNCEmpFQikUSqCO9PVmHfiowCBzS5pCLAncdGOKXzyeoX8qqlvTmkMgHagLFvzAzoGwDuGMVf61kwlXuYdy8g5B/CtXd6V6WD+Bnn4r4kLj0pR701XI6jNPDDPI4rrOUdQTijKetGVPrVAApcUDb60vy+tACUcUbkzgMKcV9KAG0U4IfWjaaAEx6UoHPNKAe9PAxQIZg54pkueamFRzUDIEO4YIIIpwyKcgBWl9qBADRQeOvIpvegBTigUhFJmmApz2pppeT3oJoAAOKNppQM0c0ANxikxT89jQQDQAwHFGaUgUmKAEIFJg040mKATsYuKPwoopALk+lHJoooAKXNFFADcZpyrRRQAppuKKKADB+lGcD5RRRQA05IyRTTwKKKAIXbORtFQhWh+Yj5T+lFFSxovWz5Ax3qZgQaKKEDECE9QaY8gwVT8TRRVCI1T1p+AOB1oooAkVeOaTZk8UUUAOCDPtTtuOaKKAEyKcAMjPSiigCTjGSOOwp4XA3PwPSiioKQySQuMbBjtUQ44wBRRTQmG3JpwXFFFUIdtz9KcBkYWiipY0SJC2MtwKV49ib2b5aKKgroQG4UHaFJ+lPEhI4UL79aKKYIRlDdSSaaIlU5xzRRTEPApaKKYhjyqnU0qOGGQaKKAW5KOBzSdaKKBhiiiigBygUuKKKBC4o6UUUAA560ECiikA0jIxQq46UUUDHAUUUUAGaKKKBhTlHFFFAhwGaXiiigBC2OKaWoooAaSKKKKB9AB5p24YoooAVBmn4x1oopCEYZ6U5U5oooAe2OBnFL0xRRQC3FLYGcVEZT7UUUGlkNA5yaeooooMx2OKaRRRQAAe1PGDRRQAknHQUwmiigBKKKKBid6VenNFFAhs/FnPxzsb+VM8R3n9n6RPKOoUgflRRWtLZnXh9mYsOl2+ueDrS2uh8s1ukgbujkZ3D8TVPwV4dfQYrprrY08j7QV6bB0x9aKKx6mDk9Tp87hg4Aq1oTZ8KRx94ZZUP8A39Y/1ooqo7m2G3YuaM0UV0HaGasacu+9iHvn8qKKT2EY9xJ53iDV5gcjzliH/AEA/nmpQRRRXOebV+JigClFFFBmKAc08YHWiigBC/FRNgnmiigBp605UB60UUDFKDtTSCDiiimBFuMGqaTPgfLdop+jZQ/+hV0OrLtv5PfB/Siiqp7nbhvhKmaM0UVqdQZpkhwhPpzRRQIi1hd/gy4XGQ0scWffzR/RT+deZ6wnl+ItRXAAZYnH/fOP6UUVND+L/XYwqfEh8Zyi/SnUUV3ki0UUUAVJ5MknOFFXvCun/a5RqlwMRjK2yH06F/x7e1FFc+Ik1FIifwnV7AaTZjoKKK4mcwm33r0LxP8A6boGm33VmRGcj1ZRu/8AHgaKK5MTsjehuzlQfkqfwNI0fii7gUfu5YRIfqrAf+zUUVxM60WviM3/ABM7Zf8Ap3B/8eauCt8f2o4J4LEZoopxFI0FknVAZiKia5dhjOB7UUVJSIGcseeaUNx1oooKDI9ajbrxRRQCGlqXcKKKYy54fI/tO4A/55r/ADq54jb/AEFu48wD9aKKfYye7FtiRGKfmiipKAn0pc8UUVQyOzP/ABME9lP8qr+IW2pb47yn+VFFKO7E+hQVjVlHbFFFBZPGW61MCaKKZDEYE0gRqKKQwK+tMZBRRSYIjx7UlFFSUNKmjkUUUAA5PSnAgdqKKBj1w1O20UU0SGMUGiikykNzzS5oopAKCRTxz1oopiHKg608KBRRTEBX0oIOKKKAIzTWoopMoaaQ0UUgAkelID70UUDFzjvTWJ7GiigBu8+lKGGOcUUUAMLewpBJiiiqQIBIc9KdvNFFAD0kGOafDIDdx+oBooprciezN62bFrI3c4FZti/3+f4j/Oiir7ma2RdD07d70UVSEITVfP8ApUf1ooqZbMcfiRBrjYlgXsWY/lj/ABqlvGOtFFTI0jsNLDsaUGiipZQhbI5pAVHrRRSAC4HQcVBNcKv8Dt9BRRTQIl02czX0YCMo56j2rcxRRXpYX4Dz8X8YoI70ZoorqOYBjNO4NFFACjb9ajaMjOxj9DRRQBXnM44Chh6irFo77MuTn0oopAWPMIo831FFFMB24N3oZsYooqhCqwPWo5T70UUDGRk446U8UUUITFpp4PtRRQITNGKKKY2JtNGKKKQhQMUZoooAQ0nSiigAooopoBM0vFFFAH//2Q=='%3E%3C/image%3E%3C/svg%3E)
With the new area in Honkai Star Rail, "Warbling Shores" Styxia, becoming available, players can explore it and complete various challenges, solve puzzles, and open treasure chests. Treasure chests are fairly popular among players since they grant a decent amount of Stellar Jade. However, since they are scattered across the map, players might end up missing some.
This article explores every treasure chest location in “Warbling Shores” Styxia in Honkai Star Rail.
Honkai Star Rail: All treasure chest locations in "Warbling Shores" Styxia
All “Warbling Shores” Styxia B1 treasure chests
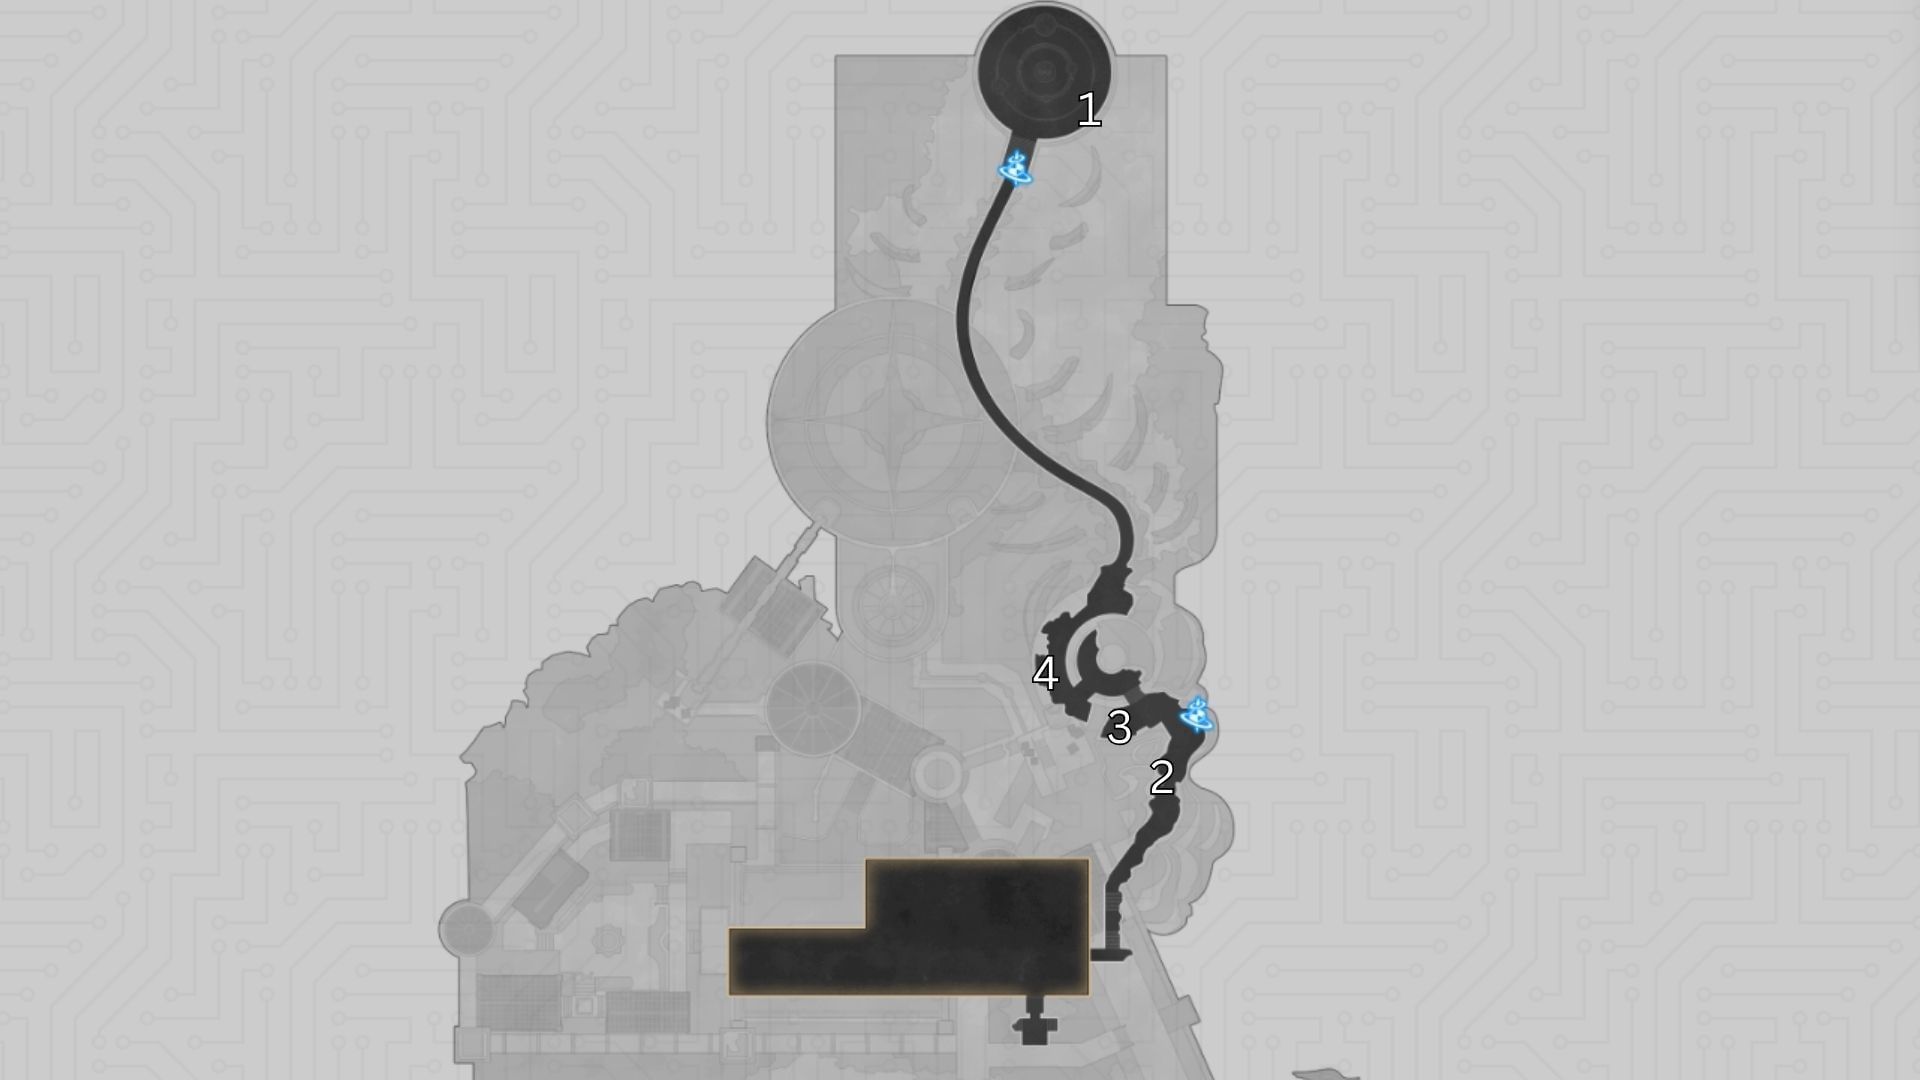
Looking for Crossword hints & solutions? Check out latest NYT Mini Crossword Answers, LA Times Crossword Answers, and Atlantic Crossword Answers
- Chest 1: Teleport to the Seabed of Luminous Remains waypoint and go right. The chest is located between two broken pillars.
- Chest 2: Go to the Somber Altar of Candles anchor and turn left. The chest will be near a broken stone pillar.
- Chest 3: From the last location, go back to the previous waypoint and turn left. The chest will be near some candles.
- Chest 4: Using the path in the broken wall, go to the next hallway. You will see the fourth chest there.

- Chest 5: Following the path where the second chest was, walk until you reach a door. Open it to see the fifth chest near a sleeping enemy.
- Chest 6: For the sixth chest, use the Slumbering Palace Corridor Space Anchor. From there, head to where the Golden Scapegoat puzzle is. Make sure the time is Dawn to interact with the chest.
- Chest 7: From the last location, go down using the elevator. When you are off it, go right at the end of the hall to go down. In the middle, right before you turn right again, you’ll see the chest.
- Chest 8: Following the same path, go down to the bottom of the pool. There, you will find the Eighth chest.
Also read: Best Hysilens build in Honkai Star Rail: Light Cones, Relics, stats, teams, and more
All “Warbling Shores” Styxia F1 treasure chests
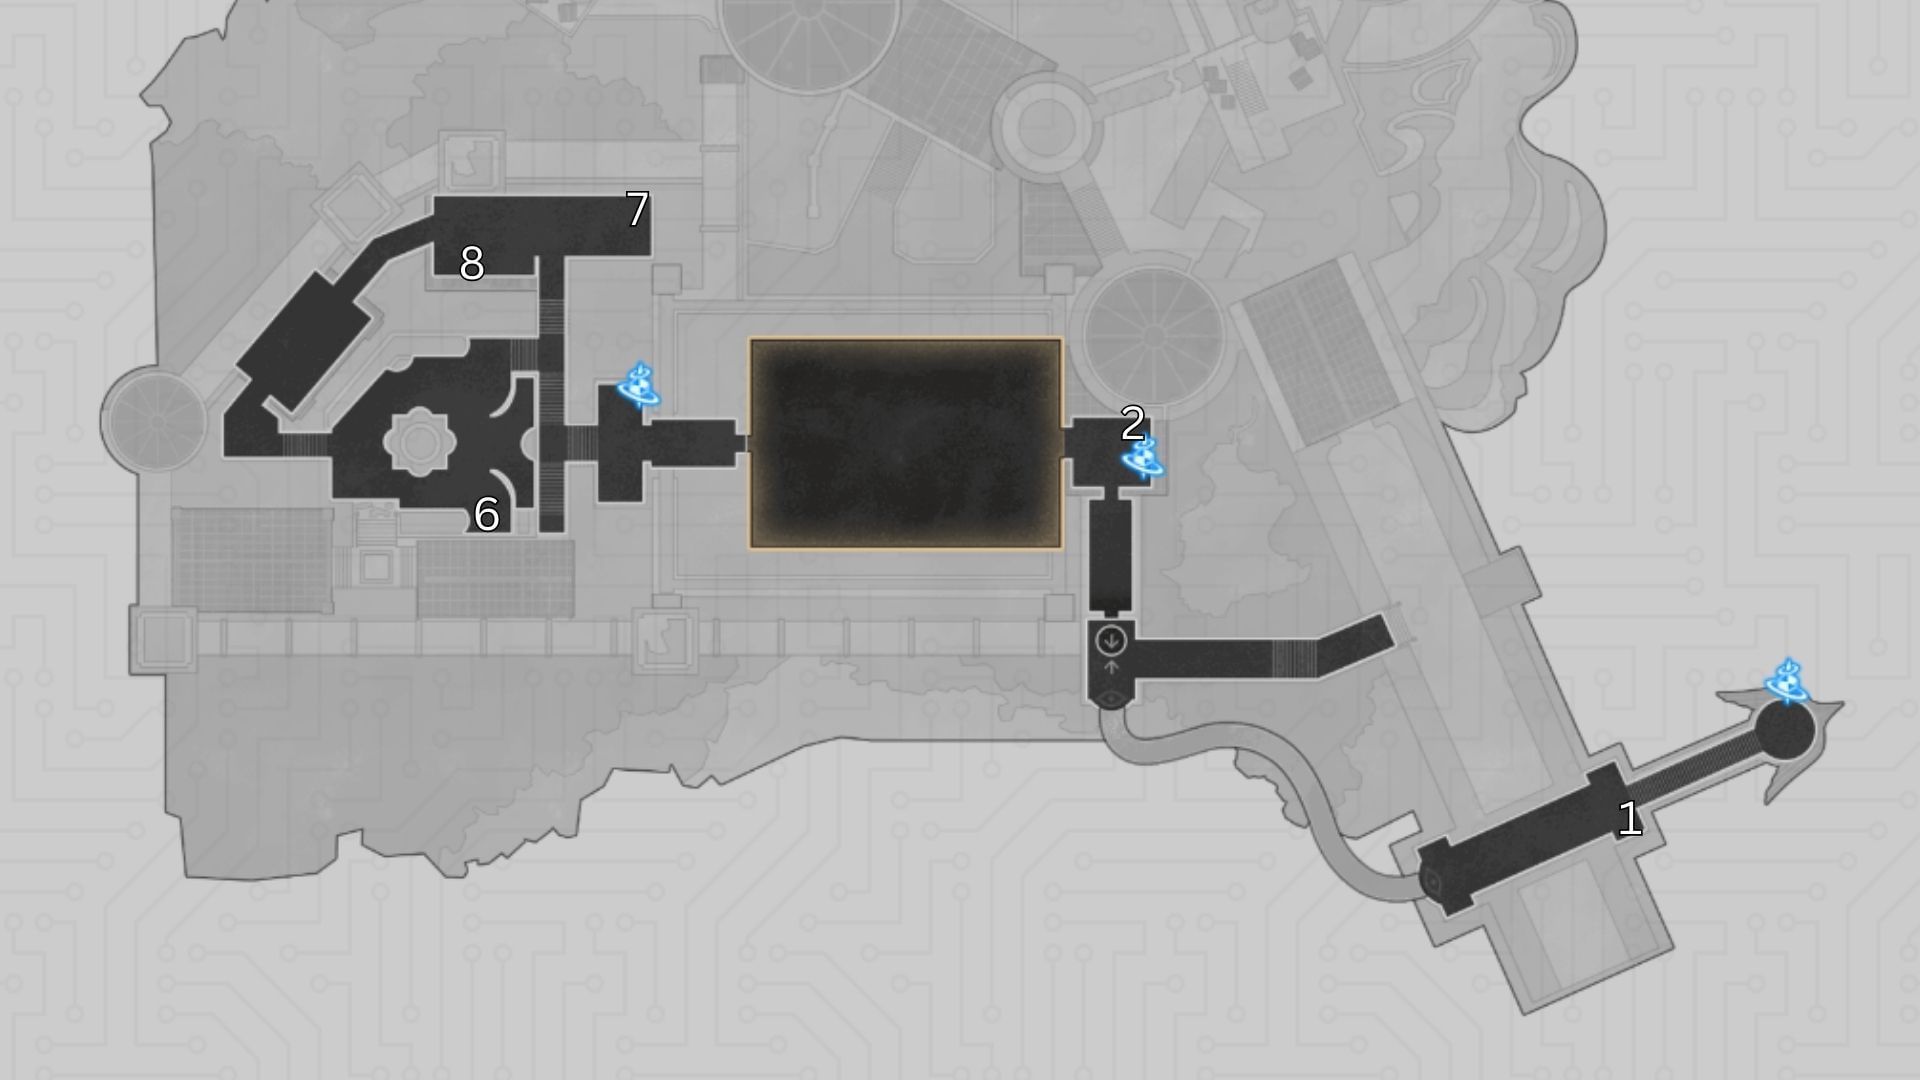
- Chest 1: Spawn on the Revelry’s Keep waypoint and go down the staircase. After doing so, you will see the chest on your left.
- Chest 2: After getting the first chest, teleport to the Passage of Treasures anchor, then look right. You’ll see the chest near the waypoint.
- Chest 3: From the last spot, go inside the room using the giant door. Turn right immediately after going inside. At the end of the path, you’ll see the chest.
- Chest 4: Go to the entrance of the room. From there, you can walk towards the other side of the room using the bridge. Right before the staircase on the left side, you’ll see the fourth chest.

- Chest 5: Go down the stairs from the last chest’s spot and walk toward the elevator. Instead of going down, make a left turn.
- Chest 6: Spawn on the Ariose Fountain Courtyard and go down the stairs. Turn left upon reaching the fountain.
- Chest 7: Go to where the Stagnant Shadow stage is located. The chest will be behind the enemy.
- Chest 8: From the last location, turn around and walk towards the next area. There, walk behind the second table.
Also read: Hysilens E1 vs S1 in Honkai Star Rail: Which one should you pull?
Check out the following section for more Honkai Star Rail articles:
- Best Saber build in Honkai: Star Rail: Light Cones, Relics, stats, teams, and more
- Best Archer build in Honkai: Star Rail: Light Cones, Relics, stats, teams, and more
- Honkai Star Rail Archer teams guide: Best F2P and premium team comps
- Honkai Star Rail Saber teams guide: Best F2P and premium team comps
- New Honkai Star Rail leaked endgame mode looks like Genshin Impact's Stygian Onslaught

Are you stuck on today's Wordle? Our Wordle Solver will help you find the answer.