

'%20x='0'%20y='0'%20height='100%25'%20width='100%25'%20%0A%20%20%20%20%20%20%20%20%20%20xlink%3Ahref='data:image/jpg;base64,/9j/2wBDAAYEBQYFBAYGBQYHBwYIChAKCgkJChQODwwQFxQYGBcUFhYaHSUfGhsjHBYWICwgIyYnKSopGR8tMC0oMCUoKSj/2wBDAQcHBwoIChMKChMoGhYaKCgoKCgoKCgoKCgoKCgoKCgoKCgoKCgoKCgoKCgoKCgoKCgoKCgoKCgoKCgoKCgoKCj/wgARCAAGAAoDASIAAhEBAxEB/8QAFgABAQEAAAAAAAAAAAAAAAAAAAMH/8QAFQEBAQAAAAAAAAAAAAAAAAAAAwT/2gAMAwEAAhADEAAAAMcqSt//xAAfEAABAwMFAAAAAAAAAAAAAAABAgMEABIhFiJBYtH/2gAIAQEAAT8AQxMitS4KloDMgqQ5a4TgkcEdRWlpadofaIGAbz5X/8QAFxEAAwEAAAAAAAAAAAAAAAAAAAEiMf/aAAgBAgEBPwBTh//EABcRAAMBAAAAAAAAAAAAAAAAAAABIQL/2gAIAQMBAT8A1XT/2Q=='%3E%3C/image%3E%3C/svg%3E)
Halfway through Chapter 3, you’ll face Rude and Elena in Final Fantasy 7 Rebirth. This is the first of two boss battles in the Mithril Mines, and while they aren’t horribly challenging, they can still overwhelm you. This battle is a good test of a player’s ability to focus on two important NPCs simultaneously. Don’t underestimate Elena because she’s a newer member of the Turks - she’s just as dangerous as Rude.
During the battle, look out for Shockwave attacks, Grenades, and their various synergy/combo strikes. We’ll give you all the information you need to beat Rude and Elena in Final Fantasy 7 Rebirth - how to pressure, weaknesses, and important attacks to deal with.
Disclaimer: This contains spoilers for a boss battle in Final Fantasy 7 Rebirth.
Looking for Crossword hints & solutions? Check out latest NYT Mini Crossword Answers, LA Times Crossword Answers, and Atlantic Crossword Answers
How to battle Rude and Elena in Final Fantasy 7 Rebirth (Chapter 3)
1) Phase 1 of the Turks fight
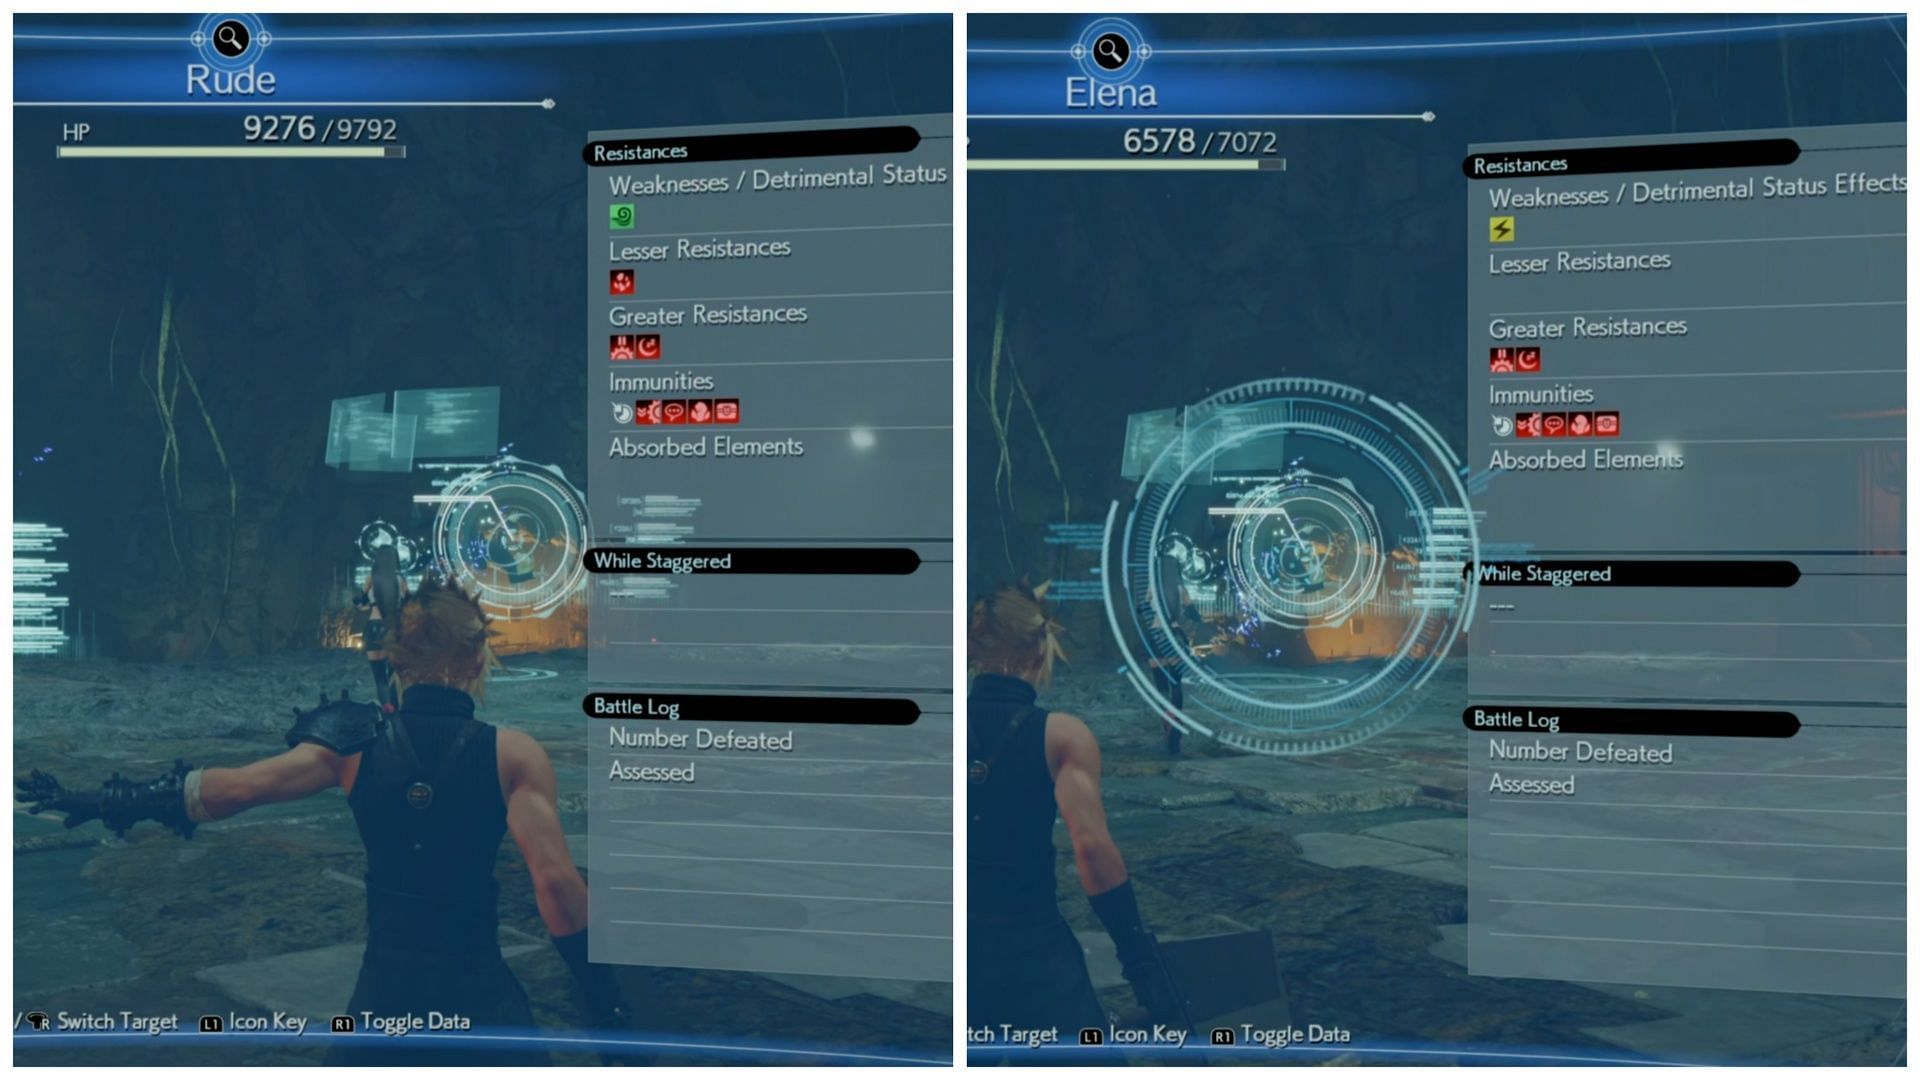
When I fought Rude and Elena in Final Fantasy 7 Rebirth, Cloud, Tifa and Aerith took the stage. Don’t worry, as Barret and Red XIII will have their own little adventure to go on deep in the Mithril Mines. Above, you’ll see the Assess screens of both boss characters. As you can see, Rude is weak to wind, Elena is weak to Electricity, and they are both immune to several status ailments.
Unlike the Midgardsormr battle from the previous chapter, this is a high-speed, high-pace battle against two foes. They work together well, but there’s one strategy I focus on through most of my time battling the Turks: Elena drops first. It doesn’t matter which you choose, but that was my focus.
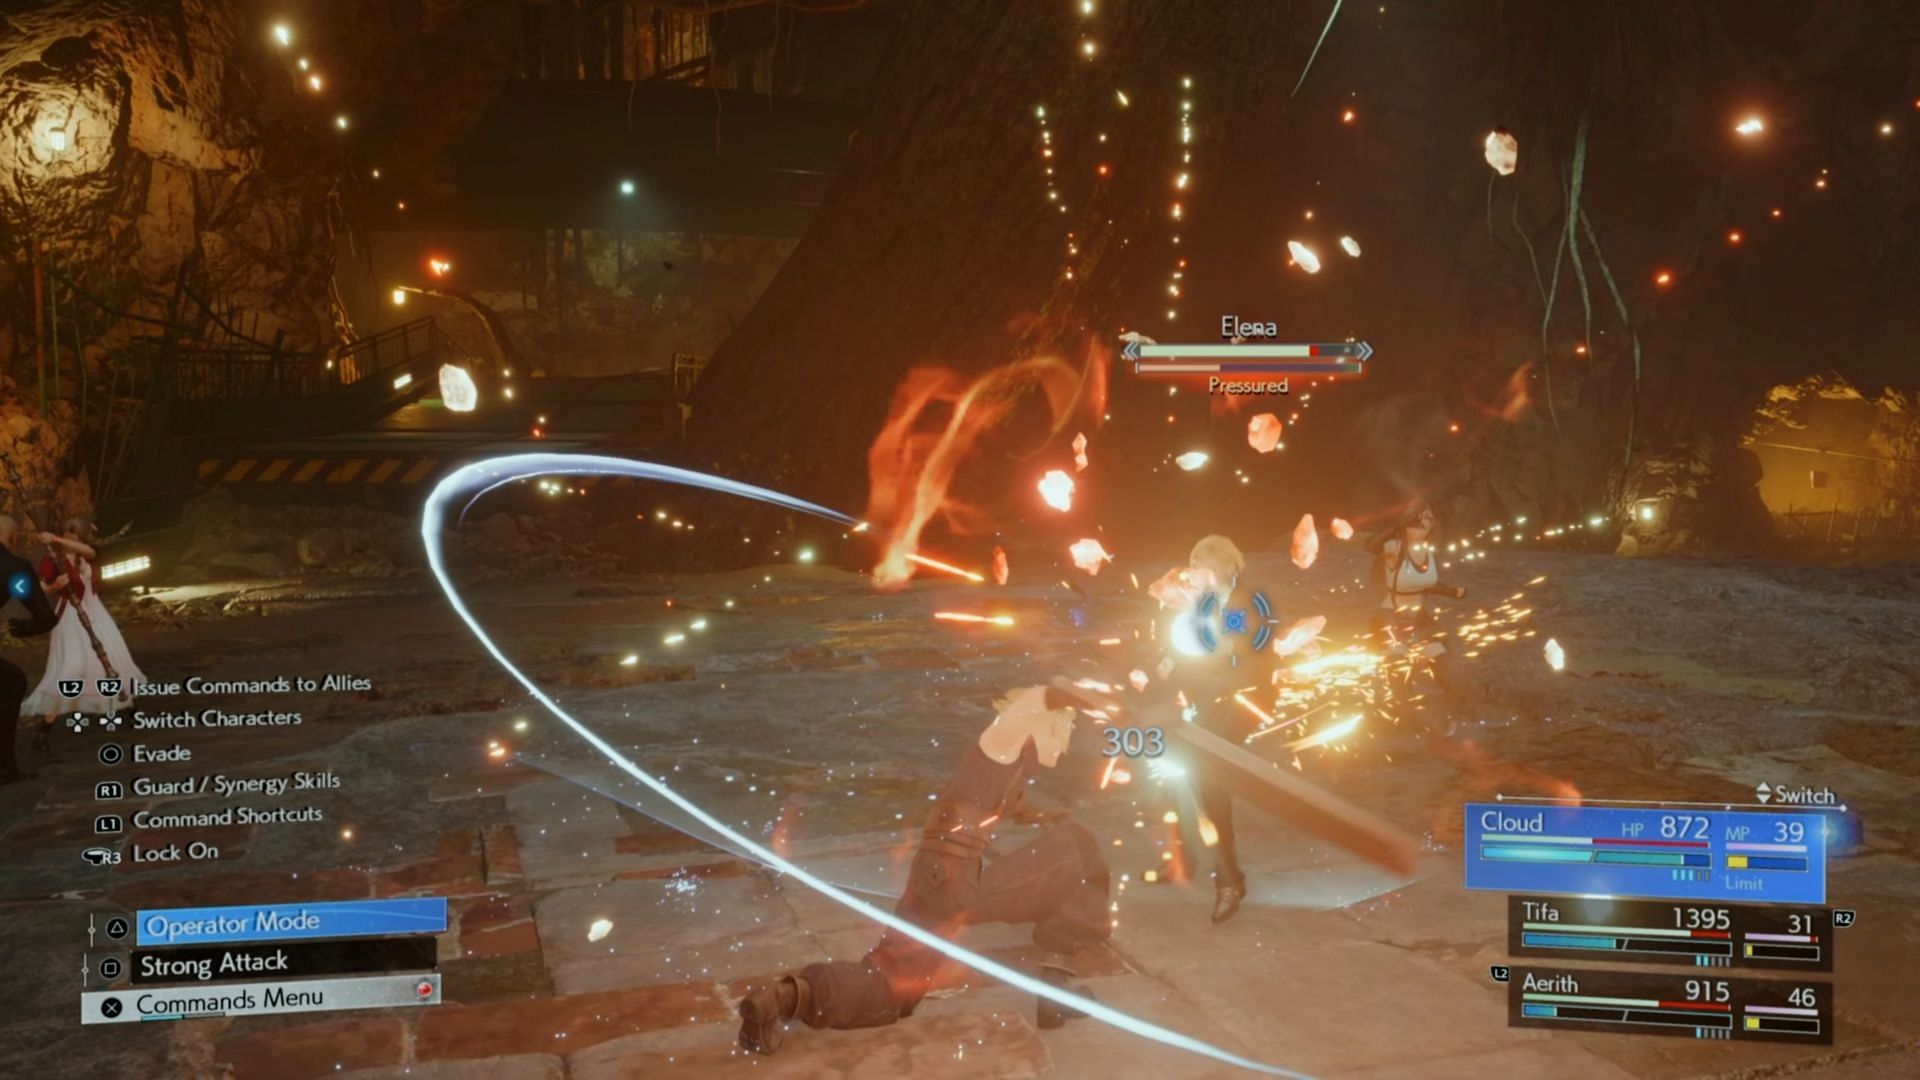
If you want to pressure Rude, you need to hit him with repeated powerful strikes while he’s guarding. Then, it’s a simple matter of using Focused Thrust to break and stagger him. Just hitting Elena with powerful moves can pressure her. They both gain pressured status by interrupting their synergy/combo moves.
If you’re quick with switching to Punisher Mode on Cloud, Rude and Elena in Final Fantasy 7 Rebirth can be incredibly easy at the start. I used it to immediately parry Rude’s incoming attacks while Tifa pressured Elena right out of the gates.
You’ll still have to worry about the range on Rude’s Triple Shockwave, and Rude will often show up to defend Elena. To pressure Rude, I focused on attacks like Braver and Focused Thrust when he guarded. He still uses Spirit Geyser, but it appears you can stop it with enough damage. Elena has many ranged attacks like Backflip Barrage, where she tosses grenades, and close-range attacks like the Elena Knuckle.
If you can switch to Punisher Mode right before Elena strikes, you can easily pressure her, get her staggered, and stomp on her. When she’s staggered, hit her with everything you have - she’ll stop taking damage at 25%.
2) Phase 2 of the Turks battle
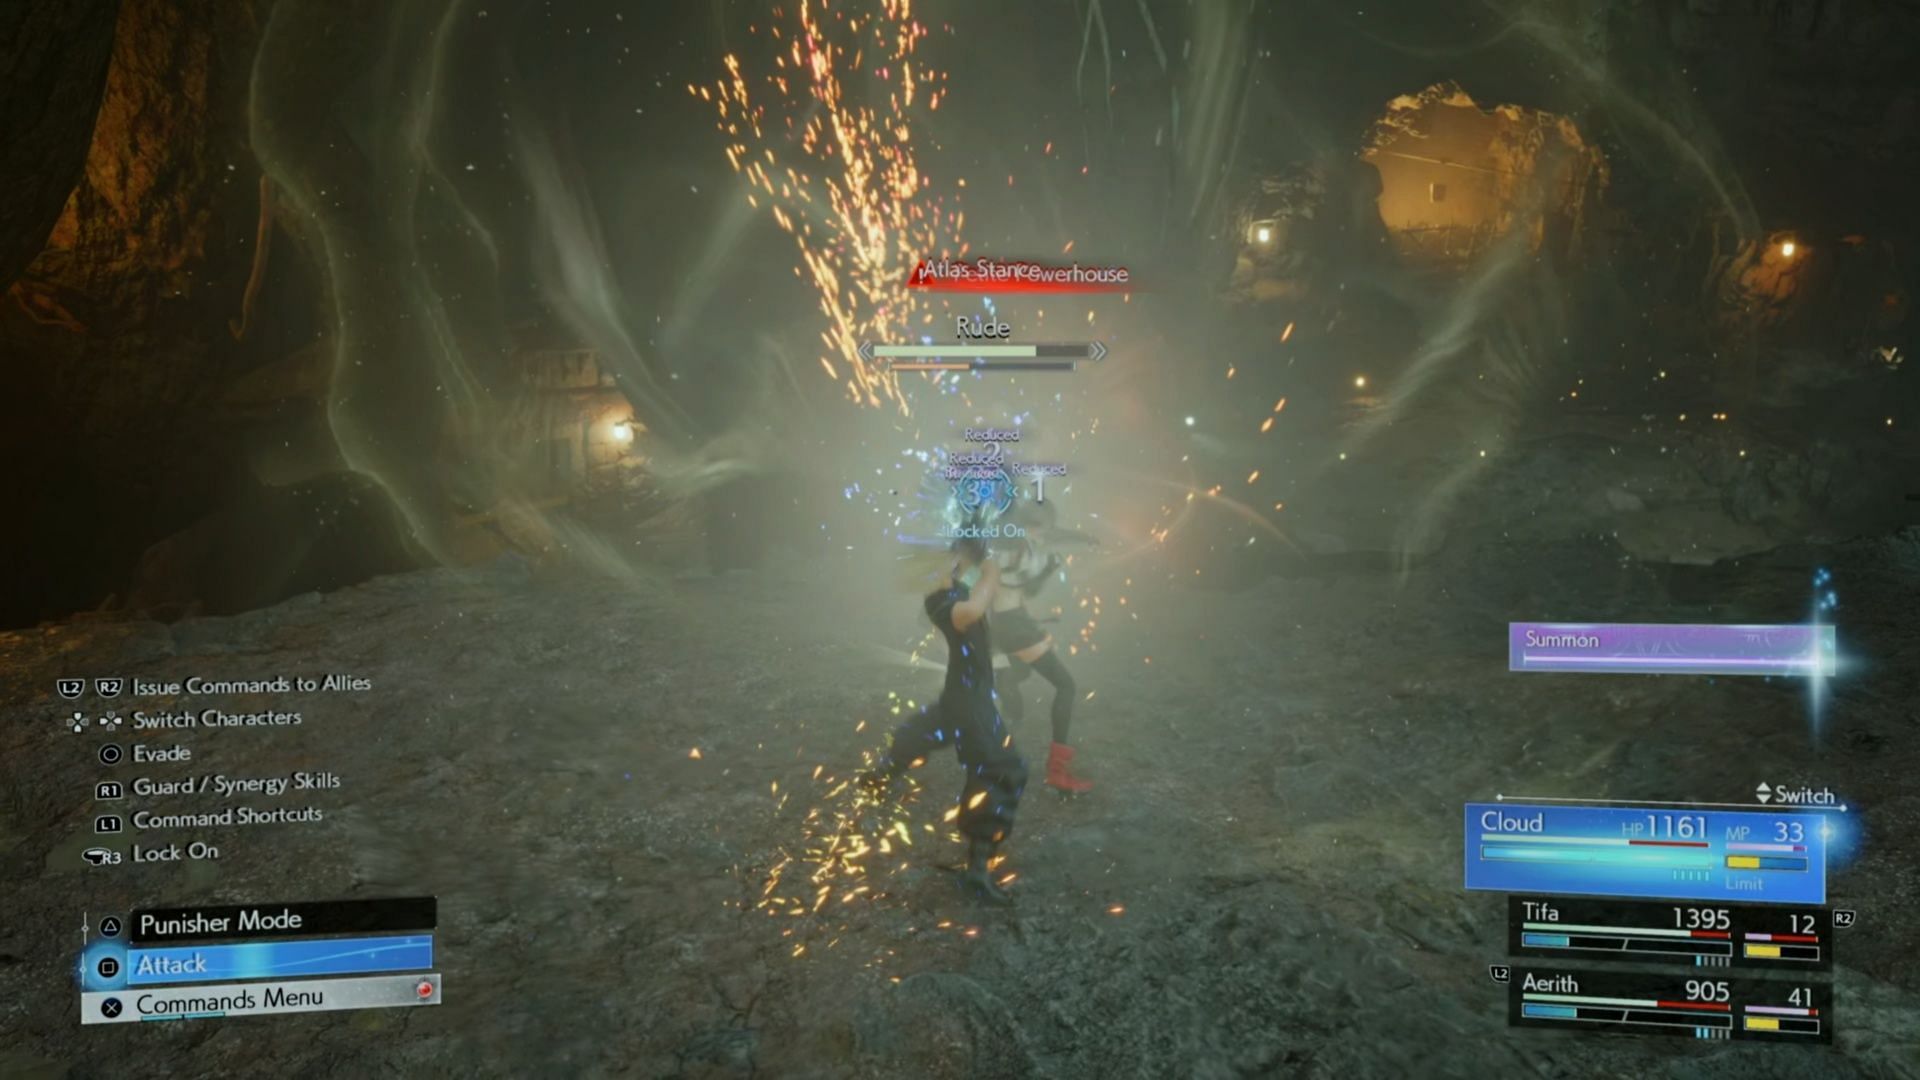
That’s when I switched to fighting Elena in the Rude and Elena battle in Final Fantasy 7 Rebirth. She resumed taking damage after the stagger, but I chose to wear down Rude a bit before returning to her. When he hits about 50% HP, you’ll see a cutscene where they both take on new abilities.
Rude uses Atlas Stance, and Elena activates Petite Powerhouse. They stay in this stance for several long moments, so I just beat on them with as much stagger as I could possibly muster. When Elena finally uses her attack, it’s a three-hit combo that can hit pretty hard.
For the final part of the Rude and Elena fight in Final Fantasy 7 Rebirth, she switches back to Raid Stance and resumes throwing grenades at the party. It’s not hard to finish them off at this point and claim your rewards:
- 50 Party EXP
- 175 EXP & 10 AP
- 700 Gil

This also leads to a party split, where Red XIII and Barret will work together to get out of the depths of Mithril Mines and catch up to the rest of the group. If you’ve spent time completing sidequests like Where the Wind Blows, these battles will be cake.
Check out our other Final Fantasy 7 Rebirth guides:
- How to easily beat the final boss of Final Fantasy 7 Rebirth
- How to easily beat Titan in Final Fantasy 7 Rebirth
- How to easily beat Gi Nattak in Final Fantasy 7 Rebirth
- How to easily beat Galian Beast in Final Fantasy 7 Rebirth
- How to obtain the Magic Pot Summoning materia in Final Fantasy 7 Rebirth
- Best early-game summons in Final Fantasy 7 Rebirth
- Games like Final Fantasy 7 Rebirth on Nintendo Switch

Are you stuck on today's Wordle? Our Wordle Solver will help you find the answer.