Wayne Rooney of Manchester United celebrates scoring his team’s third goal during the UEFA Champions League Group A match between Manchester United and Bayer Leverkusen at Old Trafford on September 17, 2013 in Manchester, England.
Wayne Rooney has been the talk of the country since the close of the 2012-13 seasons, both for the wrong and the right reasons.
The everyday musings of the transfer window found one of its prime targets as the Manchester United #10 became the epicentre of a rather shambolic window for the club.
Much was made of Chelsea‘s nonchalant approach to make Rooney their star #9, but as fate were to have it, Wayne Rooney remains the Man United #10 for the foreseeable future.
On the pitch, Rooney has no doubt been the stand out performer for David Moyes. The striker has started the season in full throttle, registering 3 goals and 3 assists in 3 starts, picking up 3 MOTM’s in the process.
The #10 has been a revelation in a side which has somewhat struggled to carve open a stubborn opposition, as seen at Anfield and Old Trafford at the weekend.
Rooney’s form can be put down to a variety of reasons – after a lengthy lay-off due to injury, the striker has arguably been at the peak of his fitness in some time now. Also, after a summer long question mark over his commitment to his club, Rooney would unquestionably be hungry to put floundering vultures against him to rest with a sustained run of form.
But keeping aside the qualitative domains of the striker’s current predicament and casting an eye on the tactical spectrum of his showings, it is interesting to note the bearing that the signing of Marouane Fellaini has had on the striker’s pronounced influence in the team’s play in the final third.
For starters, carefully notice Wayne Rooney’s heat map and areas of action in the 0-0 draw against Jose Mourinho’s Chelsea at Old Trafford. It is to remembered that it was Tom Cleverley who started alongside Michael Carrick for the fixture.

Heat Map on the left; Action Zones on the right (source: squawka.com)
As seen above, Rooney spent the majority of the game between Chelsea’s midfield and defence, trying to pull strings from the third quarter.
The heat zones on the heat map also convey that the #10 was required to drop deep and act as an auxiliary midfielder to restrict the influence of Chelsea’s uberly-talented midfield.
Now, compare the above image with the one from Tuesday night when Fellaini made his Champions League bow -

Heat-Map to the left; Action Areas to the right (source: squawka.com)
On careful observation, it is noticed that Rooney did spend a lot more time in the final third of the pitch compared to the game against Chelsea, more significantly in the opposition penalty box.
The pronounced green patches seen in the heat-map of the Chelsea fixture are not visible in the above graphic, paying testimony to the assurance that the Belgian provides in central midfield, thereby allowing Rooney to impose himself in the final third to a larger extent.
Though this was just the curtain-raiser, Fellaini’s bite and discipline in central midfield could possibly provide the missing piece in United’s midfield.
With the Belgian ably supporting Carrick in keeping things ticking in the middle, it could possibly remove a lot of the burden on Rooney’s shoulder to drop deeper and deeper to provide cover for his central midfielders and free him up to support Van Persie upfront.
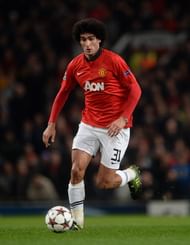
Marouane Fellaini of Manchester United in action during the UEFA Champions League Group A match between Manchester United and Bayer Leverkusen at Old Trafford on September 17, 2013 in Manchester, England.
The presence of Fellaini gave Evra the added insurance down the left hand side.
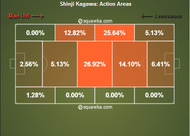
(source: squawka.com)
With Shinji Kagawa predominantly occupying the central areas of the pitch as seen below and his own barraging runs down the flank, Patrice Evra potentially risked a swift counter from his side as the in form Sidney Sam posed a considerable threat on the counter.
The Belgian drifted out to the left to nip any potential counter by Sam in the bud and regain possession for his team. As seen in the graphic below, Fellaini did occasionally drift wide left to act as an auxiliary left sided midfielder.
The black circles indicate Fellaini’s presence down Leverkusen’s right -

Heat Map to the left; Action zones to the right (source: squawka.com)
The sight of the diminutive Sidney Sam trying to glide past the monstrous Belgian, only to eventually lose possession and bounce of him into the turf, thereby setting the gory locks of Fellaini into motion remains one of the sights of a satisfactory evening at Old Trafford.
It is interesting to note that against Chelsea, it was Carrick who did the same, instead of the more agile and swift Cleverley -
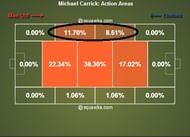
Michael Carrick taking up the responsibility of covering for Evra during the Chelsea game. (source: squawka.com)
And finally, there is the bit on Shinji Kagawa and how he ultimately proved to be a vital cog in United’s attack, even though he did not have a direct contribution to any of the 4 goals.
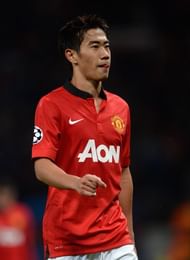
Shinji Kagawa of Manchester United during the UEFA Champions League Group A match between Manchester United and Bayer Leverkusen at Old Trafford on September 17, 2013 in Manchester, England.
The Japanese international played it smart for the hour that he was on the pitch, taking up some interesting positions, predominantly between Giulio Donati, the right back and Omar Toprak, the right sided centre back.
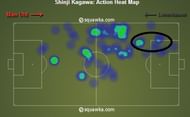
The circle indicates the positioning between full-back and center back (source: squawka.com)
As Kagawa operated between the lines of defence, he found the odd pocket of space and made good fist out of it – as seen when he put Van Persie on goal in the first half.
Another interesting observation was the drifting of Van Persie towards the left when Toprak took charge of Kagawa, thereby trying to create a 2v1 with Evra against Giulio Donati.
Though the Japanese international eventually ran put of steam during the hour mark, there were encouraging signs, and those can only amplify as he gains fitness during the course of the season.
Given that the footballing calendar has just started to gain momentum, David Moyes may well have to approach a dynamic approach to ensure United do not earn the tag of a predictable team.
He may well have to tinker and tune and play according to the situation, but with the squad at his disposal, rotation may not be the most difficult among his list of priorities.
For starters, Tuesday night was certainly impressive and commanding by the Red Devils against their German hoodoos.
