After building a new gaming PC, there are some BIOS settings you can change to significantly boost your gaming performance. The BIOS, also called UEFI, is the computer's firmware. Its function is to communicate with various components of your computer and tell them how to operate. Some BIOS settings, such as Smart Access Memory, Precision Boost, or NVMe PCIe lanes, can give you a great performance boost in gaming. So, if you want the best performance, enable the best BIOS settings available on your PC.
This article presents the 10 BIOS settings to change after building your new gaming PC.
NOTE: This article is subjective and reflects the writer's views.
10 BIOS settings to change after building your gaming PC
1) Enable Smart Access Memory/ReBar
![Enabling Re-Size Bar/SAM in BIOS (Image via MSI)](https://staticg.sportskeeda.com/editor/2024/03/3f3b9-17117876395050-1920.jpg?w=190 190w, https://staticg.sportskeeda.com/editor/2024/03/3f3b9-17117876395050-1920.jpg?w=720 720w, https://staticg.sportskeeda.com/editor/2024/03/3f3b9-17117876395050-1920.jpg?w=640 640w, https://staticg.sportskeeda.com/editor/2024/03/3f3b9-17117876395050-1920.jpg?w=1045 1045w, https://staticg.sportskeeda.com/editor/2024/03/3f3b9-17117876395050-1920.jpg?w=1200 1200w, https://staticg.sportskeeda.com/editor/2024/03/3f3b9-17117876395050-1920.jpg?w=1460 1460w, https://staticg.sportskeeda.com/editor/2024/03/3f3b9-17117876395050-1920.jpg?w=1600 1600w, https://staticg.sportskeeda.com/editor/2024/03/3f3b9-17117876395050-1920.jpg 1920w)
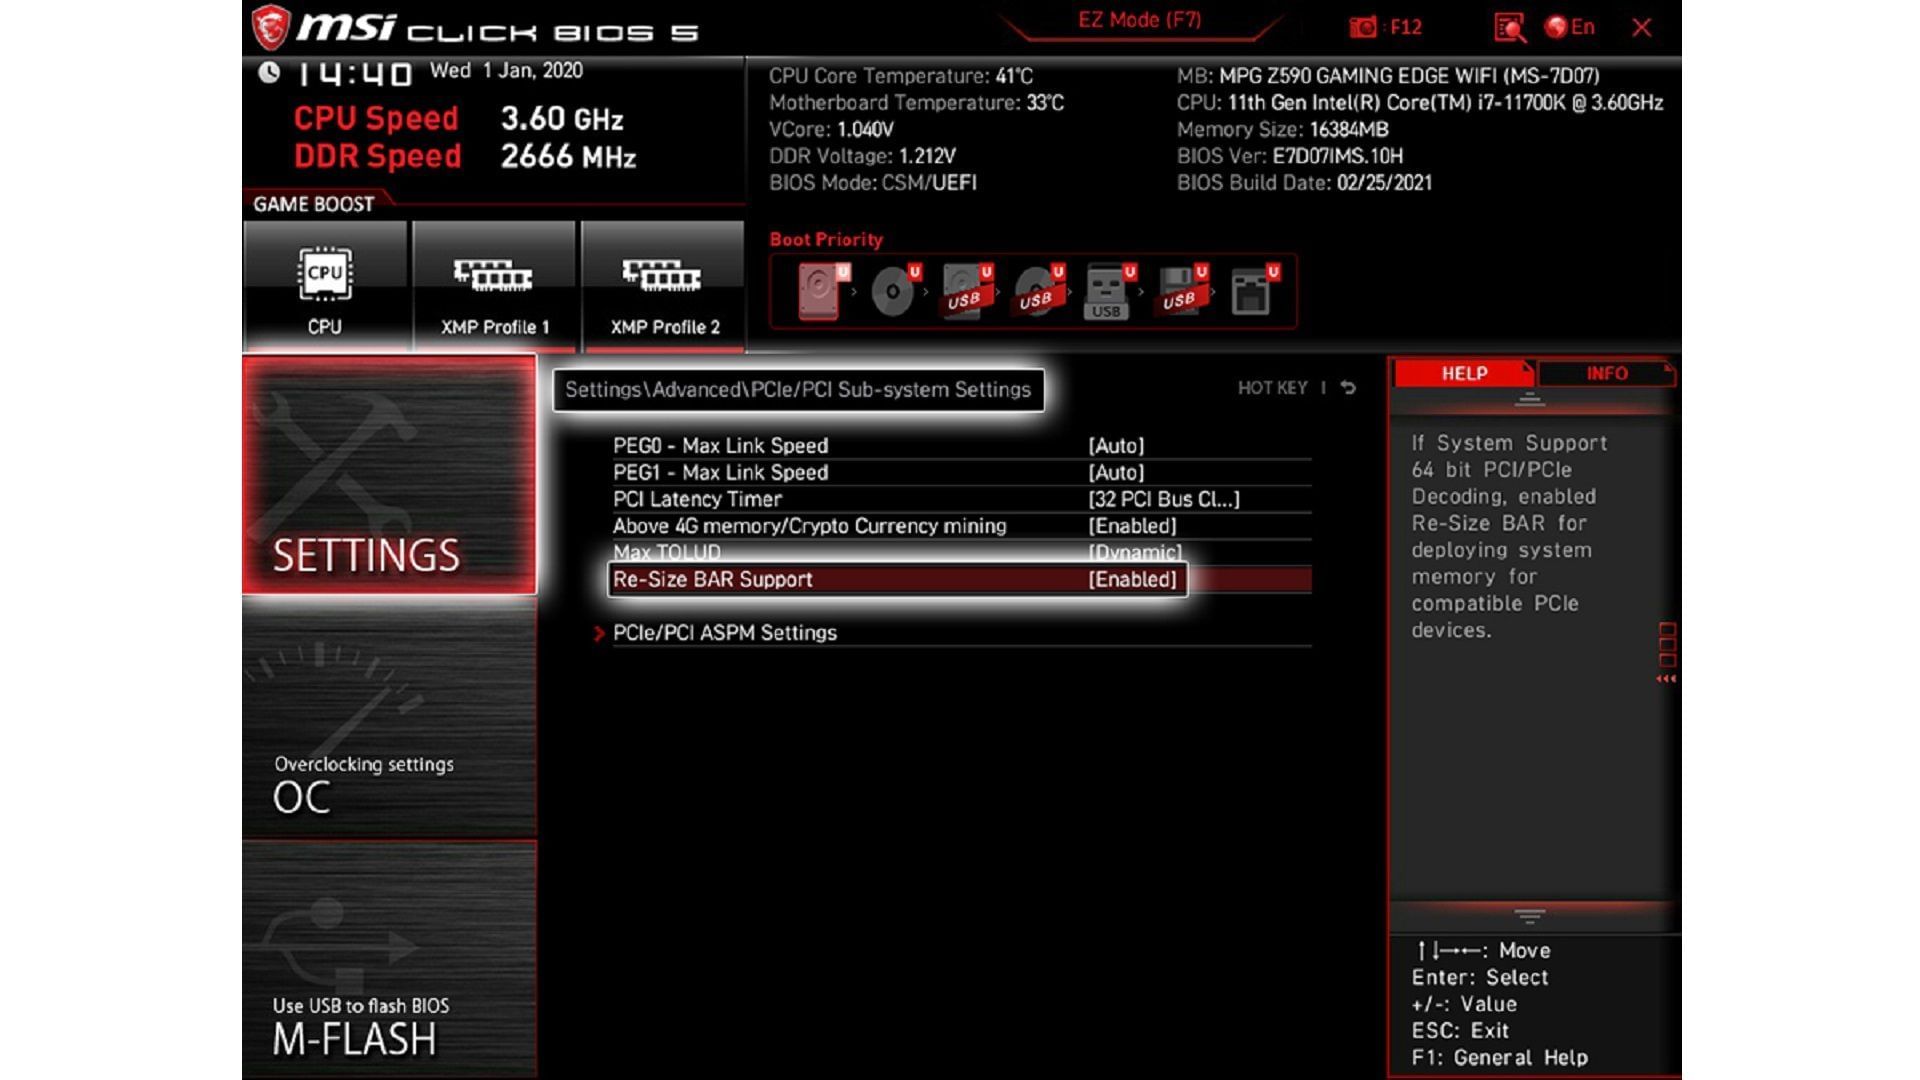
Traditionally, CPUs can access only about 128MB to 256 MB of the GPU's VRAM in a single call. But if you enable Smart Access Memory or Re-BAR, the CPU can access and use the entire VRAM in a go. So, the average FPS and the 0.1% lows of many games will improve quite a bit.
This is one of the most important BIOS settings to change for an AMD Radeon GPU as they gain the most performance from this setting.
2) Enable 4G decoding
![The 4G Decoding option in BIOS is located just below the Re-Size Bar option (Image via MSI)](https://staticg.sportskeeda.com/editor/2024/03/0fd05-17117888181850-1920.jpg?w=190 190w, https://staticg.sportskeeda.com/editor/2024/03/0fd05-17117888181850-1920.jpg?w=720 720w, https://staticg.sportskeeda.com/editor/2024/03/0fd05-17117888181850-1920.jpg?w=640 640w, https://staticg.sportskeeda.com/editor/2024/03/0fd05-17117888181850-1920.jpg?w=1045 1045w, https://staticg.sportskeeda.com/editor/2024/03/0fd05-17117888181850-1920.jpg?w=1200 1200w, https://staticg.sportskeeda.com/editor/2024/03/0fd05-17117888181850-1920.jpg?w=1460 1460w, https://staticg.sportskeeda.com/editor/2024/03/0fd05-17117888181850-1920.jpg?w=1600 1600w, https://staticg.sportskeeda.com/editor/2024/03/0fd05-17117888181850-1920.jpg 1920w)
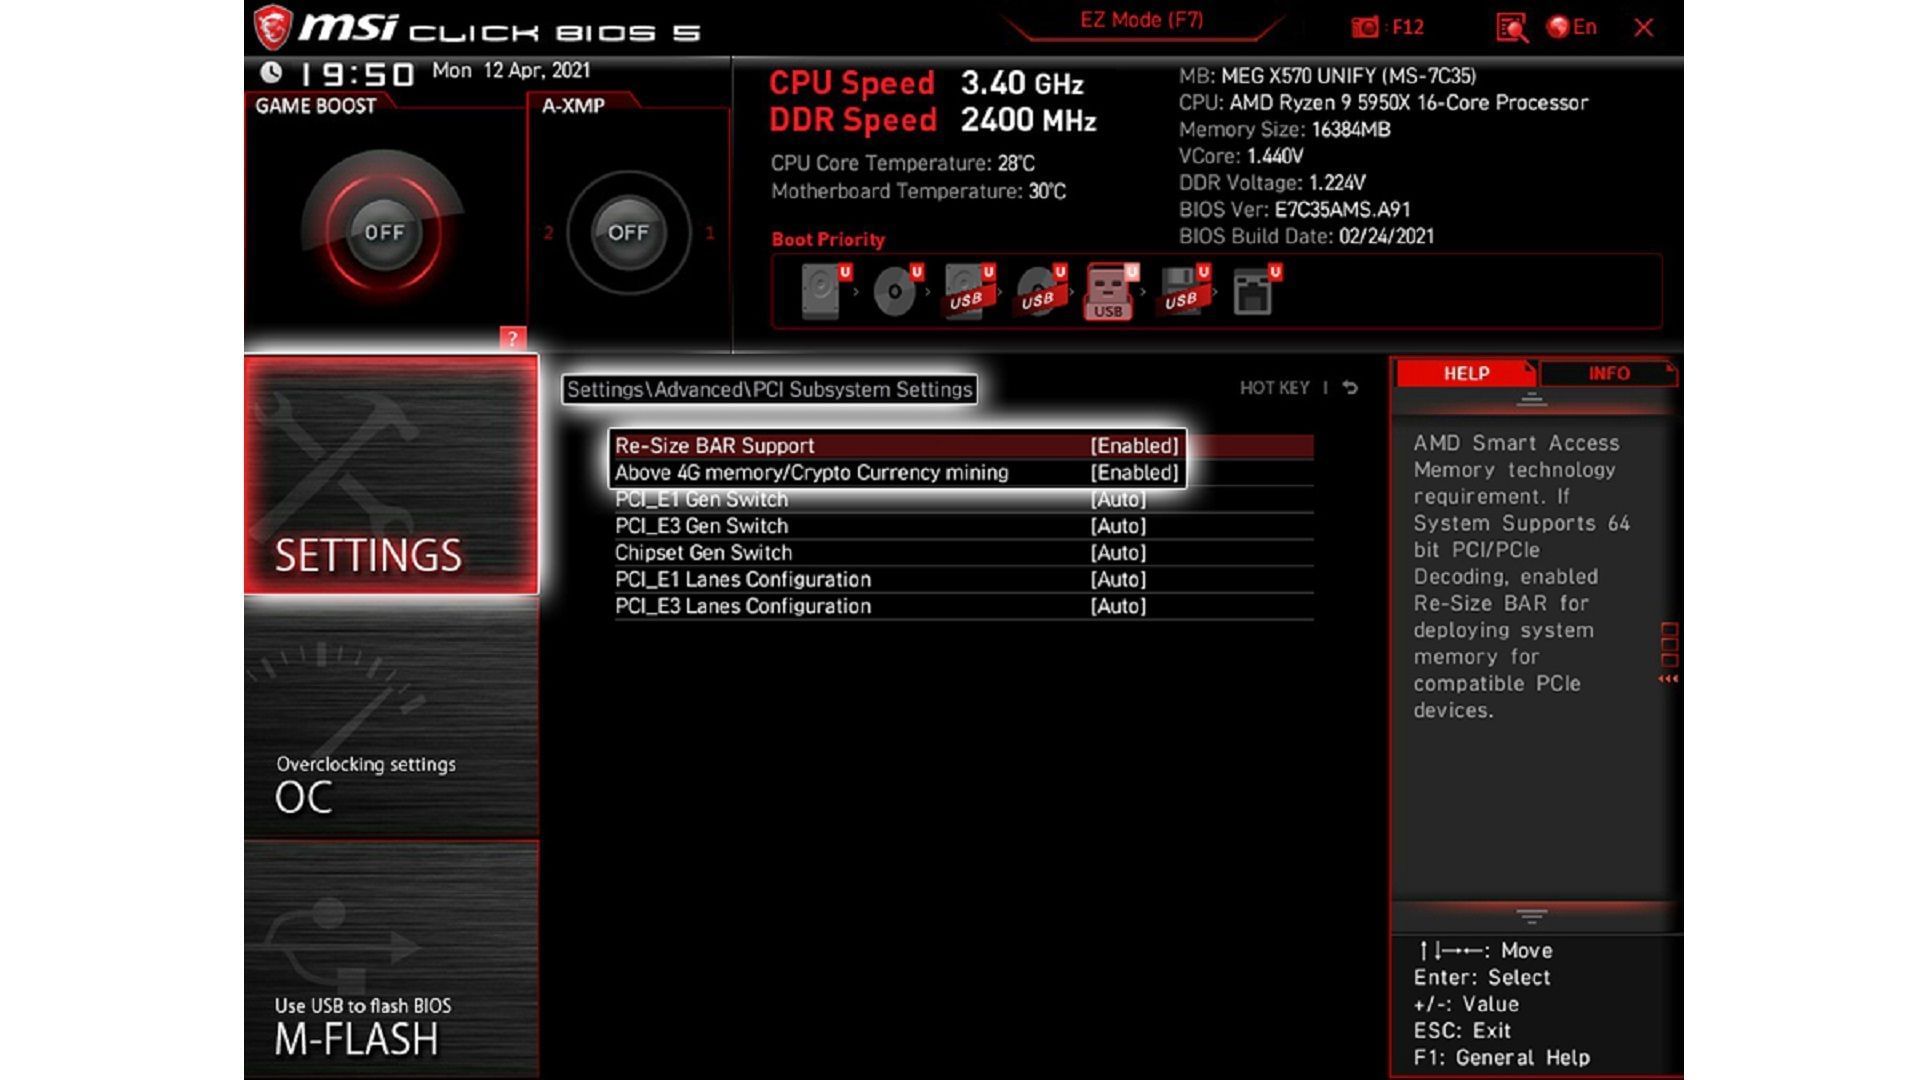
Even after enabling Smart Access Memory, the CPU still may not be able to access more than 4GB of VRAM at a time. So, to provide full access, you must enable 4G decoding in your BIOS. It's among the crucial BIOS settings to change, and it can seriously improve the 0.1% lows in a game's framerate.
3) Enable TPM
![Enabling TPM in BIOS (Image via MSI)](https://staticg.sportskeeda.com/editor/2024/03/ed43d-17117898637900-1920.jpg?w=190 190w, https://staticg.sportskeeda.com/editor/2024/03/ed43d-17117898637900-1920.jpg?w=720 720w, https://staticg.sportskeeda.com/editor/2024/03/ed43d-17117898637900-1920.jpg?w=640 640w, https://staticg.sportskeeda.com/editor/2024/03/ed43d-17117898637900-1920.jpg?w=1045 1045w, https://staticg.sportskeeda.com/editor/2024/03/ed43d-17117898637900-1920.jpg?w=1200 1200w, https://staticg.sportskeeda.com/editor/2024/03/ed43d-17117898637900-1920.jpg?w=1460 1460w, https://staticg.sportskeeda.com/editor/2024/03/ed43d-17117898637900-1920.jpg?w=1600 1600w, https://staticg.sportskeeda.com/editor/2024/03/ed43d-17117898637900-1920.jpg 1920w)
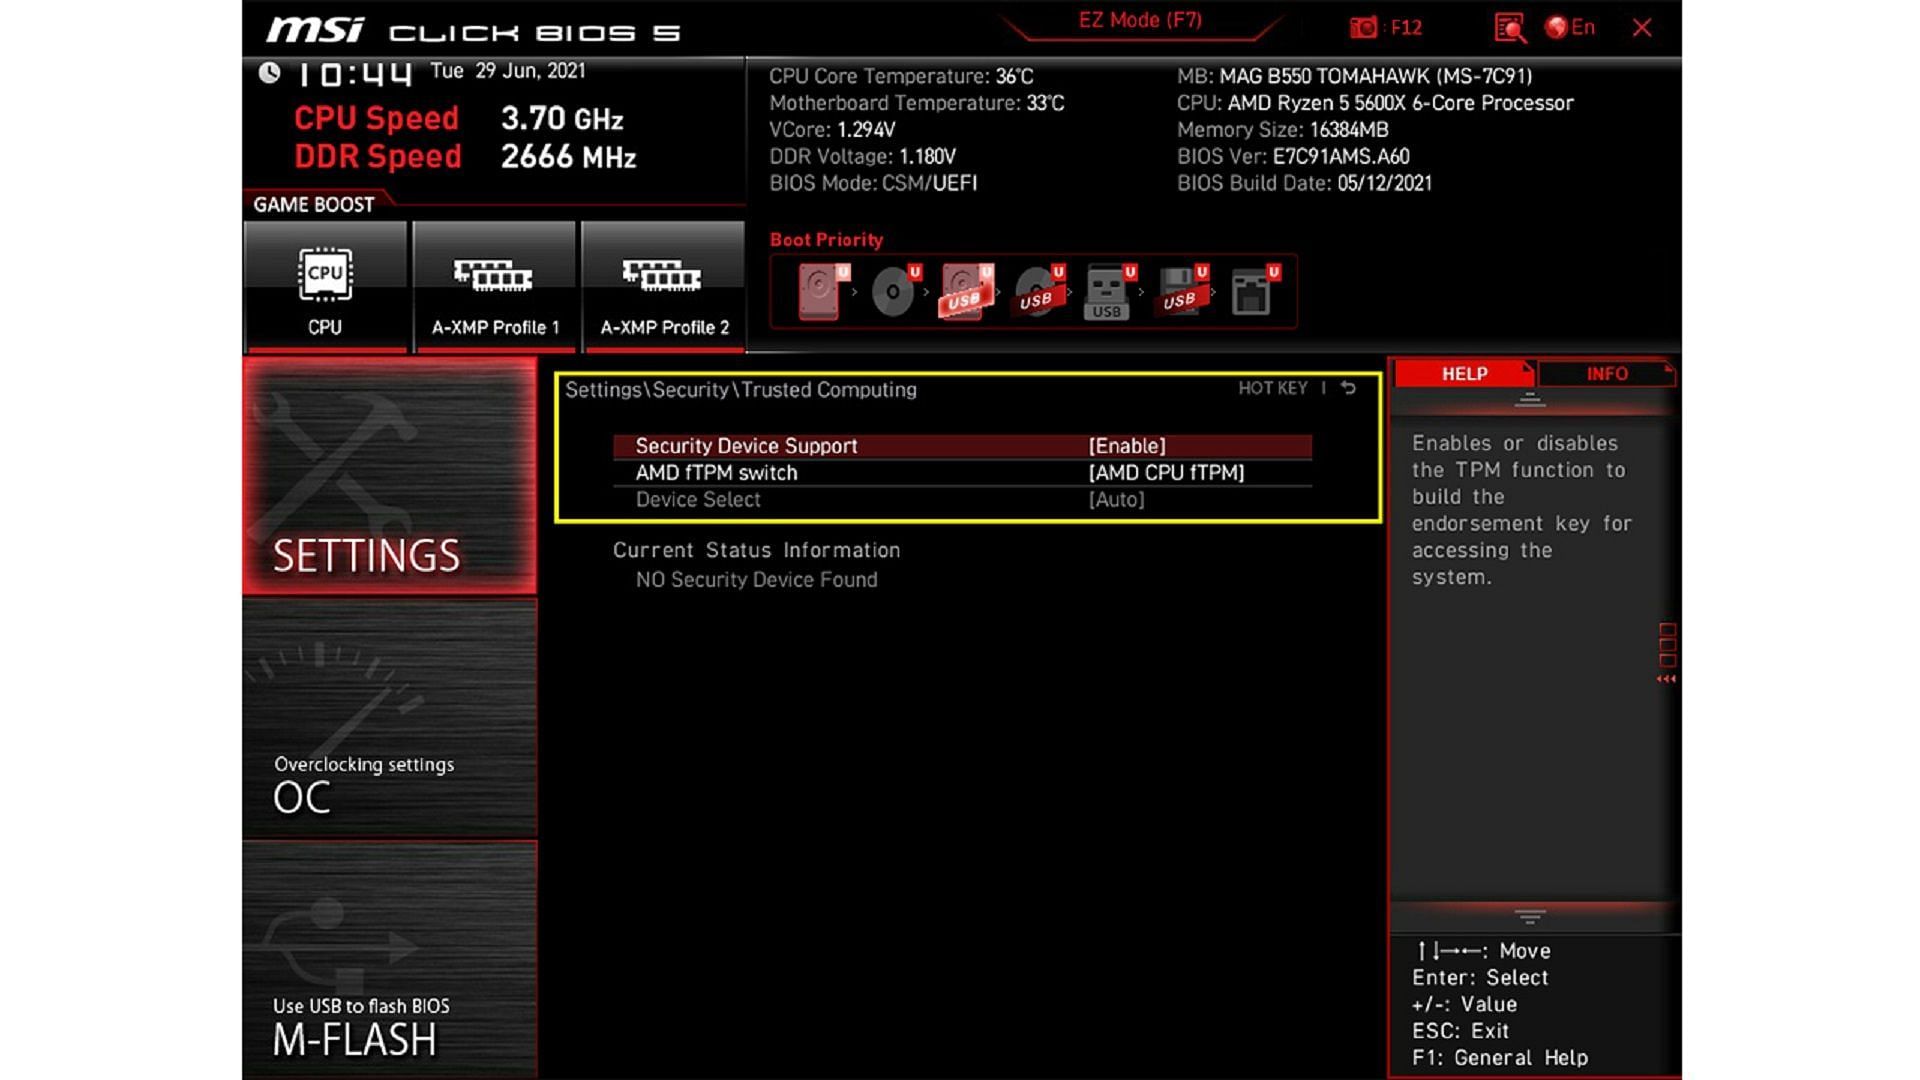
The TPM stands for Trusted Platform Module. It's one of the three major BIOS settings to change if want your PC to be Windows 11 compatible. The other two hardware requirements for Windows 11 are CPU compatibility and Secure Boot. Most modern computers and laptops already have these features.
4) Enable Secure Boot
![Enabling Secure Boot in BIOS (Image via Gigabyte)](https://staticg.sportskeeda.com/editor/2024/03/b5e43-17117896095129-1920.jpg?w=190 190w, https://staticg.sportskeeda.com/editor/2024/03/b5e43-17117896095129-1920.jpg?w=720 720w, https://staticg.sportskeeda.com/editor/2024/03/b5e43-17117896095129-1920.jpg?w=640 640w, https://staticg.sportskeeda.com/editor/2024/03/b5e43-17117896095129-1920.jpg?w=1045 1045w, https://staticg.sportskeeda.com/editor/2024/03/b5e43-17117896095129-1920.jpg?w=1200 1200w, https://staticg.sportskeeda.com/editor/2024/03/b5e43-17117896095129-1920.jpg?w=1460 1460w, https://staticg.sportskeeda.com/editor/2024/03/b5e43-17117896095129-1920.jpg?w=1600 1600w, https://staticg.sportskeeda.com/editor/2024/03/b5e43-17117896095129-1920.jpg 1920w)
Enable Secure Boot in the BIOS settings. It's one of the most important BIOS settings to change if you want your PC to be Windows 11 upgrade. Enabling Secure Boot is also necessary to run competitive games like Valorant. Also, make sure CSM is disabled, or else the Secure Boot option will be greyed out.
5) Enable AMD Precesion Boost
![Enabling AMD Precision Boost (Image via Savvy Layman/YouTube)](https://staticg.sportskeeda.com/editor/2024/03/82695-17118918538511-1920.jpg?w=190 190w, https://staticg.sportskeeda.com/editor/2024/03/82695-17118918538511-1920.jpg?w=720 720w, https://staticg.sportskeeda.com/editor/2024/03/82695-17118918538511-1920.jpg?w=640 640w, https://staticg.sportskeeda.com/editor/2024/03/82695-17118918538511-1920.jpg?w=1045 1045w, https://staticg.sportskeeda.com/editor/2024/03/82695-17118918538511-1920.jpg?w=1200 1200w, https://staticg.sportskeeda.com/editor/2024/03/82695-17118918538511-1920.jpg?w=1460 1460w, https://staticg.sportskeeda.com/editor/2024/03/82695-17118918538511-1920.jpg?w=1600 1600w, https://staticg.sportskeeda.com/editor/2024/03/82695-17118918538511-1920.jpg 1920w)
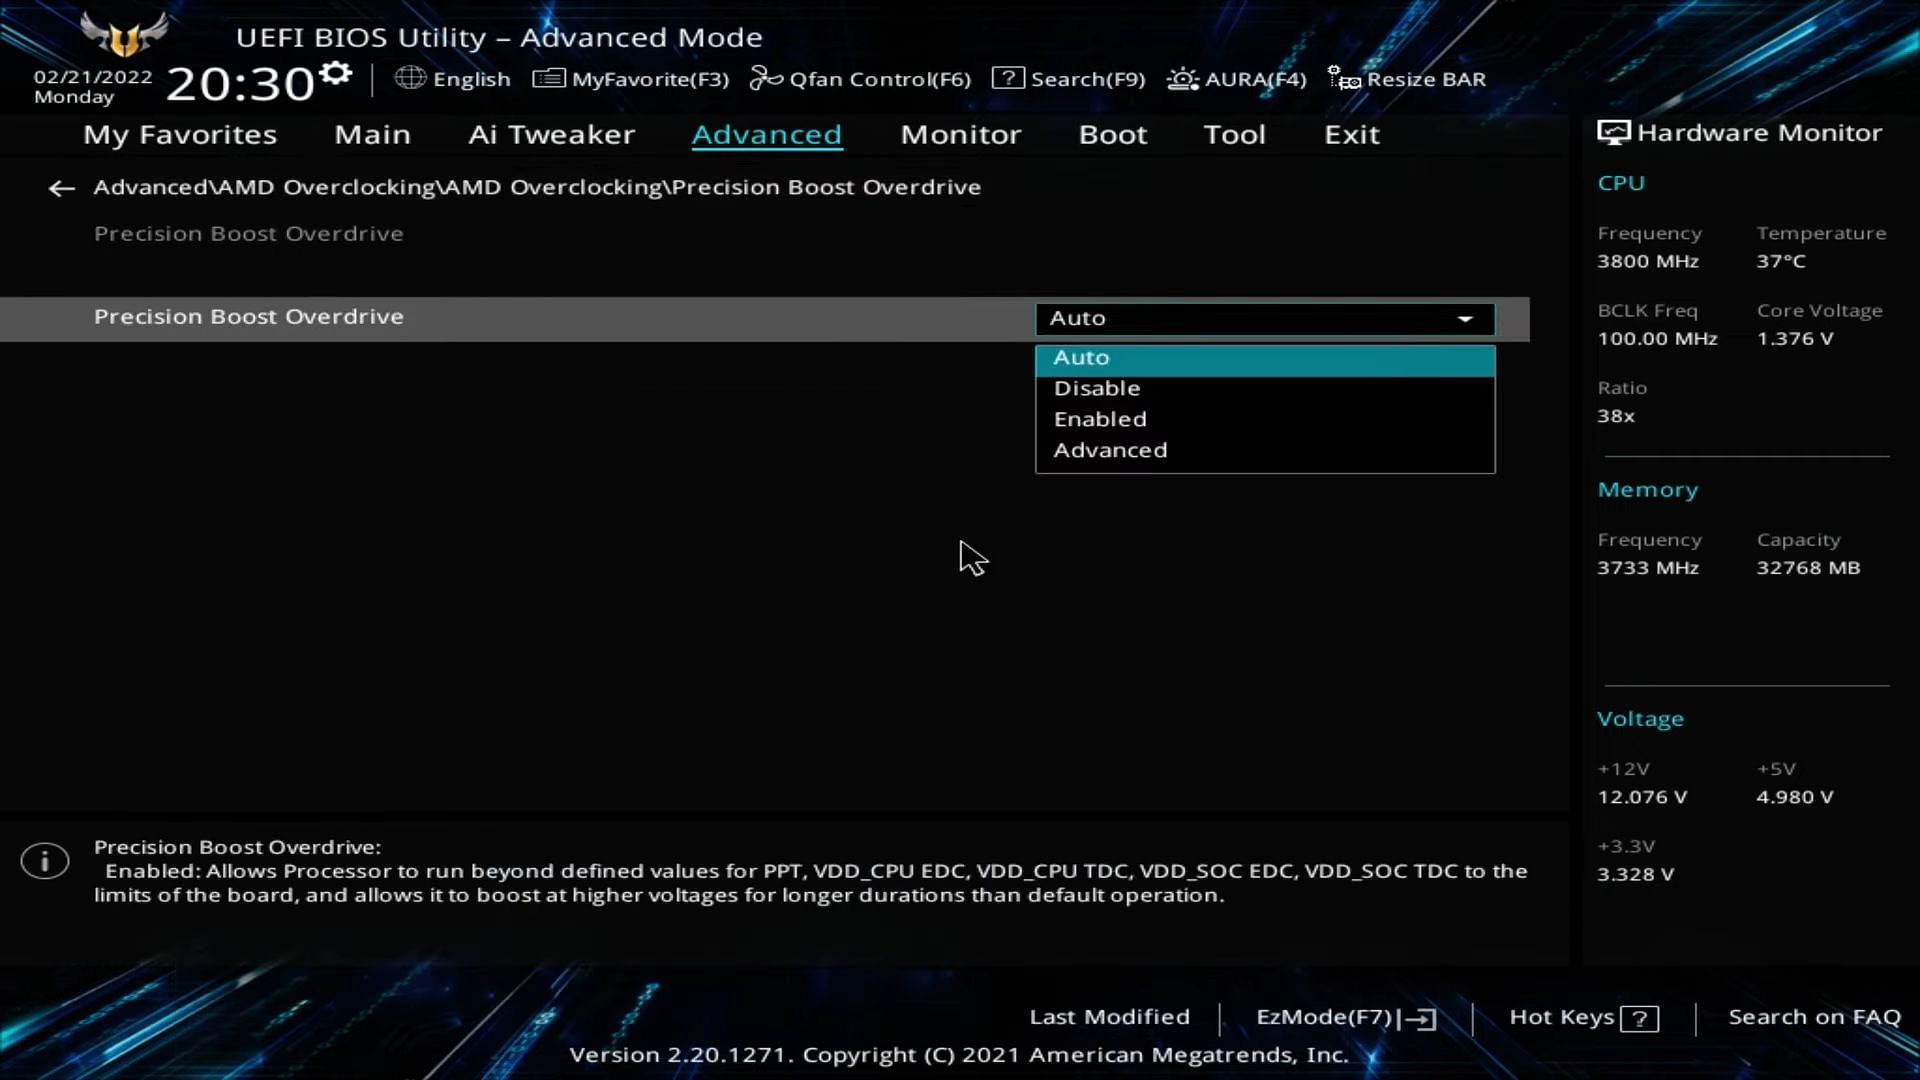
If you have a Ryzen processor, you must enable AMD Precision Boost to get the best turbo clocks possible on your CPU. This is one of the best BIOS settings to change for AMD Ryzen users.
6) Disable Intel Power Limits
![Remove any power limits on the Intel CPU (Image via PC H/W and Tech Unboxings 🔥 /YouTube)](https://staticg.sportskeeda.com/editor/2024/03/2b102-17118920555081-1920.jpg?w=190 190w, https://staticg.sportskeeda.com/editor/2024/03/2b102-17118920555081-1920.jpg?w=720 720w, https://staticg.sportskeeda.com/editor/2024/03/2b102-17118920555081-1920.jpg?w=640 640w, https://staticg.sportskeeda.com/editor/2024/03/2b102-17118920555081-1920.jpg?w=1045 1045w, https://staticg.sportskeeda.com/editor/2024/03/2b102-17118920555081-1920.jpg?w=1200 1200w, https://staticg.sportskeeda.com/editor/2024/03/2b102-17118920555081-1920.jpg?w=1460 1460w, https://staticg.sportskeeda.com/editor/2024/03/2b102-17118920555081-1920.jpg?w=1600 1600w, https://staticg.sportskeeda.com/editor/2024/03/2b102-17118920555081-1920.jpg 1920w)
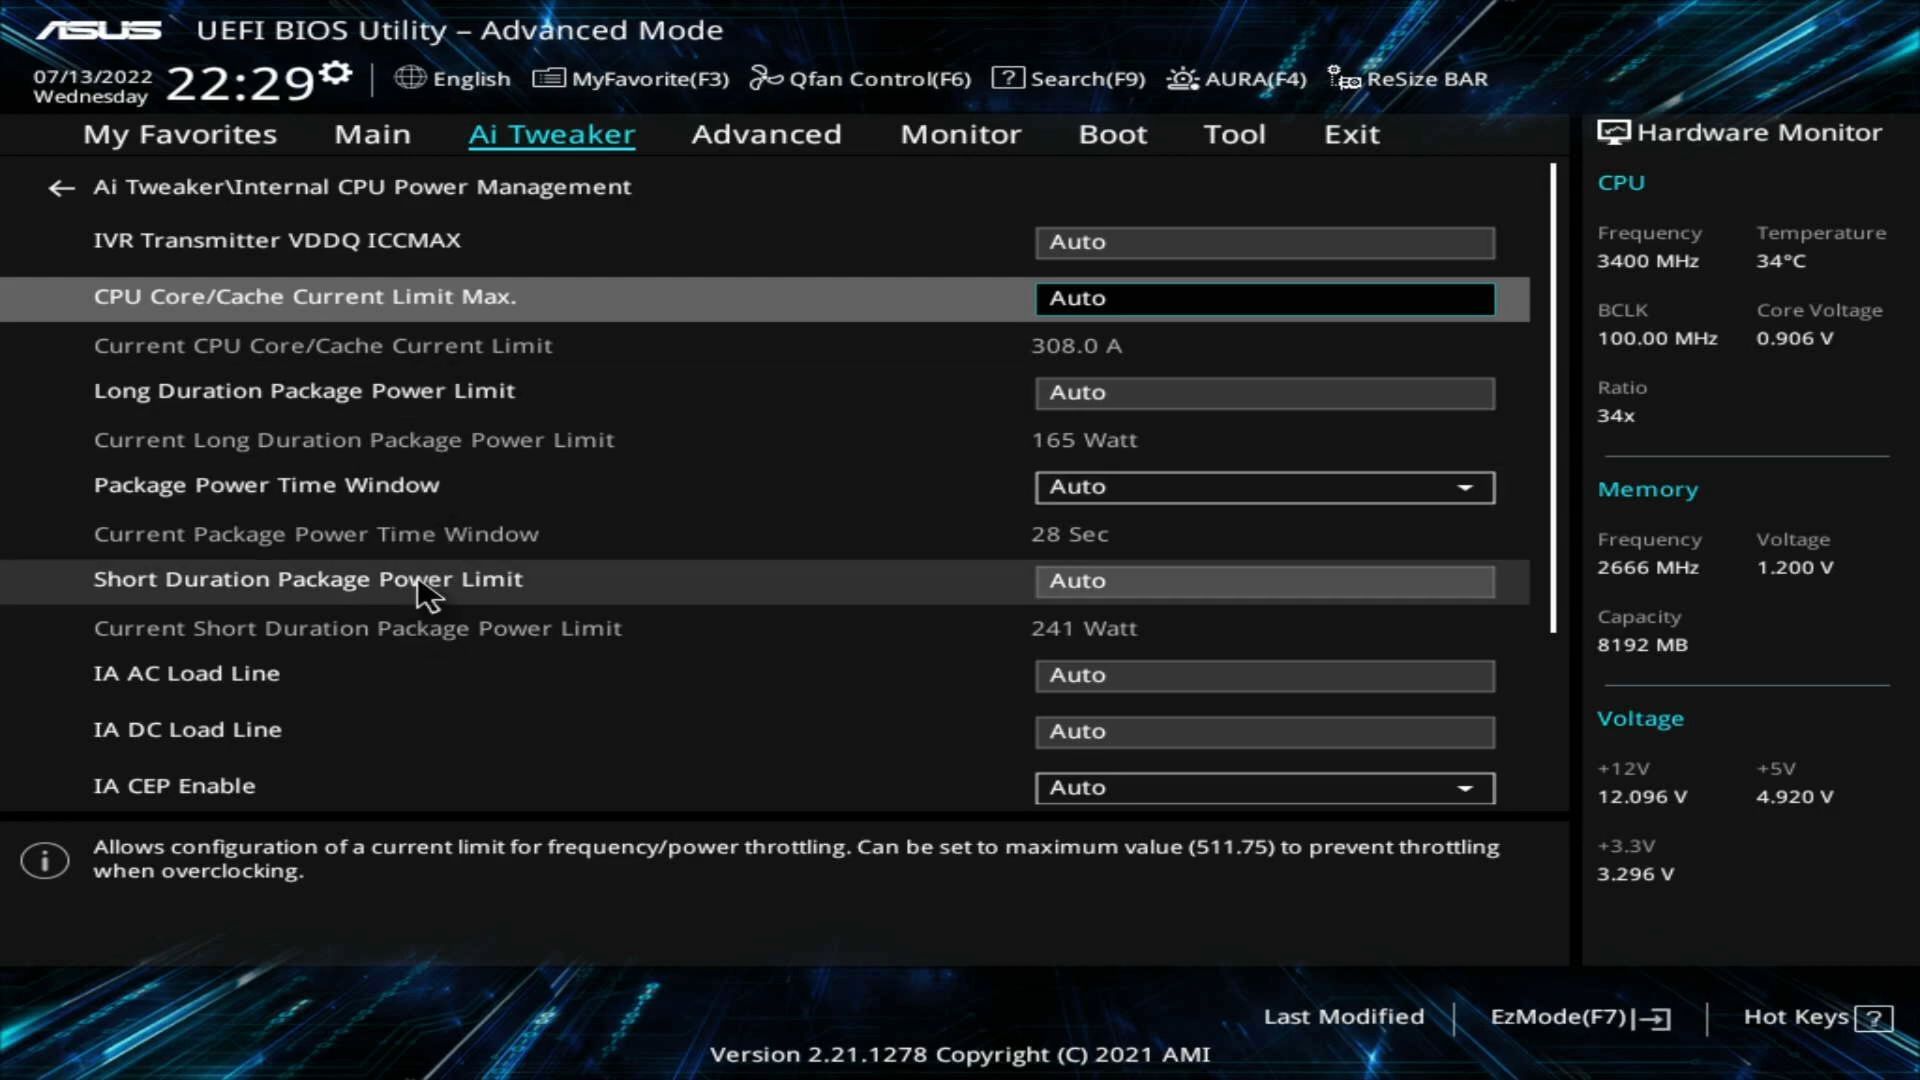
Some Intel Z-series motherboards may have specific numbers applied to the Power Limit settings. This can significantly limit the performance of the CPU. Thus, you should set it to Auto or add higher Power Limits to allow the CPU to pull more power from the motherboard and deliver better performance.
7) Set a fan curve
![Changing CPU fan curve settings (Image via TiredHamster/YouTube)](https://staticg.sportskeeda.com/editor/2024/03/2a099-17118921951147-1920.jpg?w=190 190w, https://staticg.sportskeeda.com/editor/2024/03/2a099-17118921951147-1920.jpg?w=720 720w, https://staticg.sportskeeda.com/editor/2024/03/2a099-17118921951147-1920.jpg?w=640 640w, https://staticg.sportskeeda.com/editor/2024/03/2a099-17118921951147-1920.jpg?w=1045 1045w, https://staticg.sportskeeda.com/editor/2024/03/2a099-17118921951147-1920.jpg?w=1200 1200w, https://staticg.sportskeeda.com/editor/2024/03/2a099-17118921951147-1920.jpg?w=1460 1460w, https://staticg.sportskeeda.com/editor/2024/03/2a099-17118921951147-1920.jpg?w=1600 1600w, https://staticg.sportskeeda.com/editor/2024/03/2a099-17118921951147-1920.jpg 1920w)
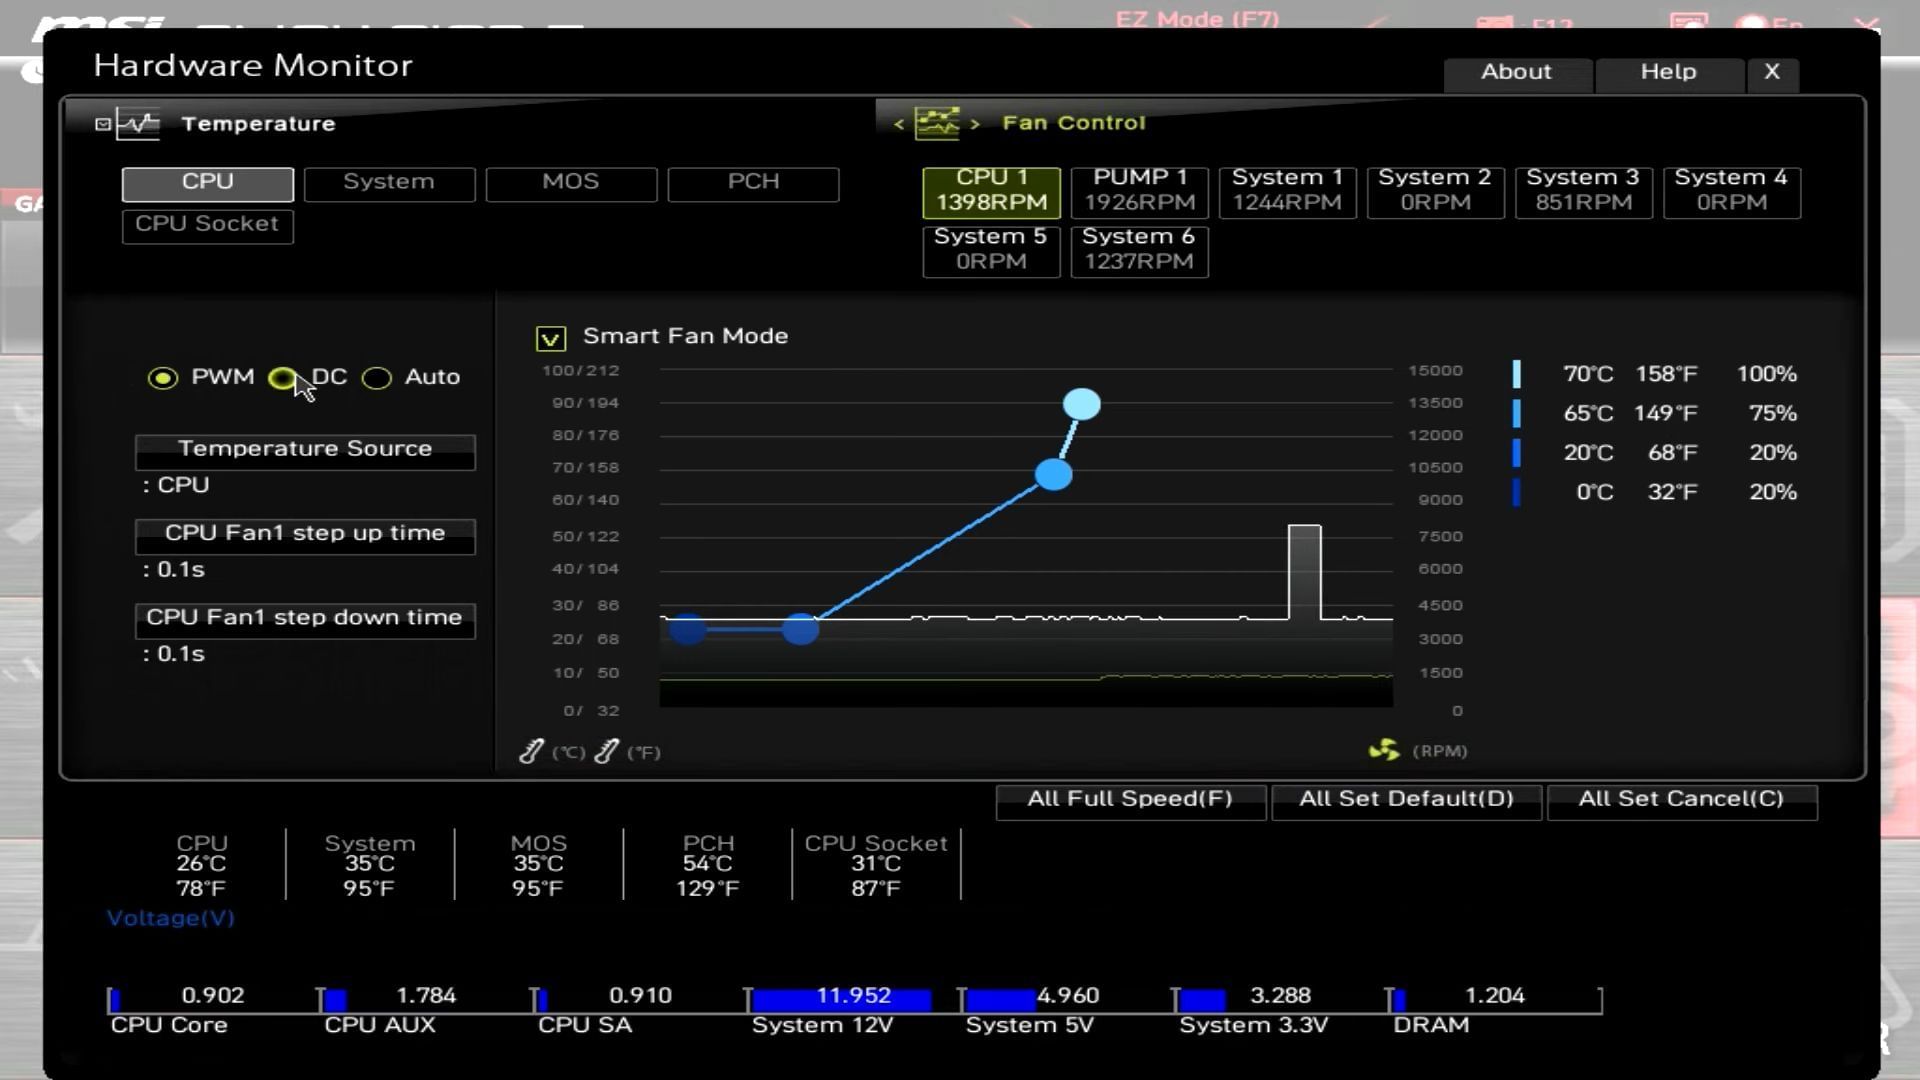
If the CPU or case fans run at full speeds for longer durations, the bearings will wear out quickly. So, if you set a fan curve, you can greatly improve the fan's lifespan and noise levels. Set the fans to run at 60% speed if the CPU temperature is below 50°.
After that, set the fans to run at 70% speed if the CPU temperature exceeds 60°. Finally, set them to run at full speed if the CPU temperature exceeds 70°.
8) Set RAM XMP
![Enabling RAM XMP (Image via Tech Grant/ YouTube)](https://staticg.sportskeeda.com/editor/2024/03/8be89-17118924555276-1920.jpg?w=190 190w, https://staticg.sportskeeda.com/editor/2024/03/8be89-17118924555276-1920.jpg?w=720 720w, https://staticg.sportskeeda.com/editor/2024/03/8be89-17118924555276-1920.jpg?w=640 640w, https://staticg.sportskeeda.com/editor/2024/03/8be89-17118924555276-1920.jpg?w=1045 1045w, https://staticg.sportskeeda.com/editor/2024/03/8be89-17118924555276-1920.jpg?w=1200 1200w, https://staticg.sportskeeda.com/editor/2024/03/8be89-17118924555276-1920.jpg?w=1460 1460w, https://staticg.sportskeeda.com/editor/2024/03/8be89-17118924555276-1920.jpg?w=1600 1600w, https://staticg.sportskeeda.com/editor/2024/03/8be89-17118924555276-1920.jpg 1920w)
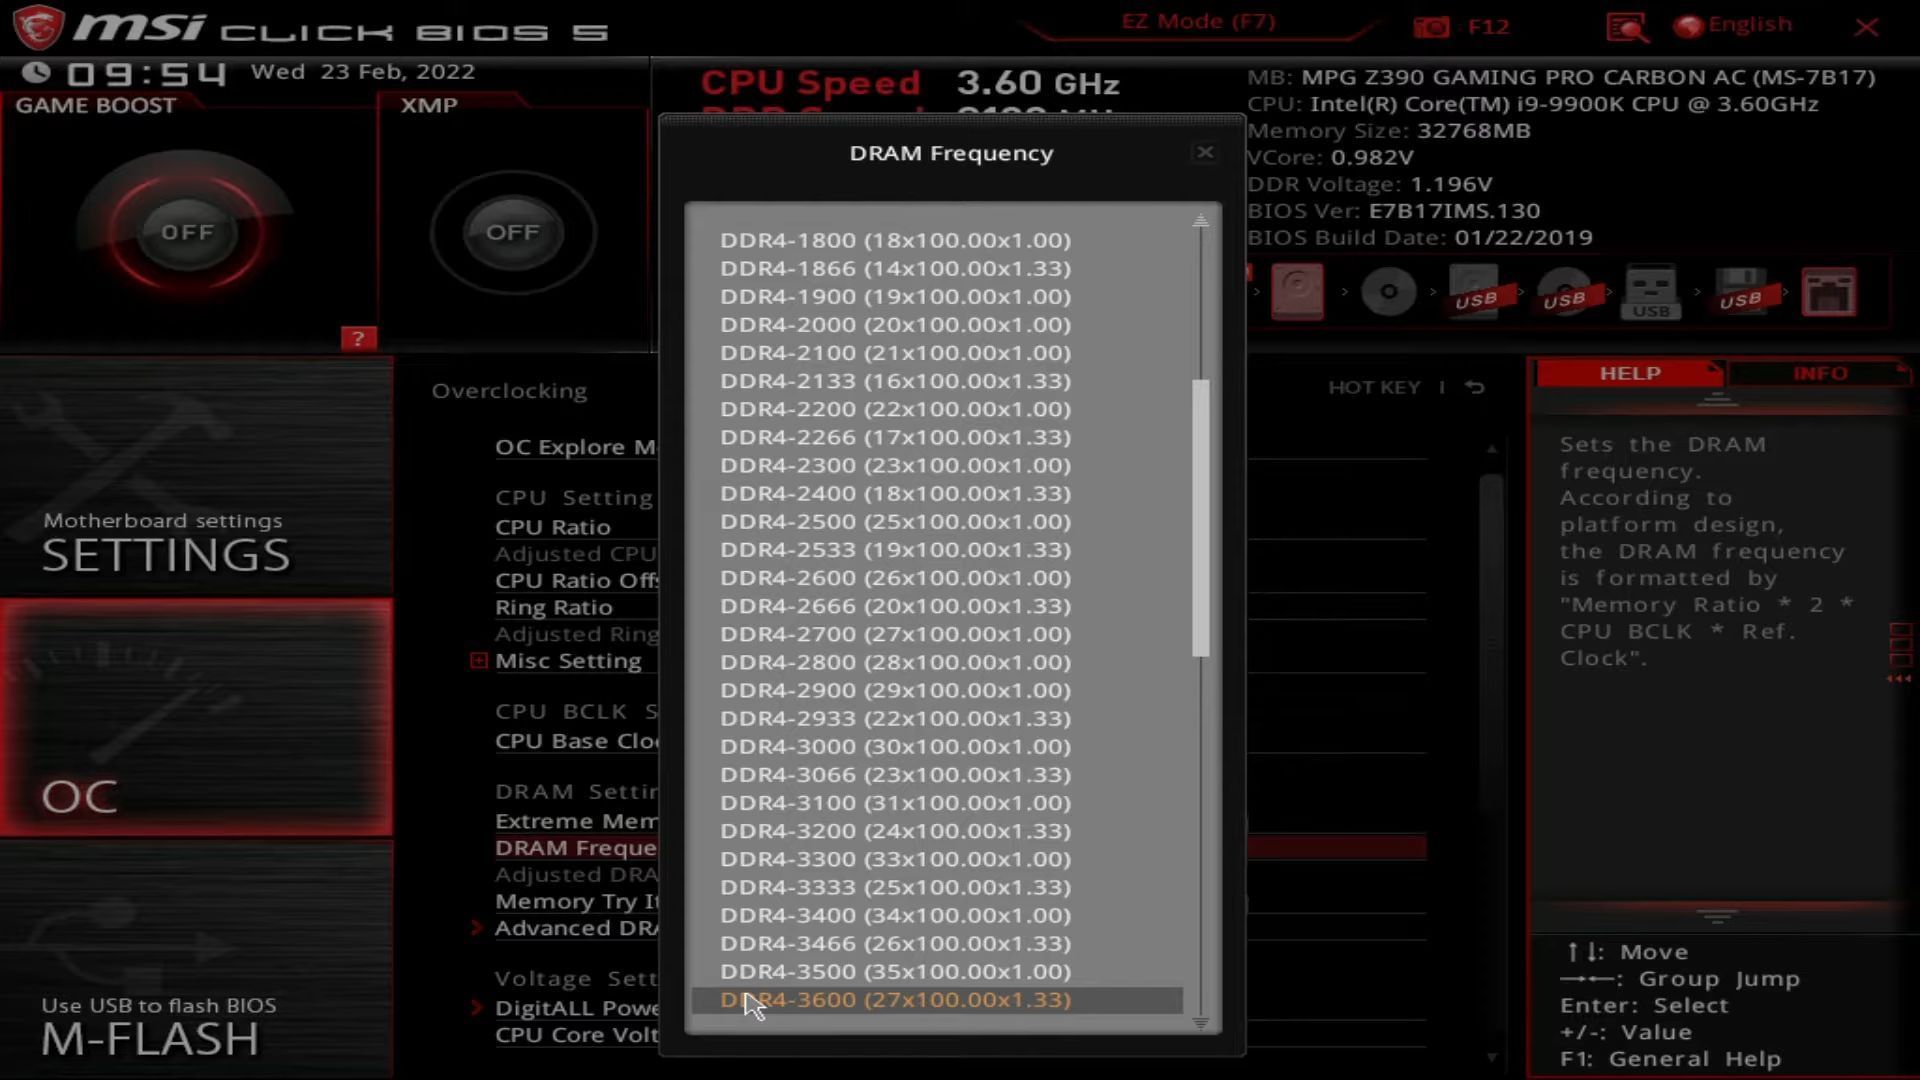
By default, RAM sticks may not run at their full speeds. So, use XMP profiles to achieve the best possible RAM speeds on your system. However, those RAM speeds must be supported by the motherboard, CPU, and RAM kits. It's one of the major BIOS settings to change if you want the best gaming performance.
9) Enable CPU PCIe lanes on your NVMe SSD
![Enabling CPU lanes for NVMe drive (Image via The GrayingTech/YouTube)](https://staticg.sportskeeda.com/editor/2024/03/08772-17118925552181-1920.jpg?w=190 190w, https://staticg.sportskeeda.com/editor/2024/03/08772-17118925552181-1920.jpg?w=720 720w, https://staticg.sportskeeda.com/editor/2024/03/08772-17118925552181-1920.jpg?w=640 640w, https://staticg.sportskeeda.com/editor/2024/03/08772-17118925552181-1920.jpg?w=1045 1045w, https://staticg.sportskeeda.com/editor/2024/03/08772-17118925552181-1920.jpg?w=1200 1200w, https://staticg.sportskeeda.com/editor/2024/03/08772-17118925552181-1920.jpg?w=1460 1460w, https://staticg.sportskeeda.com/editor/2024/03/08772-17118925552181-1920.jpg?w=1600 1600w, https://staticg.sportskeeda.com/editor/2024/03/08772-17118925552181-1920.jpg 1920w)
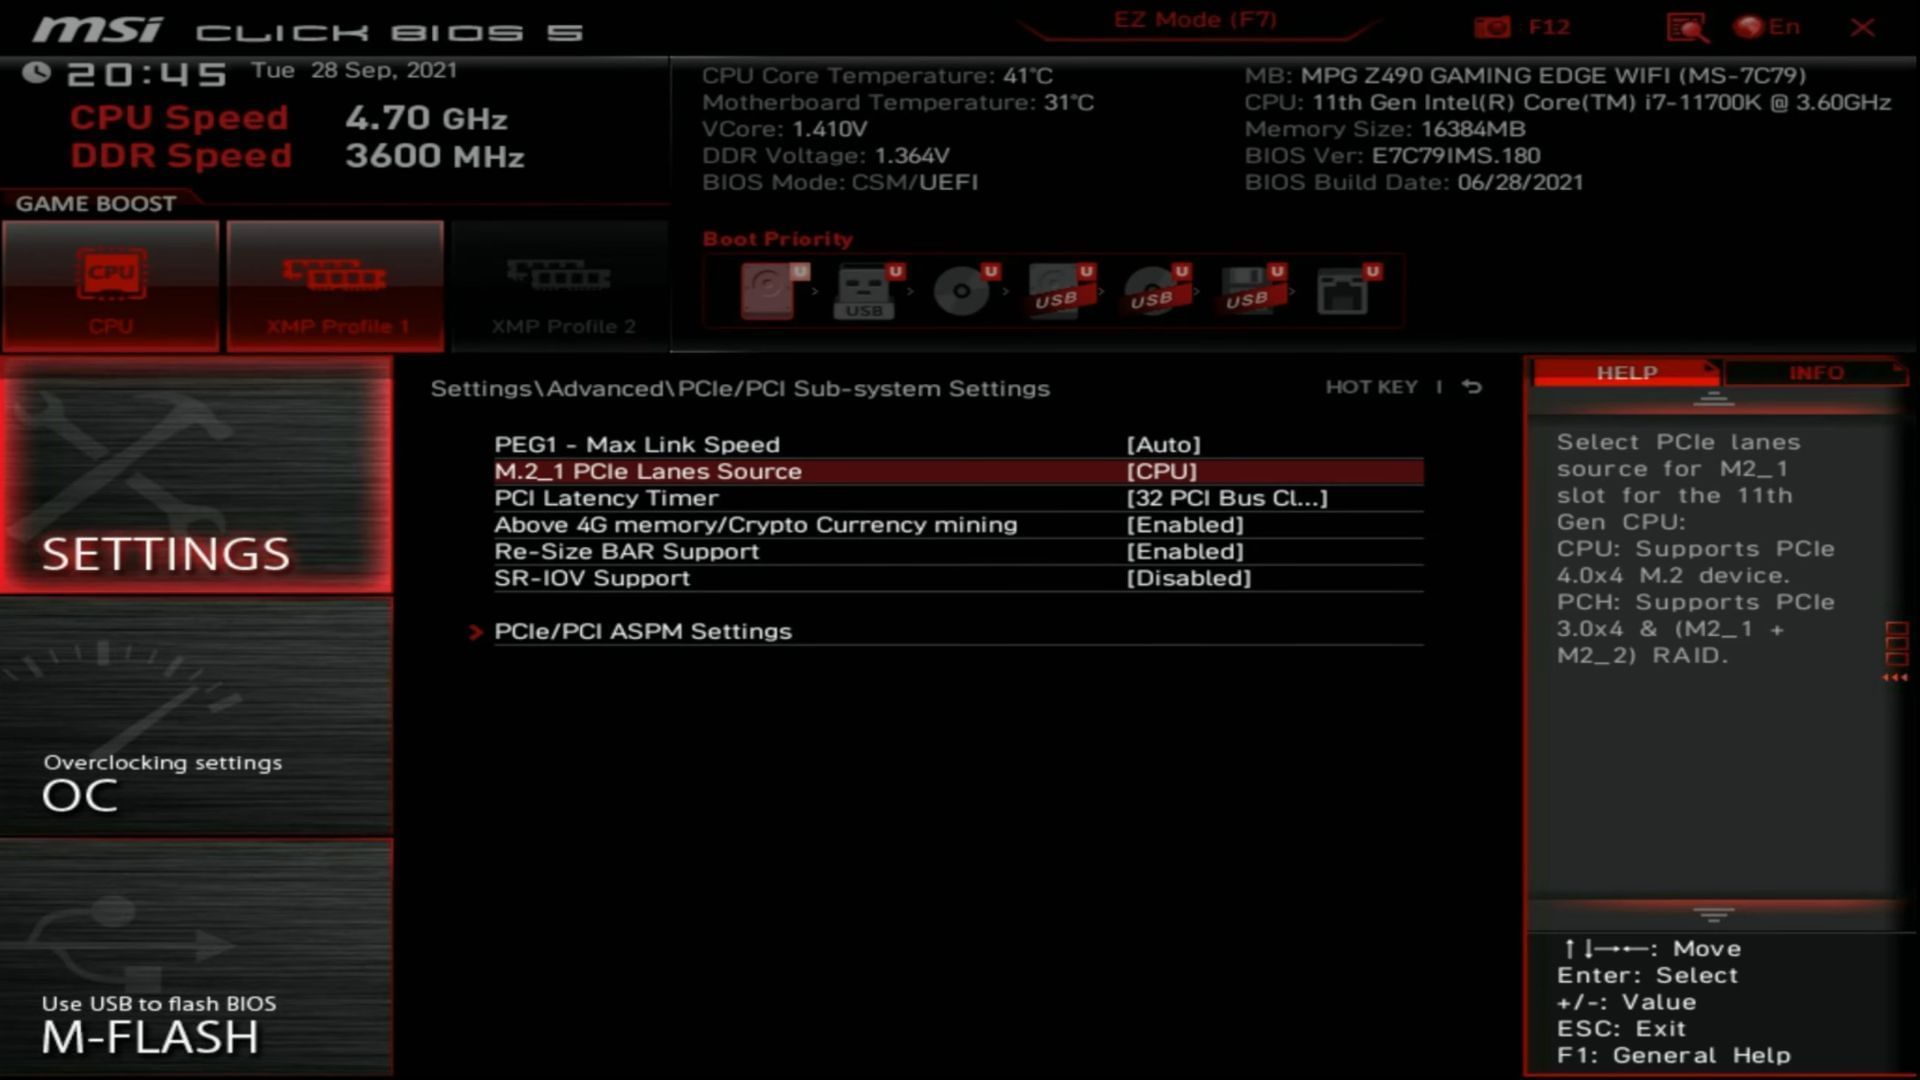
High-speed NVMe Gen 4 SSDs must be directly connected to the CPU lanes to get the best speed and lowest latency. By default, it could be set to PCH lanes in BIOS. So, set it to CPU lanes for your Gen 4 NVMe SSDs to perform the best.
10) Enable USB power on standby
![Enabling USB standby power in BIOS (Image via TheGrayingTech/YouTube)](https://staticg.sportskeeda.com/editor/2024/03/4340a-17118928927027-1920.jpg?w=190 190w, https://staticg.sportskeeda.com/editor/2024/03/4340a-17118928927027-1920.jpg?w=720 720w, https://staticg.sportskeeda.com/editor/2024/03/4340a-17118928927027-1920.jpg?w=640 640w, https://staticg.sportskeeda.com/editor/2024/03/4340a-17118928927027-1920.jpg?w=1045 1045w, https://staticg.sportskeeda.com/editor/2024/03/4340a-17118928927027-1920.jpg?w=1200 1200w, https://staticg.sportskeeda.com/editor/2024/03/4340a-17118928927027-1920.jpg?w=1460 1460w, https://staticg.sportskeeda.com/editor/2024/03/4340a-17118928927027-1920.jpg?w=1600 1600w, https://staticg.sportskeeda.com/editor/2024/03/4340a-17118928927027-1920.jpg 1920w)
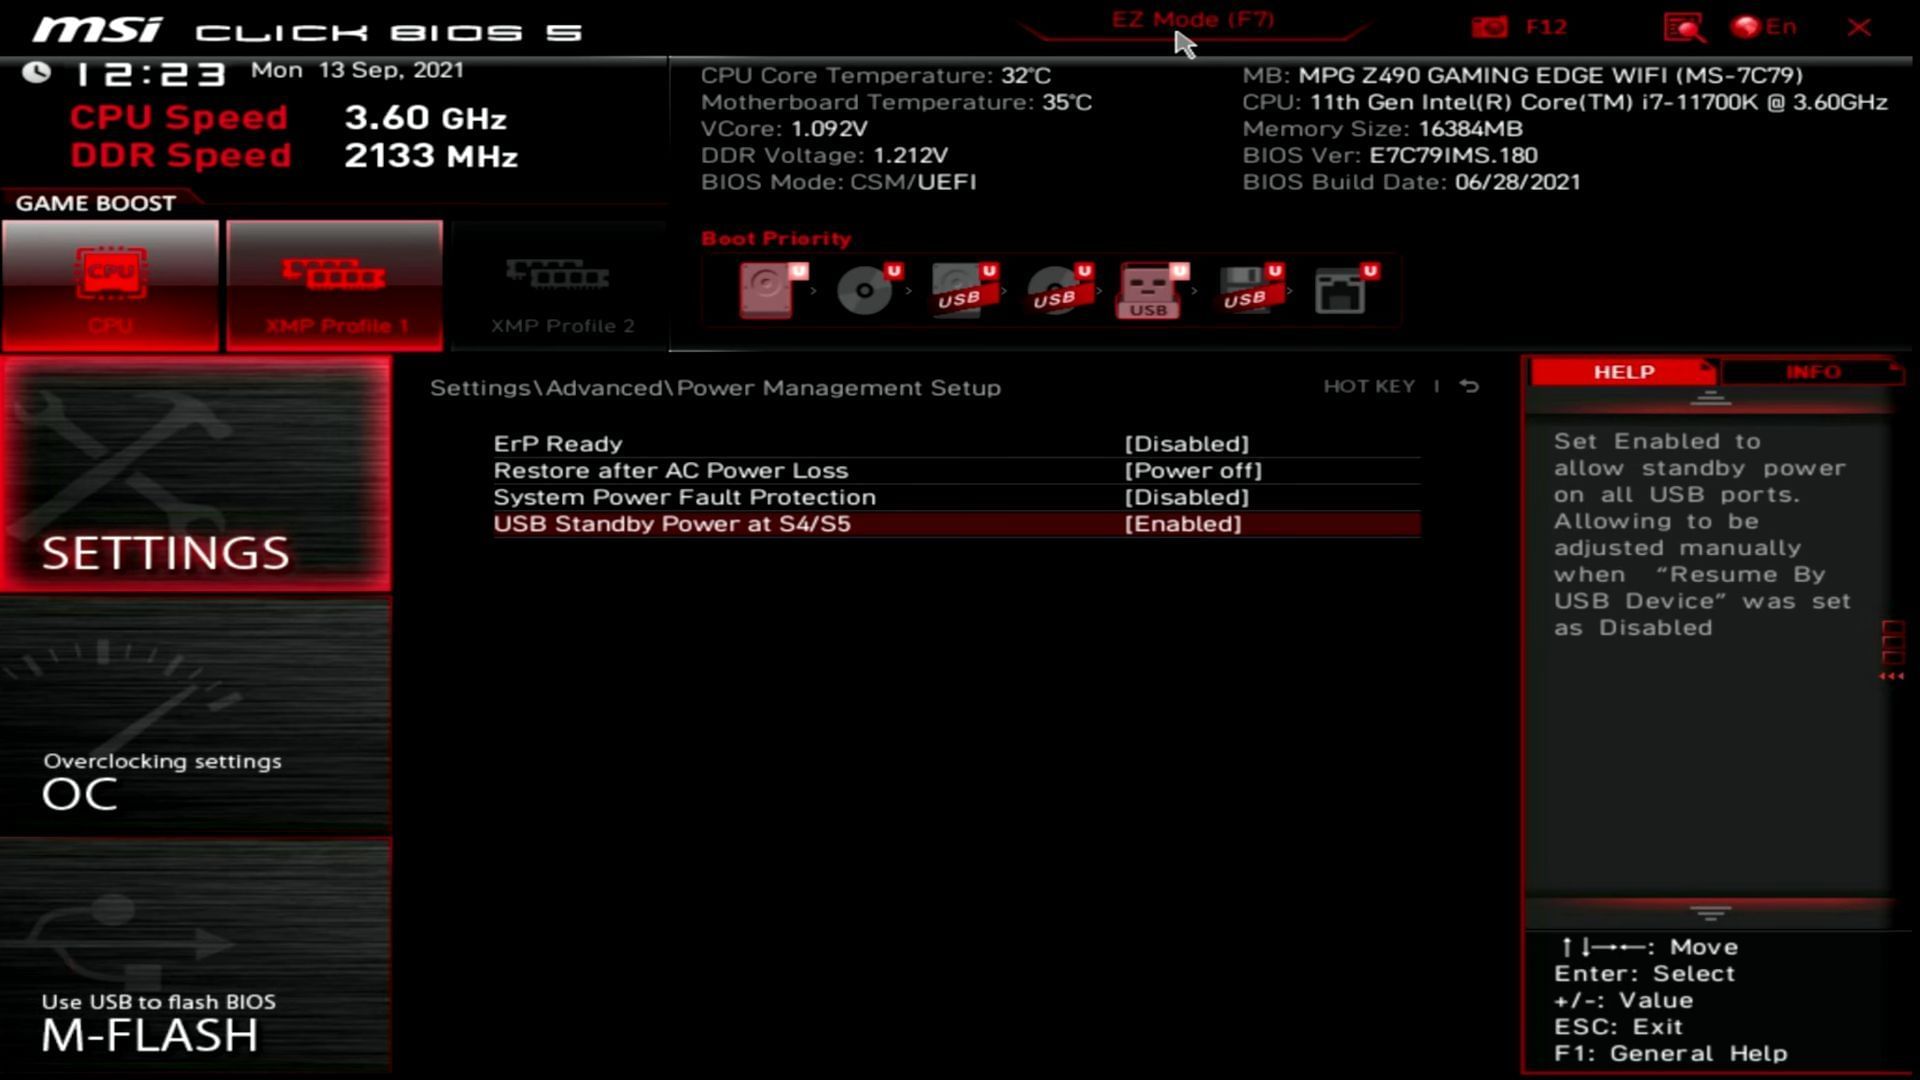
Enable USB power on standby. This allows you to charge your wireless mouse or gamepad via the PC's USB port, even if the PC is in standby low power mode.
With the right BIOS settings in place, you can access the maximum performance potential of your new gaming PC. These settings will provide a significant boost to the gaming experience. You will get the best FPS without any stutters or lags, provided that you have a powerful CPU and GPU in the first place.