The compatibility mode in Windows 10 or 11 is an excellent way to run old versions of software. You may have noticed programs designed for older versions of Windows operating systems having trouble functioning properly for several reasons. Therefore, the compatibility mode helps emulate the required version of Windows and get that particular program running as intended.
In this guide, we'll learn about how to properly run older programs using compatibility mode in Windows 10 or 11.
Running older software in compatibility mode in Windows 11/10: Two simple methods
Method 1: Select manually
Step 1:
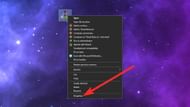
First, right-click on the program's .exe file and select "Properties."

Step 2:
Go to the "Compatibility" tab and select the "Run this program in compatibility mode for:" option.

Step 3:
Finally, you'll see the older version of Windows. If you're using Windows 10, you will only have the previous versions. Select the OS from the list and click on "Apply." If you're not sure what to choose, you can try all of the versions one after the other and see what works for you.

Method 2: Compatibility troubleshooter
Step 1:
The built-in tool in Windows is an easy way to fix compatibility issues with a program. First, right-click on the program's .exe file and select "Troubleshoot compatibility."

Step 2:
Choose the option "Try recommended settings” and see if it works automatically for you. If it doesn't, choose the second option to troubleshoot the program.

Step 3:
The troubleshooter will ask you to choose the issues you are facing when trying to run the program. Select the issues and click on "Next."

Step 4:
Now you can try to test the new settings for the program before applying them by clicking on the "Test the program..." option. After that, click on "Next."

Step 5:
If the program ran properly, select the first option to save the settings. Otherwise, select the second option to try again with different settings. However, if you don't want to make any changes, select "Cancel."

By activating compatibility mode, users can ensure that their favorite legacy software continues to function properly, allowing them to enjoy the benefits of both older programs and newer operating systems.
Follow Sportskeeda for more guides and news regarding games and technology.
