'%20x='0'%20y='0'%20height='100%25'%20width='100%25'%20%0A%20%20%20%20%20%20%20%20%20%20xlink%3Ahref='data:image/jpg;base64,/9j/2wBDAAYEBQYFBAYGBQYHBwYIChAKCgkJChQODwwQFxQYGBcUFhYaHSUfGhsjHBYWICwgIyYnKSopGR8tMC0oMCUoKSj/2wBDAQcHBwoIChMKChMoGhYaKCgoKCgoKCgoKCgoKCgoKCgoKCgoKCgoKCgoKCgoKCgoKCgoKCgoKCgoKCgoKCgoKCj/wgARCAAGAAoDASIAAhEBAxEB/8QAFgABAQEAAAAAAAAAAAAAAAAAAAUG/8QAFQEBAQAAAAAAAAAAAAAAAAAAAgT/2gAMAwEAAhADEAAAAMNWJ3//xAAfEAACAgIBBQAAAAAAAAAAAAABAgMSBBEABQciobL/2gAIAQEAAT8Aw+ujCRIhCQgC6luXfwXVTY6I98h7iYkUKRvFl2RQpqo19c//xAAWEQADAAAAAAAAAAAAAAAAAAAAATH/2gAIAQIBAT8AVP/EABYRAQEBAAAAAAAAAAAAAAAAAAEAEv/aAAgBAwEBPwDI3//Z'%3E%3C/image%3E%3C/svg%3E)
Connecting dual monitors with Macbook Air can be quite problematic. When MacBooks had an Intel processor, using dual or even triple monitor setup was no problem, and it used to be very popular among many enthusiasts. However, the multi-monitor capability was seemingly gone when Apple switched to an ARM processor.
That said, with the launch of the new M3-based MacBook Air, Apple has brought back the ability to use dual monitors.
In this article, we will show you how to use dual monitors with every MacBook Air model.
Note: Some aspects of this article are subjective and reflect the writer's opinions.
Dual monitor support on Intel MacBook Air

Intel Macs have the best support for dual or even triple monitor setups. Apart from the MacBook Air 2018, all other models with Intel chips have a dedicated Mini Display or Thunderbolt 1/2 port, which can be connected to two monitors simultaneously.
There are two ways of using dual monitors:
- You can use a Mini DP to dual HDMI adapter to connect two monitors.
- You can use a Mini DP to DP adapter to connect the MacBook to the first monitor and then daisy chain the second monitor to the first monitor. However, for that, you will need special monitors that have built-in daisy chain functionality.
On the MacBook Air 2018, you will need two USB-C adapters to connect two monitors. However, one of those adapters must have an additional USB-C port for power delivery.
Dual monitor support on M1 and M2 MacBook Air
M1 and M2 MacBook Air laptops don't support dual external displays. With adapters, you can connect two monitors but with mirrored content. Essentially, the two monitors will display the same thing. Having two monitors with different contents on the screen is sadly impossible on these MacBooks.
To use two monitors on M1 and M2 MacBooks with a mirrored view, you will need two USB-C adapters with an additional USB-C port for power delivery.
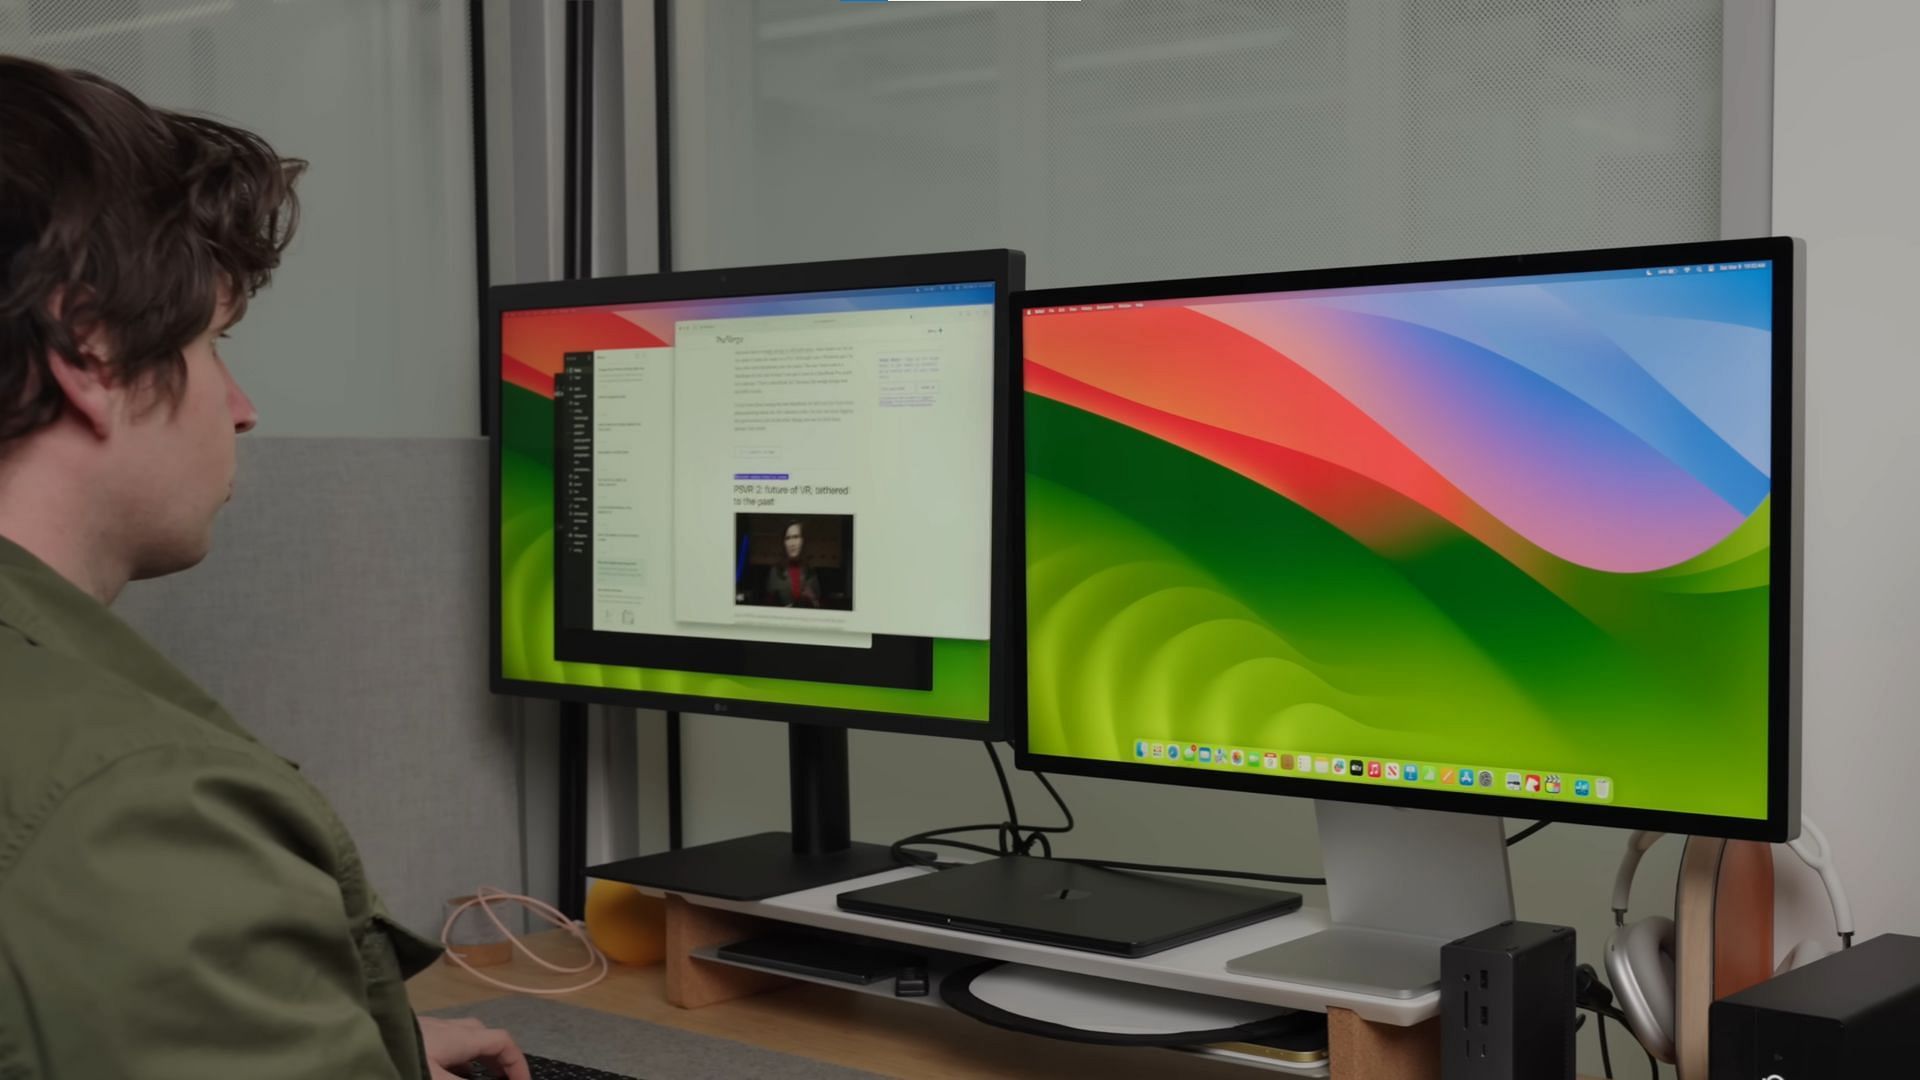
Dual monitor support on M3 MacBook Air and newer
Before we show you how to use dual monitors on M3 MacBook Air and newer, there are a few requirements you need to fulfill.
Following is the list of things you will need:
- M3-based MacBook Air.
- macOS Sonoma version 14.3 or above.
- USB-C adapter or hubs for display out and peripherals.
With the requirements out of the way, here's how to use dual monitors on a M3 MacBook:
- Connect the two monitors via adapters and hub.
- Connect the power to the laptop via the USB-C port in any one of the adapters.
- Next, close the lid of the laptop and wait for both displays to light up.
This process gets the dual monitors up and running on a MacBook, but if you want to customize the two displays, you must do that from the Settings app.
Things to keep in mind
Here are some things to keep in mind:
- Only the Intel-based MacBooks and the newer M3 MacBooks support a dual monitor setup. The older M1 or M2 MacBook Air doesn't and can only mirror the display between the two monitors.
- You will also need to keep the lid of the M3 MacBook closed for the dual monitor setup to work, which is not required for other MacBooks.
- If you open the lid of an M3 MacBook, one of the monitors will turn off until you close the lid.
- You must use an external mouse and keyboard via USB-C hubs if you plan to keep the laptop's lid closed on the M3 MacBook.
Check out our other articles:
- iOS 18 vs Android 15: Which is the best mobile OS?
- Apple Intelligence vs Samsung Galaxy AI: Which is the best smartphone AI?
- Intel Core i5-13400F vs Core i5-13600KF: Which is the best Core i5 CPU in gaming?