Minecraft is one of the most versatile games out there, and developers are constantly creating new mods to improve the gameplay experience.
One of the more impressive mods is known simply as The Replay Mod. This Minecraft mod is fairly simple and allows players to record, playback, and share video clips of their in-game experiences.
For those who may not want to rely on external software such as Fraps or OBS, this mod is an excellent alternative. It can operate in-game without substantial knowledge of video capture and editing software, making it an accessible choice for new and veteran players alike.
Chart New Territories with the ultimate Minecraft Seed Generator!
Minecraft: Using The Replay Mod

Using The Replay Mod may seem daunting at first, but fortunately, the mod's interface is simplistic enough for Minecraft players with little experience in video editing.
With just a few clicks and some slider manipulation, players can have entertaining clips to save and post elsewhere if they so choose. What players do with their recorded clips is up to them, but capturing them can take a little time and effort.
Below, Minecraft players can find a short list of steps on how to utilize the basic aspects of The Replay Mod.
- Enter a singleplayer world or server/realm, the mod should begin recording immediately. Players can see this via a text notification as well as the "recording" symbol at the top of the screen. They can move about the world much like in Spectator Mode to view the replay.
- Once Minecraft players have recorded their footage, all they need to do is exit the world or server, the replays are saved automatically.
- Back at the main menu, players can click "replay editor" to edit their recorded replays.
- Select the suitable replay from the list of recorded replays and select "load."
- Once inside the replay, players can use the movement keys to move about the game environment as it plays the replay. Players can utilize the mouse wheel to increase their movement speed.
- By using the chat keybind, players can increase the speed of the replay, pause the replay, play the replay, and select parts of the timeline to jump around to specific points of the playback.
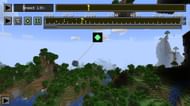
- Below the standard timeline at the top of the screen, there is also a keyframe timeline below it. Players can use the green diamond button to create position keyframes at certain points of the replay, creating a "camera path" for cinematic camera movements. The position keyframes will memorize the position of the camera at each keyframe and string them together.
- Minecraft players can also click the hourglass button to place time keyframes. Time keyframes use the actual timeline instead of the keyframe timeline to mark important parts in the replay time. This can be used to pause or slow down/speed up certain moments in the replay that will play back at that speed in the actual recording.
- Once Minecraft players are happy with their results, they can click the floppy disk button to render the clip into a video file. Players can select the file encoding, the resolution of the video, and the bitrate/framerate of the file, while also allowing them to enter a file name for their new video clip. Players can then press the "render" button to create the clip.
- Lastly, Minecraft players can select "replay center" from the main menu to view their clips by logging in to Replaymod.com (it's also possible to create an account from here). Players can then search for their own clips based on the file name or server IP as well as view clips uploaded by others. One can enter the replay viewer to upload their own clips, and they can even download their own clips or those posted by other players.
Uncover new worlds with our Minecraft Seed Generator!

