Minecraft has been rising in popularity for over 15 years with millions of players worldwide. The game comes in two versions, the Java and the Bedrock Edition. While both editions are fairly similar, they do have some subtle yet noticeable differences. For example, you can easily add friends on the Bedrock Edition of the game, but things are not so simple on the Java one.
This article will highlight all the ways through which you can add friends on the Java edition of Minecraft. From paid options that are quick and easy to free options that require a little bit of effort, here’s how you can play the game with your friends if you do not have the Bedrock Edition.
How to add friends on Minecraft Java Edition

Chart New Territories with the ultimate Minecraft Seed Generator!
First, let’s explain what we mean by “adding friends.” You can add another player or players to your game world to experience the title together. The easiest way of doing so is by getting the Realms Plus subscription which gives you access to Mojang Studios’ servers where you can host your world..
Getting Realms is quite easy. All you need to do is go to the “Realms” tab and then subscribe to their monthly plan. Although this requires a small payment, the amount of which depends on your region, it is the easiest method to play Minecraft with your friends. After the payment process is completed, you can launch the Realms world and add your friends there.

The second and free method to play Minecraft with a friend involves hosting your own LAN server. In this method, you will be hosting the world while your friend has to connect to it.
Here are the steps to start a LAN world:
- Launch Minecraft and select the world you want to play with your friend. You can also start a new world.
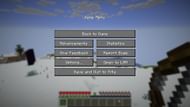
- From the pause menu, select the “Start a LAN world” option. This will give you a port key option. Enter any five-digit number and note it down as you will need it later.
- Now you need to find your local IP address. So, minimize the game and open the search menu.
- In the search menu, type in “cmd” and press enter. This will launch the command prompt.
- In the Command Prompt terminal, type in “ipconfig” and press enter. This should give you all the details about your router and your connection.
- Copy the IPV4 address. This should be a string of numbers separated by periods.
This concludes your part in the process. Your friend now needs to follow the steps mentioned below to connect to your world.
All of these steps should be performed on their device.
- Launch the game and from the title screen, they need to click on the “Multiplayer” tab.
- From the next page, they need to select the “Direct Connection” option at the bottom of the page.
- Now, in the Server Address box, they need to enter your wifi’s IPV4 address as well as the port key separated by a colon. This is how it should look: 192.178.14.160:xxxxx, where xxxxx is the five-digit port key you set before.
- Click on the Join Server tab and that should connect your friend to your Minecraft world.
If there is a problem, you can head over to the Windows Firewall option and turn it off for private networks. Ensure that your friend does the same if the issue persists.
Finally, if you do not want to go through all of these steps and start a LAN world, you can install and download third-party mods such as the popular Essential mod that allows you to host worlds and play multiplayer. You can also get third-party servers and host the game there, but at that point, it is better to get a Realms Plus subscription.
Uncover new worlds with our Minecraft Seed Generator!

