Iron is one of the most valuable minerals in Minecraft as it can be used to craft reliable tools and armor in the early phase of any survival world. Armor crafted from iron is the third-best kind in the game, which adds up to 15 defense points to the player's health.
Getting iron in Minecraft is pretty easy as they are commonly found in underground areas. For mining iron ore, players need a pickaxe that is better than a wooden pickaxe, or else the ore will break but not drop as a collectible item.
The best way for players to get iron in huge quantities is by making an automatic iron farm. This article covers how players can make this farm in Minecraft Bedrock Edition.
Chart New Territories with the ultimate Minecraft Seed Generator!
Making an iron farm in Minecraft Bedrock
To build an efficient iron farm, choosing a spot at least 150 blocks away from a village is recommended to maximize the golem spawn rate.
The following items are required to build an easy iron farm in bedrock edition:
- 20 beds
- 3 stacks of any block for building
- 35 glass blocks
- 2 chests
- 20 cartography table
- Water buckets
- 1 campfire
- 2 stacks of any slab
- 1 lava bucket
- 1 hopper
- 6 buttons
- 1 sign
Steps for building

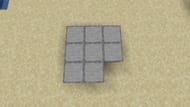
Step 1: Make a 3x3 platform using eight building blocks, leaving a hole in one corner.

Step 2: Dig a 2x2x2 hole under the gap in the platform.
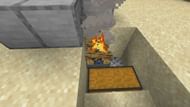
Step 3: Place a double chest and connect a hopper to the chest right under the hole in the platform. Above the hopper, players need to place a campfire.

Step 4: Place a button above the campfire on the platform as shown.

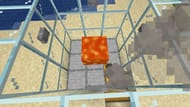
Step 5: Make a three-block high glass wall around the building blocks as shown.

Step 6: Place buttons and a sign in the middle of the chamber as done in the above image. Then place lava using a lava bucket on the sign.
Step 7: Place water inside the glass chamber on the opposite side of the campfire.

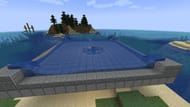
Step 8: Build a 19x19 platform above the chamber and place water on the edges as shown.
Step 9: Make a 7x7 platform above the killing chamber with a 3x3 hole in the center. Place beds on the platform and then remove the layer.
Step 10: Make a 9x3 platform in the middle of the edge of the platform on one side. Then make a two-block high pillar in each corner.

Step 11: Place 20 fetching tables to fill three walls. Use glass to fill the last side of the wall. Players need to get 10-20 villagers inside these walls.
Step 12: Cover the top of the villager chamber using slabs.
This fantastic iron farm will spawn many golems, eventually falling into the killing chamber and dying to the lava. The iron will then be collected in the chest. And in 13 minutes, players can get around 100 iron ingots.
Uncover new worlds with our Minecraft Seed Generator!
