
'%20x='0'%20y='0'%20height='100%25'%20width='100%25'%20%0A%20%20%20%20%20%20%20%20%20%20xlink%3Ahref='data:image/jpg;base64,/9j/2wBDAAYEBQYFBAYGBQYHBwYIChAKCgkJChQODwwQFxQYGBcUFhYaHSUfGhsjHBYWICwgIyYnKSopGR8tMC0oMCUoKSj/2wBDAQcHBwoIChMKChMoGhYaKCgoKCgoKCgoKCgoKCgoKCgoKCgoKCgoKCgoKCgoKCgoKCgoKCgoKCgoKCgoKCgoKCj/wgARCAAGAAoDASIAAhEBAxEB/8QAFgABAQEAAAAAAAAAAAAAAAAAAAQG/8QAFQEBAQAAAAAAAAAAAAAAAAAAAwT/2gAMAwEAAhADEAAAAMtCTJ//xAAfEAACAQQCAwAAAAAAAAAAAAABAwIABhESBBMFYdL/2gAIAQEAAT8At+4m+OVJgXtx+mIKjgxB9DFNvxiWzX1OOhMc7Q+a/8QAFhEBAQEAAAAAAAAAAAAAAAAAAQAS/9oACAECAQE/ABdJf//EABYRAQEBAAAAAAAAAAAAAAAAAAECAP/aAAgBAwEBPwBuh3//2Q=='%3E%3C/image%3E%3C/svg%3E)
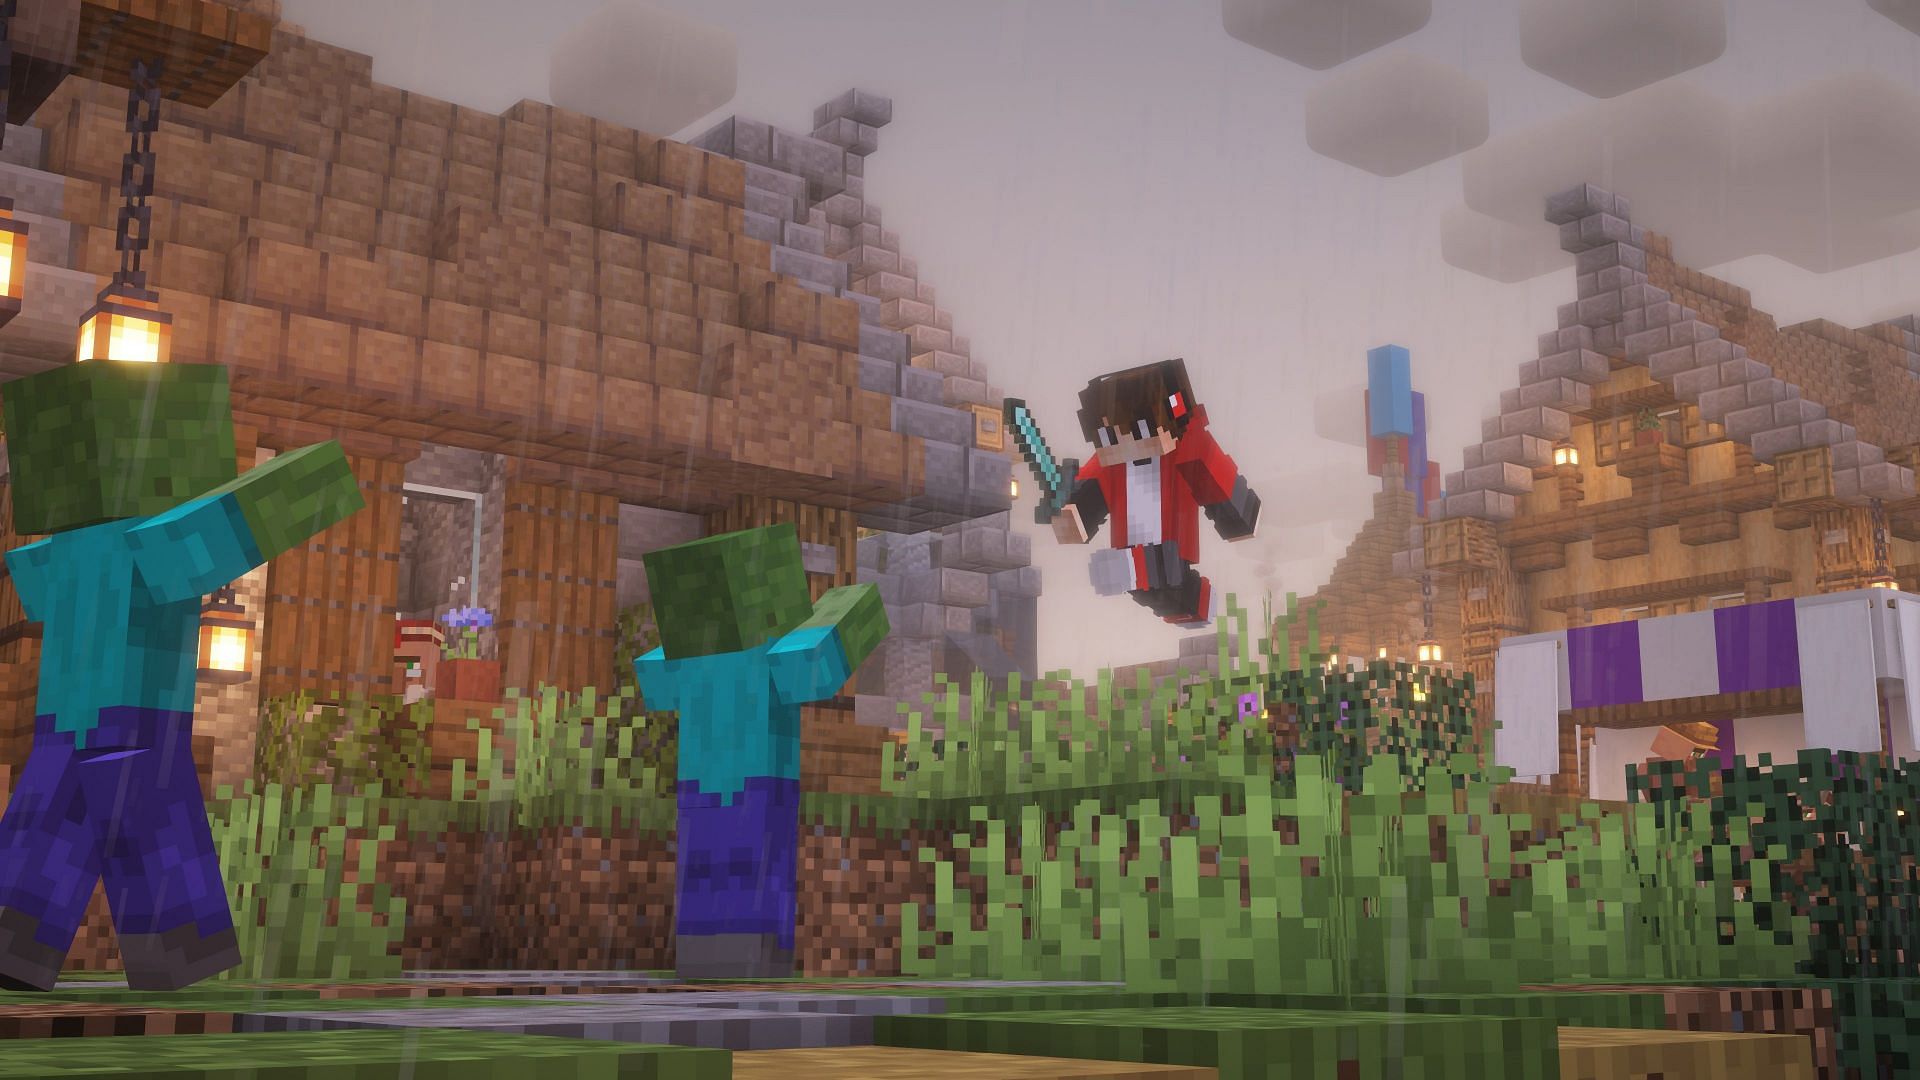
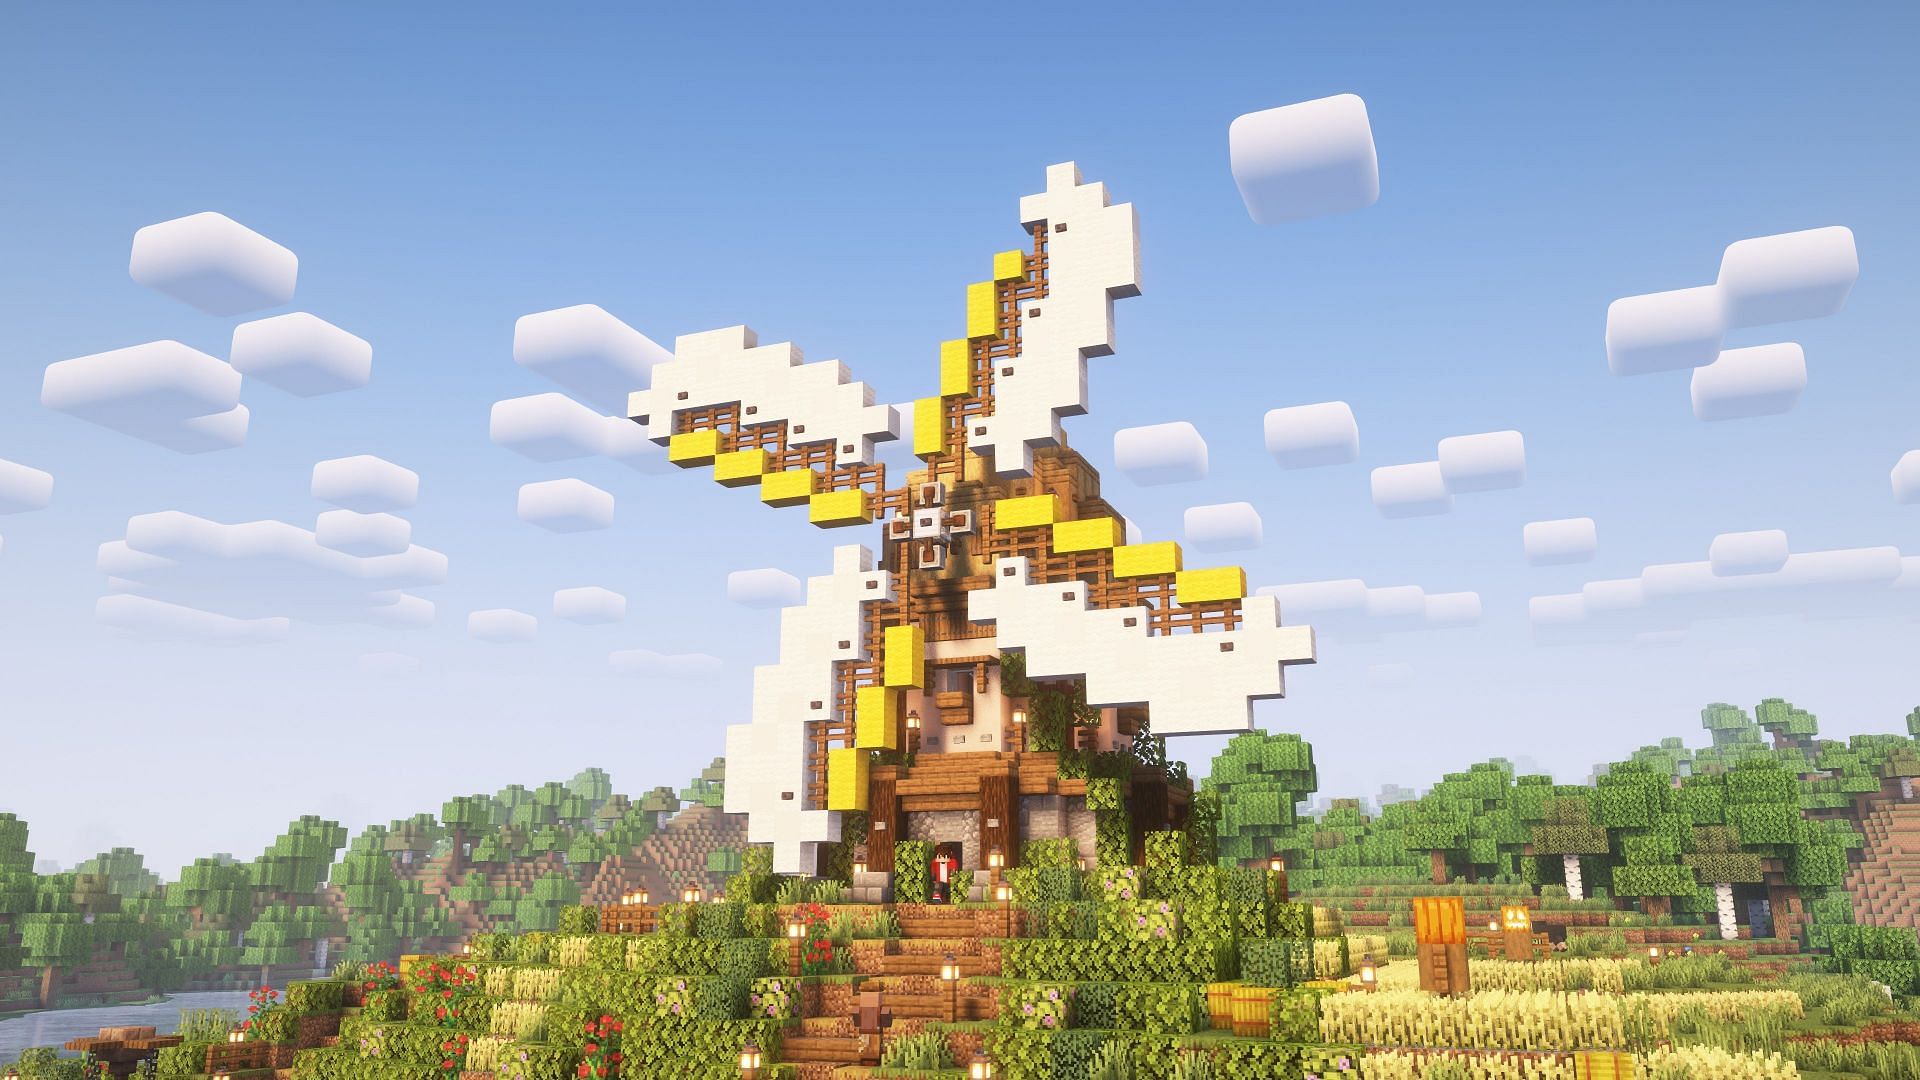
Since its early days, Minecraft has uniquely represented its diverse biomes, flora, and fauna with blocky textures. Despite not being the most visually advanced game, every player has found beauty in it. The freedom to create anything imaginable, combined with a wide variety of block options, has led the community to produce breathtaking creations they eagerly share with the world.
To take beautiful screenshots of their creations or themselves performing tasks in the game, players can follow a handful of tips and tricks and use various mods to create cinematic, high-quality pictures.
In this article, we guide players on how to easily create stunning Minecraft screenshots using mods and other tricks.

Chart New Territories with the ultimate Minecraft Seed Generator!
Minecraft guide: How to take beautiful screenshots
Taking screenshots in vanilla Minecraft can be challenging due to limited perspective settings. While Spectator mode offers some flexibility, it doesn't allow players to include themselves in the picture. On the other hand, the regular third-person view restricts them to being in the center of the image, often overshadowing the main focus of the picture.
However, there isn't a problem that cannot be resolved using Minecraft mods. To keep things simple, we will include only a few mods and guide players on how to use their basic features.
The mods players will need to transform their boring, dull pictures into something as impressive as what they see in online cinematic videos are Iris Shaders, Sodium, and Replay Mod.
Iris Shaders significantly boost graphics quality by adding shader support, ensuring the pictures will come out crisp. Sodium is a performance mod that is almost always paired with Iris Shaders to ensure smooth and lag-free gaming.
Replay Mod, as the name suggests, allows players to create replays of gameplay, which they can review later to capture screenshots from any angle, field of view, and higher resolution, capturing more details.
Minecraft mod guide for beautiful screenshots

With the earlier mentioned Minecraft mods installed and a shader of choice applied, the player is ready to dive into the process of taking artistic screenshots. They can follow these steps to create beautiful pictures of their Minecraft world featuring themselves.
Creating a replay
Firstly, players must create a replay of themselves performing a task during which they want to take the screenshot. Even if they only want to take a simple screenshot of a build, they can record a replay of walking around the structure or interacting with it to add more life to the picture.
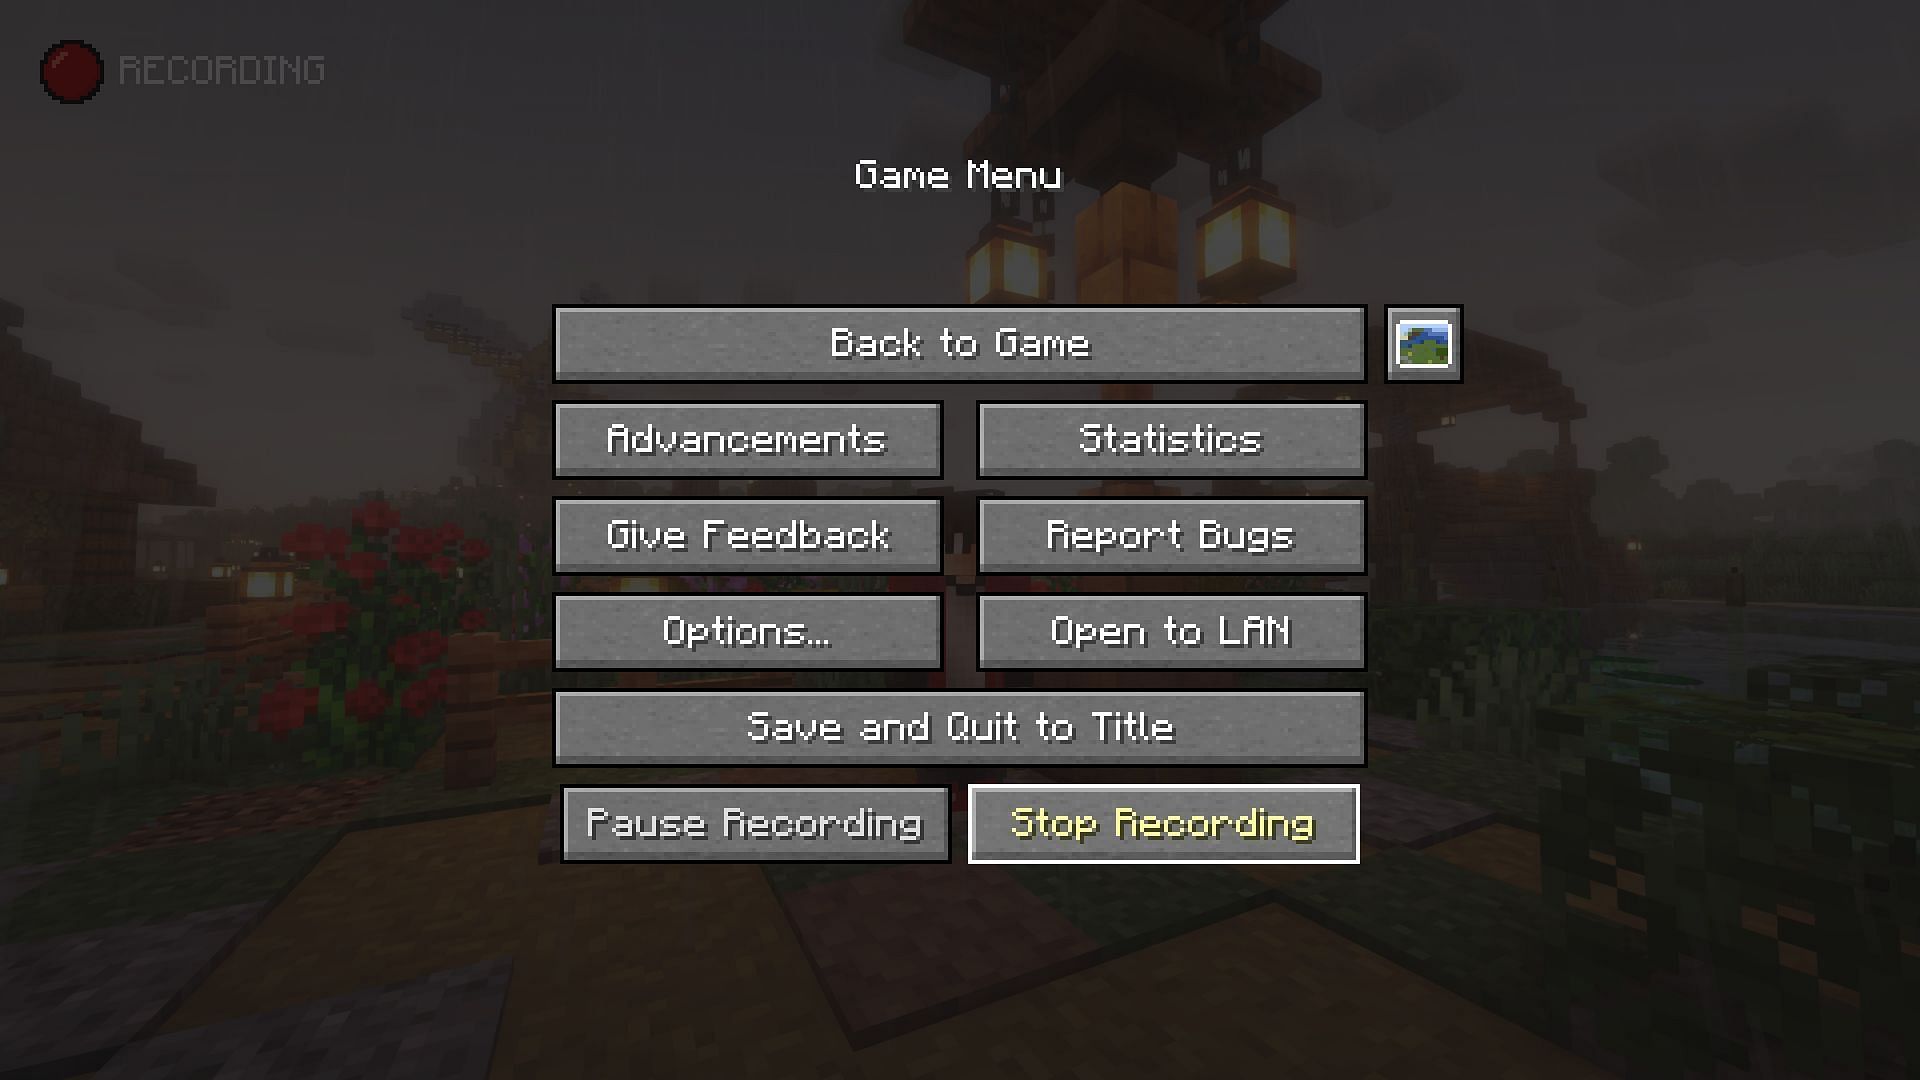
To record a replay, players don't need to do anything special as opening a world with Replay mod installed starts recording by default. The recording can be stopped by pressing the stop recording button in the escape menu.
Playing the replay and creating the best frame
Then, players need to exit their world and let the game save the replay file. A progress bar for this process will appear in the top right corner. Once it's complete, players need to click "Done." This step is crucial. Otherwise, the replay will not appear in the replay viewer.
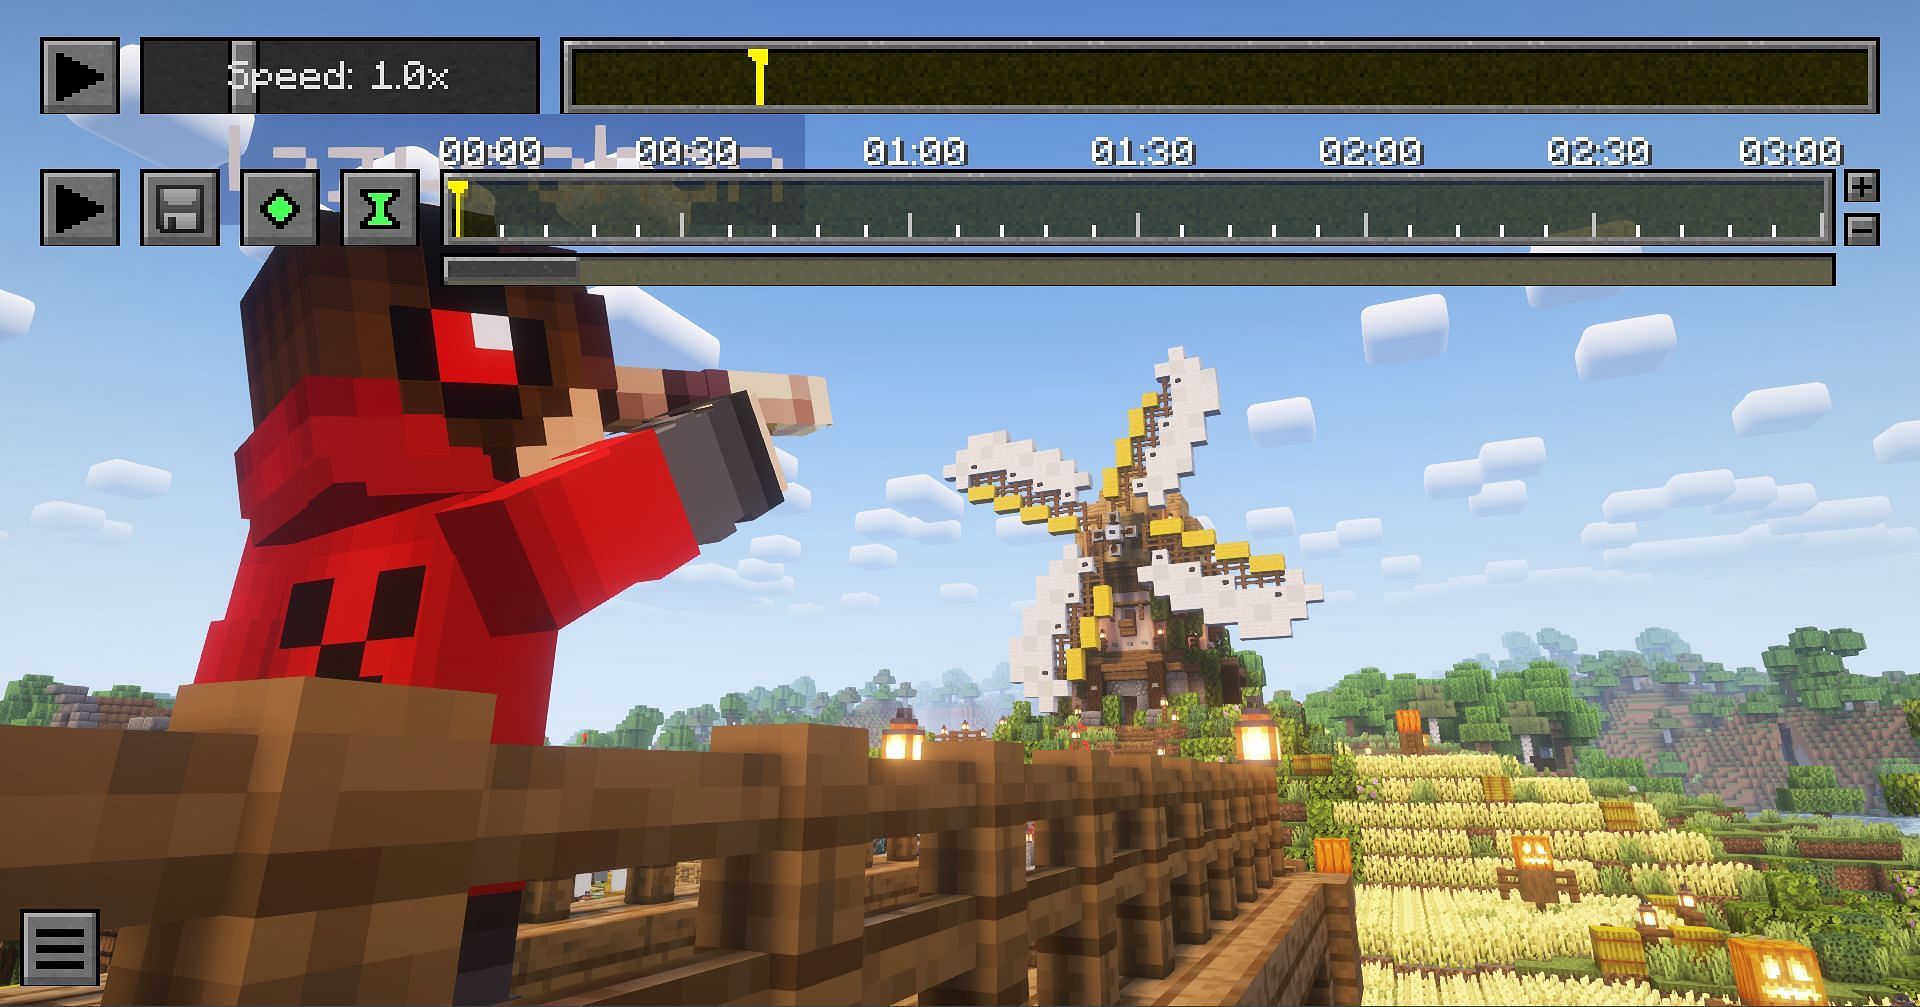
In the main menu of the game, click on the replay viewer next to the Minecraft Realms option and play the latest recording. Players can spectate the entire recording from any angle using their movement keybinds.
Press "T" to make the cursor appear in the recording, and use the seek bar at the top to move forward or backward in the replay. It is recommended that players adjust the speed using the bar on the top left to slow down the recording, making it easier to pause at the right frame, as it may otherwise pass by too quickly.
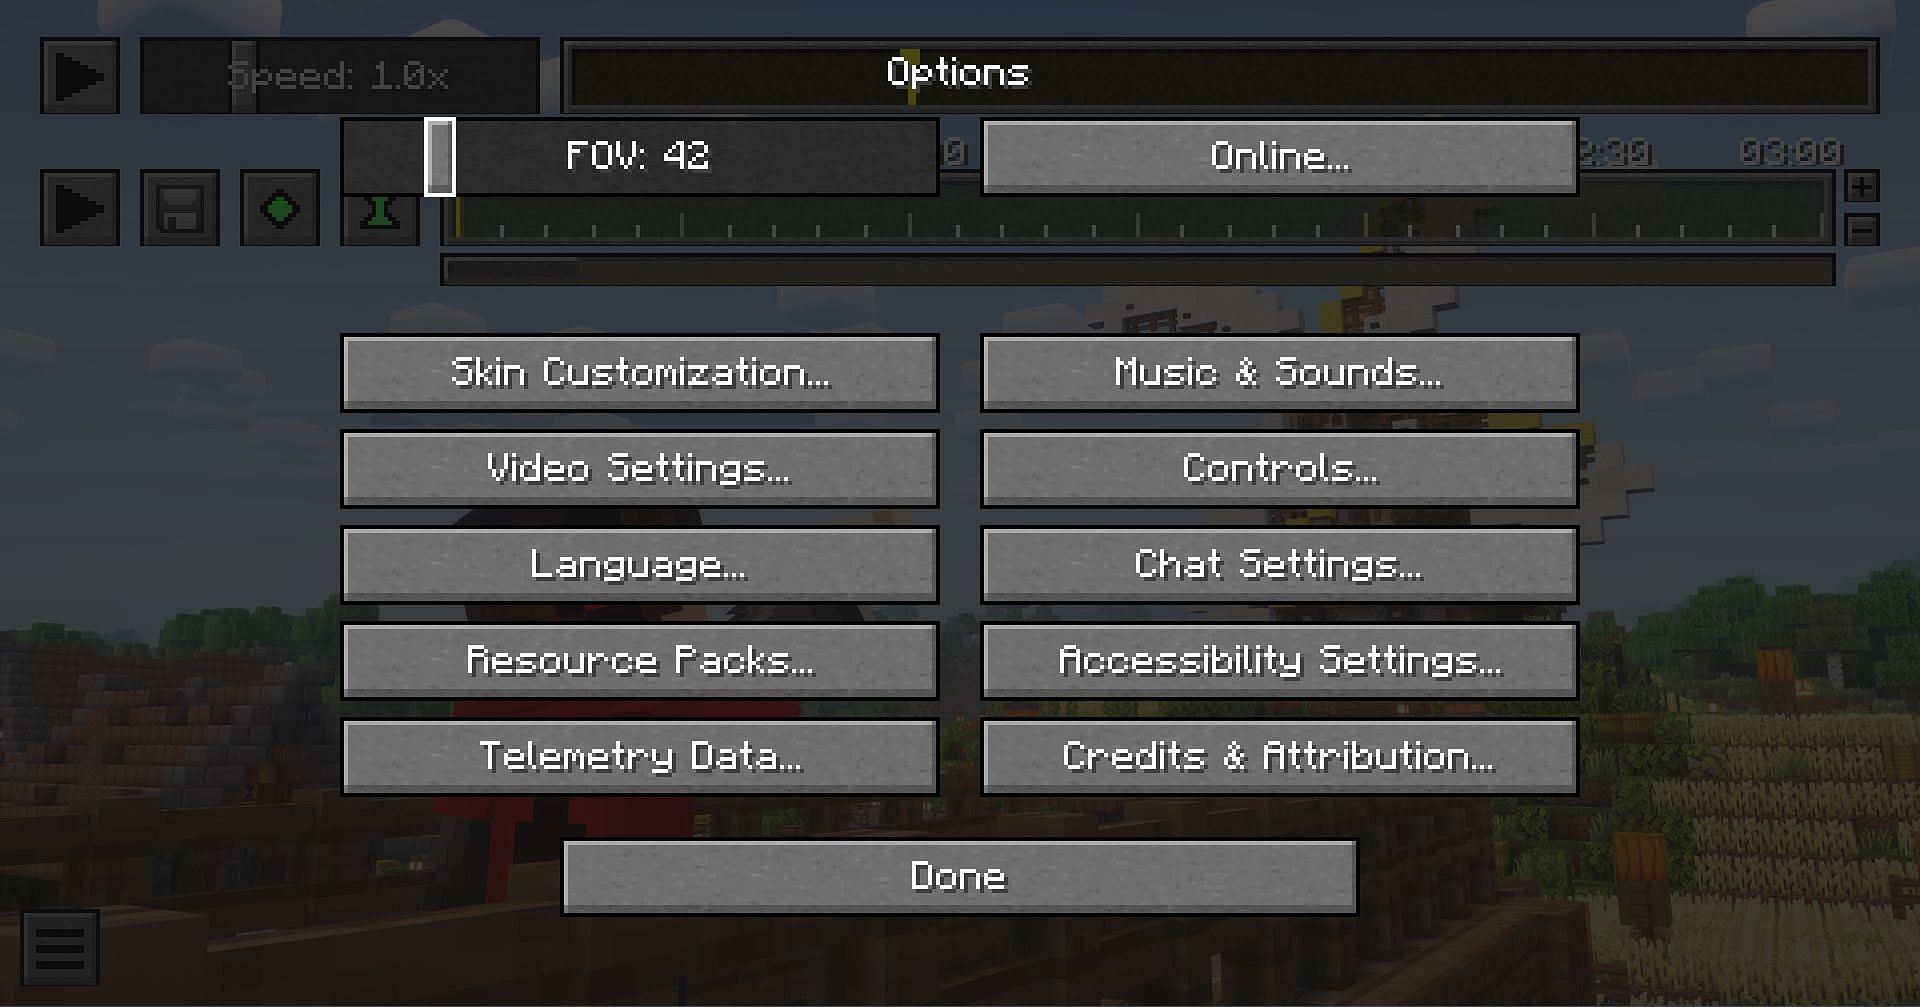
Once the best frame has been found, pause the recording before taking the screenshot. At this stage, players can go to their game settings by pressing "ESC" and navigate to the options menu to tweak the FOV for more immersion.
For shots highlighting a structure or player, a lower FOV is recommended. For scenes with many natural elements, such as mountains, a slightly higher FOV than the default usually looks best. Players can also adjust their shader settings, such as saturation levels, to create a better picture or try a different shader altogether.
Additionally, if the lighting in a scene feels insufficient, they can click on the three horizontal lines at the bottom left to open the Replay Mod settings, where they can toggle lighting to make the scene brighter.
Taking the screenshot
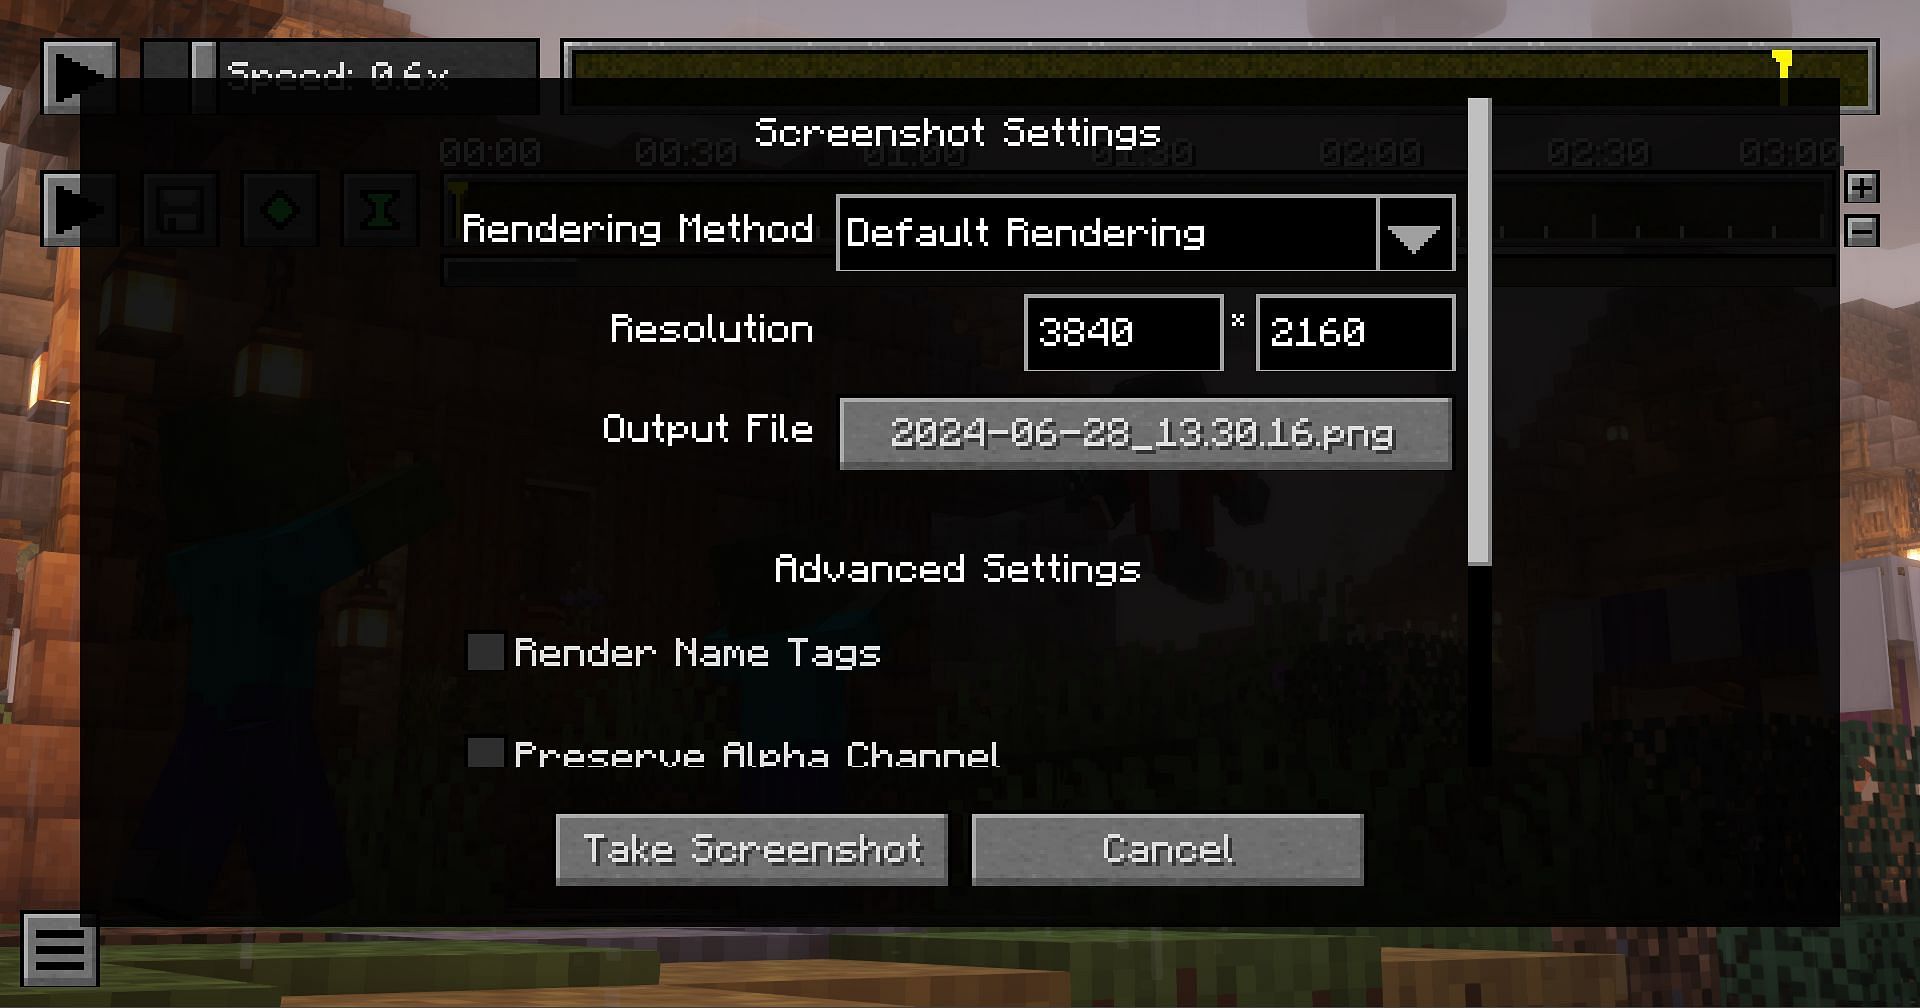
Once the perfect frame has been found, press CTRL + F2 to open the screenshot menu. The frame will be paused, and players will be given a few extra options they can tweak before saving the screenshot.
Here, the only two options beginners should adjust are the "Render Name Tags" and the resolution setting. The first one will make it so that the screenshot will include their name on top of them.
When it comes to resolution, it is recommended that players increase the resolution to a higher 16:9 ratio option, such as 3840*2160(4K), to enhance image quality.
However, doing so may cause a bug where the picture comes out with strange white lighting. In such cases, players should switch back to the native resolution and retake the screenshot.
After following these steps, they can access the newly created high-quality screenshot ready to share in Minecraft's application data folder.

Uncover new worlds with our Minecraft Seed Generator!