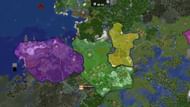
Minecraft's Dynmap plugin is a way for server administrators to supply their players and moderators with an immensely useful tool—the ability to render a Google Maps-styled world map that updates to reflect changes in the environment, thanks to Dynmap's integrated web server that can be opened in an ordinary web browser. The plugin even operates with mod loaders like Forge and Fabric.
Dynmap includes a full suite of tools that allow for real-time rendering of a Minecraft server's world, visible player tracking, and even the ability for players using Dynmap to chat with their friends who are currently playing on the server. There's much more to this plugin, and it doesn't hurt to examine what Dynmap has to offer.
What to know about the Dynmap plugin for Minecraft

Chart New Territories with the ultimate Minecraft Seed Generator!
Dynmap may be a map rendering plugin for Minecraft servers, but it performs many functions beyond simply showing terrain and structures. The following features, either through the plugin itself or one of its many additions, can be found when using Dynmap to provide an incredibly thorough map viewing experience:
- Multiple modes of rendering a server's world to find the adequate balance between performance and detail.
- Maps update in real-time and will reflect changes in the world or movements of players while the map is being viewed.
- Players are visible on the map based on their character skins' heads.
- Chat messages relayed on the server can be viewed as a chat log or in dialogue bubbles on the map viewer.
- Map viewers can chat with players who are currently in-game.
- The current time of the Minecraft world is visible on the map viewer.
- The current weather of the world is visible on the map viewer.
- Additional downloadable components to track territories or marked areas used in WorldGuard, PvP Factions server plugins, and Towny survival plugins.
Additionally, Dynmap also provides built-in components to facilitate its chat functions as well as customizable markers that can be placed within the viewer. Even lines can be drawn to demarcate different areas on a server or the territories of various player communities or PvP factions, providing a cohesive and all-in-one mapping system for Minecraft servers.
How to install Dynmap to your Minecraft server

This installation guide will assume that you've already created a Minecraft server for yourself, either via Mojang's server.jar file and folders or via a third-party hosting website or software. Your server will also need a plugin loader like Spigot, Bukkit, or Paper. The mod loaders Forge and Fabric can also be used if you have their respective server versions installed.
Using plugin or server mod loaders will create a plugin folder in your server's directory. This will be the location where you'll place the Dynmap plugin once you've downloaded it.
You can set up the Dynmap plugin on your server by following these steps:
- Head to https://modrinth.com/plugin/dynmap and find the version of the plugin under "featured versions" that matches your server's version—Spigot/Paper/Bukkit/Forge/Fabric—and click it, then download its .jar file.
- Proceed to your server directory. For example, if you set up your server using the official Mojang server.jar file for Java Edition, the directory's default location would be %APPDATA%\.minecraft on Windows, ~/Library/Application Support/minecraft on MacOS, and simply ~/.minecraft on Linux platforms. For third-party web hosting services, log in and navigate to your server's dashboard, and find where the server's folders are kept.
- If you've installed Spigot/Bukkit/Paper/Fabric/Forge on your server, there should be a corresponding plugins folder in this directory. Move or copy/paste the Dynmap .jar file you downloaded in Step 1 to this plugins folder.
- Reboot your server via the server console, and when the server resets, the console should provide an output that states that Dynmap has been enabled.
- If you're hosting your server via a third-party service instead of on your own platform, navigate to wherever your server's network information or port information is displayed and create a new allocation port. Return to the server directory and enter the Dynmap folder within the plugins folder. Open the configuration.txt file and type in a # next to the type of file storage you don't want to use for the plugin (either type: filetree or type: sqlite).
- Scroll down the .txt file and find a line that reads "webserver-port" and change the port listed in the .txt file to the port number provided by your third-party server host.
- Save the configuration.txt file and restart your server once more.
With these steps completed, you can view your Dynmap plugin via a web browser by entering your server's IP address into the URL bar. However, instead of using the port forward address you'd usually use (for example, serverhostingexample.net:12345), you'll enter the newly allocated port you created in Step 5. Keep in mind that this is in the case of third-party hosting.
If you're hosting your server on your machine locally, Steps 5-7 won't be necessary, and you should be able to navigate to your server's local address (http://localhost:8123/ for example) and view Dynmap from there. However, it's important to note that the map will initially look quite empty, and it may take time (or using the command /dynmap fullrender world) to populate it.
Uncover new worlds with our Minecraft Seed Generator!

