One of the biggest contributors to Minecraft's long-term success is inarguably the game's swath of content creators. YouTubers and streamers keep things entertaining, while master builders show off the endless scope for creativity that this game offers. Many of these projects and posts wouldn't be possible without the Replay mod capturing it all.
This mod allows you to easily record your in-game footage for later use, be it to share with friends or to keep a record of your survival world. Everything you need to know about using the Replay mod for yourself can be found below.
How to install Replay mod
1) Open Modrinth or CurseForge

Chart New Territories with the ultimate Minecraft Seed Generator!
The first thing you'll need to do to install the Replay mod is open either Modrinth or CurseForge. The mod is featured on both sites, meaning that you can use your preferred Minecraft launcher. Additionally, you can utilize launchers such as ATLauncher or Prism Launcher, as they are able to use content from these websites.
2) Search for "Replay"

You'll next need to use the search bar located within your launcher to search for the term "replay." On CurseForge, this search bar is near the top of the screen. On Modrinth, you'll need to use the magnifying glass icon near the lefthand side of the screen to switch to the content browser. After that, use the search bar under the Mods tab.
3) Install the mods

Modrinth Replay mod link: https://modrinth.com/mod/replaymod
CurseForge Replay mod link: https://www.curseforge.com/minecraft/mc-mods/replay-mod-fabric-and-forge
FFmpeg link: https://www.replaymod.com/docs/#installing-ffmpeg
You'll want to install the mod now. CurseForge users will need to hit the orange Install button and either add Replay to an existing Minecraft modpack or create a new one for it. Modrinth users will see a green Install option to the right of the mod's name. Clicking this will similarly prompt you to either add the mod to an existing profile or create a new one.
You'll also need to install FFmpeg after making your decision. To do this, you have to manually open up the installation and drop the mod into your game's .minecraft folder. A version of FFmpeg that's compatible with Replay can be found linked above.
How to use the Replay mod to record Minecraft
1) Launch the game

Now that you've got both Replay and FFmpeg installed, you'll need to launch the game using the CurseForge or Modrinth installation you just created. Return to the profile's home screen and use the orange or green "Play" option (depending on your platform) to launch the game.
2) Record some gameplay

The next thing you'll need to do is actually record some gameplay. Load into your survival world or a Minecraft server and play for a few minutes. You'll be able to tell if the mod is working by a large recording indicator at the top left of the screen.
If you plan on recording solo Minecraft survival gameplay, make sure that the "Record singleplayer" toggle is turned on in the world selection menu.
3) Find the file

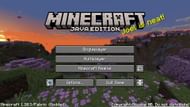
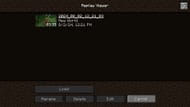
One of the most exciting parts about the Replay Minecraft mod is how easy it makes finding and even editing files. All you need to do to find your recording — to upload or send to a friend — is return to the main menu. It will have an extra button, and clicking it will open a list of all Replay mod recordings. From here, you can load into, edit, or rename the file.
4) Render the video

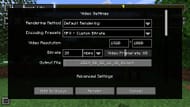
You'll need to load into the recording to render it. Once you've done that, hit the Chat key to free your mouse within the viewer. Click on the Save icon to open up the rendering options. Make any changes you want, and then hit the "Render" button near the bottom to get a usable mp4 file. This file can then be edited and used to make a Minecraft YouTube video or social media post.
Uncover new worlds with our Minecraft Seed Generator!

