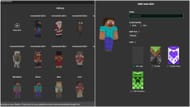
When you enter Minecraft, you will have to select a skin. Since there are no specific characters in the game, you have the option to choose any official skin offered by Mojang Studios. Additionally, you can download and install a whole host of custom-made skins from the internet. These custom skins are created by players and published online for others to download.
Here is a step-by-step guide to download and install skins for Minecraft, both on the Java and Bedrock Edition.
How to download or create custom Minecraft skins?

Chart New Territories with the ultimate Minecraft Seed Generator!
Players have created all kinds of custom skins for Minecraft ever since the game's release in 2011. At first, these skins were only available for the Java Edition, but soon some Bedrock Edition ones started popping out.
Custom skins are primarily uploaded to various skin websites like NovaMC, NameMC, and Skindex. Not only do these websites offer thousands of skins to download, but you can also create your very own skin by filling each pixel with different colors.
The downloaded skin will be in PNG format and might look weird when opened on a regular photo viewer. However, the game will read it perfectly and paste it on the character model.
Once you have the desired look, you can apply the skin to your characters in both Minecraft Bedrock and Java Edition.
How to install skins on Minecraft Bedrock Edition

The Bedrock Edition has an in-built skin customization feature where you can either claim various skin customization accessories as rewards or buy them from the marketplace. However, there is a way to add custom downloaded skins onto this edition of the game as well.
These are the steps to install skins on the Bedrock Edition:
- Open the game and head to the dressing room section
- Create a new character and select 'Classic Skin'
- Select 'Owned Skins' that will show a blank character model
- Click on 'Choose new skin' below the character model
- Select the custom skin you downloaded from the device directories
- Once selected, the game will show the skin applied to the character
- Save the skin customization and exit the dressing room
How to install skins on Minecraft Java Edition

On the other hand, skins can be applied in Minecraft's Java Edition by going into the official launcher and selecting the custom skin from your computer.
Follow these steps to apply skins in the Java Edition:
- Open the official game launcher
- Select Java Edition from the left side tab
- Head to the skin tab from the top
- Click on 'New Skin'
- Click on the 'Browse' button to look for skin from the device's folders
- Find the skin and open it in the launcher
- Name the skin as per your desire
- Click on the 'save and use' button to apply the new skin
Check out other Minecraft skin-related articles:
- 7 Best Minecraft Skins for Java Edition in 2024
- How to import skins to Minecraft PE
- 7 best Minecraft skins for roleplay
Uncover new worlds with our Minecraft Seed Generator!

