With the caves and clifts update just around the corner, players will need to know how to install a Minecraft update on their computer.
In some cases, Windows 10 will hold off on updates for any number of reasons. This can be a pain for some players after Minecraft version 1.17 gets officially released. This article will go over how to check for updates and show fans how to download any updates in apps like Minecraft.
How to install a Minecraft update for Windows 10
Step one

Chart New Territories with the ultimate Minecraft Seed Generator!
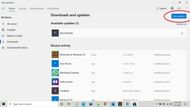
As the first step, players should open the Microsoft store on their PC. Once open, look for the download icon. The download icon should be located at the top right of the players' screen as shown above.
The icon isn't there?

If the download icon isn't loading in, try waiting just a little bit longer to see if it shows up. Still can't see it? Select the three dots icon to reveal the drop bar. Then select "downloads and updates," located at the top of the drop bar.
Step 2

Once on the downloads and updates screen, the player can see if any Minecraft update is available, along with the player's recent activity. This is where a player should be looking for a Minecraft update for Windows 10.
Once the player has started downloading the update, they can let the computer do the rest. Updates can take either a few of seconds, or a couple of hours, depending on the update's size and the user's internet speed. This can also depend on the computer's performance.
Let the given amount of time pass and voila, the Minecraft update for Windows 10 is now downloaded and ready for the player to get back into the game.
Uncover new worlds with our Minecraft Seed Generator!

