Zero Hour is one of the longest and most challenging Exotic quests in Destiny 2. It involves death traps, jumping puzzles, and enemies that can one-shot anyone with Tier 10 Resilience. Its Legend version can be a nightmare for anyone looking to run an Exotic mission for the very first time.
However, this article covers everything that needs to be done in terms of hunting secrets, and alternate paths in the Legend variant of Zero Hour.
Disclaimer: Note that playing the Legend version of Zero Hour is recommended only after running the Normal version at least once. Each run of Legend Zero Hour grants approximately 20 minutes to complete.
Zero Hour Exotic Ship puzzles in Destiny 2
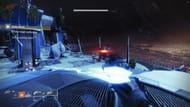
The first puzzle can be found in the second open area of this Destiny 2 mission, just after passing through the purple barrier. The location in question is shown in the image below.

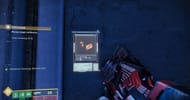
To start the puzzle, clear out the enemies first and then look for a small console at the upper balcony of the entrance, as shown in the image below.

Interact with the console to start, and keep an eye on the symbol shown. Your task now is to find the same symbol in a corner of the location and shoot it. For example, if you have the symbol shown below, your job is to find the same symbol attached to a small structure in any random part of the arena.
After interacting with the console, you will be given 45 seconds to find the matching symbol.

Use the Outbreak Perfected Pulse Rifle to shoot the correct symbol. Once done, look for a small hologram with another symbol, similar to something in the image below.

Here, you are looking at the order in which you must shoot the final two symbols. The order is to find and shoot the symbols highlighted on the hologram. You will see a "Sequence Accepted" message after doing everything correctly.
Follow the same mechanics every week. For the second week of Zero Hour, you can find the console in the White Ship area, just behind the ship, inside a small gap.
For the final week, drop down in the TR3-VR room and take a right. Look for a small dent in the wall to your right, which will have the starting switch. Next, follow the shapes
Outbreak Perfected Intrinsic Switch puzzle in Destiny 2 Zero Hour
The first intrinsic for Zero Hour can be found in the Vault room, specifically after the death trap tiles room and before the boss arena. Here, you must interact with a set of switches in a specific order to crack the puzzle. The order can be seen in the monitor located outside the three rooms, shown in the image below.

However, if you are looking to rush through the content and get the Intrinsic, follow these steps:
- In the first room from the entrance, interact with the front-right switch
- In the same room, interact with the front-left switch
- Head outside and interact with the switch located left of the door
- Head inside the room and interact with the back-left switch
- In the same room, interact with the back-right switch
- Head outside and take a left to the third room with a blue shield. Interact with the switch located on the left of the shield
Following this sequence will land you the "The Corrupted Spreads II" Intrinsic in Week 1 of Zero Hour.
Alternate path of Legend Zero Hour in Destiny 2
The alternate path in the Legend Zero Hour starts from the White Ship room, where the vent underneath the ship is closed. Instead of going towards the Ship, you must take a left to the multiple vent lines present on the upper end of the location, shown in the image below.

The entrance can be found in the third vent at the back, as marked in the image above. Follow the path until you see an open area with yellow lights, red pipes, and a single bridge with Fallen captains.
Toggle the first pair of Switches in Legend Zero Hour of Destiny 2
Here, your job is to complete the second objective of the "Outbreak Refined I" quest given by Ada-1. To start, jump on the small platform with a small switch on its wall, followed by the set of pipes to the left of you while looking at the switch. An example is given in the image below.

Head back to the wall switch and activate it to get a 30-second debuff called "Catalyst Switch Primed." Now, go to the opposite set of red pipes, specifically on the left, and climb up to find an opened door with a "03" label. Jump on top of the door and keep climbing until you come across a dark room.

After entering, take a left, and you will see a switch on the wall past a shelf. Interact to complete the quest step.
Toggle the second pair of switches in Legend Zero Hour of Destiny 2
Your job is to complete the second weekly Legend objective of the "Outbreak Refined II" quest given by Ada-1. To start, take the alternate path of Legend, and make it to the humping puzzle shown in the image below.


Flip the switch shown in the image above, and make your way to the end of the jumping puzzle, where you will see a small opened vent. You will also see a switch outside the vent, which you must not interact with in any way.

Enter the vent and push through the linear path until you drop down. Take a left immediately after dropping down, and pass through the red pipes to find the end switch.
Typically, you will have a 30-second "Catalyst Switch Primed" debuff after flipping the first switch.
Toggle the final pair of switches in Destiny 2 Zero Hour Legend
The final pair of switches in the Legend Zero Hour is in the jumping puzzle in the alternative path. The puzzle is the same as shown in the image below.

After arriving in the open area through the circular vent, go right for the first switch instead of taking a left. This will trigger the "Catalyst Switch Primed" debuff for 30 seconds.
Now, go through five circular vents on the wall, and keep going until you see a series of pipes over the fifth vent. The image below should provide a clearer idea.

Climb the pipes and interact with the second switch to complete the "Outbreak Refined III" Exotic quest step.
Tiles trap room alternate path in Legend Zero Hour of Destiny 2
Unlike the normal version, Legend Zero Hour doesn't present a diagram for the path required for the Trap room. Hence, you must step on different tiles to bypass the room, which isn't anything close to the ones from the Normal version.
To start, step on the leftmost tile. Go to one tile in the front, followed by three on the right. Then, go three tiles to the front again, followed by three to the wall on the left. Lastly, make your way to the front by one tile and get off the floor.

Renowned content creator Kackis HD has provided the image above, and it might make things easier for players.
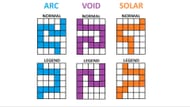
When writing this article, it seems that the Zero Hour tiles room changes pattern based on the elemental threat in the daily modifier. The image below should provide a detailed view of each pattern based on the difficulty and elemental threat.

Regardless of the elemental threat, patterns in normal and Legend will always be different.
Check out other guides on this game from Sportskeeda:
5 best Rocket Launchers for PvE || Destiny 2 weekly reset || Destiny 2 this week at Xur || Destiny 2 Grandmaster Nightfall calendar || Destiny 2 server status || Destiny 2 PvP build tier list || Destiny 2 PvE build tier list || Everything to expect from Destiny 2 in 2024 || All Destiny 2 Into the Light weapons and perks || All free emblem codes
