

'%20x='0'%20y='0'%20height='100%25'%20width='100%25'%20%0A%20%20%20%20%20%20%20%20%20%20xlink%3Ahref='data:image/jpg;base64,/9j/2wBDAAYEBQYFBAYGBQYHBwYIChAKCgkJChQODwwQFxQYGBcUFhYaHSUfGhsjHBYWICwgIyYnKSopGR8tMC0oMCUoKSj/2wBDAQcHBwoIChMKChMoGhYaKCgoKCgoKCgoKCgoKCgoKCgoKCgoKCgoKCgoKCgoKCgoKCgoKCgoKCgoKCgoKCgoKCj/wgARCAAGAAoDASIAAhEBAxEB/8QAFgABAQEAAAAAAAAAAAAAAAAAAAEH/8QAFQEBAQAAAAAAAAAAAAAAAAAAAgT/2gAMAwEAAhADEAAAAM9oaf/EAB8QAAEDBAMBAAAAAAAAAAAAAAIBAwQFBhIhAAcRov/aAAgBAQABPwDrC16nWLbfmwGaAYv5phOYdJRx1pRLjlGvBtwgR23BxXzwY2k+Of/EABgRAAIDAAAAAAAAAAAAAAAAAAECAAMh/9oACAECAQE/AGqRtIn/xAAYEQACAwAAAAAAAAAAAAAAAAAAAgESMf/aAAgBAwEBPwC7Lkn/2Q=='%3E%3C/image%3E%3C/svg%3E)
Destiny 2 Salvation Edge Raid's first boss comes early in the activity, where a fireteam will meet the Herald of Finality in the second encounter. After going through plates, wires, and shards in the first encounter, players should get ready to follow the same mechanics all over again, only this time a boss is waiting for a fight at the end.
This article lists the basic mechanics of defeating the Herald of Finality boss in the second encounter of Salvation's Edge.
Disclaimer: This Destiny 2 article assumes you are familiar with the mechanics introduced in the first/Substratum encounter of the same Raid. While we will skip the mechanics of glowing plates and shooting pillars here, any additional mechanics added in the second encounter, alongside the older ones, will be mentioned.
All the mechanics of the Herald of Finality boss encounter in Destiny 2 Salvation's Edge
As mentioned earlier, it is highly recommended that readers go through each mechanic of Salvation's Edge's first encounter, and then try to decipher the puzzle hidden behind the Herald of Finality boss fight.
Go through the small jumping puzzle between the first and the second encounter locations, and you will eventually come across the rally banner for the second encounter.
To defeat the Herald of Finality in Destiny 2 Salvation's Edge, here is a list of all mechanics that you and your fireteam can perform in the following order:
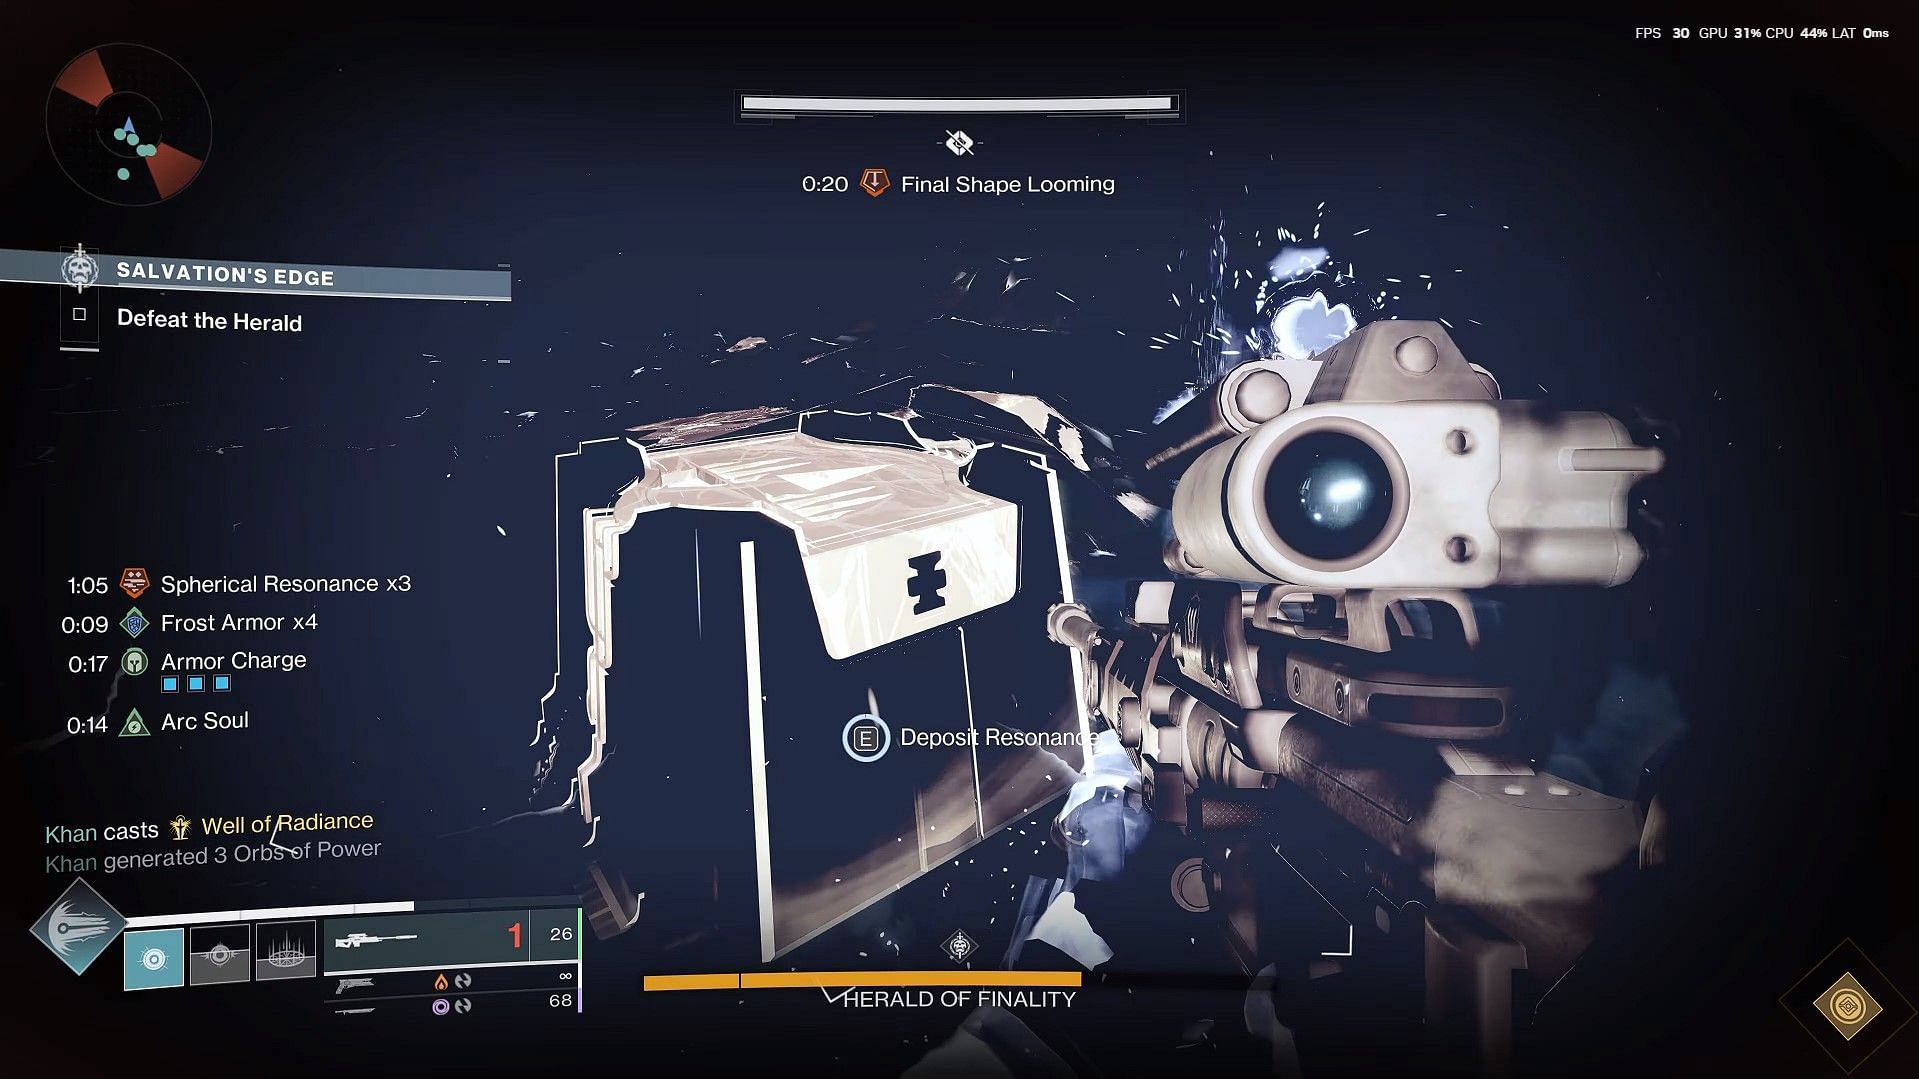
- The arena has a rectangular courtyard where the boss wanders around, with three plates on the left, right, and center, alongside three pillars with their corresponding plates.
- Start the encounter by shooting a Taken blight in the middle. This will spawn the boss, alongside Taken and Dread enemies throughout the arena.
- Look for named Wizards on the left, Phalanx on the center, and Ogre on the right. While all of this is going on, make sure to keep an eye on the "The Final Shape looms" countdown, similar to the first encounter, and Resonant bees flying in from the Witness's hand.
- One player kills the aforementioned named enemies and gets a "Call for Reckoning" buff. Hence, three players on three sides can have this buff.
- All three players with the "Call for Reckoning" buff should head into the boss arena, and shoot the boss' head to spawn blights across different parts of the area. Doing this will also spawn a small Taken blight over the boss' head.
- The rest of the three members must find the blights and destroy them to make the blight over the boss' head disappear, allowing the three players in the arena to damage the boss again. However, the head must be destroyed until the "Call for reckoning" buff turns into "Stone Valor."
- Leave the arena with the "Stolen Valor."
- While all the mechanics are getting done in the middle with the boss, the three players outside must still bounce glows between the plates, and spawn a Pyramid shard alongside a Sphere Shard. However, DO NOT pick them up yet.
- The "Stolen Valor" buff allows the player to see a specific shaped resonance on the pillars located near the plates.
- The shapes can be either a Pyramid or a Sphere, matching the two Shard shapes that drop after bouncing the plates.
- One player on each side gets the callout of the shape on the pillar from a "Stolen Valor" player and picks up three of the matching shapes. However, note that all three picked-up Shard shapes don't need to be the same. For example, picking up two Pyramidal Shards and one Spherical Shard will convert the entire stack into "Spherical Resonance x3."
- Shoot all three pillars on three sides and run to the center with your fireteam. Look for an orange box/altar that spawns at the far back of the arena, where you must deposit all stacks of resonances present in you. More resonance deposited means an increased wipe timer, maximum up to 3 minutes and 20 seconds
- The DPS phase starts after exhausting all resonance stacks on the altar.
- Repeat until the final stand, and then immediately go for more damage to kill the Destiny 2 boss.

Here are a few pointers and tricks to make it easier in the Destiny 2 encounter. To damage the boss, weapons such as Legend of Acrius or Swords have proven to be useful. For the second phase, players will spend less time on the wipe counter compared to the first phase, as "The Final Shape Looms" extends only after starting the first damage phase.
Hence, all six players must deposit at least 10 Resonance buffs in the altar. Lastly, split three teams with two players on each plate location. One player should be on plate duty, while the other player should look for the enemy and get the "Call for Reckoning" buff.
Follow Sportskeeds for more Destiny 2 guides:
- Where to find Xur
- All disabled items in Destiny 2 Salvation's Edge Raid
- All Visions of the Traveler locations guide
- How to get Khvostov 7G-0X Exotic Auto Rifle
- Destiny 2 Salvation's Edge first encounter guide
