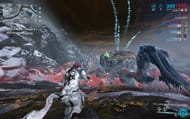
Warframe's Profit-Taker Orb — along with being a formidable foe — is one of the two available end-game bounties, alternatively called "heists." In line with Eidolons from the Plains of Eidolon, this is the archetypal boss of the Orb Vallis' open world. Living up to its status as one of the most difficult raid bosses, fighting this entity involves unique mechanics and build requirements.
You can begin this battle by visiting the backroom of Fortuna, where Little Duck is located, accessible after reaching Old Mate rank with Solaris United. Here, you can talk to Eudico at the briefing table to begin the heist. The repeatable Warframe Profit-Taker run is generally a reoccurrence of Phase 4.
Note that a long cutscene will play every time you select this foe from the bounty table. You can choose to skip the dialogues by pressing the Attack button rapidly (bound to LMB on the mouse by default).
Warframe Profit-Taker phases and mechanics explained

Loading into Orb Vallis with the Proft-Taker Orb bounty active will automatically point you to the location of this foe, which can be one of two possible places in Warframe.
In either case, it is best to use your Archwing Launcher to get to its location. Once you land near it, the Profit-Taker will start launching its volley of attacks on you and spawn miscellaneous enemies.
Profit-Taker's phases
The Profit Taker boss fundamentally cycles through three phases: the Shield phase, Armor phase, and Pylon phase.
Shield phase

For the Shield phase, the Profit-Taker will have a blue health bar. It will also display the icon of a status/damage type on its head. You can only damage it with a weapon whose currently equipped build includes this status/damage type.
Armor phase

The Armor phase shows the true health of the Profit-Taker. As with the Eidolons, this is indicated by a yellow health bar displayed during this stage. You can only deal damage to the orb in this phase with Heavy Weapons, which are repurposed Archguns.
You have to take the boss' limbs down first, which then allows you to inflict damage on its head until the fight progresses to its next stage.
Pylon phase

During the fight, the Profit-Taker will open up a mortar from the top of its head, and shoot out four to six pylons that land around the battlefield. In this phase, the boss is invulnerable.
This will be the case until you destroy all existing pylons, which have fields around them that block almost all inbound projectiles.
Throughout the course of the fight, the order of these phases is invariably the following:
Shield -> Armor -> Pylon -> Armor -> Shield -> Armor -> Pylon -> Shield -> Armor -> (End)
After the Profit-Taker enters its second Shield phase, you have a five-minute time limit to end the fight till its satellite shields realign, rendering this bounty impossible to complete.
If you successfully beat your foe, you will be rewarded for your efforts with a number of Orb Vallis resources, Servofish, a bulk sum of Credits, and Crisma Toroids. This boss fight is also the only source for Crisma Toroids, which are required to rank up your standing with the Vox Solaris faction and get higher-iter Amp parts.
Warframe Profit-Taker Orb tricks and tips

Here are some general tips that may help you if you are struggling to beat the Profit-Taker Orb:
- If you do not have an exceptionally durable Warframe, try to clear the Alert Beacons around you when they spawn in. These surrounding enemy spawns may turn out to be overwhelming if left unchecked.
- The Pylon phase is generally the most tedious stage of this fight. Thankfully, the game has three weapons that can pierce through the pylons' force fields: Zenith, Opticor, and Opticor Vandal.
- Some form of knockdown immunity will be invaluable in this boss fight. Traditional options in this regard are knockdown resistance mods, Spellbind as a Helminth ability, or the Poise ability in the Uniaru focus tree.
- The status type on the orb's head in the Shields phase automatically cycles to another type every 25 seconds. You can manually override this mechanic by shooting at the foe with an Amp every five seconds.
- On-Call Crew and Necramech weapons can help you deal with more status types.
Generally, your build needs to cover two basic aspects to make sure you complete it in a timely fashion. Firstly, your total build needs to contain at least 10 of the 13 possible status types to make sure you spend less time waiting your turn to deal damage.
Secondly, it also needs to include some type of up-front damage, which is traditionally done through weapon buffs. You can either use a native Warframe buff, such as Chroma's Vex Armor, or Eclipse as a Helminth ability for this purpose.
